はじめに
面の法線は、ライティングに使われる情報です。それが$z$軸正方向の場合、それはこちらから見て裏側であっても$z$軸正方向として処理されます。なので光の差す方向が$z$軸のマイナス方向の場合、表から見ても裏から見てもそのように処理されます。ゆえに、普通に平面を描画すると、orbitControlで裏から見ても同じ明るさになってしまいます。
それを回避するという話です。まあとにかく見た方が早いですね。
コード全文
/*
  baseMaterialShaderを使って裏側の処理
  https://p5js.org/reference/p5/baseMaterialShader/

  ライティングめんどくさいです。ああもう。
  https://p5js.org/reference/p5/spotLight/
*/

let loopFunc = () => {};

function setup() {
  createCanvas(400, 400, WEBGL);

  const gr = createGraphics(800, 400);
  gr.noStroke();
  gr.fill("red");
  gr.square(0,0,400);
  gr.fill("blue");
  gr.square(400,0,400);
  gr.textSize(320);
  gr.textAlign(CENTER,CENTER);
  gr.fill("white");
  gr.text("表",200,200);
  gr.text("裏",600,200);

  const sh = baseMaterialShader().modify({
'fragmentDeclarations':`
  uniform sampler2D uMyTex;
  uniform bool uUseTexture;
`,
'Inputs getPixelInputs':`(Inputs inputs){
vec3 n = inputs.normal;
if (gl_FrontFacing) { n *= -1.0; }
inputs.normal = n;
vec2 uv = inputs.texCoord;
if (!gl_FrontFacing) {
  uv.x *= 0.5;
}else{
  uv.x = 1.0 - uv.x * 0.5;
}
if(uUseTexture){
  inputs.color = texture(uMyTex, uv);
}
return inputs;
}`
  });

  noStroke();

  loopFunc = () => {
    shader(sh);
    sh.setUniform("uMyTex", gr);

    orbitControl();
    background(0);
    directionalLight(255,255,255,0,0,-1);
    ambientLight(64);
    spotLight(color("white"), 0,0,-300,0,0,1);
    rotateY(frameCount*TAU/240);
    sh.setUniform("uUseTexture", true);
    plane(160);

    // 表と裏が分かりにくいので基準を設ける
    fill(255);
    resetMatrix();
    translate(0,100,0);
    sh.setUniform("uUseTexture", false);
    plane(200,30);
  }
}

function draw() {
  loopFunc();
}
実行結果:
最初のところで簡単なコードを動かしています。lights()で平面を描画して、orbitControlを使って裏側から見ているだけです。裏から見ているのに明るいです。ライトは$z$軸正方向から差しているので、もし裏から見た場合に面の法線が逆向きであることを主張したい場合、これだと不自然です。後半は今上げたコードで、orbitControlを使って裏から見るとちゃんと暗くなっています。今回はついでに、裏側を違うテクスチャにする実験もしています。
解説
使うのはbaseMaterialShaderですね。
この中のgetPixelInputsというのを使います。これを使うとライティングの材料をいじることができます。このうち今回いじるのは法線の方向です。gl_FrontFacingを参照していますが、これは面の向きを取得するものです。p5は逆カリングなので、表向きの場合これはfalseで、裏向きだとtrueです。ゆえに、trueの場合に法線の向きを逆にしています。
vec3 n = inputs.normal;
if (gl_FrontFacing) { n *= -1.0; }
inputs.normal = n;
裏側のテクスチャをいじることについてですが、これはどうやっているかというと、仕様の都合上、テクスチャ採取の前のtexCoordはいじれないことが判明した(不便)ので、setUniformで別にテクスチャを用意してそれを使うことにしました。で、サイズが800x400で、$x$座標をいじることで表の場合に左側、裏の場合に右側が使われるようにしました。
いじるのは色です。テクスチャ描画の場合ここがテクスチャ採取の結果になるんですが、それを計算するためのuvがいじれないため、結果をダイレクトに書き換えています。なお通常描画にも反映されてしまうのを防ぐためにフラグで分岐させています。
vec2 uv = inputs.texCoord;
if (!gl_FrontFacing) {
  uv.x *= 0.5;
}else{
  uv.x = 1.0 - uv.x * 0.5;
}
if(uUseTexture){
  inputs.color = texture(uMyTex, uv);
}
ちなみに裏側の場合uvが左右反転することに留意しています。
また、裏側から見ると真っ黒になってしまうので、$z$軸下方にスポットライトを上向きに用意することで暗くならないようにしています。
    orbitControl();
    background(0);
    directionalLight(255,255,255,0,0,-1);
    ambientLight(64);
    spotLight(color("white"), 0,0,-300,0,0,1);
実行すると、上の動画のようにorbitControlで裏から見るとちゃんと暗くなります。また、平面の裏側が違うテクスチャになっていますね。
下方に細い板を置いてるのは、平面が回転していてカメラが裏側になってることが分かりにくいからです。確認用です。
おわりに
たとえば平面を使って立体を組み上げる場合、裏側の法線の向きが逆にならないので、それがちょっと気になる場合があるわけです(板を使えばいいんですが面倒なので...)。そういう場合に使えるかなと思いました。
ここまでお読みいただいてありがとうございました。
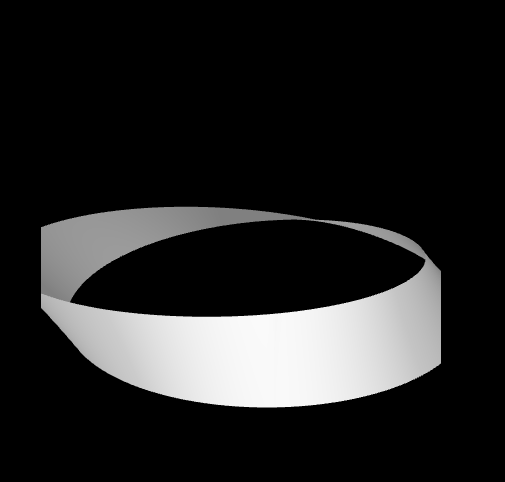
応用:メビウスの帯
メビウスの帯は面で作る場合、始めと終わりで法線の向きが逆になるので、普通にライティングすると境目で色が違ってしまいます(頂点色使えばいいじゃんとか言わないでね):

これをここで紹介したコードを使って解消することができます。
mebius band
/*
  https://qiita.com/inaba_darkfox/items/563e94fd4f1d5da0df95
  ax(), ay(), az()はクォータニオンが表す正規直交基底の3本のベクトルを
  個別に取得する関数
  まとめて取得する場合はgetAxes()がある(x,y,z成分がベクトル)
  あとinitで1,0,0,0にできるように追加
*/

const {Vecta, Quarternion} = fox3Dtools;

let loopFunction = () => {};

function setup() {
  createCanvas(400, 400, WEBGL);

  const geom = new p5.Geometry();

  // クォータニオン使った方が楽です(イメージを作るのが)
  const v = new Vecta(0, 0, 200);
  const q = new Quarternion();
  // なおイメージはzが手前でyが下でxが右で向きとしてはz-->xの方向に回す感じですね

  for(let i=0; i<=200; i++){
    const angleY = Math.PI*2*i/200;
    const angleX = Math.PI*i/200;

    // qをyのまわりにローカル回転、次いでxのまわりにローカル回転
    q.init();

    // 先にy回転して軸の中心を決める
    q.localRotate(0,1,0,angleY);
    const centerPosition = q.az().mult(200);

    // そのあとでx回転してねじる
    q.localRotate(1,0,0,angleX);
    const diffVector = q.ay().mult(40);

    // centerからdiffでマイナス、プラス
    const pUp = centerPosition.sub(diffVector, true);
    const pDown = centerPosition.add(diffVector, true);

    geom.vertices.push(
      createVector(...pUp.array()), createVector(...pDown.array())
    );
  }
  for(let i=0; i<200; i++){
    const lu = 2*i;
    const ru = 2*(i+1);
    const ld = 2*i+1;
    const rd = 2*(i+1)+1;
    geom.faces.push([lu, ru, ld], [ld, ru, rd]);
  }
  geom.computeNormals();
  const _gl = this._renderer;
  _gl.createBuffers("mebius", geom);

  const sh = baseMaterialShader().modify({
'Inputs getPixelInputs':`(Inputs inputs){
vec3 n = inputs.normal;
if (gl_FrontFacing) { n *= -1.0; }
inputs.normal = n;
return inputs;
}`
  });

  const lightVector = new Vecta(0,0,-1);
  const lightVectorAxis = new Vecta(0,1,0);

  loopFunction = () => {

    shader(sh);
    lightVector.rotate(lightVectorAxis, TAU/240);

    background(0);
    orbitControl();
    directionalLight(128,128,128,...lightVector.array());
    ambientLight(128);
    specularMaterial(64);
    fill("white");
    specularMaterial(32);
    _gl.drawBuffers("mebius");
  }
}

function draw() {
  loopFunction();
}
実行結果:
このように、どの面でも面に垂直な法線となります。まあテクスチャとか使えばいいんですが、法線で彩色したい場合はこういう選択肢もあるとおもいます。
PLANE_BACK_FRONTのサムネが死んでるのを修正
キャンバス要素を使いましょう。
PLANE BACK FRONT_REMAKE
/*
  baseMaterialShaderを使って裏側の処理
  https://p5js.org/reference/p5/baseMaterialShader/

  ライティングめんどくさいです。ああもう。
  https://p5js.org/reference/p5/spotLight/

  サムネ復活しました。
	もう簡単な内容の場合はcreateGraphicsは避けた方がいいですね
*/

let loopFunc = () => {};

function setup() {
  createCanvas(400, 400, WEBGL);

	const cvs = document.createElement('canvas');
	cvs.width = 800;
	cvs.height = 400;
	const ctx = cvs.getContext("2d");
	ctx.fillStyle = "red";
	ctx.fillRect(0,0,400,400);
	ctx.fillStyle = "blue";
	ctx.fillRect(400,0,400,400);
	ctx.fillStyle = "white";
	ctx.font = "italic 320px sans-serif";
  ctx.textAlign = "center";
  ctx.textBaseline = "middle";
	ctx.fillText("表",200,200);
	ctx.fillText("裏",600,200);

	// この場合正規の方法では登録できないので裏ルートを使う

  const sh = baseMaterialShader().modify({
'fragmentDeclarations':`
  precision mediump sampler2DArray;
  uniform sampler2DArray uMyTex;
  uniform bool uUseTexture;
`,
'Inputs getPixelInputs':`(Inputs inputs){
vec3 n = inputs.normal;
if (gl_FrontFacing) { n *= -1.0; }
inputs.normal = n;
vec2 uv = inputs.texCoord;
if (!gl_FrontFacing) {
  uv.x *= 0.5;
}else{
  uv.x = 1.0 - uv.x * 0.5;
}
if(uUseTexture){
  inputs.color = texture(uMyTex, vec3(uv, 0.0));
}
return inputs;
}`
  });

  shader(sh); // これでprogramができる
  const gl = this._renderer.GL;
  const pg = sh._glProgram;
  gl.useProgram(pg); // これでprogramが走る
  const loc = gl.getUniformLocation(pg, "uMyTex");
  // 3番に入れる。
  gl.uniform1i(loc, 3);

  const tex = gl.createTexture();
  // 3番に入れる
  gl.activeTexture(gl.TEXTURE3);
  gl.bindTexture(gl.TEXTURE_2D_ARRAY, tex);

  gl.texImage3D(
    gl.TEXTURE_2D_ARRAY, 0, gl.RGBA, 800, 400, 1,
    0, gl.RGBA, gl.UNSIGNED_BYTE, cvs
  );
  gl.texParameteri(gl.TEXTURE_2D_ARRAY, gl.TEXTURE_MAG_FILTER, gl.LINEAR);
  gl.texParameteri(gl.TEXTURE_2D_ARRAY, gl.TEXTURE_MIN_FILTER, gl.LINEAR);

	gl.activeTexture(gl.TEXTURE0);

  noStroke();

  loopFunc = () => {
    shader(sh);
    //sh.setUniform("uMyTex", cvs);

    orbitControl();
    background(0);
    directionalLight(255,255,255,0,0,-1);
    ambientLight(64);
    spotLight(color("white"), 0,0,-300,0,0,1);
    rotateY(frameCount*TAU/240);
    sh.setUniform("uUseTexture", true);
    plane(160);

    // 表と裏が分かりにくいので基準を設ける
    fill(255);
    resetMatrix();
    translate(0,100,0);
    sh.setUniform("uUseTexture", false);
    plane(200,30);
  }
}

function draw() {
  loopFunc();
}
createGraphicsでオフキャンバス作ると、オフにもかかわらずなぜか内容がサムネに反映されちゃうんですよね。不便。なので修正しました。