Minishift v1.28.0をCentOS7.6-Minimalにインストールしてみた
CentOS7.6セットアップ
VMware WorkstationにCentOS7.6-1810をインストールして準備開始
その時の注意点は以下の通り
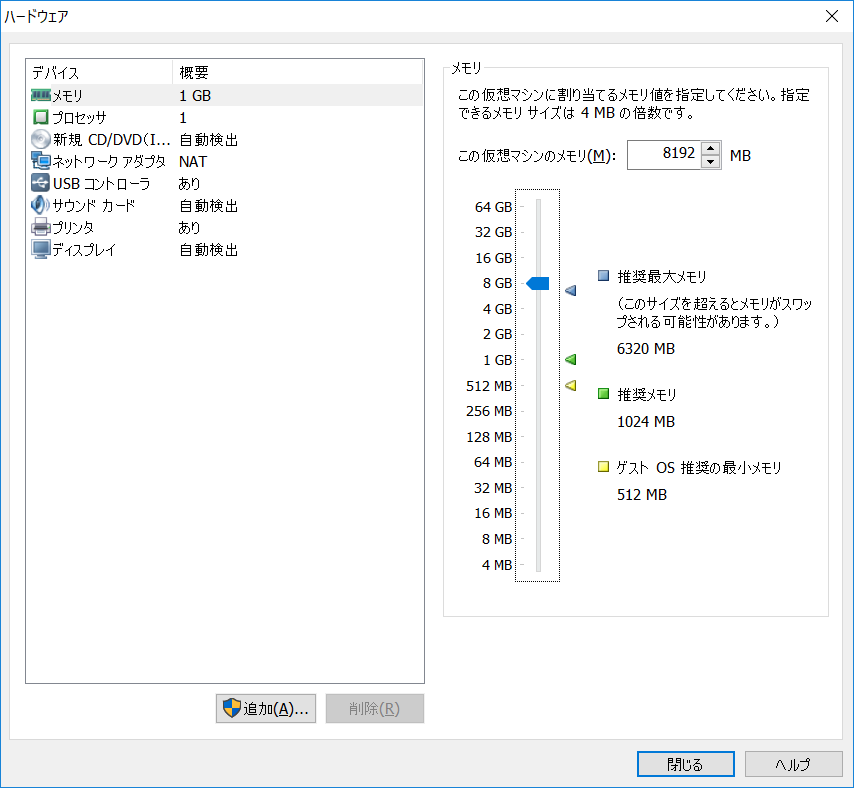
Memory:8GB
CPU:2core (Intel VT-x/EPTまたはAMD-V/RVIを仮想化)
Media:CentOS-7-x86_64-Minimal-1810.iso


とりあえずインストールが終わったらyum updateしてreboot
# yum update
# reboot
必要なソフトのインストール
Setting Up the Virtualization Environmentの記事Fedoraの章を参考にセットアップします。
まずはlibvirt,qemu-kvmが必要との事
# yum install libvirt qemu-kvm
# usermod -a -G libvirt <username>
# su - <username>
$ newgrp libvirt
$ exit
$ exit
KVM driver binaryを入れる必要があるようなので最新版を確認→github docker-machine-kvm
# curl -L https://github.com/dhiltgen/docker-machine-kvm/releases/download/v0.10.0/docker-machine-driver-kvm-centos7 -o /usr/local/bin/docker-machine-driver-kvm
# chmod +x /usr/local/bin/docker-machine-driver-kvm
# ll /usr/local/bin/docker*
-rwxr-xr-x. 1 root root 11939128 12月  8 20:56 /usr/local/bin/docker-machine-driver-kvm
libvirtd serviceの状態を確認し起動します。
# systemctl is-active libvirtd
inactive
# systemctl start libvirtd
minishiftのインストール
いよいよminishiftをインストールして行きます。
まずは最新版を確認します→github minishift
# curl -L https://github.com/minishift/minishift/releases/download/v1.28.0/minishift-1.28.0-linux-amd64.tgz -o ~/minishift-1.28.0-linux-amd64.tgz
# tar zxvf minishift-1.28.0-linux-amd64.tgz
minishift-1.28.0-linux-amd64/
minishift-1.28.0-linux-amd64/LICENSE
minishift-1.28.0-linux-amd64/README.adoc
minishift-1.28.0-linux-amd64/minishift
# mv minishift-1.28.0-linux-amd64/minishift /usr/local/bin/
# chmod +x /usr/local/bin/minishift
# ll /usr/local/bin/minishift
-rwxrwxr-x. 1 tak tak 23719712 12月  5 03:49 /usr/local/bin/minishift
そして起動です!
ここでインストーラとかイメージとか最新版を落としてくれます。
ちなみに途中でWARNがありますが…その後何事来なく動いてくれましたw
# su - <username>
$ minishift start
-- Starting profile 'minishift'
-- Check if deprecated options are used ... OK
-- Checking if https://github.com is reachable ... OK
-- Checking if requested OpenShift version 'v3.11.0' is valid ... OK
-- Checking if requested OpenShift version 'v3.11.0' is supported ... OK
-- Checking if requested hypervisor 'kvm' is supported on this platform ... OK
-- Checking if KVM driver is installed ...
   Driver is available at /usr/local/bin/docker-machine-driver-kvm ...
   Checking driver binary is executable ... OK
-- Checking if Libvirt is installed ... OK
-- Checking if Libvirt default network is present ... OK
-- Checking if Libvirt default network is active ... OK
-- Checking the ISO URL ... OK
-- Downloading OpenShift binary 'oc' version 'v3.11.0'
 53.89 MiB / 53.89 MiB [===============================================================================================] 100.00% 0s-- Downloading OpenShift v3.11.0 checksums ... OK
-- Checking if provided oc flags are supported ... OK
-- Starting the OpenShift cluster using 'kvm' hypervisor ...
-- Minishift VM will be configured with ...
   Memory:    4 GB
   vCPUs :    2
   Disk size: 20 GB

   Downloading ISO 'https://github.com/minishift/minishift-centos-iso/releases/download/v1.13.0/minishift-centos7.iso'
 346.00 MiB / 346.00 MiB [=============================================================================================] 100.00% 0s
-- Starting Minishift VM .......................................................... OK
-- Checking for IP address ... OK
-- Checking for nameservers ... OK
-- Checking if external host is reachable from the Minishift VM ...
   Pinging 8.8.8.8 ... OK
-- Checking HTTP connectivity from the VM ...
   Retrieving http://minishift.io/index.html ... OK
-- Checking if persistent storage volume is mounted ... OK
-- Checking available disk space ... 1% used OK
-- Writing current configuration for static assignment of IP address ... WARN
   Importing 'openshift/origin-control-plane:v3.11.0'  CACHE MISS
   Importing 'openshift/origin-docker-registry:v3.11.0'  CACHE MISS
   Importing 'openshift/origin-haproxy-router:v3.11.0'  CACHE MISS
-- OpenShift cluster will be configured with ...
   Version: v3.11.0
-- Pulling the OpenShift Container Image .................................... OK
-- Copying oc binary from the OpenShift container image to VM ... OK
-- Starting OpenShift cluster ....................................................................................
Getting a Docker client ...
Checking if image openshift/origin-control-plane:v3.11.0 is available ...
Pulling image openshift/origin-cli:v3.11.0
E1208 12:14:35.712501    2119 helper.go:173] Reading docker config from /home/docker/.docker/config.json failed: open /home/docker/.docker/config.json: no such file or directory, will attempt to pull image docker.io/openshift/origin-cli:v3.11.0 anonymously
Image pull complete
Pulling image openshift/origin-node:v3.11.0
E1208 12:14:39.874223    2119 helper.go:173] Reading docker config from /home/docker/.docker/config.json failed: open /home/docker/.docker/config.json: no such file or directory, will attempt to pull image docker.io/openshift/origin-node:v3.11.0 anonymously
Pulled 5/6 layers, 84% complete
Pulled 6/6 layers, 100% complete
Extracting
Image pull complete
Checking type of volume mount ...
Determining server IP ...
Using public hostname IP 192.168.42.238 as the host IP
Checking if OpenShift is already running ...
Checking for supported Docker version (=>1.22) ...
Checking if insecured registry is configured properly in Docker ...
Checking if required ports are available ...
Checking if OpenShift client is configured properly ...
Checking if image openshift/origin-control-plane:v3.11.0 is available ...
Starting OpenShift using openshift/origin-control-plane:v3.11.0 ...
I1208 12:15:23.748697    2119 config.go:40] Running "create-master-config"
I1208 12:15:26.405012    2119 config.go:46] Running "create-node-config"
I1208 12:15:27.639224    2119 flags.go:30] Running "create-kubelet-flags"
I1208 12:15:28.526688    2119 run_kubelet.go:49] Running "start-kubelet"
I1208 12:15:28.960893    2119 run_self_hosted.go:181] Waiting for the kube-apiserver to be ready ...
I1208 12:17:10.992138    2119 interface.go:26] Installing "kube-proxy" ...
I1208 12:17:10.992781    2119 interface.go:26] Installing "kube-dns" ...
I1208 12:17:10.992807    2119 interface.go:26] Installing "openshift-service-cert-signer-operator" ...
I1208 12:17:10.992822    2119 interface.go:26] Installing "openshift-apiserver" ...
I1208 12:17:10.992972    2119 apply_template.go:81] Installing "openshift-apiserver"
I1208 12:17:10.992979    2119 apply_template.go:81] Installing "kube-dns"
I1208 12:17:10.993928    2119 apply_template.go:81] Installing "kube-proxy"
I1208 12:17:10.994089    2119 apply_template.go:81] Installing "openshift-service-cert-signer-operator"
I1208 12:17:26.518057    2119 interface.go:41] Finished installing "kube-proxy" "kube-dns" "openshift-service-cert-signer-operator" "openshift-apiserver"
I1208 12:20:33.771855    2119 run_self_hosted.go:242] openshift-apiserver available
I1208 12:20:33.772721    2119 interface.go:26] Installing "openshift-controller-manager" ...
I1208 12:20:33.772760    2119 apply_template.go:81] Installing "openshift-controller-manager"
I1208 12:20:40.840180    2119 interface.go:41] Finished installing "openshift-controller-manager"
Adding default OAuthClient redirect URIs ...
Adding web-console ...
Adding router ...
Adding sample-templates ...
Adding persistent-volumes ...
Adding centos-imagestreams ...
Adding registry ...
I1208 12:20:40.971718    2119 interface.go:26] Installing "openshift-web-console-operator" ...
I1208 12:20:40.971745    2119 interface.go:26] Installing "openshift-router" ...
I1208 12:20:40.971765    2119 interface.go:26] Installing "sample-templates" ...
I1208 12:20:40.971779    2119 interface.go:26] Installing "persistent-volumes" ...
I1208 12:20:40.971799    2119 interface.go:26] Installing "centos-imagestreams" ...
I1208 12:20:40.971840    2119 interface.go:26] Installing "openshift-image-registry" ...
I1208 12:20:40.973299    2119 apply_template.go:81] Installing "openshift-web-console-operator"
I1208 12:20:40.974113    2119 interface.go:26] Installing "sample-templates/mongodb" ...
I1208 12:20:40.974149    2119 interface.go:26] Installing "sample-templates/cakephp quickstart" ...
I1208 12:20:40.974164    2119 interface.go:26] Installing "sample-templates/django quickstart" ...
I1208 12:20:40.974178    2119 interface.go:26] Installing "sample-templates/rails quickstart" ...
I1208 12:20:40.974192    2119 interface.go:26] Installing "sample-templates/nodejs quickstart" ...
I1208 12:20:40.974205    2119 interface.go:26] Installing "sample-templates/jenkins pipeline ephemeral" ...
I1208 12:20:40.974220    2119 interface.go:26] Installing "sample-templates/sample pipeline" ...
I1208 12:20:40.974233    2119 interface.go:26] Installing "sample-templates/mariadb" ...
I1208 12:20:40.974247    2119 interface.go:26] Installing "sample-templates/mysql" ...
I1208 12:20:40.974262    2119 interface.go:26] Installing "sample-templates/postgresql" ...
I1208 12:20:40.974275    2119 interface.go:26] Installing "sample-templates/dancer quickstart" ...
I1208 12:20:40.974392    2119 apply_list.go:67] Installing "sample-templates/dancer quickstart"
I1208 12:20:40.975723    2119 apply_list.go:67] Installing "centos-imagestreams"
I1208 12:20:40.976068    2119 apply_list.go:67] Installing "sample-templates/mongodb"
I1208 12:20:40.976312    2119 apply_list.go:67] Installing "sample-templates/cakephp quickstart"
I1208 12:20:40.976578    2119 apply_list.go:67] Installing "sample-templates/django quickstart"
I1208 12:20:40.976830    2119 apply_list.go:67] Installing "sample-templates/rails quickstart"
I1208 12:20:40.977067    2119 apply_list.go:67] Installing "sample-templates/nodejs quickstart"
I1208 12:20:40.977311    2119 apply_list.go:67] Installing "sample-templates/jenkins pipeline ephemeral"
I1208 12:20:40.977641    2119 apply_list.go:67] Installing "sample-templates/sample pipeline"
I1208 12:20:40.977887    2119 apply_list.go:67] Installing "sample-templates/mariadb"
I1208 12:20:40.978143    2119 apply_list.go:67] Installing "sample-templates/mysql"
I1208 12:20:40.978360    2119 apply_list.go:67] Installing "sample-templates/postgresql"
I1208 12:21:18.764757    2119 interface.go:41] Finished installing "sample-templates/mongodb" "sample-templates/cakephp quickstart" "sample-templates/django quickstart" "sample-templates/rails quickstart" "sample-templates/nodejs quickstart" "sample-templates/jenkins pipeline ephemeral" "sample-templates/sample pipeline" "sample-templates/mariadb" "sample-templates/mysql" "sample-templates/postgresql" "sample-templates/dancer quickstart"
I1208 12:22:13.441915    2119 interface.go:41] Finished installing "openshift-web-console-operator" "openshift-router" "sample-templates" "persistent-volumes" "centos-imagestreams" "openshift-image-registry"
Login to server ...
Creating initial project "myproject" ...
Server Information ...
OpenShift server started.

The server is accessible via web console at:
    https://192.168.42.238:8443/console

You are logged in as:
    User:     developer
    Password: <any value>

To login as administrator:
    oc login -u system:admin


-- Exporting of OpenShift images is occuring in background process with pid 20613.
ocコマンドのPATHを通す
管理に必要なocコマンドなどを呼び出すためPATHを通します。
$ eval $(minishift oc-env)
これでocコマンドが打てるか確認します。
$ oc
OpenShift Client

This client helps you develop, build, deploy, and run your applications on any OpenShift or Kubernetes compatible
platform. It also includes the administrative commands for managing a cluster under the 'adm' subcommand.

To create a new application, login to your server and then run new-app:

  oc login https://mycluster.mycompany.com
  oc new-app centos/ruby-25-centos7~https://github.com/sclorg/ruby-ex.git
  oc logs -f bc/ruby-ex

This will create an application based on the Docker image 'centos/ruby-25-centos7' that builds the source code from
GitHub. A build will start automatically, push the resulting image to the registry, and a deployment will roll that
change out in your project.

Once your application is deployed, use the status, describe, and get commands to see more about the created components:

  oc status
  oc describe deploymentconfig ruby-ex
  oc get pods

To make this application visible outside of the cluster, use the expose command on the service we just created to create
a 'route' (which will connect your application over the HTTP port to a public domain name).

  oc expose svc/ruby-ex
  oc status

You should now see the URL the application can be reached at.

To see the full list of commands supported, run 'oc --help'.
これでPATHが通りましたね。
管理画面のURLを確認する
スタートアップ時に出ていた管理画面へのURLですが、以下のコマンドでも確認できます。
何も作ってないから作りなさいって言われてるw
$ oc status
In project My Project (myproject) on server https://192.168.42.238:8443

You have no services, deployment configs, or build configs.
Run 'oc new-app' to create an application.
本当は…
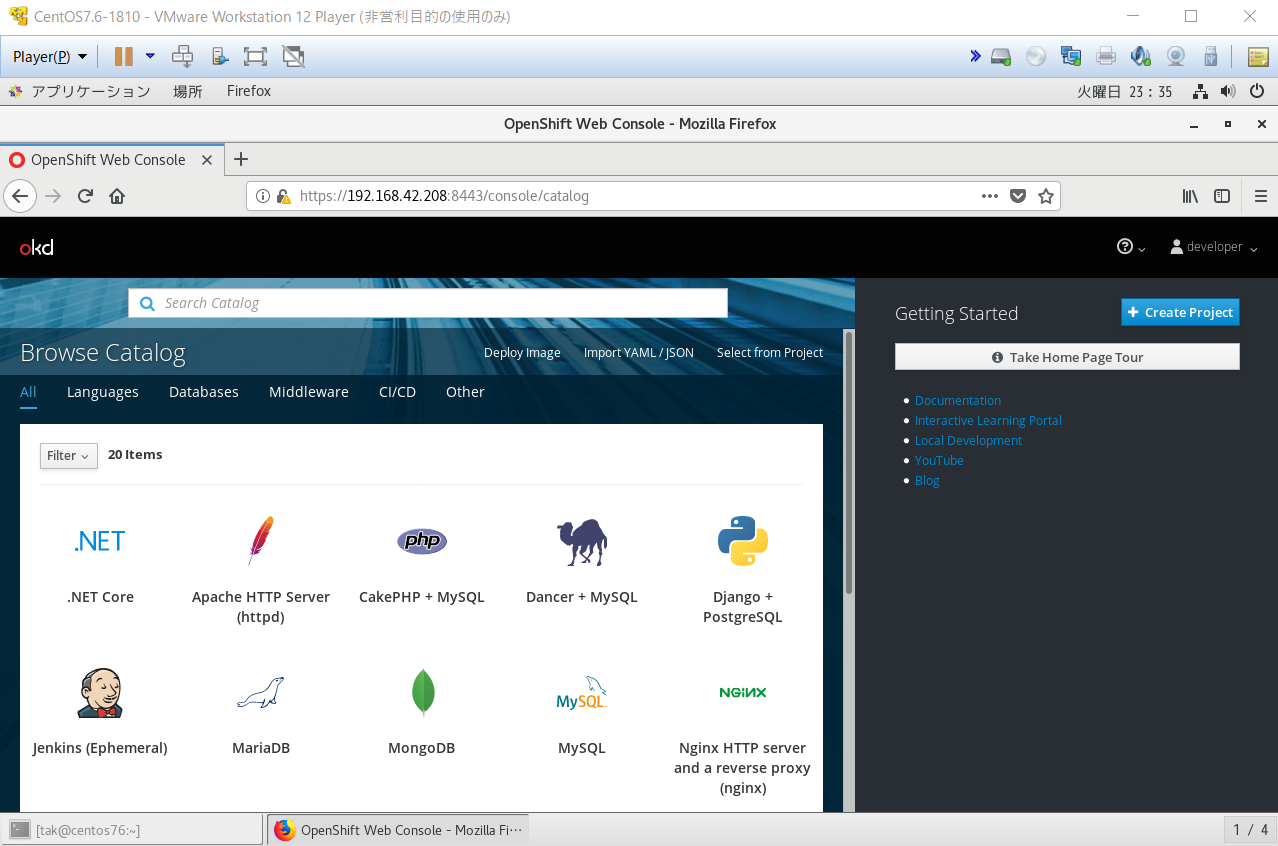
ホストコンピュータから管理画面を見たいのですが…今のところ試行錯誤中です(T_T)
192.168.42.238が何者なのか調査w
# ip addr
1: lo: <LOOPBACK,UP,LOWER_UP> mtu 65536 qdisc noqueue state UNKNOWN group default qlen 1000
    link/loopback 00:00:00:00:00:00 brd 00:00:00:00:00:00
    inet 127.0.0.1/8 scope host lo
       valid_lft forever preferred_lft forever
    inet6 ::1/128 scope host
       valid_lft forever preferred_lft forever
2: ens33: <BROADCAST,MULTICAST,UP,LOWER_UP> mtu 1500 qdisc pfifo_fast state UP group default qlen 1000
    link/ether 00:0c:29:5c:cc:50 brd ff:ff:ff:ff:ff:ff
    inet 192.168.253.137/24 brd 192.168.253.255 scope global noprefixroute dynamic ens33
       valid_lft 1079sec preferred_lft 1079sec
    inet6 fe80::3bac:a711:eb9a:80fd/64 scope link noprefixroute
       valid_lft forever preferred_lft forever
3: virbr0: <BROADCAST,MULTICAST,UP,LOWER_UP> mtu 1500 qdisc noqueue state UP group default qlen 1000
    link/ether 52:54:00:bd:41:5b brd ff:ff:ff:ff:ff:ff
    inet 192.168.122.1/24 brd 192.168.122.255 scope global virbr0
       valid_lft forever preferred_lft forever
4: virbr0-nic: <BROADCAST,MULTICAST> mtu 1500 qdisc pfifo_fast master virbr0 state DOWN group default qlen 1000
    link/ether 52:54:00:bd:41:5b brd ff:ff:ff:ff:ff:ff
5: virbr1: <BROADCAST,MULTICAST,UP,LOWER_UP> mtu 1500 qdisc noqueue state UP group default qlen 1000
    link/ether 52:54:00:e5:6d:71 brd ff:ff:ff:ff:ff:ff
    inet 192.168.42.1/24 brd 192.168.42.255 scope global virbr1
       valid_lft forever preferred_lft forever
6: virbr1-nic: <BROADCAST,MULTICAST> mtu 1500 qdisc pfifo_fast master virbr1 state DOWN group default qlen 1000
    link/ether 52:54:00:e5:6d:71 brd ff:ff:ff:ff:ff:ff
7: vnet0: <BROADCAST,MULTICAST,UP,LOWER_UP> mtu 1500 qdisc pfifo_fast master virbr0 state UNKNOWN group default qlen 1000
    link/ether fe:54:00:2c:4f:67 brd ff:ff:ff:ff:ff:ff
    inet6 fe80::fc54:ff:fe2c:4f67/64 scope link
       valid_lft forever preferred_lft forever
8: vnet1: <BROADCAST,MULTICAST,UP,LOWER_UP> mtu 1500 qdisc pfifo_fast master virbr1 state UNKNOWN group default qlen 1000
    link/ether fe:54:00:dd:38:56 brd ff:ff:ff:ff:ff:ff
    inet6 fe80::fc54:ff:fedd:3856/64 scope link
       valid_lft forever preferred_lft forever
# ss | grep 8443
#
# ip r
default via 192.168.253.2 dev ens33 proto dhcp metric 100
192.168.42.0/24 dev virbr1 proto kernel scope link src 192.168.42.1
192.168.122.0/24 dev virbr0 proto kernel scope link src 192.168.122.1
192.168.253.0/24 dev ens33 proto kernel scope link src 192.168.253.137 metric 100
CentOS7.6でOpenShiftが実行されているわけではないので当たり前ですが…
CentOS7.6上からwgetしてみると大丈夫ですね。
# yum install wget
# wget --no-check-certificate https://192.168.42.238:8443/console
--2018-12-09 16:47:18--  https://192.168.42.238:8443/console
192.168.42.238:8443 に接続しています... 接続しました。
警告: 192.168.42.238 の証明書(発行者: `/CN=openshift-signer@1544271324')の検証に失敗しました:
  自己署名証明書です。
HTTP による接続要求を送信しました、応答を待っています... 301 Moved Permanently
場所: /console/ [続く]
--2018-12-09 16:47:18--  https://192.168.42.238:8443/console/
192.168.42.238:8443 への接続を再利用します。
HTTP による接続要求を送信しました、応答を待っています... 200 OK
長さ: 特定できません [text/html]
`console' に保存中

    [ <=>                                                                                      ] 2,243       --.-K/s 時間 0s

2018-12-09 16:47:18 (28.3 MB/s) - `console' へ保存終了 [2243]
ホスト側のNWを確認
C:\>ipconfig

Windows IP 構成


イーサネット アダプター イーサネット:

   メディアの状態. . . . . . . . . . . .: メディアは接続されていません
   接続固有の DNS サフィックス . . . . .:

Wireless LAN adapter ローカル エリア接続* 1:

   メディアの状態. . . . . . . . . . . .: メディアは接続されていません
   接続固有の DNS サフィックス . . . . .:

イーサネット アダプター VMware Network Adapter VMnet1:

   接続固有の DNS サフィックス . . . . .:
   リンクローカル IPv6 アドレス. . . . .: fe80::cc35:adf8:bd4c:3f26%19
   IPv4 アドレス . . . . . . . . . . . .: 192.168.214.1
   サブネット マスク . . . . . . . . . .: 255.255.255.0
   デフォルト ゲートウェイ . . . . . . .:

イーサネット アダプター VMware Network Adapter VMnet8:

   接続固有の DNS サフィックス . . . . .:
   リンクローカル IPv6 アドレス. . . . .: fe80::49ff:41b8:70c0:e3f%24
   IPv4 アドレス . . . . . . . . . . . .: 192.168.253.1
   サブネット マスク . . . . . . . . . .: 255.255.255.0
   デフォルト ゲートウェイ . . . . . . .: 192.168.253.2

Wireless LAN adapter Wi-Fi:

   接続固有の DNS サフィックス . . . . .:
   リンクローカル IPv6 アドレス. . . . .: fe80::b500:e8b5:868f:*******
   IPv4 アドレス . . . . . . . . . . . .: 192.168.0.38
   サブネット マスク . . . . . . . . . .: 255.255.255.0
   デフォルト ゲートウェイ . . . . . . .: 192.168.0.10

イーサネット アダプター Bluetooth ネットワーク接続:

   メディアの状態. . . . . . . . . . . .: メディアは接続されていません
   接続固有の DNS サフィックス . . . . .:

C:\>
ホスト側NW的にはVMnet8に飛ぶんだね
うぅ~ん。
管理画面を外に公開するのもセキュリティ的にアレやし
せっかくMinimal入れたけど、GUI追加しようかなぁ~(T_T)
後日談
yum -y groupinstall "GNOME Desktop"
しちゃいました(爆)
