Vue3 + Bootstrap5 + TypeScriptを使ったコンポーザブルな関数を提供するプラグインを開発した際の備忘録になります。
プラグインを開発するための環境はDocker + WSL2で用意しています。
エディタはVSCodeを使用しています。
今回、作成したプラグインのソースは以下になります
GitHub:imo-tikuwa/vue3-bootstrap5-composables
上記プラグインの開発自体は3週間ほど前に行っていてメモは残していたものの記憶があやふやな箇所が多々あるため、Qiitaに記事としてまとめる用に別途以下のリポジトリも作成し開発を進めながら記事を作成しました。
GitHub:imo-tikuwa/vue3-plugin-dev-study
1. Docker環境構築
まず、以下のようなディレクトリ構造でNode.js 18.xのイメージをベースとしたコンテナ環境を用意します。
.
├── .docker/node/Dockerfile
├── .env
├── .env.example
├── .gitignore
└── docker-compose.yml
COMPOSE_PATH_SEPARATOR=:
COMPOSE_FILE=docker-compose.yml

DEVELOPMENT_PACKAGE_NAME=vue3-plugin-dev-study
DEVELOPMENT_PACKAGE_NAMEというオレオレ環境変数でこれから開発するプラグインのパッケージ名称を渡します。
この値はDockerイメージをビルドする際のARGとしても使用しており、コンテナのWORKDIR(初期ディレクトリ)に設定します。
services:
  node:
    build:
      context: ./
      dockerfile: ./.docker/node/Dockerfile
      args:
        - WORKDIR_NAME=${DEVELOPMENT_PACKAGE_NAME}
    volumes:
      - .:/${DEVELOPMENT_PACKAGE_NAME}:cached
    ports:
      - 5173:5173
    tty: true
ホストPCのルートディレクトリをコンテナ内の所定の場所にマウントするボリュームの設定やViteの開発サーバーに外からアクセスするためのポートフォワーディングの設定を含みます。
FROM node:18-slim
SHELL ["/bin/bash", "-oeux", "pipefail", "-c"]

ARG WORKDIR_NAME
ENV TZ=Asia/Tokyo

RUN apt-get update -o Acquire::Check-Valid-Until=false -o Acquire::Check-Date=false && \
    apt-get -y --no-install-recommends install ca-certificates && \
    apt-get clean && \
    rm -rf /var/lib/apt/lists/* && \
    rm -rf /tmp/* && \
    { \
        echo "alias ll='ls -l --color=auto'"; \
    } >> /home/node/.bashrc

WORKDIR /${WORKDIR_NAME}

USER node
.gitignoreでは.envファイルをGitの管理から外す設定のみ行っています
.env
Dockerのイメージビルドとコンテナの起動を行います
$ docker-compose up -d --build

Dockerfile内のUSER nodeについてnodeイメージにおけるnodeユーザーはUID=1000のユーザーとなっており、ホストPC(WSL2)の一般ユーザーのUIDと揃うようにしています。

2. Vueの新規プロジェクト作成
※こちらViteからvueのテンプレートオプションを指定してプロジェクトを作成することも出来るみたいです。この記事の中ではcreate-vueからのプロジェクト作成を行っています。
まず、以下のコマンドでコンテナ内にアクセスします。
$ docker-compose exec node bash
node@0d5b94c04953:/vue3-plugin-dev-study$
アクセスしたコンテナ内の初期ディレクトリ内がホストPC側と一致していることを確認しています。
node@0d5b94c04953:/vue3-plugin-dev-study$ ls -al
total 28
drwxr-xr-x 4 node node 4096 Dec  9 10:18 .
drwxr-xr-x 1 root root 4096 Dec  9 10:19 ..
drwxr-xr-x 3 node node 4096 Dec  9 10:16 .docker
-rw-r--r-- 1 node node  104 Dec  9 10:17 .env
-rw-r--r-- 1 node node   83 Dec  9 10:16 .env.example
drwxr-xr-x 7 node node 4096 Dec  9 10:18 .git
-rw-r--r-- 1 node node  317 Dec  9 10:16 .gitignore
-rw-r--r-- 1 node node  268 Dec  9 10:17 docker-compose.yml
次にnpm init vue@latestから対話によってVueの新規プロジェクトを作成するのですが、nodeコンテナ内のカレントには.gitignoreやdocker-compose.ymlなどのファイルが既に存在します。
この状態でプロジェクトを立ち上げようとすると以下に添付する画像のように削除を求められ、拒否するとエラーとなってしまいます。。![]()
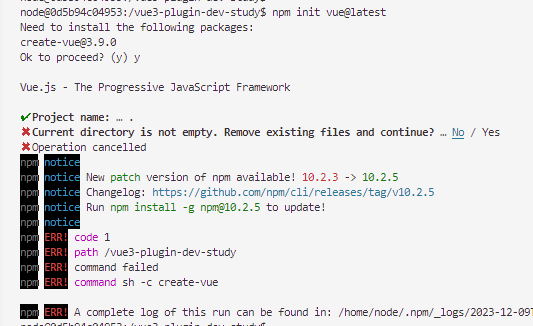
そこで新規プロジェクトの作成はコンテナ内の/tmpディレクトリ内で行い、作成したVueプロジェクトの一式をホストとボリューム共有しているディレクトリにコピーするという手順を踏んで構築しています。
※Dockerfile内で/tmpディレクトリを空にしていたのはこのため
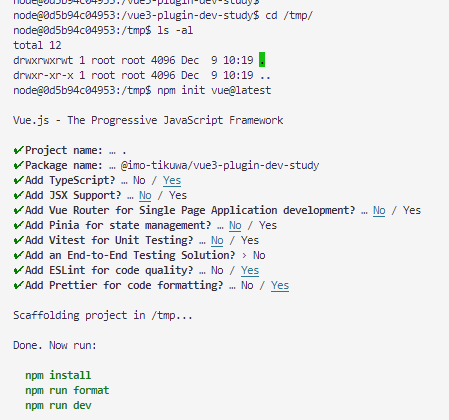
/tmpディレクトリに移動してnpm init vue@latestからプロジェクトを作成します。
Project nameはVueのプロジェクトをカレント(/tmp)に作成するため.(ドット記号)と入力します。
Package nameで入力した値は生成されるpackage.json内のnameに設定されます。
後で手動で変更することも可能ですが、npmjsでscoped packageとして公開することを想定しているため[@GitHubユーザー名]/パッケージ名の入力を行っています。
node@0d5b94c04953:/vue3-plugin-dev-study$ cd /tmp
node@0d5b94c04953:/tmp$ npm init vue@latest

Vue.js - The Progressive JavaScript Framework

✔ Project name: … .
✔ Package name: … @imo-tikuwa/vue3-plugin-dev-study
✔ Add TypeScript? … No / Yes
✔ Add JSX Support? … No / Yes
✔ Add Vue Router for Single Page Application development? … No / Yes
✔ Add Pinia for state management? … No / Yes
✔ Add Vitest for Unit Testing? … No / Yes
✔ Add an End-to-End Testing Solution? › No
✔ Add ESLint for code quality? … No / Yes
✔ Add Prettier for code formatting? … No / Yes

Scaffolding project in /tmp...

Done. Now run:

  npm install
  npm run format
  npm run dev
Package name以降のオプションについて、↑のスニペット上だとどちらを選んだかわかりませんが、以下に添付する画像のようにTypeScriptとEslintとPrettierについてYesを選択しています。
続けて/tmpディレクトリ内に作成したVueプロジェクトを丸ごとホストPCとボリューム共有しているディレクトリに移動します。
.(ドット記号)で始まる隠しファイルも含めて丸ごと/tmpディレクトリから移動するには以下のようなコマンド操作が必要でした。
node@0d5b94c04953:/tmp$ shopt -s dotglob
node@0d5b94c04953:/tmp$ mv /tmp/* /vue3-plugin-dev-study/

↓/tmpディレクトリが空となったことを確認
node@0d5b94c04953:/tmp$ ls -al
total 8
drwxrwxrwt 1 root root 4096 Dec  9 10:49 .
drwxr-xr-x 1 root root 4096 Dec  9 10:19 ..
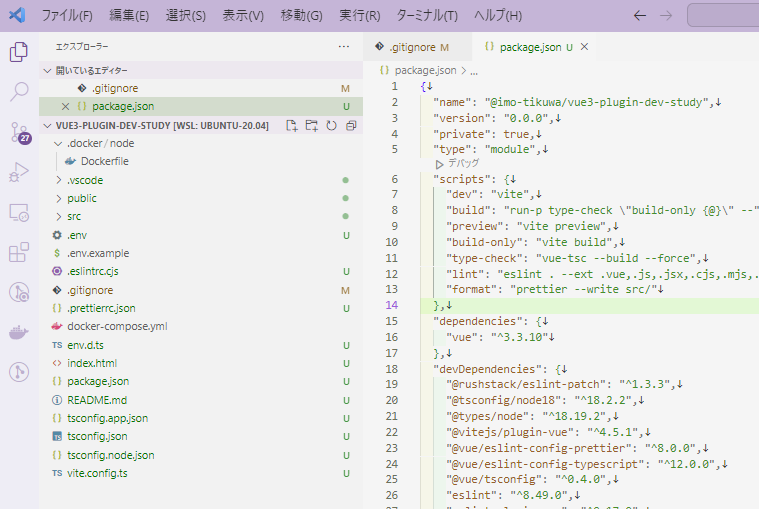
この時点でエディタ側では以下に添付する画像のようにVueプロジェクトが見れているはずです。
ホストとボリューム共有を行っているディレクトリに戻り npm installなどを実施します。
node@0d5b94c04953:/tmp$ cd /vue3-plugin-dev-study/
node@0d5b94c04953:/vue3-plugin-dev-study$ npm install

added 269 packages, and audited 270 packages in 31s

72 packages are looking for funding
  run `npm fund` for details

found 0 vulnerabilities
なお、ホストPCに元々存在した.gitignoreがVueプロジェクトの中に含まれているもので上書きされ、Git管理から外していた.envファイルがコミット対象として表示されてしまっているかと思います。。

こちら再度Git管理の対象から外す設定を行います。
~~~省略~~~
# Editor directories and files
.vscode/*
!.vscode/extensions.json
.idea
*.suo
*.ntvs*
*.njsproj
*.sln
*.sw?

*.tsbuildinfo
+
+.env
+
3. Vite開発サーバー起動
開発環境についてDockerを使っているため、ホストPCからコンテナ内のVite開発サーバーに接続するための設定を行います。
import { fileURLToPath, URL } from 'node:url'

import { defineConfig } from 'vite'
import vue from '@vitejs/plugin-vue'

// https://vitejs.dev/config/
export default defineConfig({
  plugins: [
    vue(),
  ],
  resolve: {
    alias: {
      '@': fileURLToPath(new URL('./src', import.meta.url))
    }
-  }
+  },
+  server: {
+    host: true
+  }
})
こちらの追記を行った後、Viteの開発サーバーを立ち上げます。
node@0d5b94c04953:/vue3-plugin-dev-study$ npm run dev

  VITE v5.0.7  ready in 350 ms

  ➜  Local:   http://localhost:5173/
  ➜  Network: http://192.168.32.2:5173/
  ➜  press h + enter to show help
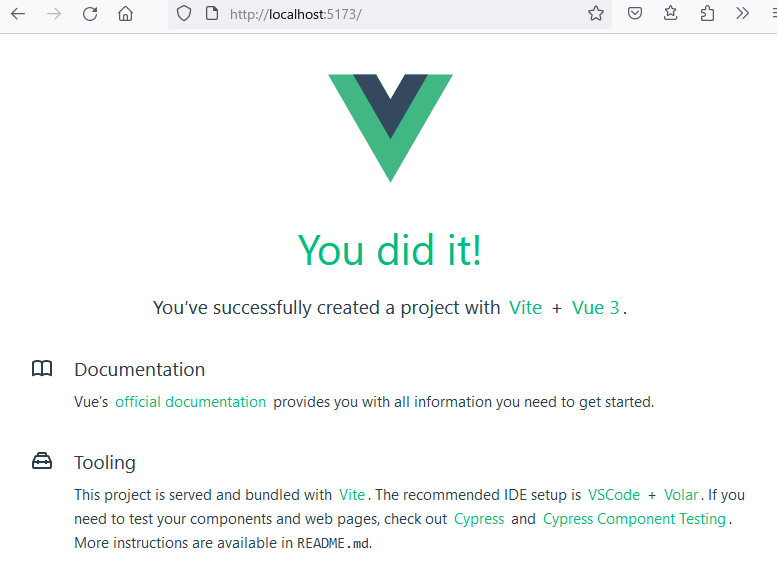
ホストPCのブラウザで http://localhost:5173/ にアクセスし、以下の画面が見れていればOK
4. 不要なファイルの削除
プラグイン開発前にVueの新規プロジェクトに含まれるHelloWorld.vueなどのファイルについては不要となるので削除します。
不要なファイルは以下のコマンドで削除しました。
node@0d5b94c04953:/vue3-plugin-dev-study$ rm -rf src/assets/
node@0d5b94c04953:/vue3-plugin-dev-study$ rm -rf src/components/*
また、いくつかのファイルについて以下の通り修正しました。
<script setup lang="ts">
</script>

<template>
  <div></div>
</template>
import { createApp } from 'vue'
import App from './App.vue'

createApp(App).mount('#app')
5. Bootstrap5の導入
今回はVue3+Bootstrap5のプラグイン開発のデモとしてBootstrap5を導入してBootstrap5を使用したボタンコンポーネントを提供するプラグインを提供する形で進めます。
bootstrapはこれから作成するVueプラグインがBootstrap5に依存するプラグインであることからdevDependenciesではなくdependenciesに含める形でインストールします。
また、bootstrapが依存するPopperとsassもインストールします。
node@0d5b94c04953:/vue3-plugin-dev-study$ npm install bootstrap
node@0d5b94c04953:/vue3-plugin-dev-study$ npm install -D @popperjs/core sass
bootstrapのSCSSをインポートするための設定を行います。
以下のようなファイルを作成します。
@import 'bootstrap/scss/bootstrap';
また、上記ファイルを読み込む設定をmain.tsに追加します。
+import './scss/styles.scss'
+
import { createApp } from 'vue'
import App from './App.vue'

createApp(App).mount('#app')
動作確認用にApp.vueに適当なBootstrap5の確認が行えるHTMLを追加(※動作確認後に元に戻します)
<script setup lang="ts">
</script>
<template>
- <div></div>
+ <div class="container mt-2">
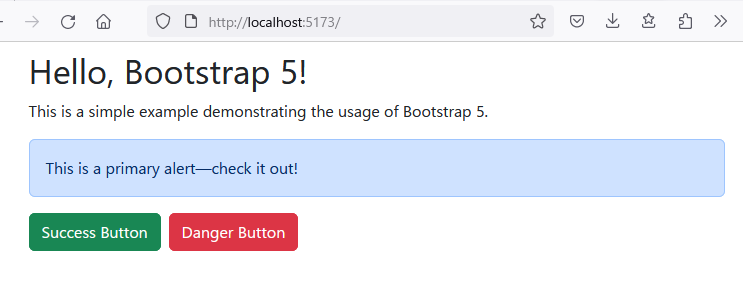
+ <h1>Hello, Bootstrap 5!</h1>
+ <p>This is a simple example demonstrating the usage of Bootstrap 5.</p>
+
+ <div class="alert alert-primary" role="alert">
+ This is a primary alert—check it out!
+ </div>
+
+ <button type="button" class="btn btn-success me-2">Success Button</button>
+ <button type="button" class="btn btn-danger">Danger Button</button>
+ </div>
</template>
Viteの開発サーバーを再度起動してブラウザの表示が以下のようになっていればOK
6. VScode用のPrettier設定
ファイルの編集にVSCodeを使っているので、保管時にPrettierの整形を効かせるための設定を行います。
{
  "editor.formatOnSave": true,
  "editor.defaultFormatter": "esbenp.prettier-vscode",
  "prettier.configPath": ".prettierrc.json"
}
-
esbenp.prettier-vscodeはVSCodeでPrettierを使うためのプラグインです。- Vueのプロジェクト作成時にPrettierについてYesを指定したためVueプロジェクトにおけるPrettierの設定ファイル(
.prettierrc.json)やesbenp.prettier-vscodeプラグインの使用を推奨するVSCodeの設定(.vscode/extensions.json)は既に含まれているかと思います。 - エディタの指示に従って
esbenp.prettier-vscodeプラグインをインストール済みであればこの設定を明示することによってファイル保存時にPrettierを使ったフォーマットが行えるようになります。
- Vueのプロジェクト作成時にPrettierについてYesを指定したためVueプロジェクトにおけるPrettierの設定ファイル(
- VSCode側のPrettierもVueプロジェクトと同じ設定ファイルを参照できるようにするため
prettier.configPathによってプロジェクトのルートの配置されている.prettierrc.jsonを読み込むようにしています。
なお、こちらの修正について.gitignoreで.vscodeディレクトリのextensions.json以外のファイルについて除外設定がされていました。
以下のように修正し、settings.jsonについてGitの管理対象としました。
~~~省略~~~
# Editor directories and files
.vscode/*
!.vscode/extensions.json
+!.vscode/settings.json
.idea
*.suo
~~~省略~~~
7. プラグインとして公開したいコンポーネント作成
以下のようなbootstrap5固有のCSSクラスを施したボタンを1つ表示する単一ファイルコンポーネント(以後、SFC)を作成しました。
<template>
  <button type="button" class="btn" :class="[btnSizeClass, btnColorClass]" :disabled="disabled">
    <template v-if="label">{{ label }}</template>
    <slot v-else></slot>
  </button>
</template>

<script setup lang="ts">
import { computed } from 'vue'
import type { ButtonProps } from '../types'

const props = withDefaults(defineProps<ButtonProps>(), {
  size: 'medium',
  outline: false,
  color: 'primary',
  disabled: false
})

const btnSizeClass = computed(() => {
  switch (props.size) {
    case 'small':
      return 'btn-sm'
    case 'large':
      return 'btn-lg'
    default:
      return null
  }
})
const btnColorClass = computed(() => `btn-${props.outline ? 'outline-' : ''}${props.color}`)
</script>
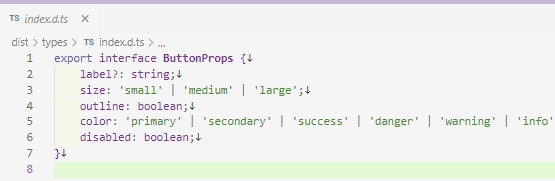
export interface ButtonProps {
  label?: string
  size: 'small' | 'medium' | 'large'
  outline: boolean
  color:
    | 'primary'
    | 'secondary'
    | 'success'
    | 'danger'
    | 'warning'
    | 'info'
    | 'light'
    | 'dark'
    | 'link'
  disabled: boolean
}
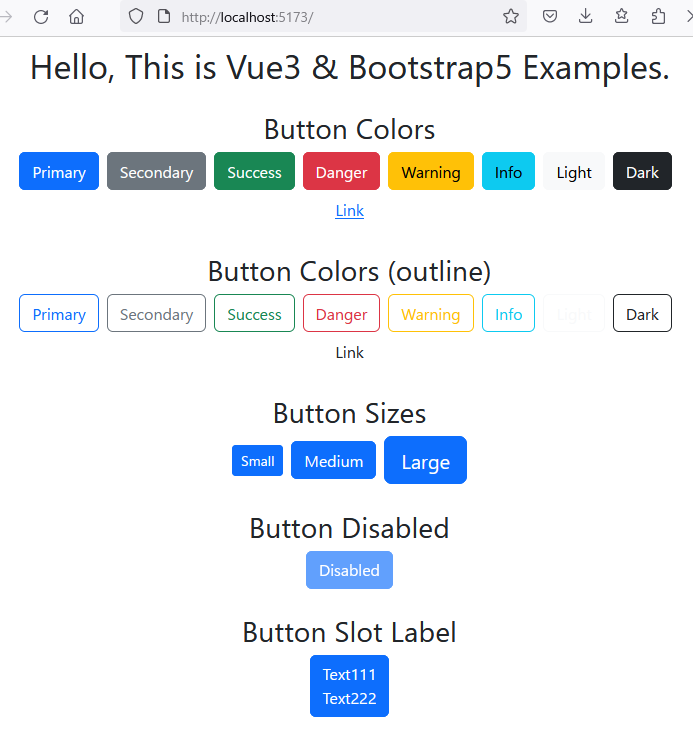
このSFCを使用する側のデモページとしてApp.vueを以下の通り修正しました。
<script setup lang="ts">
+import BaseButton from './components/BaseButton.vue'
</script>

<template>
-  <div></div>
+  <div class="container mt-2 text-center">
+    <h1>Hello, This is Vue3 & Bootstrap5 Examples.</h1>
+    <h2 class="mt-4">Button Colors</h2>
+    <div class="row">
+      <div class="col-12">
+        <BaseButton label="Primary" class="me-2" />
+        <BaseButton label="Secondary" :color="'secondary'" class="me-2" />
+        <BaseButton label="Success" :color="'success'" class="me-2" />
+        <BaseButton label="Danger" :color="'danger'" class="me-2" />
+        <BaseButton label="Warning" :color="'warning'" class="me-2" />
+        <BaseButton label="Info" :color="'info'" class="me-2" />
+        <BaseButton label="Light" :color="'light'" class="me-2" />
+        <BaseButton label="Dark" :color="'dark'" class="me-2" />
+        <BaseButton label="Link" :color="'link'" />
+      </div>
+    </div>
+    <h2 class="mt-4">Button Colors (outline)</h2>
+    <div class="row">
+      <div class="col-12">
+        <BaseButton label="Primary" :outline="true" class="me-2" />
+        <BaseButton label="Secondary" :outline="true" :color="'secondary'" class="me-2" />
+        <BaseButton label="Success" :outline="true" :color="'success'" class="me-2" />
+        <BaseButton label="Danger" :outline="true" :color="'danger'" class="me-2" />
+        <BaseButton label="Warning" :outline="true" :color="'warning'" class="me-2" />
+        <BaseButton label="Info" :outline="true" :color="'info'" class="me-2" />
+        <BaseButton label="Light" :outline="true" :color="'light'" class="me-2" />
+        <BaseButton label="Dark" :outline="true" :color="'dark'" class="me-2" />
+        <BaseButton label="Link" :outline="true" :color="'link'" />
+      </div>
+    </div>
+    <h2 class="mt-4">Button Sizes</h2>
+    <div class="row">
+      <div class="col-12">
+        <BaseButton label="Small" :size="'small'" class="me-2" />
+        <BaseButton label="Medium" class="me-2" />
+        <BaseButton label="Large" :size="'large'" />
+      </div>
+    </div>
+    <h2 class="mt-4">Button Disabled</h2>
+    <div class="row">
+      <div class="col-12">
+        <BaseButton label="Disabled" :disabled="true" />
+      </div>
+    </div>
+    <h2 class="mt-4">Button Slot Label</h2>
+    <div class="row">
+      <div class="col-12">
+        <BaseButton>Text111<br />Text222</BaseButton>
+      </div>
+    </div>
+  </div>
</template>
Viteの開発サーバーを起動して以下に添付する画像のような表示が確認できました。
8. Vueプラグインファイル作成&お試しビルド
まず、↑の手順で作成したSFCをプラグインとして提供するためのプラグインファイルを作成します。
import type { App, Plugin } from 'vue'
import BaseButton from '../components/BaseButton.vue'

export const BootstrapButtonPlugin: Plugin = {
  install(app: App) {
    app.component('BaseButton', BaseButton)
  }
}
- Vue本体のPluginという型を参照した
BootstrapButtonPluginという名前のオブジェクトを外向けにexportしています - プラグインとして提供するVueコンポーネントを、使用する側でインポートせずにグローバルに呼び出せるようプラグインのinstall内で定義しています
続けて、↑で作成したプラグインファイルとBaseButton.vueを1つのファイルにまとめて再度エクスポートするエントリーファイル(src/index.ts)を作成します。
import BaseButton from './components/BaseButton.vue'
import { BootstrapButtonPlugin } from './plugins/bootstrapButton'

export { BaseButton, BootstrapButtonPlugin }
↑で作成したエントリーファイルを読み込み、ライブラリとしてのバンドルを作成する設定をvite.config.tsに追加します。
import { fileURLToPath, URL } from 'node:url'

import { defineConfig } from 'vite'
import vue from '@vitejs/plugin-vue'
+import { resolve } from 'node:path'

// https://vitejs.dev/config/
export default defineConfig({
  plugins: [
    vue(),
  ],
+  publicDir: false,
+  build: {
+    lib: {
+      entry: resolve(__dirname, 'src/index.ts'),
+      name: 'Vue3PluginDevStudy',
+      fileName: 'vue3-plugin-dev-study'
+    },
+    rollupOptions: {
+      external: ['vue', 'bootstrap'],
+      output: {
+        globals: {
+          vue: 'Vue'
+        }
+      }
+    }
+  },
  resolve: {
    alias: {
      '@': fileURLToPath(new URL('./src', import.meta.url))
    }
  },
  server: {
    host: true
  }
})
↑のvite.config.tsの修正によってViteはbuildコマンドについてライブラリモードと呼ばれるモードで動作するようになります(build.libのところ)。
ここまでの状態で試しにビルドを行います。ビルドはnpm run buildから行います。
node@0d5b94c04953:/vue3-plugin-dev-study$ npm run build

> @imo-tikuwa/vue3-plugin-dev-study@0.0.0 build
> run-p type-check "build-only {@}" --


> @imo-tikuwa/vue3-plugin-dev-study@0.0.0 build-only
> vite build


> @imo-tikuwa/vue3-plugin-dev-study@0.0.0 type-check
> vue-tsc --build --force

vite v5.0.7 building for production...
"createCommentVNode" is imported from external module "vue" but never used in "src/components/BaseButton.vue?vue&type=script&setup=true&lang.ts".
✓ 4 modules transformed.
dist/vue3-plugin-dev-study.js  1.15 kB │ gzip: 0.59 kB
dist/vue3-plugin-dev-study.umd.cjs  1.12 kB │ gzip: 0.64 kB
✓ built in 547ms

node@0d5b94c04953:/vue3-plugin-dev-study$ find ./dist/ -type f
./dist/vue3-plugin-dev-study.js
./dist/vue3-plugin-dev-study.umd.cjs
- 先ほど作成したエントリーファイル(
src/index.ts)を読み込み2つのファイルをdistディレクトリ内に出力しているログが流れています。 - 2ファイルの中にBaseButton.vueの中身に関するコードが含まれていることが確認できますが、TypeScriptの型に関する情報が一切含まれていないことがわかります。。
9. TypeScriptの型情報をビルドに含める改修
色々調べた結果、Viteのライブラリモードによるビルドとは別にvue-tscというVueのSFCに対応したTypeScriptコンパイラを使ったビルドが必要なことがわかりました。
※ここの作業内容は私が考えたものではなく以下の記事を参考にした改修を行っています。そのため自分の中でいくつかおまじない(意味を理解していない)的な箇所があります。。
参考:How to Create and Publish a Vue Component Library – 2023 Update
まずtsconfig.app.jsonについて削除
node@0d5b94c04953:/vue3-plugin-dev-study$ rm tsconfig.app.json
次にtsconfig.jsonについて以下の通り修正
{
  "compilerOptions": {
    "target": "ES2020",
    "useDefineForClassFields": true,
    "module": "ESNext",
    "lib": ["ES2020", "DOM", "DOM.Iterable"],
    "skipLibCheck": true,

    /* Bundler mode */
    "moduleResolution": "bundler",
    "allowImportingTsExtensions": true,
    "resolveJsonModule": true,
    "isolatedModules": true,
    // "noEmit": true,
    "jsx": "preserve",

    "outDir": "dist",
    "declaration": true,

    /* Linting */
    "strict": true,
    "noUnusedLocals": true,
    "noUnusedParameters": true,
    "noFallthroughCasesInSwitch": true
  },
  "exclude": [
    // ライブラリへのバンドルから除外したいファイル
    "src/App.vue",
    "src/main.ts"
  ],
  "include": [
    // ライブラリへのバンドルに含めたいファイル
    "src/**/*.ts",
    "src/components/*.vue"
  ],
  "references": [{ "path": "./tsconfig.node.json" }]
}
次にtsconfig.node.jsonを修正
{
  "extends": "@tsconfig/node18/tsconfig.json",
  "include": [
    "vite.config.*",
    "vitest.config.*",
    "cypress.config.*",
    "nightwatch.conf.*",
    "playwright.config.*"
  ],
  "compilerOptions": {
    "composite": true,
-    "noEmit": true,
    "module": "ESNext",
    "moduleResolution": "Bundler",
    "types": ["node"]
  }
}
最後にpackage.jsonを修正
  "scripts": {
    "dev": "vite",
-    "build": "run-p type-check \"build-only {@}\" --",
+    "build": "vite build && vue-tsc --emitDeclarationOnly",
    "preview": "vite preview",
-    "build-only": "vite build",
-    "type-check": "vue-tsc --build --force",
+    "type-check": "vue-tsc --noEmit --composite false",
    "lint": "eslint . --ext .vue,.js,.jsx,.cjs,.mjs,.ts,.tsx,.cts,.mts --fix --ignore-path .gitignore",
    "format": "prettier --write src/"
  },
この修正を施したうえで再度ビルドを実施したところ以下のようになりました。
node@0d5b94c04953:/vue3-plugin-dev-study$ npm run build

> @imo-tikuwa/vue3-plugin-dev-study@0.0.0 build
> vite build && vue-tsc --emitDeclarationOnly

vite v5.0.7 building for production...
✓ 4 modules transformed.
dist/vue3-plugin-dev-study.js  1.15 kB │ gzip: 0.59 kB
dist/vue3-plugin-dev-study.umd.cjs  1.12 kB │ gzip: 0.64 kB
✓ built in 454ms

node@0d5b94c04953:/vue3-plugin-dev-study$ find ./dist/ -type f
./dist/types/index.d.ts
./dist/vue3-plugin-dev-study.js
./dist/index.d.ts
./dist/plugins/bootstrapButton.d.ts
./dist/components/BaseButton.vue.d.ts
./dist/vue3-plugin-dev-study.umd.cjs
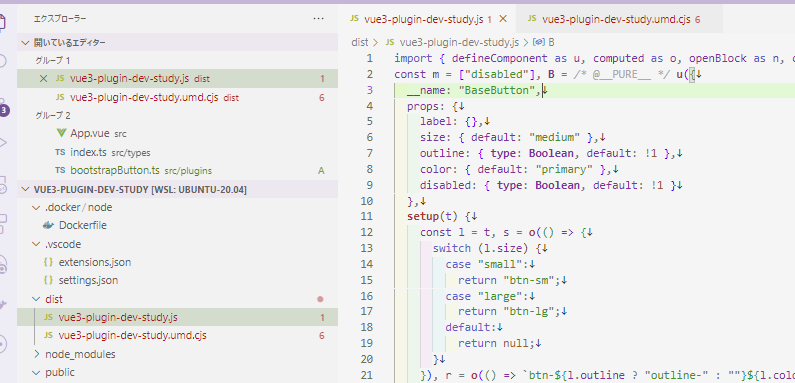
先ほどは2ファイルしかなかったdistディレクトリ内に何やら色々生えてきました。
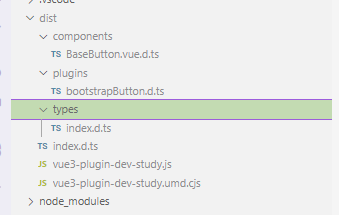
パッケージに含めたかったBaseButton.vueのpropsに割り当ててるTypeScriptの型情報が出力されてることを確認できました。![]()
10. npmパッケージとして公開するための設定を追加
package.jsonにnpmパッケージとして公開したときに表示する情報を追記
{
  "name": "@imo-tikuwa/vue3-plugin-dev-study",
-  "version": "0.0.0",
+  "version": "0.0.1",
-  "private": true,
  "type": "module",
  "scripts": {
    "dev": "vite",
    "build": "vite build && vue-tsc --emitDeclarationOnly",
    "preview": "vite preview",
    "type-check": "vue-tsc --noEmit --composite false",
    "lint": "eslint . --ext .vue,.js,.jsx,.cjs,.mjs,.ts,.tsx,.cts,.mts --fix --ignore-path .gitignore",
    "format": "prettier --write src/"
  },
  "dependencies": {
    "bootstrap": "^5.3.2",
    "vue": "^3.3.10"
  },
  "devDependencies": {
    "@popperjs/core": "^2.11.8",
    "@rushstack/eslint-patch": "^1.3.3",
    "@tsconfig/node18": "^18.2.2",
    "@types/node": "^18.19.2",
    "@vitejs/plugin-vue": "^4.5.1",
    "@vue/eslint-config-prettier": "^8.0.0",
    "@vue/eslint-config-typescript": "^12.0.0",
    "@vue/tsconfig": "^0.4.0",
    "eslint": "^8.49.0",
    "eslint-plugin-vue": "^9.17.0",
    "npm-run-all2": "^6.1.1",
    "prettier": "^3.0.3",
    "sass": "^1.69.5",
    "typescript": "~5.2.0",
    "vite": "^5.0.5",
    "vue-tsc": "^1.8.25"
-  }
+  },
+  "description": "This is Vue3&Bootstrap5 component library development examples.",
+  "files": [
+    "dist"
+  ],
+  "main": "./dist/vue3-plugin-dev-study.umd.cjs",
+  "module": "./dist/vue3-plugin-dev-study.js",
+  "exports": {
+    ".": {
+      "import": "./dist/vue3-plugin-dev-study.js",
+      "require": "./dist/vue3-plugin-dev-study.umd.cjs",
+      "types": "./dist/index.d.ts"
+    }
+  },
+  "types": "./dist/index.d.ts",
+  "repository": {
+    "type": "git",
+    "url": "git+https://github.com/imo-tikuwa/vue3-plugin-dev-study.git"
+  },
+  "homepage": "https://github.com/imo-tikuwa/vue3-plugin-dev-study"
}
11. npmjsでアクセストークンを作成
※npmjsのアカウント作成は2年以上前に行っており一切の記憶がないので省略しています。。
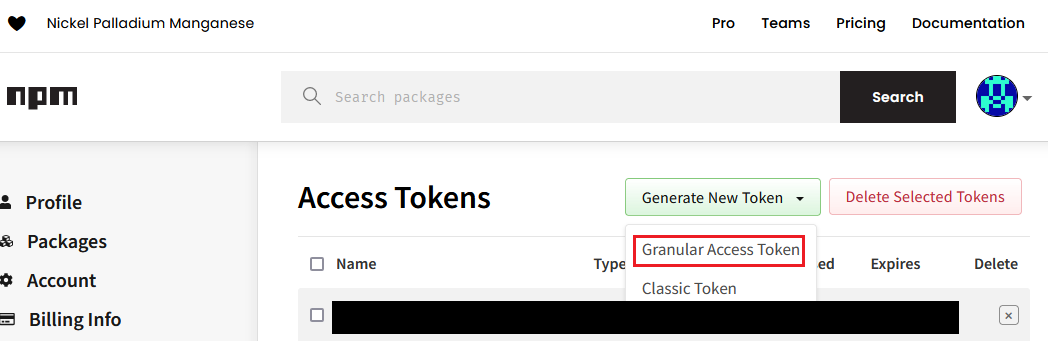
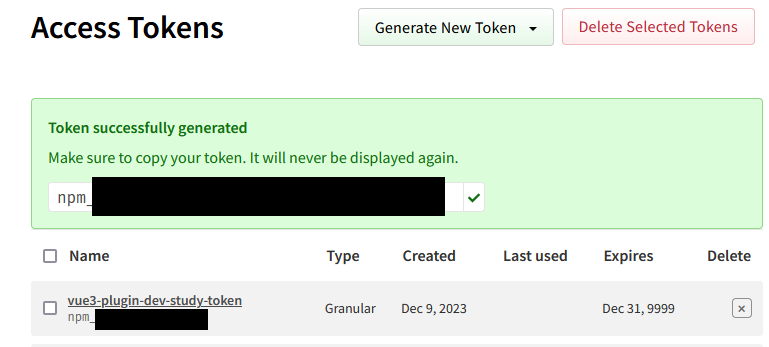
npmjsのサイトでログイン後、Access Tokensのページより「Granular Access Token」をクリック
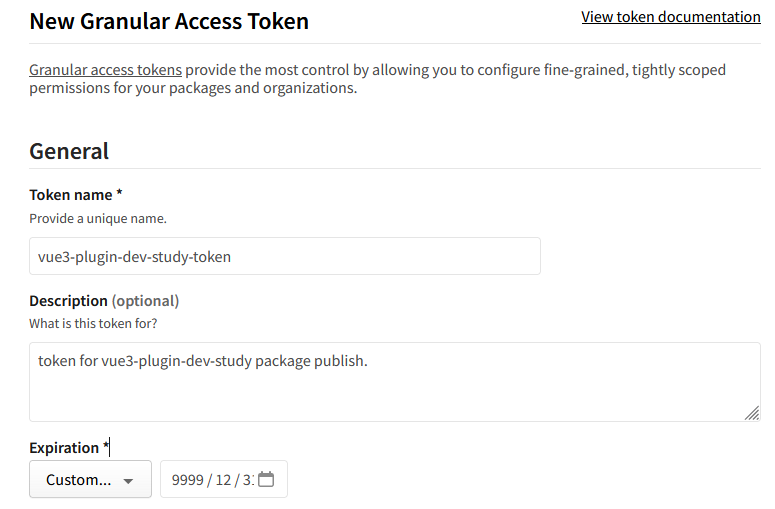
トークン名、説明文、有効期限等、アクセストークンに関する情報を入力
↓
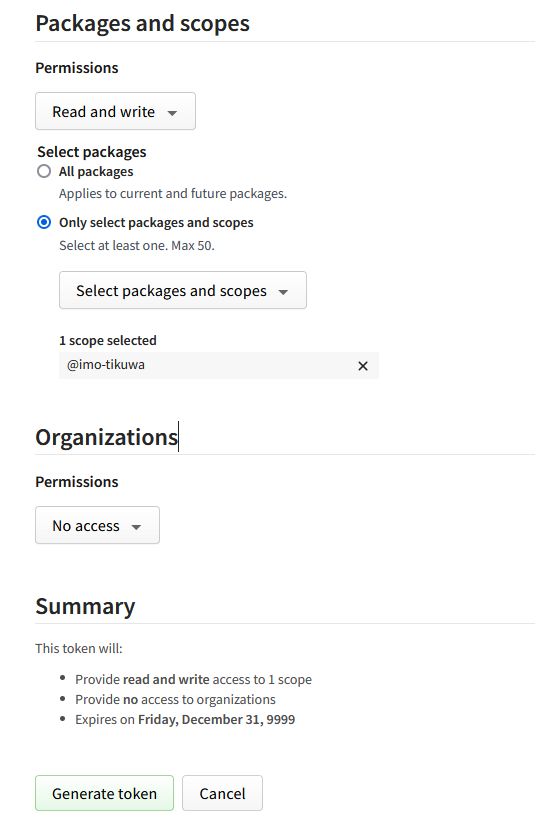
※この記事内のどこか上の方にも書いた通り、勉強中のプラグインを世間に大々的に公開するのは忍びないので自分のアカウント名以下のパッケージ(scoped package)のみを操作可能とするパーミッションの設定を行っています。
作成したアクセストークンを含む.npmrcをプロジェクトのルートに作成
registry=https://registry.npmjs.org/
init-author-name=[GitHubユーザー名]
init-author-url=[GitHubユーザーのURL]
//registry.npmjs.org/:_authToken=[作成したアクセストークン]
.gitignoreに.npmrcの除外設定を追加
~~~省略~~~
.env
+.npmrc
12. npmjsへパッケージを公開
公開はコンテナ内よりnpm publish --access=publicで行えます。
念のため公開前に以下の辺りを確認しておくとよいかと思います。
- distディレクトリに公開したいファイルが存在するか(ビルドが済んでいるか)
- package.jsonのパッケージ公開に関する情報に不備はないか(パッケージ名、バージョン等)
- .npmrcのアクセストークンの設定に不備はないか
node@0d5b94c04953:/vue3-plugin-dev-study$ npm publish --access=public
npm notice
npm notice package: @imo-tikuwa/vue3-plugin-dev-study@0.0.1
npm notice === Tarball Contents ===
npm notice 1.7kB README.md
npm notice 1.5kB dist/components/BaseButton.vue.d.ts
npm notice 167B  dist/index.d.ts
npm notice 87B   dist/plugins/bootstrapButton.d.ts
npm notice 246B  dist/types/index.d.ts
npm notice 1.1kB dist/vue3-plugin-dev-study.js
npm notice 1.1kB dist/vue3-plugin-dev-study.umd.cjs
npm notice 1.6kB package.json
npm notice === Tarball Details ===
npm notice name:          @imo-tikuwa/vue3-plugin-dev-study
npm notice version:       0.0.1
npm notice filename:      imo-tikuwa-vue3-plugin-dev-study-0.0.1.tgz
npm notice package size:  3.4 kB
npm notice unpacked size: 7.6 kB
npm notice shasum:        5189bc8685eda648cdac157a7b5ca6f8a2a9f71e
npm notice integrity:     sha512-RXfefijEgR/X+[...]x2xYdbWDOvdiA==
npm notice total files:   8
npm notice
npm notice Publishing to https://registry.npmjs.org/ with tag latest and public access
+ @imo-tikuwa/vue3-plugin-dev-study@0.0.1
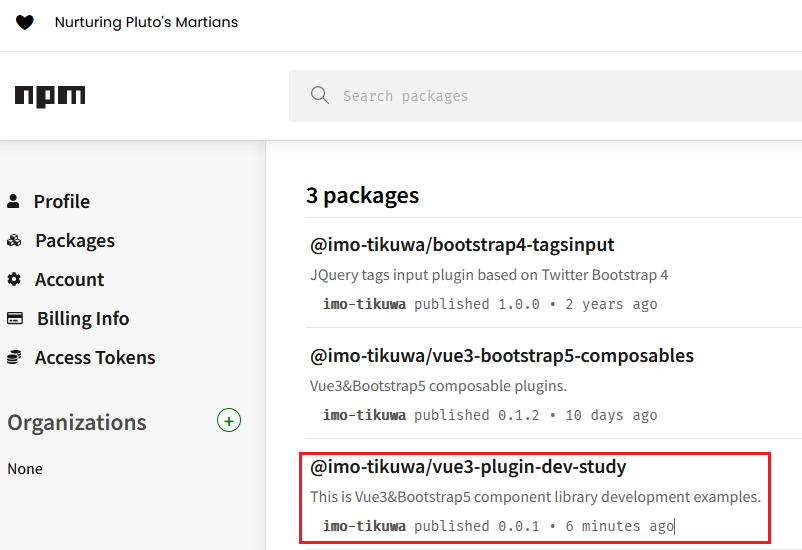
npmjsのサイトに戻り、Packagesのページより自分が公開したパッケージを確認します。
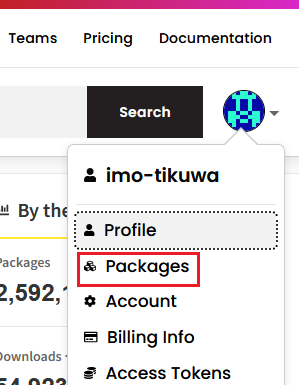
無事公開出来ていました。![]()
今回作成しnpmjsに公開したプラグインはこちら → @imo-tikuwa/vue3-plugin-dev-study
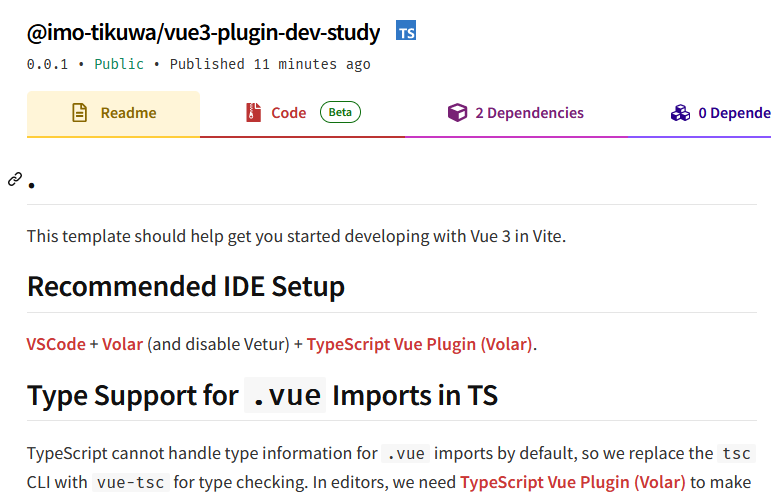
npmjsではリポジトリのルートにあるREADME.mdを読み取ってプラグインのインデックスページとして表示してくれるみたいなので、あとはこのファイルでプラグインのインストール方法、使い方などを記載することでプラグインとしての体裁が整うのではないかと思います(※以下は修正し忘れてVueプロジェクトを作成した頃の情報を公開してしまっているので修正が必要な状態)
ちなみに
今回npm init vue@latestから作成したVueプロジェクトでは標準で@エイリアスを使用したインポートが行えるようになっています。
  resolve: {
    alias: {
      '@': fileURLToPath(new URL('./src', import.meta.url))
    }
  },
{
  "compilerOptions": {
    "paths": {
      "@/*": ["./src/*"]
    }
  }
}
こちら開発を進める際に便利な機能ではあるのですが、ライブラリとして提供する兼ね合いで@エイリアスを使用したインポートでソースの開発を進めてしまうと、バンドル後に解決できなくなってしまいました。。
プラグイン開発では@エイリアスを使用すべきではないのか、あるいはビルド時に解決する方法があるのか、よくわかっていません。。![]()
よくわかってないところ
- tsconfigのいろいろ(分からないことが多すぎて言語化できない。。)
- 開発したプラグインをnpmjsに公開する前に開発環境内でインストールしての確認手順