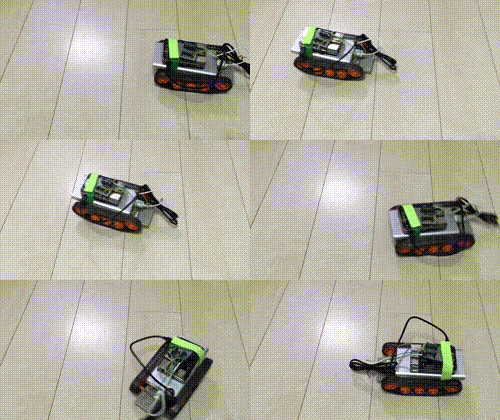
RaspberryPi3で作るラジコン
今更ながらラジコンを作ってみたのでその過程とか
目標とか仕様とか
リモート操作で前進、後退、転回が出来るところまで
転回は左右の動力に別々のDCモーターを使用し正転と逆転をし実現する
なので車体はタンク型
なるべくシンプルに作る
集めたもの
Amazonと秋葉原で集めました
(記録をとってないので大分曖昧です)
Raspberry Pi 3 Model B

 これはただの飾り
Anker PowerLine Micro USB ケーブル【高耐久ケブラー繊維】 急速充電 高速データ転送対応 数千回以上の折り曲げテスト Samsung、Nexus, LG、 Motorola、 Android スマートフォン他対応
 最大2.5Aの電源供給が必要なので百均のだとNG。なので急速充電に対応と書かれたケーブルじゃないとダメ
【Amazon.co.jp限定】Transcend microSDHCカード 32GB Class10
 RaspberryPi3には記憶媒体がないので必須。16GBでもよかった模様
Anker 24W 2ポート USB急速充電器 iPhone 6s, 6s Plus/iPad Pro, Air, mini/iPod touch/Nexus/Xperia/GALAXY 他対応 【PowerIQ & VoltageBoost 折畳式プラグ搭載】
 RaspberryPi3は最大2.5Aの電源を使うので0.1A足りませんが1.0Aでも動きます。USBに色々刺したりフルで使用すると2.5A必要とのこと
(パワーアド)Poweradd Pilot 2GS 10000mAhモバイルバッテリー 大容量 スマホ急速充電器 2USBポート iPhone / iPod / iPad / Xperia / Nexus / Sony 等対応
 1.0A供給をモーターの電源に2.4A供給をRaspberryPi3の電源に
タミヤ 楽しい工作シリーズ No.168 ダブルギヤボックス 左右独立4速タイプ (70168)
 モーターが左右二つ付いているのでこれで転回を実現する
タミヤ 楽しい工作シリーズ No.100 トラック&ホイールセット (70100)
 キャタピラがダルダルですぐ外れるのが難点
タミヤ 楽しい工作シリーズ No.157 ユニバーサルプレート 2枚セット (70157)
 穴が空いた板
モータードライバー TA7291P 2個セット
 DCモーターを正転・逆転・ストップ・ブレーキの 4 モード操作できるらしい
uxcell 炭素皮膜抵抗 カーボン抵抗器 酸金抵抗 250V 10KΩ 1/4W 許容差5% 100個セット
 ショートさせないため
5pcs SY-170 ミニブレッドボード カラフルブレッドボード [並行輸入品]
 はんだが面倒になったらブレッドボードにさして終わりにするつもりだったのでなるべく小さいのを選んだ
Aukru 3本セット ブレッドボード・ジャンパーワイヤー ジャンパー線 / ケーブル オス-オス/ オス-メス/ メス-メス Arduino Raspberry pi 用
 オス-オスとオス-メスが数本あればいい
サンハヤト 小型ユニバーサル基板 ICB-288G
 小さいのでいい
白光 半田ゴテ レッド 40W No.502
 30WでもOK
goot 高密度集積基板用はんだ SD-60
 融点が低温の精密用が使いやすい
タミヤ クラフトツールシリーズ No.104 ベーシックヤスリセット (細目 ダブルカット) 74104
 車体のバリ取りに使った
RaspberryPi3のセットアップ
ググったら解決するので割愛
Xwindowsを使いたかったのでRASPBIAN JESSIE WITH PIXELをインストールした
- DLするのにすごい時間かかったぞめんどくさい
- DLしたらshasumは必ずやる
ブレッドボードにさしてテスト
配線図はこんな感じ
 実際の写真
実際の写真

モータードライバーの説明
販売元ページをみればいいけど少しだけ抜粋


簡単に説明をするとIN1(ピン番号5)に電圧を掛けるとCW(正転)/CCW(逆転)になり、IN2(ピン番号6)に電圧を掛けるとCCW(逆転)/CW(正転)になるらしい
また、IN1とIN2に電圧を掛けるとブレーキになるらしい
なのでRaspberryPi3側に刺した4、17と9、11から電圧を掛けるよう命令してあげたら、それぞれのOUT1と2に接続したモーターがなんらかのアクションをしてくれるそうだ
ふむふむ
で、テストしたらさっくり動いた
$ echo 4 > /sys/class/gpio/export
$ echo 17 > /sys/class/gpio/export
$ echo 9 > /sys/class/gpio/export
$ echo 11 > /sys/class/gpio/export

$ echo out > /sys/class/gpio/gpio4/direction
$ echo out > /sys/class/gpio/gpio17/direction
$ echo out > /sys/class/gpio/gpio9/direction
$ echo out > /sys/class/gpio/gpio11/direction

# 右後退
$ echo 1 > /sys/class/gpio/gpio4/value
$ echo 0 > /sys/class/gpio/gpio4/value

# 右前進
$ echo 1 > /sys/class/gpio/gpio17/value
$ echo 0 > /sys/class/gpio/gpio17/value

# 左前進
$ echo 1 > /sys/class/gpio/gpio9/value
$ echo 0 > /sys/class/gpio/gpio9/value

# 右後退
$ echo 1 > /sys/class/gpio/gpio11/value
$ echo 0 > /sys/class/gpio/gpio11/value

$ echo 4 > /sys/class/gpio/unexport
$ echo 17 > /sys/class/gpio/unexport
$ echo 9 > /sys/class/gpio/unexport
$ echo 11 > /sys/class/gpio/unexport
Webブラウザから動くようにする
-
webiopiのインストール
- パッチを当てないとRaspberryPi3で動かないのでありがたくパッチを使わせていただく
- Webページの用意
<script src="/webiopi.js"></script>
<script>
function init() {
}
function stop() {
    webiopi().callMacro("stop");
}
function forward() {
    webiopi().callMacro("forward");
}
function reverse() {
    webiopi().callMacro("reverse");
}
function turnLeft() {
    webiopi().callMacro("turnLeft");
}
function turnRight() {
    webiopi().callMacro("turnRight");
}
webiopi().ready(init);
</script>

<script src="https://use.fontawesome.com/6497e53239.js"></script>
<p>
    <i class="fa fa-fw fa-5x" aria-hidden="true"></i>
    <i class="fa fa-arrow-circle-o-up fa-fw fa-5x" aria-hidden="true" onmousedown="forward()"></i>
    <i class="fa fa-fw fa-5x" aria-hidden="true"></i>
</p>
<p>
    <i class="fa fa-arrow-circle-o-left fa-fw fa-5x" aria-hidden="true" onmousedown="turnLeft()"></i>
    <i class="fa fa-stop-circle-o fa-fw fa-5x" aria-hidden="true" onmousedown="stop()"></i>
    <i class="fa fa-arrow-circle-o-right fa-fw fa-5x" aria-hidden="true" onmousedown="turnRight()"></i>
</p>
<p>
    <i class="fa fa-fw fa-5x" aria-hidden="true"></i>
    <i class="fa fa-arrow-circle-o-down fa-fw fa-5x" aria-hidden="true" onmousedown="reverse()"></i>
    <i class="fa fa-fw fa-5x" aria-hidden="true"></i>
</p>
Webページ側のリクエストをpythonで処理
import webiopi
GPIO = webiopi.GPIO

leftMotorDrivePWM1 = 4
leftMotorDrivePWM2 = 17
rightMotorDrivePWM1 = 11
rightMotorDrivePWM2 = 9

def setup():
    webiopi.debug("setup")

    GPIO.setFunction(leftMotorDrivePWM1, GPIO.PWM)
    GPIO.setFunction(leftMotorDrivePWM2, GPIO.PWM)
    GPIO.setFunction(rightMotorDrivePWM1, GPIO.PWM)
    GPIO.setFunction(rightMotorDrivePWM2, GPIO.PWM)

@webiopi.macro
def forward():
    webiopi.debug("forward")

    GPIO.pwmWrite(leftMotorDrivePWM1, GPIO.LOW)
    GPIO.pwmWrite(leftMotorDrivePWM2, GPIO.HIGH)
    GPIO.pwmWrite(rightMotorDrivePWM1, GPIO.LOW)
    GPIO.pwmWrite(rightMotorDrivePWM2, GPIO.HIGH)

@webiopi.macro
def reverse():
    webiopi.debug("reverse")

    GPIO.pwmWrite(leftMotorDrivePWM1, GPIO.HIGH)
    GPIO.pwmWrite(leftMotorDrivePWM2, GPIO.LOW)
    GPIO.pwmWrite(rightMotorDrivePWM1, GPIO.HIGH)
    GPIO.pwmWrite(rightMotorDrivePWM2, GPIO.LOW)

@webiopi.macro
def turnLeft():
    webiopi.debug("turnLeft")

    GPIO.pwmWrite(leftMotorDrivePWM1, GPIO.LOW)
    GPIO.pwmWrite(leftMotorDrivePWM2, GPIO.HIGH)
    GPIO.pwmWrite(rightMotorDrivePWM1, GPIO.HIGH)
    GPIO.pwmWrite(rightMotorDrivePWM2, GPIO.LOW)

@webiopi.macro
def turnRight():
    webiopi.debug("turnRight")

    GPIO.pwmWrite(leftMotorDrivePWM1, GPIO.HIGH)
    GPIO.pwmWrite(leftMotorDrivePWM2, GPIO.LOW)
    GPIO.pwmWrite(rightMotorDrivePWM1, GPIO.LOW)
    GPIO.pwmWrite(rightMotorDrivePWM2, GPIO.HIGH)

@webiopi.macro
def stop():
    webiopi.debug("stop")

    GPIO.pwmWrite(leftMotorDrivePWM1, GPIO.LOW)
    GPIO.pwmWrite(leftMotorDrivePWM2, GPIO.LOW)
    GPIO.pwmWrite(rightMotorDrivePWM1, GPIO.LOW)
    GPIO.pwmWrite(rightMotorDrivePWM2, GPIO.LOW)
動いているところ
感想
動かすまでがすごく大変
これに何時間使ったんだろう。。。
困ったこと
WiMAXのせいなのかSSH接続が遅かったり反応が悪かったりするイライラする- MACのキーボードの配列を正しく認識してくれなかったのでvimとかで開くとescボタンがどこ?状態で閉じれなかった
WebIOPiを立ち上げるとCPU使用率が異常に高くなるなんだこれ- モーターに負荷がかかるとRaspberryPi3の電源が落ちる(電源は別にした方がいい)
次回は
PS4のコントローラーで操作できるようにしたいと思ってます
