作品名: エモーテクション
この作品は、顔検出したらエフェクトと感情を表示してくれます。
今回は、Meta社が提案したDeepFaceを使用して顔分析と感情分析を行い、
さらにメディアアートに落とし込みます。
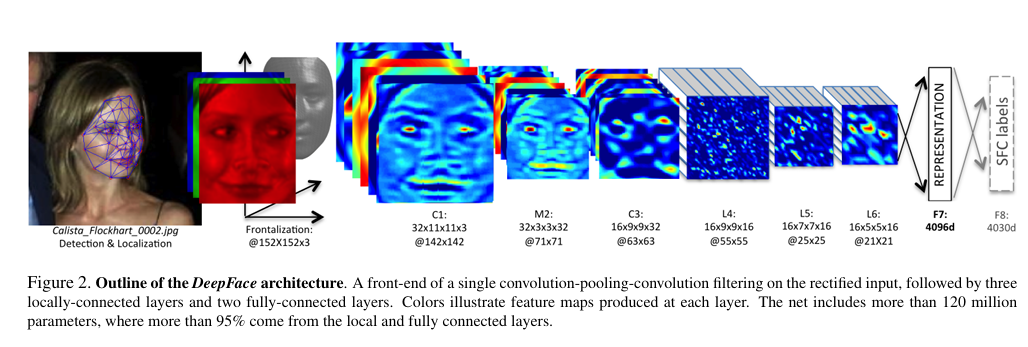
DeepFace
DeepFaceは、Meta社が2014年提案した8層からなるCNNモデルです。
具体的には、学習データとして400万枚の画像を使い、顔の向きを統一することや顔の類似度の算出などを行いました。
プログラム
ディレクトリ構成
Mediaart
├emojis
│└angry.png
│└disgust.png
│└fear.png
│└happy.png
│└neutral.png
│└sad.png
│└surprise.png
├emoji_venv→自身が作ったvenv環境
├main.py→メインプログラム
└particles.py→パーティクル表示のためのプログラム
必要ライブラリ
- Deepface: 感情分析で使用
- OpenCV: 顔認識とカメラ処理で使用
- random: パーティクル発生で使用
まず、必要なライブラリをインストールします。
pip install opencv-python
pip install deepface
次、各ライブラリのインポート、顔認識と感情分析の準備をします。
また感情分析を行うにあたり、OpenCVのカメラキャプチャと感情分析で必要なパーティクルの色と画像ファイルを辞書に格納、顔検出のためにOpenCVのHaarcascadeという分類器を用意します。
さらに顔とパーティクル、感情の初期設定として、顔を画面の中央に寄せてパーティクルと感情の初期化を行います。
from deepface import DeepFace
import cv2
import particles #パーティクル表示のために使用※別途Pythonプログラムを準備
import random


# ウェブカメラのキャプチャを開始
cap = cv2.VideoCapture(0)

# 感情に対応する絵文字(ファイル名を指定)
emoji_paths = {
    "angry": "emojis/angry.png",
    "disgust": "emojis/disgust.png",
    "fear": "emojis/fear.png",
    "happy": "emojis/happy.png",
    "neutral": "emojis/neutral.png",
    "sad": "emojis/sad.png",
    "surprise": "emojis/surprise.png"
}

#感情に対応する色
emoji_colors = {
    "angry": (0, 0, 255),
    "disgust": (255, 255, 255),
    "fear": (255, 255, 0),
    "happy": (0, 255, 255),
    "neutral": (0, 255, 0),
    "sad": (255, 0, 0),
    "surprise": (255, 0, 255)
}

# 顔検出用の Haarcascade
face_cascade = cv2.CascadeClassifier(cv2.data.haarcascades + "haarcascade_frontalface_default.xml")

particles_list = []
# 初期状態
previous_emotion = "neutral"
alpha = 1.0  # 透明度 (1.0 = 完全に表示, 0.0 = 消えている)
transition_speed = 0.05  # フェードイン・フェードアウトの速度

#顔の初期位置と感情分析が不可能になった時に使用
posx = 100
posy = 100
faceposx = 0
faceposy = 0
facewidth = 0
faceheight = 0
emoji_new = None
emoji_old = None
Haarcascadeは以下を参照しました。
https://github.com/opencv/opencv/tree/master/data/haarcascades
また、Particleクラスは以下のように作成しました。
- 消滅までの時間とパーティクルの位置・速度を設定
- 描画時はパーティクルの位置は速度に応じて変化して、消滅時間になったら非表示
import random
import time

class Particle:
    def __init__(self, x, y, color, lifetime=1.5):
        self.x = x
        self.y = y
        self.vx = random.uniform(-100, 100)  # X方向の速度
        self.vy = random.uniform(-100, 100)  # Y方向の速度
        self.color = color
        self.lifetime = lifetime  # 消滅までの時間
        self.start_time = time.time()
    def update(self):
        self.x += self.vx
        self.y += self.vy
        return (time.time() - self.start_time) < self.lifetime  # 生存チェック
最後、カメラによる描画を行います。
以下のアルゴリズムでアートを作ります。
- フレームを切り出す
- フレームから顔検出と感情分析を行う
- 感情分析の結果からパーティクルを複数出現
- 感情が変わったらパーティクルの色を変更
- 顔の位置と感情を更新する※2つのフレーム間の感情を分け、emoji_newとemoji_oldに分ける
- さらに顔の位置に基づいて絵文字を表示し、さらにalphaで2つの感情のバランスを取る
- 上記の動作をカメラキャプチャ終了まで繰り返す
# キャプチャがオープンしている間続ける
while cap.isOpened():
    #1.フレームを切り出す
    ret, frame = cap.read()
    if not ret:
        break

    #2. フレームから顔検出と感情分析を行う
    # 顔検出
    gray = cv2.cvtColor(frame, cv2.COLOR_BGR2GRAY)
    faces = face_cascade.detectMultiScale(gray, 1.3, 5)

    try:
        #感情分析を行う
        result = DeepFace.analyze(frame, actions=['emotion'], enforce_detection=False)
        emotion = result[0]['dominant_emotion']
        print("Detected Emotion:", emotion)
        before_emotion = emotion
    except:
        emotion = previous_emotion
        print("No face detected")

    #3. 感情分析の結果からパーティクルを複数出現
    # 感情が変わったときにパーティクルを生成
    #4. 感情が変わったらパーティクルの色を変更
    if previous_emotion and previous_emotion != emotion:
        for _ in range(50):  # 50個のパーティクルを生成
            particles_list.append(
                particles.Particle(
                    random.randint(posx-200, posx + 200), random.randint(posy-200, posy + 200), emoji_colors[emotion]
                )
            )
    #5. 顔の位置と感情を更新する
    previous_emotion = emotion  # 現在の感情を保存→感情が変わった時に使用
    for (x, y, w, h) in faces:
        if emotion in emoji_paths:
            emoji_new = cv2.imread(emoji_paths[emotion], cv2.IMREAD_UNCHANGED)
            emoji_old = cv2.imread(emoji_paths[previous_emotion], cv2.IMREAD_UNCHANGED)
            posx,posy = x+w//2,y+h//2
            faceposx, faceposy, facewidth, faceheight = x, y, w, h

    #6. さらに顔の位置に基づいて絵文字を表示 ※ただし
    if emoji_new is not None and emoji_old is not None:
        emoji_new = cv2.resize(emoji_new, (facewidth, faceheight))
        emoji_old = cv2.resize(emoji_old, (facewidth, faceheight))

        # フェードアニメーション (alphaを少しずつ増加)
        alpha = min(alpha + transition_speed, 1.0)

        if emoji_new.shape[2] == 4 and emoji_old.shape[2] == 4:
            # 透過処理(フェードアニメーション)
            # alphaで2つの感情のバランスを取る
            alpha_mask_new = emoji_new[:, :, 3] / 255.0 * alpha
            alpha_mask_old = emoji_old[:, :, 3] / 255.0 * (1 - alpha)

            for c in range(0, 3):
                frame[faceposy:faceposy+faceheight, faceposx:faceposx+facewidth, c] = (
                    (1 - alpha_mask_new) * frame[faceposy:faceposy+faceheight, faceposx:faceposx+facewidth, c] +
                    alpha_mask_new * emoji_new[:, :, c] +
                    alpha_mask_old * emoji_old[:, :, c]
                )
        else:
            frame[faceposy:faceposy+faceheight, faceposx:faceposx+facewidth] = cv2.addWeighted(emoji_old, 1 - alpha, emoji_new, alpha, 0)


        # 顔を枠で囲む
        #cv2.rectangle(frame, (x, y), (x + w, y + h), (255, 0, 0), 2)
    # パーティクルの描画と更新
    new_particles = []
    for particle in particles_list:
        if particle.update():
            cv2.circle(frame, (int(particle.x), int(particle.y)), 5, particle.color, -1)
            new_particles.append(particle)

    particles_list = new_particles  # 残ったパーティクルのみ更新


    cv2.imshow("Emotion Detector", frame)
    #7. 上記の動作をカメラキャプチャ終了まで繰り返す
    if cv2.waitKey(1) & 0xFF == ord('q'):
        break

cap.release()
cv2.destroyAllWindows()
そうすると、下記の画像の通り絵文字とパーティクルを表示させました!

まとめ
今回はいつも使っているProcessingと異なり、Pythonで開発を試しました。まだまだ感情分析の精度など至らないこともあったが、最終的には自作モデルでアートに落とし込むことを目標としています。
さらに、ディープラーニングを組み合わせることによって画期的なアート作成も可能です。