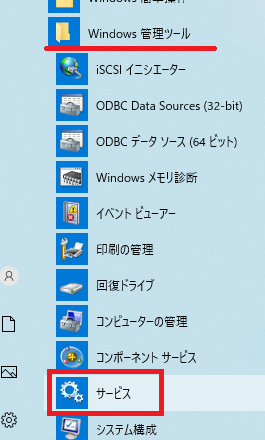
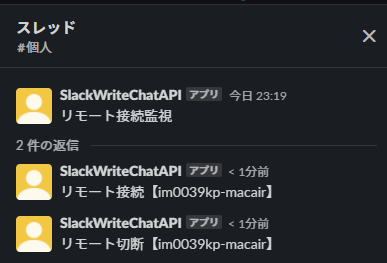
概要
WindowsPCにリモートディスクトップ接続した場合に、接続者がいるとキックしてしまうのでSlackに通知して誰が接続しているのかを投稿して管理するとわかりやすいのではないかと思い作成してみました。
Windowsサービス作成自体は チュートリアル: Windows サービス アプリを作成する と同じ手順で行っています。
開発環境
Visual Studio 2019
.Net Framework 4.7.2
Windowsサービスプロジェクトを作成する
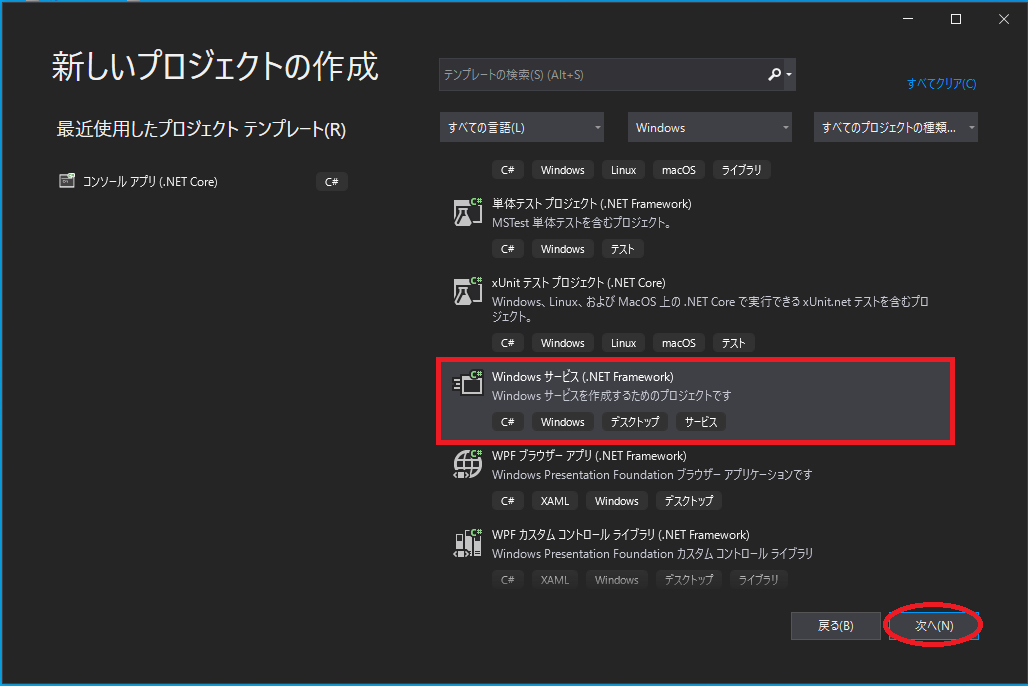
・Visual Studio 2019を起動して新しいプロジェクトの作成からWindows サービス(.NET Framwork)を選択
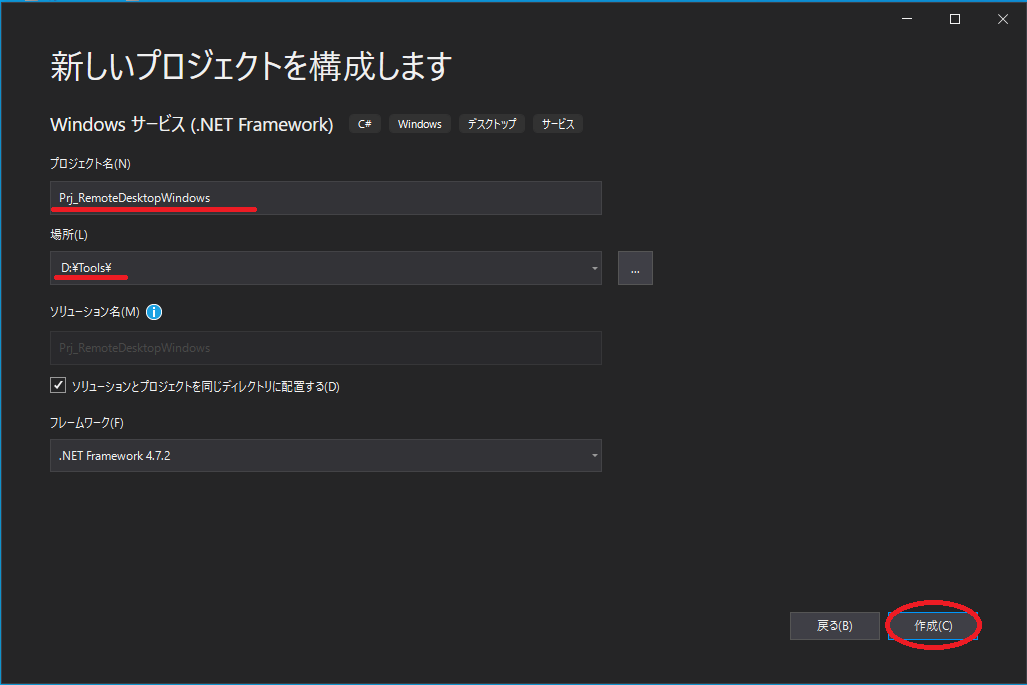
・プロジェクト名と保存先を指定して作成
| 項目 | 内容 |
|---|---|
| プロジェクト名 | 好きな名前 |
| 場所 | 好きな保存先にしましょう |
サービス名の変更
テンプレートのファイル名を変更
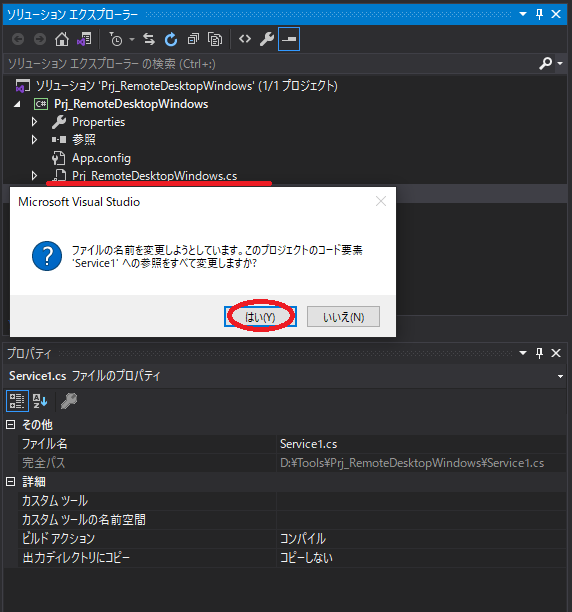
・作成するとService1.csのファイルがあるので名前を変更しましょう。
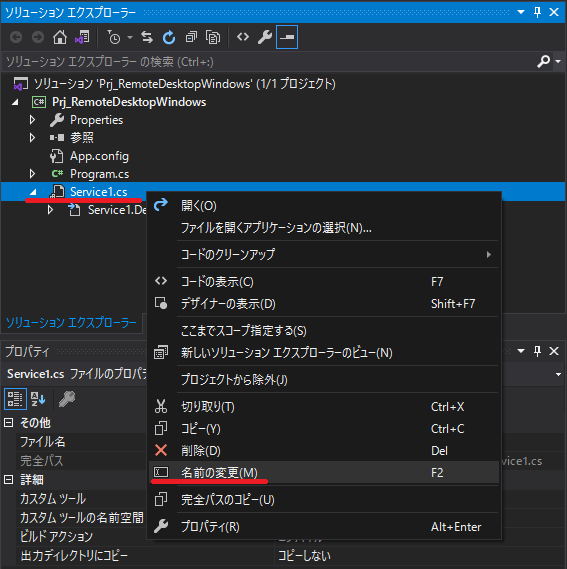
・エラーが出ない限り好きな名前でよいです今回はPrj_RemoteDesktopWindowsにしています。
・名前を変更すると参照をすべて変更しますかと出るのではいを選択します。
デザインのServiceNameを変更
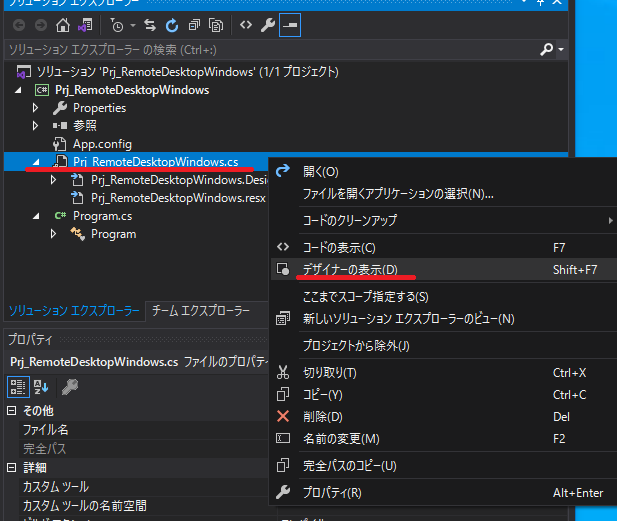
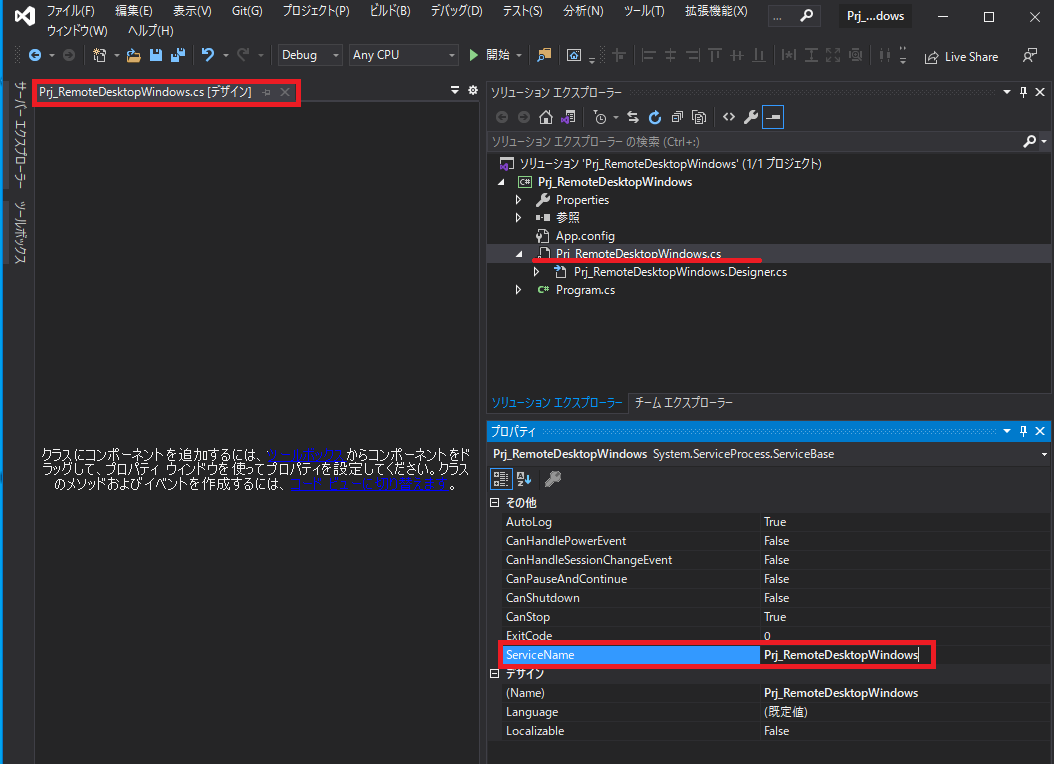
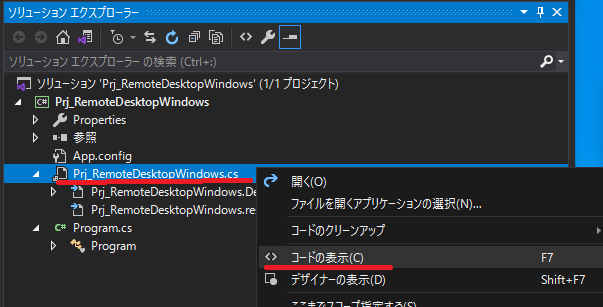
・先ほど変更したPrj_RemoteDesktopWindows.csファイルを右クリックしてデザイナーの表示を選択
・プロパティのServiceNameをPrj_RemoteDesktopWindowsに変更します。
サービス保留の状態を実装する
・チュートリアル: Windows サービス アプリを作成するの通りにサービス保留の状態を実装しておきます。
・Prj_RemoteDesktopWindows.csのコードを開いて
サービス保留の状態を実装コード.cs
using System;
using System.Collections.Generic;
using System.ComponentModel;
using System.Data;
using System.Diagnostics;
using System.Linq;
using System.ServiceProcess;
using System.Text;
using System.Threading.Tasks;
using System.Runtime.InteropServices;

namespace Prj_RemoteDesktopWindows
{
    public partial class Prj_RemoteDesktopWindows : ServiceBase
    {
        public Prj_RemoteDesktopWindows()
        {
            InitializeComponent();
        }

        protected override void OnStart(string[] args)
        {
            // Update the service state to Start Pending.
            ServiceStatus serviceStatus = new ServiceStatus();
            serviceStatus.dwCurrentState = ServiceState.SERVICE_START_PENDING;
            serviceStatus.dwWaitHint = 100000;
            SetServiceStatus(this.ServiceHandle, ref serviceStatus);

            // Update the service state to Running.
            serviceStatus.dwCurrentState = ServiceState.SERVICE_RUNNING;
            SetServiceStatus(this.ServiceHandle, ref serviceStatus);

        }

        protected override void OnStop()
        {
        }

        public enum ServiceState
        {
            SERVICE_STOPPED = 0x00000001,
            SERVICE_START_PENDING = 0x00000002,
            SERVICE_STOP_PENDING = 0x00000003,
            SERVICE_RUNNING = 0x00000004,
            SERVICE_CONTINUE_PENDING = 0x00000005,
            SERVICE_PAUSE_PENDING = 0x00000006,
            SERVICE_PAUSED = 0x00000007,
        }

        [StructLayout(LayoutKind.Sequential)]
        public struct ServiceStatus
        {
            public int dwServiceType;
            public ServiceState dwCurrentState;
            public int dwControlsAccepted;
            public int dwWin32ExitCode;
            public int dwServiceSpecificExitCode;
            public int dwCheckPoint;
            public int dwWaitHint;
        };

        [DllImport("advapi32.dll", SetLastError = true)]
        private static extern bool SetServiceStatus(System.IntPtr handle, ref ServiceStatus serviceStatus);


    }
}
セクションが変更したときに取得する(リモート接続を検知する)
・ここからチュートリアルと少し違ってきます。
・ServiceBase.OnSessionChange(SessionChangeDescription) メソッド
・OnSessionChangeの注釈を見るとそのままでは動かないのでCanHandleSessionChangeEventを有効にします。
・ServiceBase.CanHandleSessionChangeEvent プロパティ
リモート接続を検知実装コード.cs
using System;
using System.Collections.Generic;
using System.ComponentModel;
using System.Data;
using System.Diagnostics;
using System.Linq;
using System.ServiceProcess;
using System.Text;
using System.Threading.Tasks;
using System.Runtime.InteropServices;

namespace Prj_RemoteDesktopWindows
{
    public partial class Prj_RemoteDesktopWindows : ServiceBase
    {
        public Prj_RemoteDesktopWindows()
        {
            InitializeComponent();
            // OnSessionChange関数をの実行を有効にするため、CanHandleSessionChangeEventをtrueに
            CanHandleSessionChangeEvent = true;
        }

        protected override void OnStart(string[] args)
        {
            // Update the service state to Start Pending.
            ServiceStatus serviceStatus = new ServiceStatus();
            serviceStatus.dwCurrentState = ServiceState.SERVICE_START_PENDING;
            serviceStatus.dwWaitHint = 100000;
            SetServiceStatus(this.ServiceHandle, ref serviceStatus);

            // Update the service state to Running.
            serviceStatus.dwCurrentState = ServiceState.SERVICE_RUNNING;
            SetServiceStatus(this.ServiceHandle, ref serviceStatus);

        }

        protected override void OnStop()
        {
        }

        public enum ServiceState
        {
            SERVICE_STOPPED = 0x00000001,
            SERVICE_START_PENDING = 0x00000002,
            SERVICE_STOP_PENDING = 0x00000003,
            SERVICE_RUNNING = 0x00000004,
            SERVICE_CONTINUE_PENDING = 0x00000005,
            SERVICE_PAUSE_PENDING = 0x00000006,
            SERVICE_PAUSED = 0x00000007,
        }

        [StructLayout(LayoutKind.Sequential)]
        public struct ServiceStatus
        {
            public int dwServiceType;
            public ServiceState dwCurrentState;
            public int dwControlsAccepted;
            public int dwWin32ExitCode;
            public int dwServiceSpecificExitCode;
            public int dwCheckPoint;
            public int dwWaitHint;
        };

        [DllImport("advapi32.dll", SetLastError = true)]
        private static extern bool SetServiceStatus(System.IntPtr handle, ref ServiceStatus serviceStatus);

        /// <summary>
        /// 変更イベントがターミナル サーバー セッションから受信された場合に実行します。
        /// </summary>
        /// <param name="changeDescription"></param>
        protected override void OnSessionChange(SessionChangeDescription changeDescription)
        {
            switch (changeDescription.Reason)
            {
                case SessionChangeReason.ConsoleConnect:
                    break;
                case SessionChangeReason.ConsoleDisconnect:
                    break;
                case SessionChangeReason.RemoteConnect:
                    break;
                case SessionChangeReason.RemoteDisconnect:
                    break;
                case SessionChangeReason.SessionLogon:
                    break;
                case SessionChangeReason.SessionLogoff:
                    break;
                case SessionChangeReason.SessionLock:
                    break;
                case SessionChangeReason.SessionUnlock:
                    break;
                case SessionChangeReason.SessionRemoteControl:
                    break;
                default:
                    break;
            }
        }
    }
}
サービスにインストーラーを追加する
インストーラーを追加
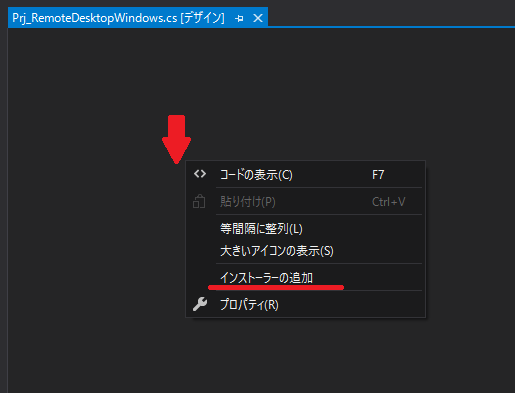
・まずはデザイナーを表示します。(Prj_RemoteDesktopWindows.csファイルを右クリックしてデザイナーの表示を選択)
・バックグランドを右クリックしてインストーラーの追加を選択
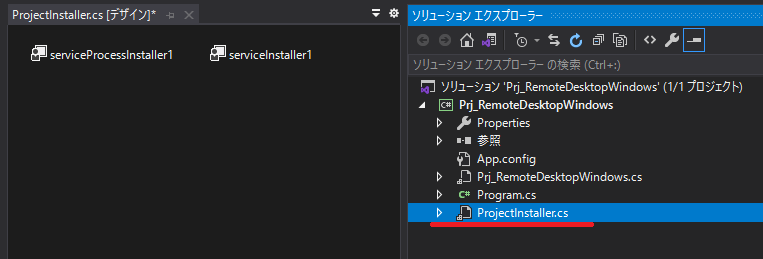
・ProjectInstallerコンポーネントクラスが生成されます。
serviceInstaller1のプロパティ設定
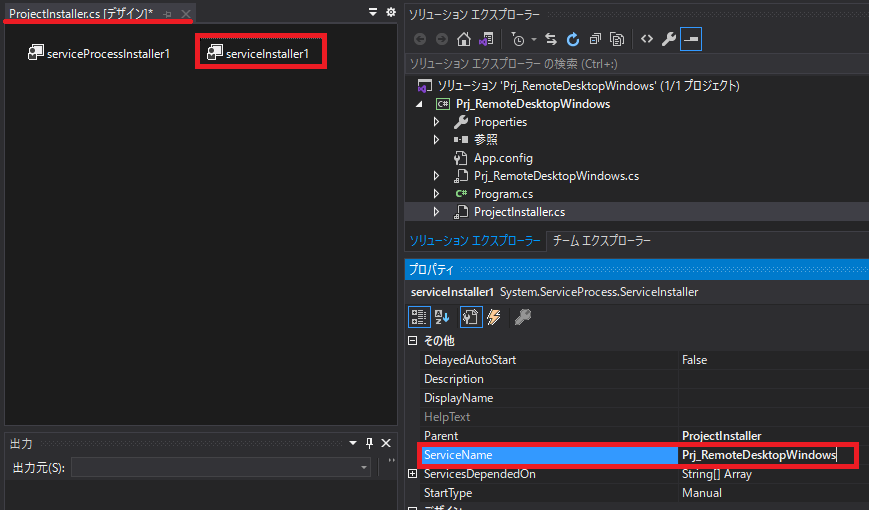
・デザインビューのserviceInstaller1を選択、プロパティのServiceNameがPrj_RemoteDesktopWindowsになっていることを確認しましょう。
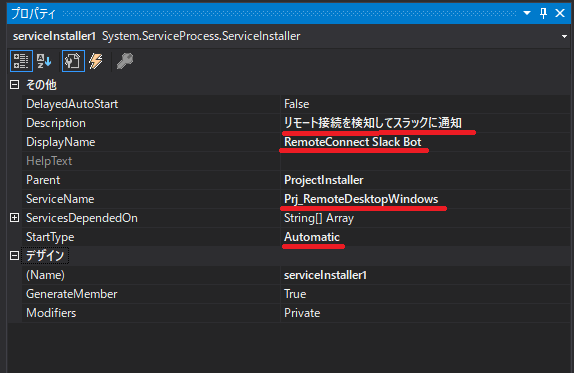
・StartTypeやサービス一覧に表示されるサービス名や説明を追記します。
| 項目 | 内容 |
|---|---|
| Description | 説明 |
| DisplayName | サービス名 |
| StartType | Automatic |
最終的なserviceInstaller1のプロパティウィンドウ
serviceProcessInstaller1のプロパティ設定
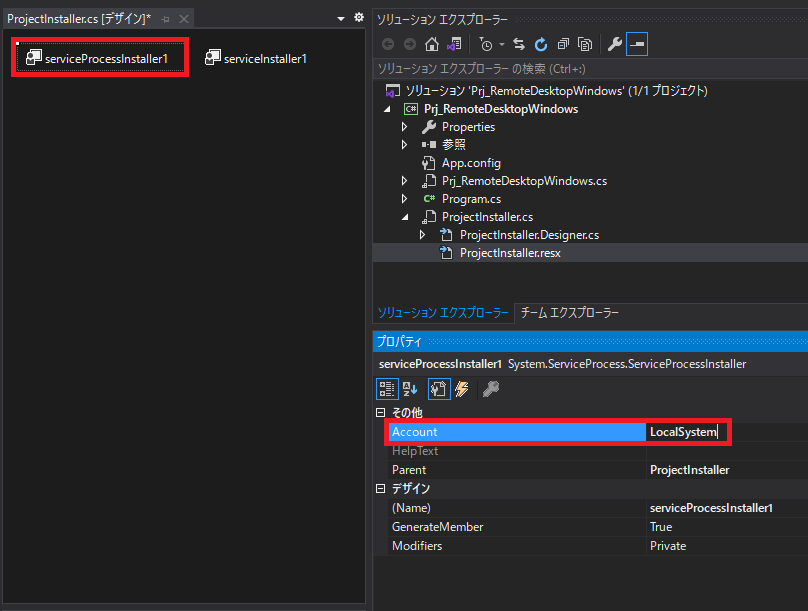
・ローカルシステムアカウントを使用してサービスがインストール、実行するようにするため、デザインビューのserviceProcessInstaller1を選択してプロパティのUserをLocalSystemにします。
| 項目 | 内容 |
|---|---|
| User | LocalSystem |
リモート接続したときにSlackに投稿する
作成したプロジェクトでインストールできるように修正してSlackに投稿できるようにします。
Slackに投稿するは【c#】Slackに投稿してスレッドに返信できるようにする。を参考にして下さい。
今回はSlackSendMessage.csで追加しました。
using System.Collections.Specialized;
using System.Net;
using System.Text;
using System.Text.Json;

namespace Prj_RemoteDesktopWindows
{
    class SlackSendMessage
    {
        private static WebClient s_webClient = new WebClient();
        public static Rootobject SendMessage(string text, string thread_ts = "")
        {
            var data = new NameValueCollection();
            data["token"] = "xoxb-";
            data["channel"] = "#個人";
            data["text"] = text;
            data["thread_ts"] = thread_ts;
            var response = s_webClient.UploadValues("https://slack.com/api/chat.postMessage", "POST", data);
            string responseInString = Encoding.UTF8.GetString(response);
            return JsonSerializer.Deserialize<Rootobject>(responseInString);
        }
    }


    public class Rootobject
    {
        public bool ok { get; set; }
        public string channel { get; set; }
        public string ts { get; set; }
        public Message message { get; set; }
    }

    public class Message
    {
        public string bot_id { get; set; }
        public string type { get; set; }
        public string text { get; set; }
        public string user { get; set; }
        public string ts { get; set; }
        public string team { get; set; }
        public Bot_Profile bot_profile { get; set; }
    }

    public class Bot_Profile
    {
        public string id { get; set; }
        public bool deleted { get; set; }
        public string name { get; set; }
        public int updated { get; set; }
        public string app_id { get; set; }
        public Icons icons { get; set; }
        public string team_id { get; set; }
    }

    public class Icons
    {
        public string image_36 { get; set; }
        public string image_48 { get; set; }
        public string image_72 { get; set; }
    }
}
JsonSerializerが見つからない。
・下記のコマンドを実行してインストールしましょう。
PM> Install-Package System.Text.Json
リモート元の接続情報を取得する
System.Environment.GetEnvironmentVariable("CLIENTNAME");
こちらで取得できるという記事がありましたが管理者権限で実行しているアプリケーションではうまく取れなかったので
Windows Terminal Services API.にアクセスできるライブラリCassiaこちらを使わせていただきます。
NuGetコンソールで
Install-Package Cassia -Version 2.0.0.60
SessionManagerクラスを追加して名前を取得できるようにしました。
using Cassia;
using System;
using System.Text;

namespace Prj_RemoteDesktopWindows
{
    class SessionManager
    {
        private static ITerminalServicesManager s_TerminalServicesManager = new TerminalServicesManager();

        public static bool IsClientName(int sessionId, out string clientName)
        {
            using (ITerminalServer ts = s_TerminalServicesManager.GetLocalServer())
            {
                ts.Open();
                StringBuilder sb = new StringBuilder();
                sb.AppendLine($"{sessionId}");
                foreach (ITerminalServicesSession session in ts.GetSessions())
                {
                    if (sessionId == session.SessionId && session.ConnectionState == ConnectionState.Active)
                    {
                        clientName = session.ClientName;
                        return true;
                    }
                }
            }
            clientName = String.Empty;
            return false;
        }
    }
}
最終的なPrj_RemoteDesktopWindows.csのコード
・OnStart()時にSlackに通知してスレッド投稿するためにtsを保持
・RemoteDisconnectのタイミングではclientNameが空白になっているのでstringで保持
・なんとなくtry-catch
using System;
using System.Runtime.InteropServices;
using System.ServiceProcess;

namespace Prj_RemoteDesktopWindows
{
    public partial class Prj_RemoteDesktopWindows : ServiceBase
    {
        private string m_ts;
        private string m_tempClientName;

        public Prj_RemoteDesktopWindows()
        {
            InitializeComponent();
            // OnSessionChange関数をの実行を有効にするため、CanHandleSessionChangeEventをtrueに
            CanHandleSessionChangeEvent = true;
        }

        protected override void OnStart(string[] args)
        {
            // Update the service state to Start Pending.
            ServiceStatus serviceStatus = new ServiceStatus();
            serviceStatus.dwCurrentState = ServiceState.SERVICE_START_PENDING;
            serviceStatus.dwWaitHint = 100000;
            SetServiceStatus(this.ServiceHandle, ref serviceStatus);

            // Update the service state to Running.
            serviceStatus.dwCurrentState = ServiceState.SERVICE_RUNNING;
            SetServiceStatus(this.ServiceHandle, ref serviceStatus);

            // スラックに投稿
            Rootobject rootobject = SlackSendMessage.SendMessage("リモート接続監視");
            m_ts = rootobject.message.ts;
        }

        protected override void OnStop()
        {
        }

        public enum ServiceState
        {
            SERVICE_STOPPED = 0x00000001,
            SERVICE_START_PENDING = 0x00000002,
            SERVICE_STOP_PENDING = 0x00000003,
            SERVICE_RUNNING = 0x00000004,
            SERVICE_CONTINUE_PENDING = 0x00000005,
            SERVICE_PAUSE_PENDING = 0x00000006,
            SERVICE_PAUSED = 0x00000007,
        }

        [StructLayout(LayoutKind.Sequential)]
        public struct ServiceStatus
        {
            public int dwServiceType;
            public ServiceState dwCurrentState;
            public int dwControlsAccepted;
            public int dwWin32ExitCode;
            public int dwServiceSpecificExitCode;
            public int dwCheckPoint;
            public int dwWaitHint;
        };

        [DllImport("advapi32.dll", SetLastError = true)]
        private static extern bool SetServiceStatus(System.IntPtr handle, ref ServiceStatus serviceStatus);

        /// <summary>
        /// 変更イベントがターミナル サーバー セッションから受信された場合に実行します。
        /// </summary>
        /// <param name="changeDescription"></param>
        protected override void OnSessionChange(SessionChangeDescription changeDescription)
        {

            try
            {
                SessionChangeReason sessionChangeReason = changeDescription.Reason;
                SessionManager.IsClientName(changeDescription.SessionId, out string clientName);
                switch (sessionChangeReason)
                {
                    case SessionChangeReason.ConsoleConnect:
                        break;
                    case SessionChangeReason.ConsoleDisconnect:
                        break;
                    case SessionChangeReason.RemoteConnect:
                        m_tempClientName = clientName;
                        SlackSendMessage.SendMessage($"リモート接続【{m_tempClientName}】", m_ts);
                        break;
                    case SessionChangeReason.RemoteDisconnect:
                        SlackSendMessage.SendMessage($"リモート切断【{m_tempClientName}】", m_ts);
                        break;
                    case SessionChangeReason.SessionLogon:
                        break;
                    case SessionChangeReason.SessionLogoff:
                        break;
                    case SessionChangeReason.SessionLock:
                        break;
                    case SessionChangeReason.SessionUnlock:
                        break;
                    case SessionChangeReason.SessionRemoteControl:
                        break;
                    default:
                        break;
                }


            }
            catch (Exception e)
            {
                SlackSendMessage.SendMessage($"エラーが発生しました。\n {e.Message}", m_ts);
            }


        }


    }


}
ビルドする
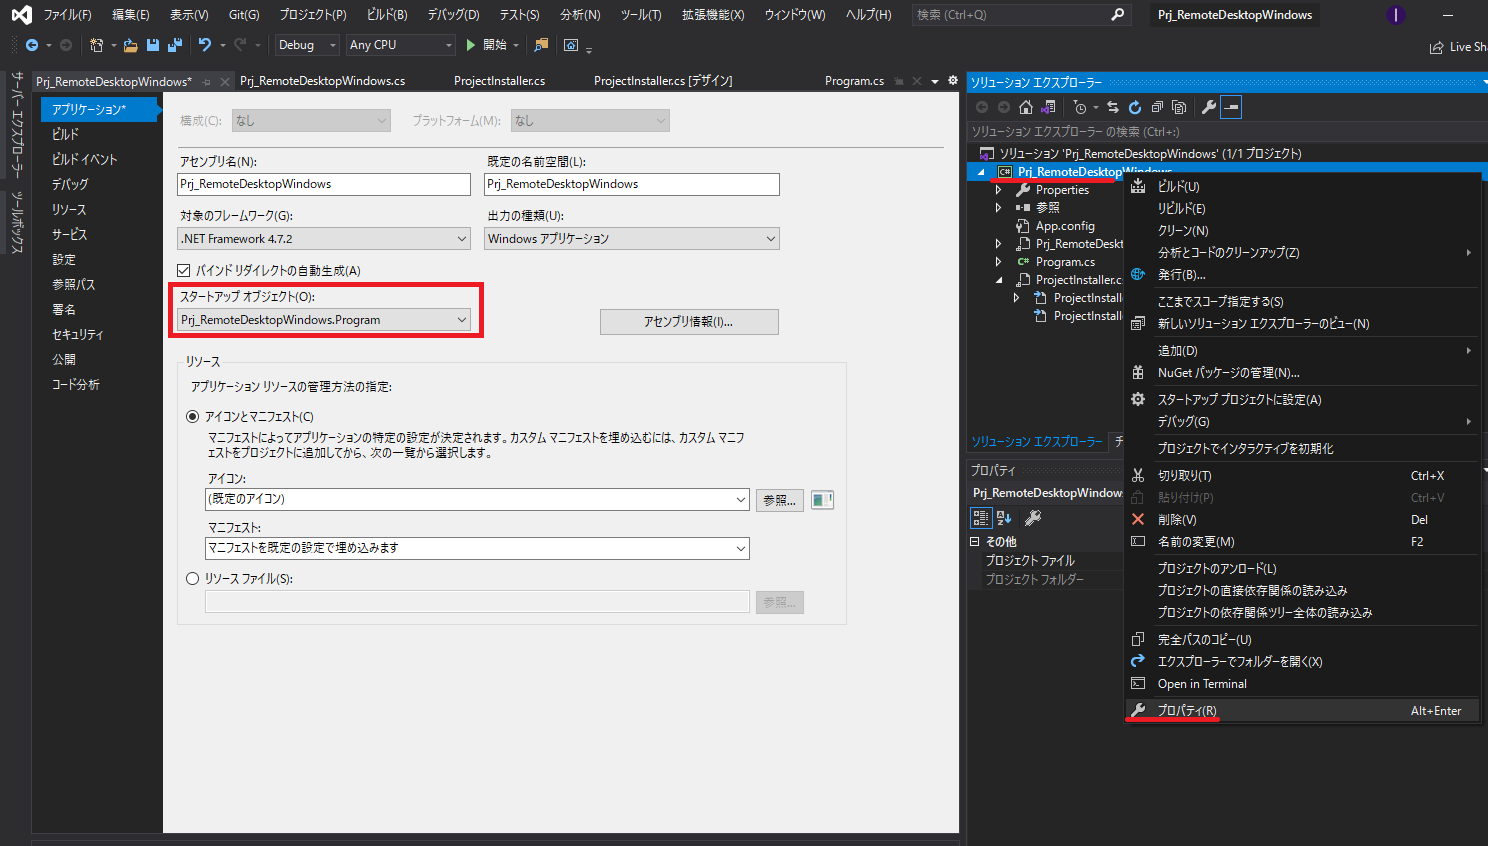
・Prj_RemoteDesktopWindowsプロジェクトのプロパティのアプリケーションタブからスタートアップオブジェクトをPrj_RemoteDesktopWindows.Programにします。
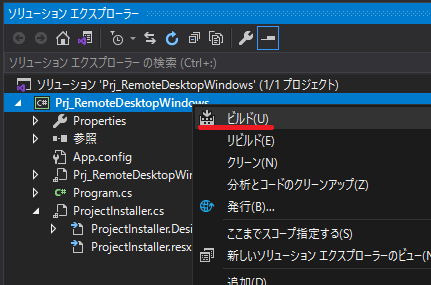
・Ctrl+Shift+Bでビルドします。(または、Prj_RemoteDesktopWindowsプロジェクトを右クリックして [ビルド] を選択します)
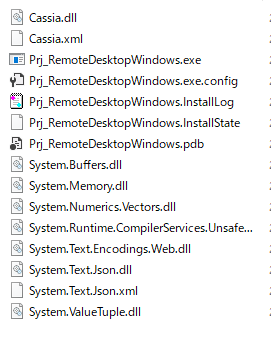
・exeが生成されます。(Debugでビルドしているとbinの中にはDebugフォルダが生成されます。)
サービスをインストールする
やっていることは同じですが2パターンのインストール方法を記載しておきます。
前提としてインストールするためには管理者として実行する必要があります。
方法1 Visual Studio 2019からインストール
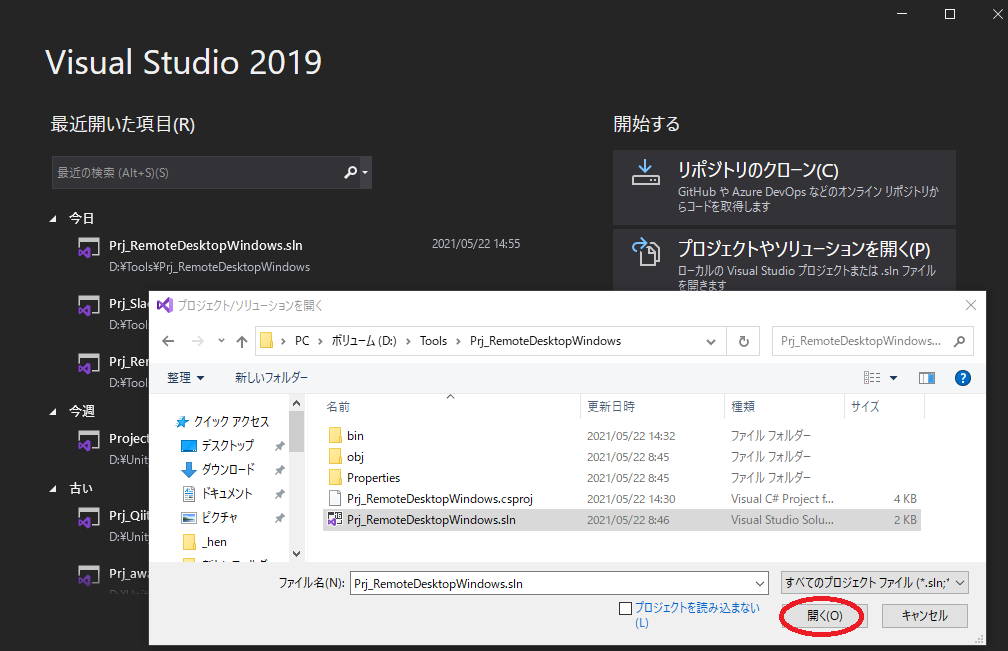
・管理者として実行して、作成したプロジェクトを再度開きましょう。
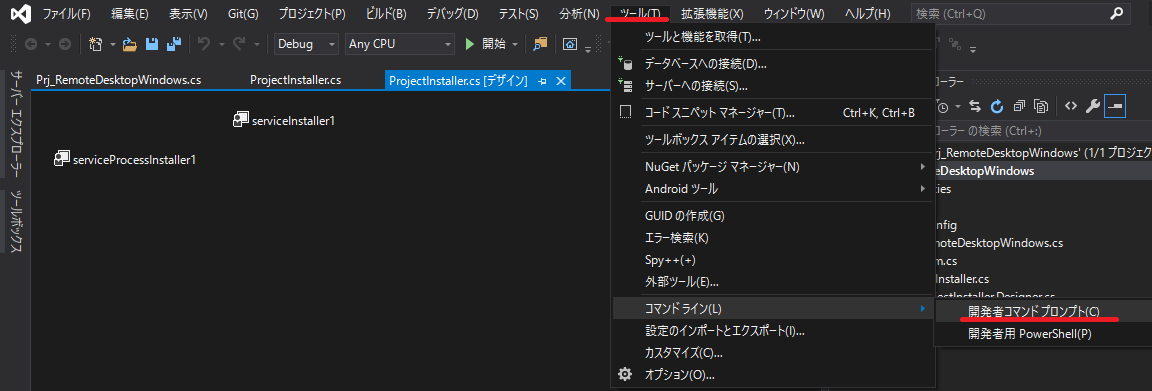
・ツールメニューコマンドラインから開発者コマンドプロンプトを選択
・コマンド実行
installutil D:\Tools\Prj_RemoteDesktopWindows\bin\Debug\Prj_RemoteDesktopWindows.exe
exeまでのパスはとりあえずフルパスがいいと思います。
・installutil.exeがない場合は自身のPCにインストールされているか確認してフルパスを指定しましょう
システムで installutil.exe を見付けることができない場合は、コンピューター上に存在することを確認してください。 このツールは、.NET Framework と共に %windir%\Microsoft.NET\Framework[64]<framework version> フォルダーにインストールされます。 たとえば、64 ビット バージョンでの既定のパスは %windir%\Microsoft.NET\Framework64\v4.0.30319\InstallUtil.exe です。
方法2 batを作り管理者として実行する
・InstallUtil.exe が必要なので自分のPCのインストール先のパスを指定したbatを作成(すべてフルパスで指定しています)
C:\Windows\Microsoft.NET\Framework64\v4.0.30319\InstallUtil.exe D:\Tools\Prj_RemoteDesktopWindows\bin\Debug\Prj_RemoteDesktopWindows.exe
pause
・右クリックで管理者として実行します。
サービスインストール時によく見るエラー
System.Security.SecurityException: ソースが見つかりませんでしたが、いくつかまたはすべてのログを検索できませんでした。アクセス不可能なログ: Security
管理者として実行しましょう。
インストール段階で例外が発生しました。
System.ComponentModel.Win32Exception: 指定されたサービスは既に開始されています。
アンインストールしてからインストールしましょう。
・アンインストールコマンド
installutil.exe /u D:\Tools\Prj_RemoteDesktopWindows\bin\Debug\Prj_RemoteDesktopWindows.exe
エラー "obj\Debug\Prj_RemoteDesktopWindows.exe" を "bin\Debug\Prj_RemoteDesktopWindows.exe" にコピーできませんでした。10 回の再試行回数を超えたため、失敗しました。このファイルは "RemoteConnectSlackBot (1544)" によってロックされています。
・サービスが開始されています、まずはアンインストールしましょう。
サービスの開始する
リモート接続してみる。
・確認のためにmacbookairでWindowsPCリモート接続してスレッドに返信されていることを確認しました。
最後に
Debugビルドのままですが最終的にはReleaseビルドにしてください。
サービス保留の状態を実装するなど行っていますが実際に必要なのかなどわかっていない部分もあります(チュートリアルが実装していたのでとりあえず追加している程度です)
はじめてWindowsサービスを作ったのですが、実際にリモート接続しないといけなかったり管理者権限でインストールしないと行けなかったりデバッグ方法が面倒でした、またOnStart()でSlackに投稿をしているので何かしらの更新で再度OnStart()が呼ばれるかもしれないなと思いました。(確認していませんが、リモート先のPCを再起動するなど)
また、人によってはエラー内容が違っていたりするので参考にプロジェクトをGithubなどに上げられたらよかったですが、アクセストークンなどもあるのでローカルで開発しています。
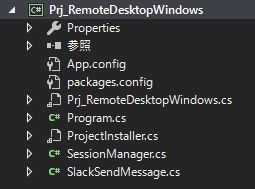
見たい方がいて問題なさそうならあげてもよいのですが、とりあえず構成だけ張っておきます。
リモートを検知してSlackに投稿するなどの需要があるのかわかりませんが、参考にしていただければと思います。
