SparkCore と MEANスタックで作るおうちハック(Advent calendar)
つくるもの
以下のサイトに温度が表示されていると思います。
これは、Spark Core という Arduino 互換のハードで取得した温度です。このハードが、直接 WiFi に繋がり、クラウドに情報をアップロードしています。
ハードウェア編
SparkCore とは
http://spark.io で発売される、Arduino + WiFi がワンセットになったデバイスです。以下の特徴があります。
必要なモノ・買い方
SparkCoreは、以下から買えます。
注意点は
- 安い Photon というのは2015年2月発売予定で、さらにTELECはまだ通っていません。SparkCoreを購入しましょう
- USからなので、届くまで時間がかかります
国内からだと、高いですが、千石からも買えます。
Spark Core の WiFi への接続
http://docs.spark.io/start/ に従って作業します。
- Spark Core を Micro USB を繋く
- アプリをインストール
- iPhone: https://itunes.apple.com/us/app/spark-core/id760157884
- Android: https://play.google.com/store/apps/details?id=io.spark.core.android
- スマートフォンが、繋ぎたいWiFiに接続されていることを確認
- アプリを起動。Spark のアカウントでログイン(まだの場合はサインアップ)
- SSID等があっていることを確認し、CONNECTをタップ
- LED の意味は以下の通り
- Blinking blue: Listening for Wi-Fi credentials
- Solid blue: Getting Wi-Fi info from app
- Blinking green: Connecting to the Wi-Fi network
- Blinking cyan: Connecting to the Spark Cloud
- Blinking magenta: Updating to the newest firmware
ブレッドボード
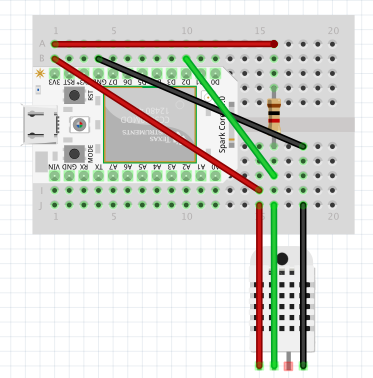
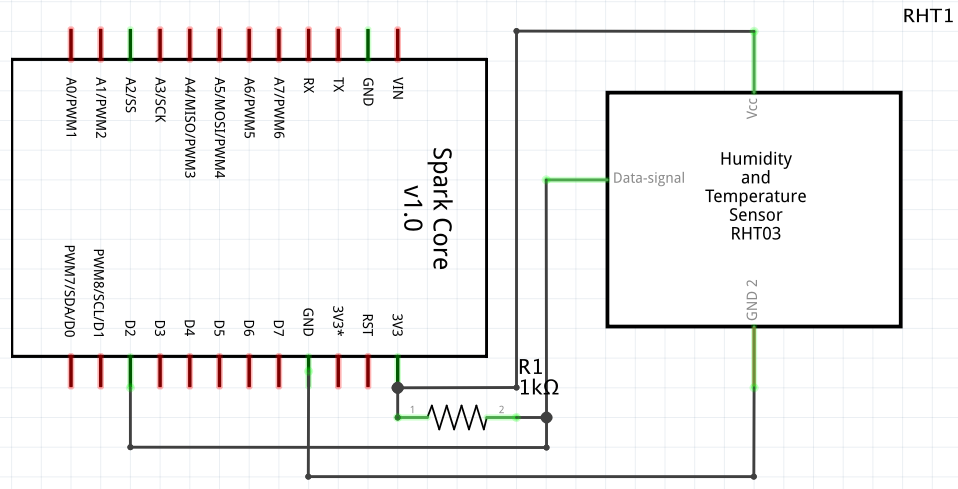
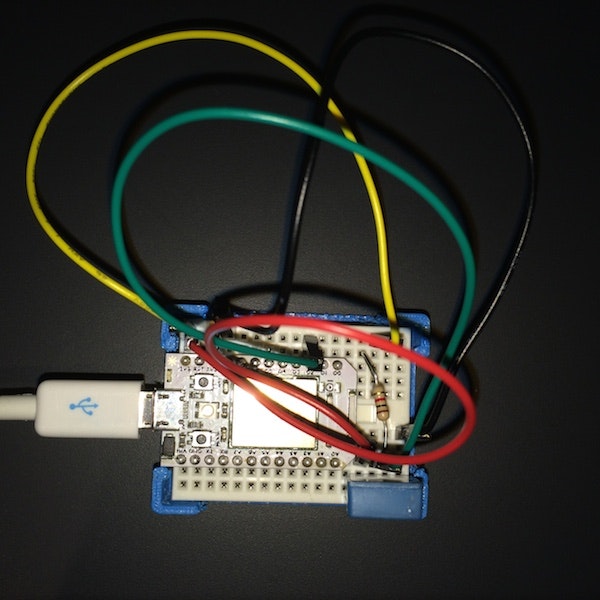
以下のように回路を組んでください。
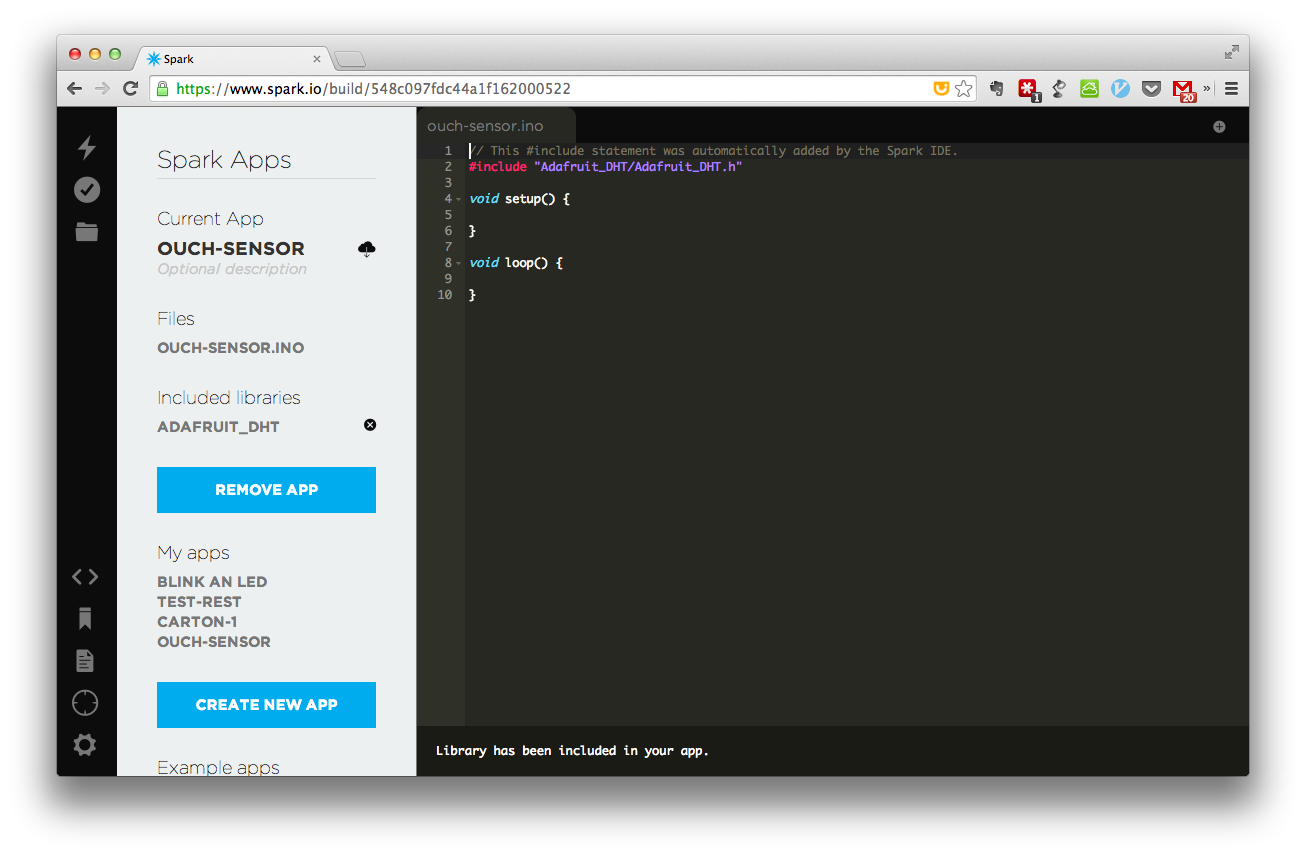
とりあえず、サンプルプログラムの書き込み
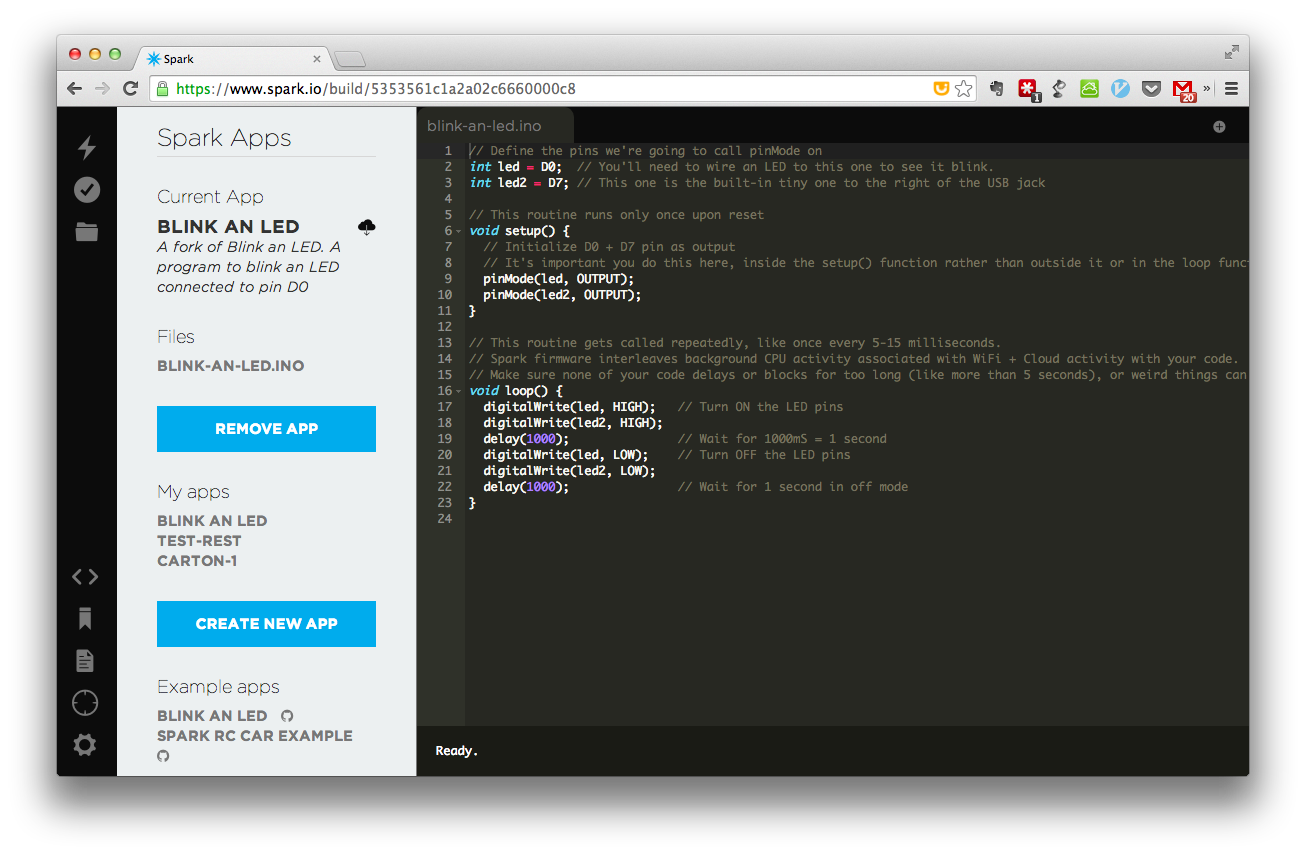
以下にアクセスしてください
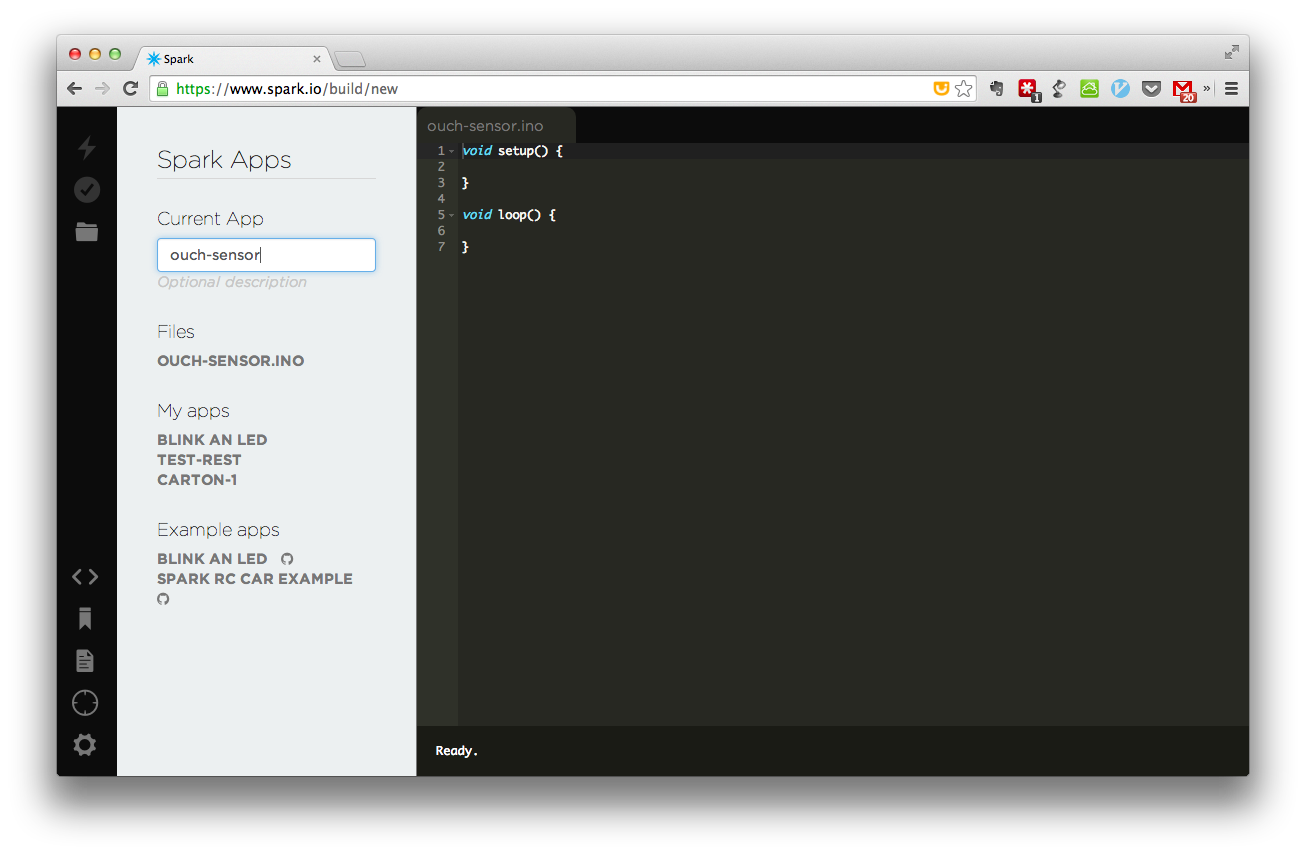
"CREATE NEW APP"をクリック
名前を付ける
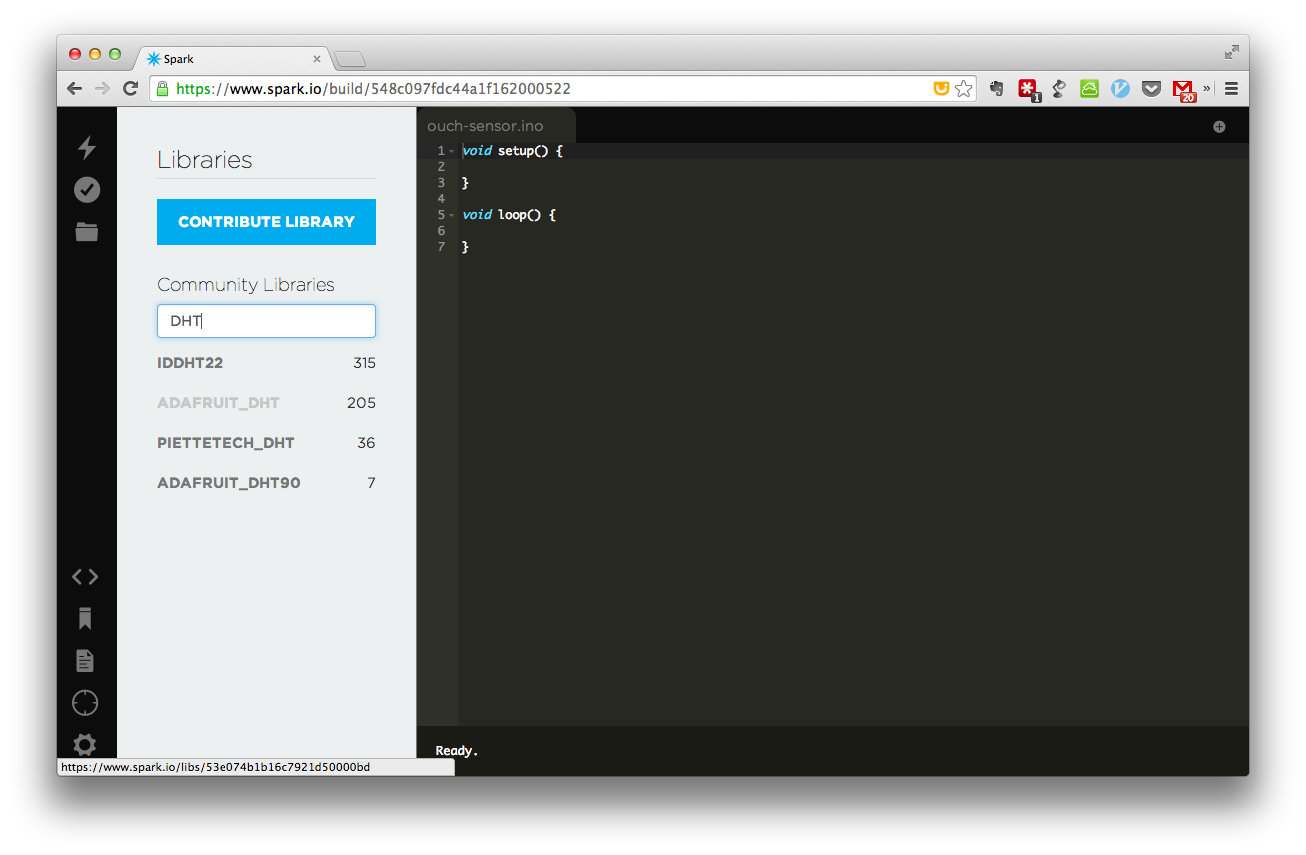
左のボタンの "LIBRARY"(下から4つめ)をクリック。DHTの入力してライブラリを検索
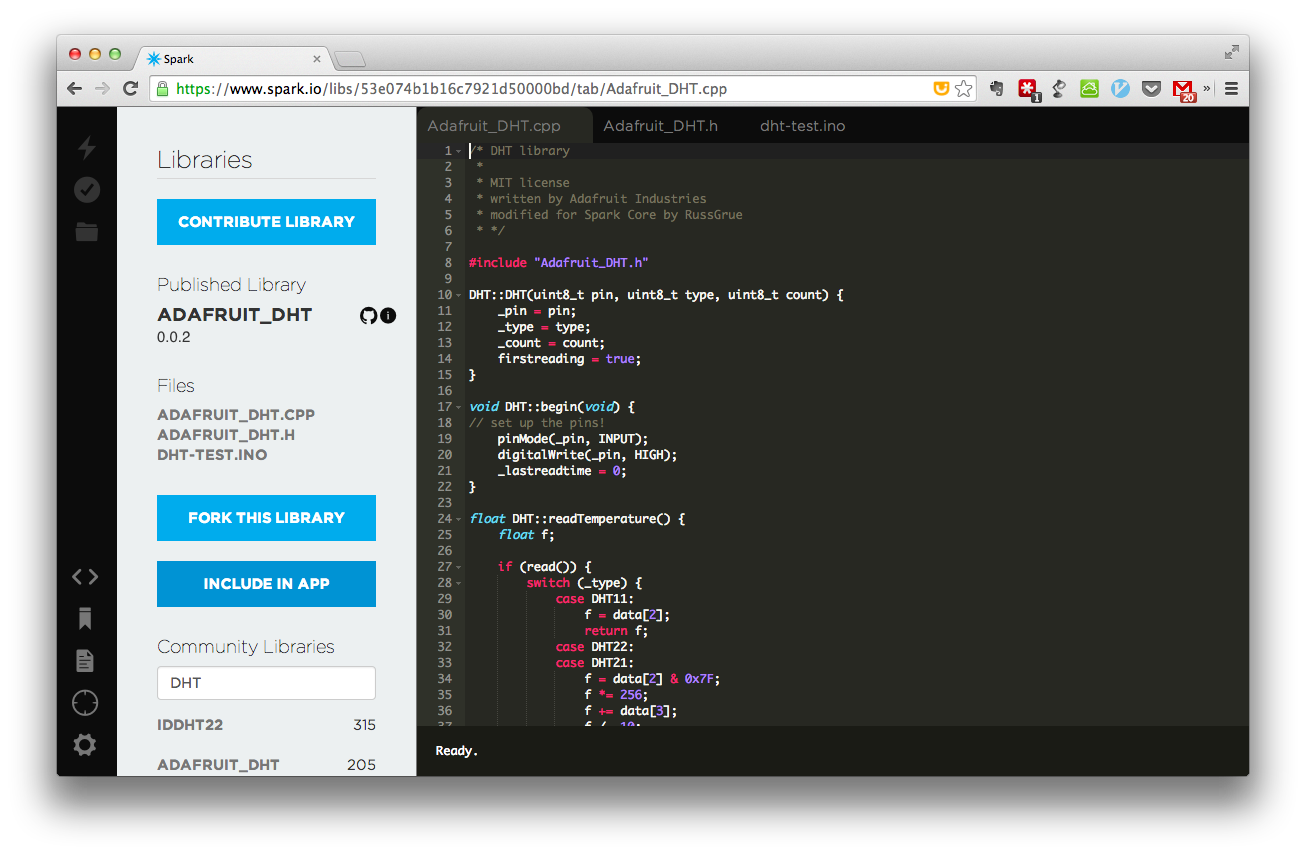
ADAFRUIT_DHT をクリック
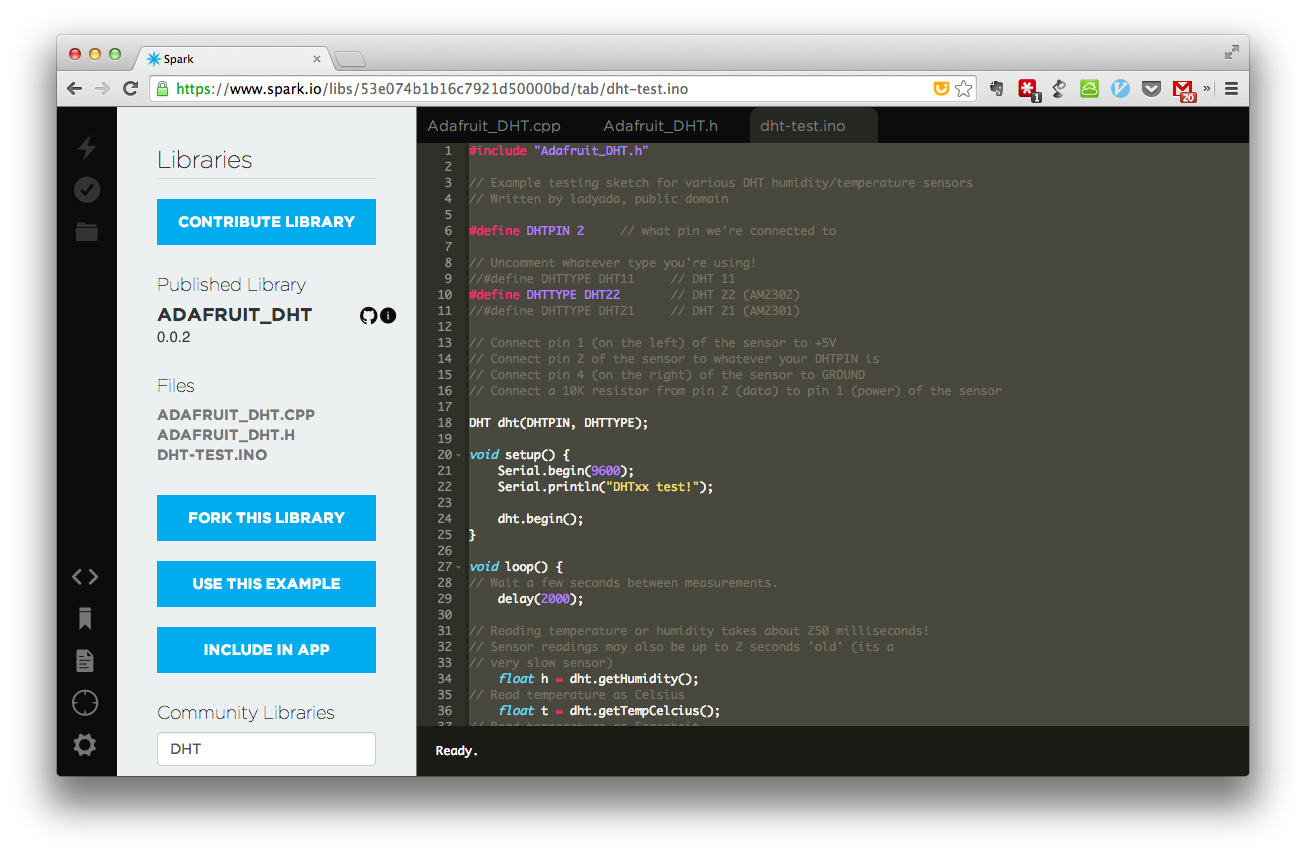
上部の dht-test.ino のタブをクリックし、サンプルを表示。内容を全てコピー。
その後、左の "INCLUDE APP"をクリック
以下のように、INCLUDEが足される。
その後に、コピーしたサンプルを貼り付け。(不要なINCLUDEを削除)
サンプル中のDHTTYPEをDHT11にする。
// This #include statement was automatically added by the Spark IDE.
# include "Adafruit_DHT/Adafruit_DHT.h"

// Example testing sketch for various DHT humidity/temperature sensors
// Written by ladyada, public domain

# define DHTPIN 2     // what pin we're connected to

// Uncomment whatever type you're using!
# define DHTTYPE DHT11		// DHT 11
//#define DHTTYPE DHT22		// DHT 22 (AM2302)
//#define DHTTYPE DHT21		// DHT 21 (AM2301)

// Connect pin 1 (on the left) of the sensor to +5V
// Connect pin 2 of the sensor to whatever your DHTPIN is
// Connect pin 4 (on the right) of the sensor to GROUND
// Connect a 10K resistor from pin 2 (data) to pin 1 (power) of the sensor

DHT dht(DHTPIN, DHTTYPE);

void setup() {
	Serial.begin(9600);
	Serial.println("DHTxx test!");

	dht.begin();
}

void loop() {
// Wait a few seconds between measurements.
	delay(2000);

// Reading temperature or humidity takes about 250 milliseconds!
// Sensor readings may also be up to 2 seconds 'old' (its a
// very slow sensor)
	float h = dht.getHumidity();
// Read temperature as Celsius
	float t = dht.getTempCelcius();
// Read temperature as Farenheit
	float f = dht.getTempFarenheit();

// Check if any reads failed and exit early (to try again).
	if (isnan(h) || isnan(t) || isnan(f)) {
		Serial.println("Failed to read from DHT sensor!");
		return;
	}

// Compute heat index
// Must send in temp in Fahrenheit!
	float hi = dht.getHeatIndex();
	float dp = dht.getDewPoint();
	float k = dht.getTempKelvin();

	Serial.print("Humid: ");
	Serial.print(h);
	Serial.print("% - ");
	Serial.print("Temp: ");
	Serial.print(t);
	Serial.print("*C ");
	Serial.print(f);
	Serial.print("*F ");
	Serial.print(k);
	Serial.print("*K - ");
	Serial.print("DewP: ");
	Serial.print(dp);
	Serial.print("*C - ");
	Serial.print("HeatI: ");
	Serial.print(hi);
	Serial.println("*C");
	Serial.println(Time.timeStr());
}
左上の稲妻マークをクリックし、書き込み。
すると、ピンク(マゼンタ)色にLEDが点滅を始めます。
シアン(明るい青緑色)に戻ったら、書き込み完了です。
結果を表示
シリアルの表示には、spark-cli を使うと便利です。
事前に node.js のインストールが必要です。
spark-cli について
http://docs.spark.io/cli/
node.js
http://nodejs.org/ からインストール
spark-cli のインストール。
$ npm install -g spark-cli
$ spark cloud login
$ spark serial list
Found 1 core(s) connected via serial:
1:	/dev/cu.usbmodem1411

$ spark serial monitor 1
Opening serial monitor for com port: "/dev/cu.usbmodem1411"

Humid: 614.40% - Temp: 665.60*C 1230.08*F 938.75*K - DewP: 1266.45*C - HeatI: 116350.96*C
Sat Dec 13 09:46:30 2014

Humid: 614.40% - Temp: 665.60*C 1230.08*F 938.75*K - DewP: 1266.45*C - HeatI: 116350.96*C
Sat Dec 13 09:46:32 2014
Spark Cloud の Variable への書き込み
クラウド上の Variable に書きこみを行います。
以下の修正を行います。
- delayを60000(1分)に変更
- 以下のようにして、Spark の変数に追加
double temp, humid;

void setup() {
    ....
	Spark.variable("temp", &temp, DOUBLE);
	Spark.variable("humid", &humid, DOUBLE);
}
void loop() {
    ....
    temp = (double)t;
    humid = (double)h;

}
以下のようにして、値を確認します。
$ spark variable get temp
$ spark variable get humid
全体のコードは以下のようになります。
// This #include statement was automatically added by the Spark IDE.
# include "Adafruit_DHT/Adafruit_DHT.h"

// Example testing sketch for various DHT humidity/temperature sensors
// Written by ladyada, public domain

# define DHTPIN 2     // what pin we're connected to

// Uncomment whatever type you're using!
# define DHTTYPE DHT11		// DHT 11
//#define DHTTYPE DHT22		// DHT 22 (AM2302)
//#define DHTTYPE DHT21		// DHT 21 (AM2301)

// Connect pin 1 (on the left) of the sensor to +5V
// Connect pin 2 of the sensor to whatever your DHTPIN is
// Connect pin 4 (on the right) of the sensor to GROUND
// Connect a 10K resistor from pin 2 (data) to pin 1 (power) of the sensor

DHT dht(DHTPIN, DHTTYPE);
double temp, humid;

void setup() {
	Serial.begin(9600);
	Serial.println("DHTxx test!");

	dht.begin();

	Spark.variable("temp", &temp, DOUBLE);
	Spark.variable("humid", &humid, DOUBLE);
}

void loop() {
// Wait a few seconds between measurements.
	delay(60000);

// Reading temperature or humidity takes about 250 milliseconds!
// Sensor readings may also be up to 2 seconds 'old' (its a
// very slow sensor)
	float h = dht.getHumidity();
// Read temperature as Celsius
	float t = dht.getTempCelcius();
// Read temperature as Farenheit
	float f = dht.getTempFarenheit();

// Check if any reads failed and exit early (to try again).
	if (isnan(h) || isnan(t) || isnan(f)) {
		Serial.println("Failed to read from DHT sensor!");
		return;
	}

// Compute heat index
// Must send in temp in Fahrenheit!
	float hi = dht.getHeatIndex();
	float dp = dht.getDewPoint();
	float k = dht.getTempKelvin();

	Serial.print("Humid: ");
	Serial.print(h);
	Serial.print("% - ");
	Serial.print("Temp: ");
	Serial.print(t);
	Serial.print("*C ");
	Serial.print(f);
	Serial.print("*F ");
	Serial.print(k);
	Serial.print("*K - ");
	Serial.print("DewP: ");
	Serial.print(dp);
	Serial.print("*C - ");
	Serial.print("HeatI: ");
	Serial.print(hi);
	Serial.println("*C");
	Serial.println(Time.timeStr());

    temp = (double)t;
    humid = (double)h;

}
これで、温度を定期的にアップできるようになりました。
サーバーサイド
ソースは以下にありますので、参考にしていただければ幸いです。
https://github.com/ikeyasu/ouchi-sensor
サーバー再度開発の下準備
以下で、インストールしていないモノは入れて下さい。
インストール方法は、MacOSXで示しています。
node.js
http://nodejs.org/ からインストール
Yeoman
$ npm install -g yo
MongoDB
$ brew install mongodb
Git
$ brew install git
Yeoman
Yeoman とは、Scaffoldツールです。Scaffold は、Railsで有名になりましたが、テンプレートを生成するツールです。
クライアント側の今回は、サーバーも含めて、Yeoman に生成してもらう事にしますので、generator-angular-fullstack を使います。
$ npm install -g generator-angular-fullstack
$ mkdir weather-checker-sample && cd $_
$ yo angular-fullstack weather-checker-sample
以下のようなのが出ます。
     _-----_
    |       |
    |--(o)--|   .--------------------------.
   `---------´  |    Welcome to Yeoman,    |
    ( _´U`_ )   |   ladies and gentlemen!  |
    /___A___\   '__________________________'
     |  ~  |
   __'.___.'__
 ´   `  |° ´ Y `

Out of the box I create an AngularJS app with an Express server.

# Client

? What would you like to write scripts with? (Use arrow keys)
❯ JavaScript
  CoffeeScript
以下の通り選択していきます。
# Client

? What would you like to write scripts with? JavaScript
? What would you like to write markup with? HTML
? What would you like to write stylesheets with? Sass
? What Angular router would you like to use? uiRouter
? Would you like to include Bootstrap? Yes
? Would you like to include UI Bootstrap? Yes

# Server

? Would you like to use mongoDB with Mongoose for data modeling? Yes
? Would you scaffold out an authentication boilerplate? No
? Would you like to use socket.io? No
$ git init .
$ git add .
$ git commit -m "Initial commit"
以下、生成されたコードを修正していきます。
出力されたコード
以下のようなファイルが出力されます。
▾ client/
  ▾ app/
    ▾ main/
        main.controller.js
        main.controller.spec.js
        main.html
        main.js
        main.scss
      app.js
      app.scss
  ▾ assets/
    ▾ images/
        yeoman.png
  ▸ bower_components/
  ▸ components/
    favicon.ico
    index.html
    robots.txt
▾ e2e/
  ▾ main/
      main.po.js
      main.spec.js
▸ node_modules/
▾ server/
  ▾ api/
    ▾ thing/
        index.js
        thing.controller.js
        thing.model.js
        thing.spec.js
  ▾ components/
    ▾ errors/
        index.js
  ▾ config/
    ▾ environment/
        development.js
        index.js
        production.js
        test.js
      express.js
      local.env.js
      local.env.sample.js
      seed.js
  ▾ views/
      404.html
    app.js
    routes.js
  bower.json
  Gruntfile.js
  karma.conf.js
  package.json
  protractor.conf.js
"server/" が、サーバーサイドのコードで、Web APIを記述します。
"client/" が、クライアント側のAngularJS のコードを記述します。
server に api/thing という、お誂え向きのAPIがあるので、これを修正します。
サーバーサイドの、データーベースのモデルを設計
シンプルで良いので以下のようにします。
'use strict';

var mongoose = require('mongoose'),
    Schema = mongoose.Schema;

var ThingSchema = new Schema({
  name: {type: String, index: true},
  value: Number,
  date: {type: Date, default: Date.now}
});

module.exports = mongoose.model('Thing', ThingSchema);
テスト
テストが動くので、動かしてみます。
まずは、mongodb を起動してください。
$ mongod --dbpath .tmp/mongodb
dbpath は何でも良いです。yeoman で生成したディレクトリに".tmp/"というのがあるので、それを利用しました。
テストを実行するには、別のコンソールで、以下を実行してください。
$ grunt test:server
Done, without errors. と表示されればOKです。
サーバーで表示してみる
以下の通り実行してください。
$ grunt serve
をブラウザで表示すると、[] というのが表示されると思います。
Seed.js に適等にデータを追加
今のままだと、データが空っぽで開発しにくいので、"server/config/seed.js" にダミーデータを追加します。
/**
 * Populate DB with sample data on server start
 * to disable, edit config/environment/index.js, and set `seedDB: false`
 */

'use strict';

var Thing = require('../api/thing/thing.model');

Thing.find({}).remove(function() {
  Thing.create({
    name : 'test1-templ',
    value : 1
  }, {
    name : 'test1-templ',
    value : 1.1
  });
});
これは、server/config/environment/*.js の中で seedDB: true と書かれている環境でだけ、実行されます。デフォルトでは、development の環境、つまり手元で grunt serve を実行したときにだけ、上記が実行されます。
Spark Cloud に値を取りに行く
Spark Core の値は、以下のURLにアクセスすることでで取ることができます。ブラウザーでも値を確認できます。
https://api.spark.io/v1/devices/(device_id)/temp?access_token=(access_token)
https://api.spark.io/v1/devices/(device_id)/humid?access_token=(access_token)
device_id は以下の方法で取得できます。
$ spark list
access_toke は、Webから取得します。https://www.spark.io/build の、左下の"Settings" のボタンをクリックし、ACCESS TOKEN をコピーして下さい。
以下のような値が取得できます。
{
  "cmd": "VarReturn",
  "name": "temp",
  "result": 27,
  "coreInfo": {
    "last_app": "",
    "last_heard": "2014-12-13T11:14:56.102Z",
    "connected": true,
    "deviceID": "(device_id)"
  }
}
これを node.js から取得するようにします。
request モジュールというのを使います。
以下のような感じで使えます。
var request = require('request');
...
request(url, function(error, response, body) {
	...
});
これを、server/api/thing/thing.controller.js に組み込みます。
DEVICE_IDとACCESS_TOKEは、環境変数から取得します。ローカルでテストするときは、server/config/local.env.js に値を書いておきます。
(執筆時間の関係で、ここでは、温度だけを扱うことにします。。)
var TEMP_SENSOR_URL = 'https://api.spark.io/v1/devices/' + process.env.DEVICE_ID +'/temp?access_token=' + process.env.ACCESS_TOKEN;
var HUMID_SENSOR_URL = 'https://api.spark.io/v1/devices/' + process.env.DEVICE_ID +'/humid?access_token=' + process.env.ACCESS_TOKEN;

function retriveSensor(url, name, callback) {
  request(url, function(error, response, body) {
    var value = JSON.parse(body).result;
    Thing.create({name: name, value: value}, callback);
  });
}

// Retrieve sensor data
exports.retrieveSensors = function(req, res) {
  retriveSensor(TEMP_SENSOR_URL, 'sensor1-temp', function (err, things_temp) {
    if(err) { return handleError(res, err); }
    return res.json(200, [things_temp, things_humid]);
  });
};
'use strict';

// Use local.env.js for environment variables that grunt will set when the server starts locally.
// Use for your api keys, secrets, etc. This file should not be tracked by git.
//
// You will need to set these on the server you deploy to.

module.exports = {
  DOMAIN: 'http://localhost:9000',
  SESSION_SECRET: "ouchisensor-secret",
  // Control debug level for modules using visionmedia/debug
  DEBUG: '',
  DEVICE_ID: '(device_id)',
  ACCESS_TOKEN: '(access_token)'
};
Heroku Scheduler による定期的な値の取得
Heroku で、定期的にタスクを実行するには、Heroku Scheduler を使います。
https://devcenter.heroku.com/articles/scheduler
http://weathercook.hatenadiary.jp/entry/2013/01/22/151034
まずは、heroku で動かしてみます。各種設定は、yeoman で行えます。
実行には、 Heroku toolbelt が必要です。以下からインストールしてください。
Heroku toolbelt
https://toolbelt.heroku.com/
以下の、(app_name) に heroku にアップする時のアプリ名を書いてください。
$ yo angular-fullstack:heroku
? Name to deploy as (Leave blank for a random name): (app_name)
heroku addons:add mongolab
heroku config:set DEVICE_ID=48ff72065067555016201587
heroku config:set ACCESS_TOKEN=cf79c949a2e35f5a987b3898e989cc47147b8c47
heroku config:set DOMAIN=(app_name).herokuapp.com
次にスケジューラーに使うスクリプトを書きます。
# !/usr/bin/env node

var request = require('request');

var DOMAIN = 'localhost:9000';
if (process.env.DOMAIN) {
  DOMAIN = process.env.DOMAIN;
}

request('http://' + DOMAIN + '/api/things/retrieveSensors', function(error, response, body) {
  console.log(body);
});
これを heroku scheduler に設定します。
$ heroku addons:add scheduler:standard
$ heroku addons:open scheduler
以下のような画面が出るので、"Add Job..."をクリックして、 TASK を node server/config/scheduledRetriveSensors.js にして、FFREQUENCY を Every 10 minites にして、save します。。
最新のセンサー情報を表示
showSensor を server/app/thing/thing.controller.js にたします。
exports.showSensor = function(req, res) {
  Thing.findOne({}, {}, { sort: { 'date' : -1 } }, function(err, thing) {
    if(err) { return handleError(res, err); }
    return res.json(200, thing);
  });
}
クライアント側も追加します。
'use strict';

angular.module('ouchiSensorApp')
  .controller('MainCtrl', function ($scope, $http) {
    $scope.awesomeThings = [];

    $http.get('/api/things/showSensor').success(function(thing) {
      $scope.sensor = thing;
    });

    $scope.addThing = function() {
      if($scope.newThing === '') {
        return;
      }
      $http.post('/api/things', { name: $scope.newThing });
      $scope.newThing = '';
    };

    $scope.deleteThing = function(thing) {
      $http.delete('/api/things/' + thing._id);
    };
  });
<div ng-include="'components/navbar/navbar.html'"></div>

<header class="hero-unit" id="banner">
  <div class="container">
    <h1>Ouchi sensor</h1>
  </div>
</header>

<div class="container">
  <h1>
  {{sensor.value}}℃
  </h1>
</div>

<footer class="footer">
  <div class="container">
      <p>Ouchi Sensor |
        <a href="https://twitter.com/ikeyasu">@ikeyasu</a></p>
  </div>
</footer>
完成!
執筆を 13日に間に合わせるため、かけこみになってしまいました。
以下が完成品です。
