jQueryを使う上で最低限知ってないと読めない知識の寄せ集めです。
これから勉強するよ、基本覚えたばっかだよ〜っていう人向けです。
html要素・クラス・IDの指定
// html要素: p h1 ul
$('p').css('color', 'purple');

// class .className
$('.item').css('color', 'red');

// id #idName
$('#sub').css('color', 'blue');
$('#itemSub').css('color', 'yellow');
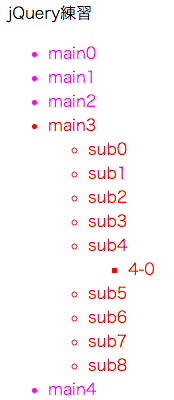
Base1
<! DOCTYPE html>
<html lang="ja">
<head>
	<meta charset="utf-8">
	<title>>jQuery練習</title>
</head>
<body>
	<p>jQuery練習</p>
	<ul id="main">
		<li>main0</li>
		<li class="item">main1</li>
		<li class="item">main2</li>
		<li>
			main3
			<ul id="sub">
				<li class="item" id="itemSub">sub0</li>
				<li>sub1</li>
				<li>sub2</li>
				<li class="item">sub3</li>
				<li>
					sub4
					<ul>
						<li>4-0</li>
					</ul>
				</li>
				<li>sub5</li>
				<li class="item2">sub6</li>
				<li>sub7</li>
				<li class="item3">sub8</li>
			</ul>
		</li>
		<li>main4</li>
	</ul>
	<script src="http://code.jquery.com/jquery-2.2.3.min.js"></script>
	<script>
	$(function() {
		// ここに命令を書く
	})
	</script>
</body>
</html>
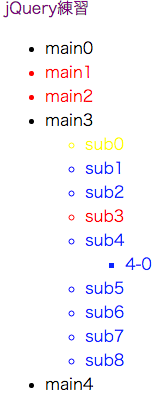
セレクタ
Base1を使います
////// ' '(空白) それ以下の要素 //////
// #main以下の.item要素
$('#main  .item').css('color', 'red');

////// '>' 直下の子要素 //////
// #mainの直下
$('#main > .item').css('color', 'green');

// ////// ',' 複数の要素 //////
// p要素と.item3要素全て
$('p, .item3').css('color', 'orange');

////// '+' 隣接する要素 //////
// .itemの横にある(隣接する).item
$('.item + .item').css('color', 'magenta');
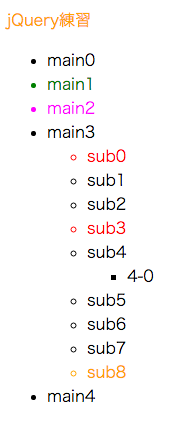
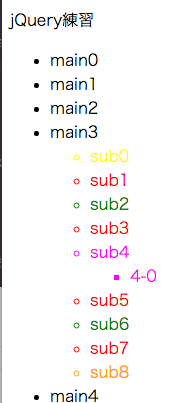
フィルタ
Base1を使います
////// イコール :eq() //////
// セル番号が2のもの
$('#sub > li:eq(2)').css('color', 'orange');

////// グレーターザン :gt() //////
// セル番号が2より上
$('#sub > li:gt(2)').css('color', 'green');

////// レスザン :lt() //////
// セル番号が2より下
$('#sub > li:lt(2)').css('color', 'blue');
////// イーブン/偶数 :even(0は偶数) //////
// #sub > liの偶数のもの
$('#sub > li:even').css('color', 'green');

////// オド/奇数 :odd //////
// #sub > liの奇数のもの
$('#sub > li:odd').css('color', 'red');

////// 中身の指定 :contains() //////
// 中身に`4`を含むもの
$('#sub > li:contains("4")').css('color', 'magenta');

////// 指定 :first, :last //////
$('#sub > li:first').css('color', 'yellow');
$('#sub > li:last').css('color', 'orange');
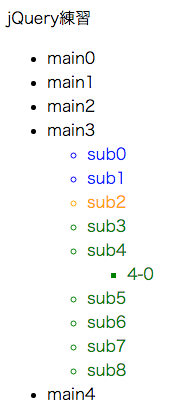
DOM操作
Base1を使います
////// 親要素 :parent() 子要素 :children() //////
$('#main').children().css('color', 'magenta');
$('#sub').parent().css('color', 'red');
////// 兄弟要素 :siblings() シブリングス //////
// 指定要素以外の指定要素と同列以下にある要素
$('#sub > li:eq(1)').siblings().css('color', 'orange');

////// その前 :prev() その後 :next() //////
$('#sub > li:eq(1)').prev().css('color', 'red');
$('#sub > li:eq(1)').next().css('color', 'magenta');

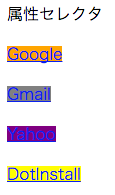
属性セレクタ
Base
<p>属性セレクタ</p>
<p><a href="http://google.com">Google</a></p>
<p><a href="gmail.com">Gmail</a></p>
<p><a href="http://yahoo.co.jp">Yahoo</a></p>
<p><a href="http://dotinstall.com">DotInstall</a></p>
jQuery
// = : ~を含む, != : ~を含まない
$('a[href="http://google.com"]').css('backgroundColor', 'green');
$('a[href!="http://google.com"]').css('backgroundColor', 'yellow');

// *= : ~が含まれる
$('a[href*="google').css('backgroundColor', 'orange');

// ^= : で始まる, $= : ~で終わる
$('a[href^="gmail"]').css('backgroundColor', 'gray');
$('a[href$="jp"]').css('backgroundColor', 'purple');
css、addClass/removeClass
Style
<style>
.mystyle {
	border: 4px solid purple;
	font-size: 36px;
}
</style>
// css
$('p').css('color', 'red').css('backgroundColor', 'orange');
console.log($('p').css('color')); // 結果: rgb(255, 0, 0)
console.log($('p').css('backgroundColor')); // 結果: rgb(255, 165, 0)

// styleの適用
$('p').addClass('mystyle');
console.log($('p').css('border')); // 結果: 4px solid rgb(128, 0, 128)
console.log($('p').css('font-size')); // 結果: 36px

// styleの削除
$('p').removeClass('mystyle');
console.log($('p').css('border')); // 結果: 0px none rgb(255, 0, 0)
console.log($('p').css('font-size')); // 結果: 16px
アトリビュート属性(attr)、データ(data)
Base
<p><a href="http://google.com" data-sitename="google">Google</a></p>
// .attr()
console.log($('a').attr('href')) // 結果: http://google.com
$('a').attr('href', "google.co.jp")
console.log($('a').attr('href')) // 結果: google.co.jp

// .data()
console.log($('a').data('sitename')) // 結果: google
タグの中身の操作
Base
<h1>タグの中身の操作</h1>
<input type="text" value="hello">
// .text()
console.log($('h1').text()); // 結果: タグの中身の操作
$('h1').text('Changed h1 text')
console.log($('h1').text()); // 結果: Changed h1 text
$('h1').text('タグの中身の操作')

// .html()
console.log($('h1').html()); // 結果: タグの中身の操作
$('h1').html('<a href="">chlic me</a>')
console.log($('h1').html()); // 結果: <a href="">chlic me</a>

// .val()
console.log($('input').val()); // 結果: hello
$('input').val('Changed value')
console.log($('input').val()); // 結果: Changed value

// .remove(): 要素をまるごと消す /.empty(): 要素の中身を消す
$('h1').empty() // 結果: <h1></h1>
$('h1').remove() // 結果: <h1>自体がなくなる
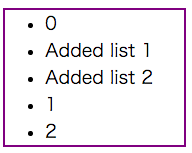
要素の追加
Base
<ul>
	<li>0</li>
	<li>1</li>
	<li>2</li>
</ul>
追加するlist
var newList1 = $('<li>').text('Added list 1');
var newList2 = $('<li>').text('Added list 2');
.before() / .after() / .insertBefore() / .insertAfter()
before/after
// .before() : 要素の前に追加
$('ul > li:eq(1)').before(newList1);
// .after() : 要素の後に追加
$('ul > li:eq(1)').after(newList2);
insertBefore/insertAfter
// .insertBefore() : 要素の前に追加
newList1.insertBefore($('ul > li:eq(1)'));
// .insertAfter() : 要素の後に追加
newList2.insertAfter($('ul > li:eq(1)'));
どちらも結果はこんなかんじになります
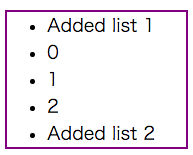
.prepend() / .append() / .prependTo() / .appendTo()
prepend/append
// .prepend() : 子要素の先頭に追加する /.append() : 子要素の末尾に追加する
$('ul').prepend(newList1);
$('ul').append(newList2);
prependTo/appendTo
// .prependTo() : 子要素の先頭に追加する / .appendTo() : 子要素の末尾に追加する
newList1.prependTo($('ul'))
newList2.appendTo($('ul'));
どちらも結果はこんなかんじになります
エフェクト
Base
<div id="box" style="width:100px;height:100px;background:red;"></div>
// hide/show
$('#box').hide();
$('#box').hide('slow'); // ゆっくり消える
$('#box').hide('800'); // 0.8秒かけて消える

// fadeOut/fadeIn
$('#box').fadeOut();

// toggle(値の切り替え)交互に実行される
// 今は表示されてる状態
$('#box').toggle('slow'); // 消える
$('#box').toggle('slow'); // 現れる

// コールバック関数(第2引数)
$('#box').hide( function() {
	alert("消えました")
});
マウスイベント
Base
<div id="box" style="width:100px;height:100px;background:red;"></div>
$('#box')
.click( function() {
	console.log("clickされました");
})
.mouseover( function() {
	// マウスがあたってる状態
	$(this).css('background', 'orange');
})
.mouseout( function() {
	// マウスがあたってない状態
	$(this).css('background', 'red');
})
.mousemove( function() {
	// マウスのX座標を表示
	$(this).text(event.pageX);
});
focus、blur、change
Base
<input id="name" type="text" value="name">
<select id="members" name="members">
	<option>select 0</option>
	<option>select 1</option>
	<option>select 2</option>
</select>
// focus, blur
$('#name')
.focus( function() {
	// フォーカスがあたった時
	$(this).css('background', 'red');
}).blur( function() {
	// フォーカスがはずれた時
	$(this).css('background', 'white');
});
// change
$('#members').change( function(event) {
	// 値が変わった時
	console.log(event)
});
onメソッド 読み込まれていないオブジェクトに対する命令
$('button').click(function() {
	var box = $('<div>').addClass('boxClass');
	$(this).before(box); // ボタンの前に追加
});

/* ドキュメント読み込み時に存在しないオブジェクトへの命令は通らない
$('.boxClass').click(function() {
	$(this).hide('slow', function() {
		$(this).remove()
	});
});
*/

// ドキュメント読み込み時に存在しないオブジェクトへの命令は`onメソッド`を使う
$('body').on('click', '.boxClass', function() {
	$(this).hide('slow', function() {
		$(this).remove()
	});
});
Ajax(Asynchronous JavaScript XML)
非同期通信などをお手軽にとりこむことができる
↓参考
jQuery公式
はじめてajaxを使うときに知りたかったこと
読み込む.load()
more.html
<p id="message">Message!</p>
<button>BUTTON</button>
<div id="result"></div>
$('button').click(function() {
	$('#result').load('more.html', function() {
		// 読み込み後の処理(コールバック)
		$('#message').css('color', 'red');
	});
});
$.get() / $.post()
getだけの例ですが、postも同じかんじで処理できます
greet.php
<?php
$rs = array(
	"message" => htmlspecialchars("Hi! " . $_GET['name'], ENT_QUOTES, "utf-8"),
	"length" => strlen($_GET['name'])
	);

// jsonで返す
header('content-type: application/json; charaset=utf-8');
echo json_encode($rs);
<p>あいさつ</p>
<p>
	<input type="text" name="name" id="name">
	<input type="button" id="greet" value="Greet!">
	<div id="greetResult"></div>
</p>
// $.get() (/ $.post())
$('#greet').click(function() {
	// $.get(ファイル, パラメータ(key: value), コールバック)
	$.get('greet.php', {
		name: $('#name').val()
	}, function(data) {
		$('#greetResult').html(data.message + "(" + data.length + ")");
	});
});
参考
参考というか、こちらをまんままとめさせていただきました><
ありがとうございます。