はじめに
CNNによる犬猫の判別モデルを構築し、Flaskを用いてwebアプリケーションを作成しました。
基本的なAIモデル構築、webアプリケーションの勉強としてアウトプットしていますのでコードの冗長性等のお見苦しい点についてはご容赦ください。
実行環境
- Python : 3.9
- Keras : 2.4.3
- TensorFlow : 2.5.0rc0
- Flask : 1.1.2
- numpy : 1.22.2
- matplotlib : 3.3.4
目的
判別モデルを構築し、webで実行できる犬猫判別webアプリケーションを作成する。
開発手順
- 犬猫の画像データセットの準備、前加工
- CNN判別モデルの構築
- webフロントサイドの構築
- webサーバーサイドの構築
- 動作確認
ディレクトリ構成
-----Classifier
|-----main.py
|-----image.py
|-----model.h5
|-----dataset
| |-----train
| | |-----dogs
| | | |-----image0.jpg
| | | |-----image1.jpg
| | | |-----image2.jpg
| | | |----- ...........
| | |
| | |-----cats
| | |-----image0.jpg
| | |-----image1.jpg
| | |-----image2.jpg
| | |----- ...........
| |-----test
| |-----dogs
| | |-----image0.jpg
| | |-----image1.jpg
| | |-----image2.jpg
| | |----- ...........
| |
| |-----cats
| |-----image0.jpg
| |-----image1.jpg
| |-----image2.jpg
| |----- ...........
|-----templates
| |-----index.html
|-----static
| |-----stylesheet.css
| |-----img1.jpg(背景画像)
|-----uploads
1.犬猫の画像データセットの準備、前加工
画像データセットのダウンロード
kaggleにデータセットがアップロードされてますので、そこから画像データを取得します。
犬と猫の画像がそれぞれ約11,000枚用意されています。
私の場合は訓練データ各4000枚、検証データ4000枚を用意しました。
■ kaggleリンク : https://www.kaggle.com/c/dogs-vs-cats/data
画像データの前加工
用意した画像はサイズなどがバラバラなので、生成するモデルの学習と検証に使用できるよう加工していきます。
from msilib.schema import Binary
from keras.preprocessing.image import ImageDataGenerator
from tensorflow.keras.models import Sequential
from tensorflow.keras.layers import Activation, Dense, Conv2D, MaxPooling2D, Flatten, Dropout
from tensorflow.keras import optimizers
import matplotlib.pyplot as plt
import numpy as np

train_data_path = '~ファイルパス~/dataset/train'
test_data_path = '~ファイルパス~/dataset/test'

train_datagen = ImageDataGenerator(rescale=1/255)
test_datagen = ImageDataGenerator(rescale=1/255)

train_generator = train_datagen.flow_from_directory(directory=train_data_path,
                                                    target_size=(150,150),
                                                    batch_size=32,
                                                    class_mode='binary'
                                                    )

test_generator = test_datagen.flow_from_directory(directory=train_data_path,
                                                    target_size=(150,150),
                                                    batch_size=32,
                                                    class_mode='binary'
                                                    )
print(train_generator.class_indices)
訓練データと検証データを保存しているのファイルパスを記述します。
ImageDataGenerator(rescale=1/255) にて入力する画像を正規化します。
flow_from_directory() にて処理時の画像サイズ、バッチサイズ、二値分類を明記します。
print(train_generator.class_indices) に'dogs'と'cats'にクラス分類されていることが表示されます。
2. CNN判別モデルの構築
モデルを構築し、準備した画像を用いて判別学習を行います。
学習後は学習状況をグラフ化して性能を評価、調整を行います。
model = Sequential()
model.add(Conv2D(filters=64, kernel_size=(5,5), input_shape=(150, 150,3)))
model.add(Activation('relu'))
model.add(MaxPooling2D(pool_size=(2,2)))
model.add(Conv2D(filters=128, kernel_size=(5,5)))
model.add(Activation('relu'))
model.add(MaxPooling2D(pool_size=(2,2)))
model.add(Conv2D(filters=128, kernel_size=(5,5)))
model.add(Activation('relu'))
model.add(MaxPooling2D(pool_size=(2,2)))
model.add(Dropout(0.5))
model.add(Flatten())
model.add(Dense(256))
model.add(Activation('relu'))
model.add(Dropout(0.5))
model.add(Dense(1))
model.add(Activation('sigmoid'))

sgd = optimizers.SGD(lr=0.1)

model.compile(loss='mean_squared_error', optimizer=sgd, metrics=['accuracy'])

history = model.fit_generator(train_generator, epochs=80, verbose=1, validation_data=(test_generator), steps_per_epoch=4000/32, validation_steps=4000/32 )

model.save('model.h5')

loss = history.history['loss']
val_loss = history.history['val_loss']

learning_count = len(loss) + 1

plt.plot(range(1, learning_count),loss,marker='+',label='loss')
plt.plot(range(1, learning_count),val_loss,marker='.',label='val_loss')
plt.legend(loc = 'best', fontsize=10)
plt.xlabel('learning_count')
plt.ylabel('loss')
plt.show()

accuracy = history.history['accuracy']
val_accuracy = history.history['val_accuracy']

plt.plot(range(1, learning_count),accuracy,marker='+',label='accuracy')
plt.plot(range(1, learning_count),val_accuracy,marker='.',label='val_accuracy')
plt.legend(loc = 'best', fontsize=10)
plt.xlabel('learning_count')
plt.ylabel('accuracy')
plt.show()
Sequential( ):レイヤーを追加し下記の層を適切に追加してCNNモデルを構築していきます。
Conv2D:畳み込み層。入力画像の一部の特徴を抽出し特徴マップを生成します。
MaxPooling2:プーリング層。畳み込み層で生成した特徴マップを集約し、データ量を削減します。
Activation:活性化関数。非線形性を持たせデータを分類できるようにします。今回は'relu'関数を使用します。
Dropout:訓練データに対する過学習を防止します。引数は削除する割合を示しています。
Flatten:全結合層に変換します。
model.compile( ) モデルをコンパイルします。
引数には損失関数(loss)、最適化関数(optimizer)、評価関数(metrics)を選択します。
model.fit_generator( ) コンパイルしたモデルを用いて学習を開始します。
引数には学習回数(epochs)、学習、検証データ数とバッチサイズ(steps_per_epoch、validation_steps)等を記します。
model.save( ) 学習したモデルを保存します。
load_model( )にて保存したモデルを使用することができ、毎回学習する必要がなくなります。
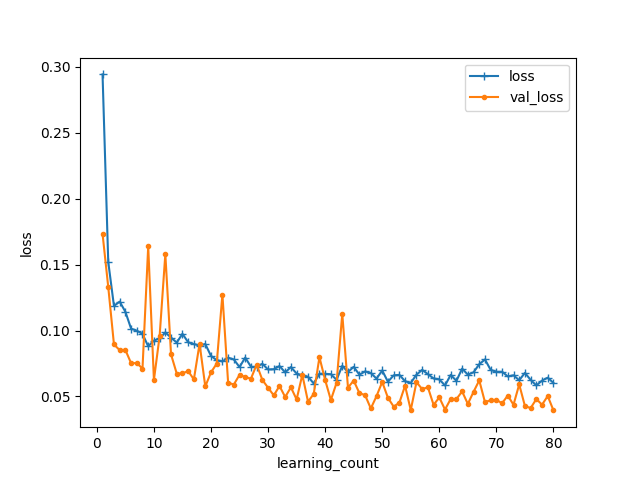
学習モデルの評価
学習が終了すると、これまでの学習状況がグラフ化されます。
縦軸が訓練データ、検証データに対する損失(教師データとの誤差)
横軸が訓練回数(epochs)を示しています。

縦軸が訓練データ、検証データに対する正解率
横軸が訓練回数(epochs)を示しています。

学習結果には様々な要素が関係してきます。
開始時は訓練データ、検証データはともに0.5~0.6ほどとなっておりました。
50回目の学習時ほどから性能は横ばいになり、0.9以上の数値を示しています。
今回はそれなりの判定精度になっているように思えます。
3. webフロントサイドの構築
HTML、CSSを使用しwebのフロント部分を作成します。
<!DOCTYPE html>
<html lang="ja">
<head>
<meta charset="UTF-8">
<meta name="viewport" content="width=device-width, initial-scale=1.0">
<meta http-equiv="X-UA-Compatible" content="ie=edge">
<title>Dogs&Cats Classifier</title>
<link rel="stylesheet" href="./static/stylesheet.css">
</head>
<body>
<header>
<a class="header-logo" href="#">犬猫判別</a>
</header>
<div class="container">
<div class="main">
<h2> 送信された犬か猫の画像をAIが判別します</h2>
<p>ファイル選択後に、判定開始を実行してください</p>
<form method="POST" enctype="multipart/form-data">
<label for="file_upload">
ファイルを選択する
<input class="file_choose" type="file" name="file" id="file_upload">
</label>
<input class="btn" value="判定開始" type="submit">
</form>
<div class="answer">{{answer}}</div>
</div>
</div>
<footer>
<small>© 2022 </small>
</footer>
</body>
</html>
header {
    background-color: #5b75cc;
    height: 60px;
    margin-top: -8px;
    margin-left:-8px;
    margin-right:-8px;
    display: flex;
    flex-direction: row-reverse;
    justify-content: space-between;
    opacity:0.7;
}

.header-logo {
    color: #fff;
    font-size: 25px;
    margin: 15px 25px;
}

.container{
    background-image: url(img1.jpg);
    background-size:cover;
    margin-left:-8px;
    margin-right:-8px;
    margin-top:-20px;
    text-align: center;
}

.main {
    height: 630px;
}

h2 {
    color: rgb(160, 247, 247);
    margin-bottom: 45px;
    padding-top: 30px;
    text-align: center;
    font-size:50px;
}

p {
    font-size:35px;
    color: rgb(199, 247, 247);
    margin: 20px 0px 150px 0px;
    text-align: center;
}

.answer {
    color: rgb(65, 64, 63);
    margin: 141px 0px 0px 0px;
    text-align: center;
    font-size:40px;
    font-family: 'Arial Narrow Bold';
    background-color: rgb(172, 170, 169);
}

form {
    text-align: center;
}

footer {
    background-color: #F7F7F7;
    height: 70px;
    margin: -8px;
    position: relative;
}

small {
    margin: 20px 5px;
    position: absolute;
    float:left;
    bottom: 0;
}

.btn{
    font-size:20px;
    padding:15px 20px;
    color:rgb(89, 107, 107);
    background-color:#cbe3f7;
    border-radius: 6px;
    opacity:0.8;
    font-family: 'Arial Narrow Bold';
}

.btn:hover{
    opacity:1;
    cursor: pointer;
}

.file_choose{
    display:none;
    font-size:15px;
    padding:0px 0px;
    color:rgb(231, 231, 231);
}

label{
    color:rgb(58, 252, 252);
    font-size:45px;
    margin-right:20px;
    opacity:0.9;
    text-align: center;
}

label:hover{
    opacity:1;
    cursor: pointer;
}
上記のhtmlファイルとcssファイルでwebのフロント部分を作成しました。
見え方としては下記のようになりました。

4. webサーバーサイドの構築
Flaskを用いて、生成した判別モデルをフロント部分に反映させます。
import os
from flask import Flask, request, redirect, render_template, flash
from werkzeug.utils import secure_filename
from tensorflow.keras.models import Sequential, load_model
from tensorflow.keras.preprocessing import image
import numpy as np

classes = ["猫","犬"]
image_size = 150

UPLOAD_FOLDER = "~ファイルパス~\\uploads"
ALLOWED_EXTENSIONS = set(['png', 'jpg', 'jpeg', 'gif'])

app = Flask(__name__)

def allowed_file(filename):
    return '.' in filename and filename.rsplit('.', 1)[1].lower() in ALLOWED_EXTENSIONS

model = load_model('./cats_dogs.h5')

@app.route('/', methods=['GET', 'POST'])
def upload_file():
    if request.method == 'POST':

        if 'file' not in request.files:
            ans = 'ファイルがありません'
            return render_template("index.html",answer=ans)

        file = request.files['file']

        if file.filename == '':
            ans = 'ファイルがありません'
            return render_template("index.html",answer=ans)

        if file and allowed_file(file.filename):
            filename = secure_filename(file.filename)
            print(filename)
            file.save(os.path.join(UPLOAD_FOLDER, filename))
            filepath = os.path.join(UPLOAD_FOLDER, filename)

            img = image.load_img(filepath, target_size=(image_size,image_size))
            img = image.img_to_array(img)
            img = np.expand_dims(img, axis=0)
            data = img /255

            result = model.predict(data)
            result = round(result[0,0])
            pred_answer = "これは " + classes[result] + " です"

            return render_template("index.html",answer=pred_answer)

    return render_template("index.html",answer="判定受け付け待ち")

if __name__ == "__main__":
    app.run()
まずクラスや入力画像、画像保存フォルダ、画像の拡張子を記述します。
app = Flask(name) Flaskのインスタンスを作成します。
allowed_file( ) '.'がファイル名に含まれ、許可した拡張子を使用している場合にTrueを返します。
load_model( ) 学習済みのモデルを使用します。
@app.route( ) @(デコレータ)は次の行で定義された関数に何かしらの処理を行います。
今回はapp.routeという指定されたURLに関数を関連付ける処理を行います。
引数の'GET'、'POST'はHTTPメソッドでweb上のファイルのやり取りを表しています。
requestはウェブ上のデータを扱うための関数です。
例えばrequest.methodにはHTTPメソッドが格納されています。
そしてweb上の操作による条件によってrender_template( )を返し引数の文字列をindex.htmlの{{answer}}に反映させます。
画像ファイルを選択し、allowed_file( )がTrueを返している場合はsecure_filename( )により危険な文字列がないか確認後、画像ファイルをUPLOAD_FOLDERのファイルパスに保存します。
入力した画像は判別するためにnumpy配列に変換をしなければなりません。
その後、生成モデルは複数の画像を読み込むことを前提にしているため、画像の次元数を増やす必要があります。
最後に画像に対して正規化を行いモデルにデータを渡します。
model.predict( ) 引数で引き渡された画像に対して0~1の数値を返します。
入力画像が猫の場合は0に近く、犬の場合は1に近づくように出力されます。
round( ) 引数の数値を四捨五入するような処理を行います。これにより0か1のどちらかの数値を出力するようになります。
リストで定義したclassesから出力されたインデックスに対応した文字列を取得します。
サイドrender_template( )に文字列を引き渡しweb上に文字列を反映させます。
5. 動作確認
実際に犬か猫の画像を入力して、AIに判定させていきます。
今回は犬の画像を入力し、判定開始ボタンから判別を行いました。
判別結果は下記のようになりました。

これは犬ですと正しい判別ができています。
考察
今回は犬と猫の2種類と、やや特徴の違うクラスでの判別を行いました。
それもあってか判別にやや高い性能を有しているように思えました。
猫や犬のみの品種判別となると、ここまでの性能にならないように思います。
同様に比較対象として、VGG16モデルを用いた判別モデルも構築しました。
VGG16:重みがある層が畳み込み層13、全結合層3で構成。数回の畳み込み後にプーリングを行う比較的に層が深めなモデル。
コードは下記となります。
from tensorflow.keras import optimizers
from tensorflow.keras.applications.vgg16 import VGG16
from tensorflow.keras.layers import Dense, Dropout, Flatten, Input, Activation
from tensorflow.keras.models import Model, Sequential
from tensorflow.keras.utils import to_categorical
from keras.preprocessing.image import ImageDataGenerator
import matplotlib.pyplot as plt
import numpy as np

train_data_dir = '~ファイルパス~/dataset/train'
test_data_dir = '~ファイルパス~/dataset/test'

train_datagen = ImageDataGenerator(rescale=1/255)
test_datagen = ImageDataGenerator(rescale=1/255)

train_generator = train_datagen.flow_from_directory(directory=train_data_dir,
                                                    target_size=(150,150),
                                                    batch_size=32,
                                                    class_mode='binary'
                                                    )

test_generator = test_datagen.flow_from_directory(directory=train_data_dir,
                                                    target_size=(150,150),
                                                    batch_size=32,
                                                    class_mode='binary'
                                                    )
print(train_generator.class_indices)

input_tensor = Input(shape=(150, 150, 3))

vgg16 = VGG16(include_top=False, weights='imagenet', input_tensor=input_tensor)

top_model = Sequential()
top_model.add(Flatten(input_shape=vgg16.output_shape[1:]))
top_model.add(Dense(256))
top_model.add(Activation('relu'))
top_model.add(Dropout(0.5))
top_model.add(Dense(1))
top_model.add(Activation('sigmoid'))

model = Model(inputs=vgg16.input, outputs=top_model(vgg16.output))

for layer in model.layers[:19]:
    layer.trainable = False

model.compile(loss='mean_squared_error',
              optimizer=optimizers.SGD(lr=0.1),
              metrics=['accuracy'])

history = model.fit_generator(train_generator, epochs=80, verbose=1, validation_data=(test_generator), steps_per_epoch=4000/32, validation_steps=1000/32 )

model.save('vgg16_model.h5')

loss = history.history['loss']
val_loss = history.history['val_loss']

learning_count = len(loss) + 1

plt.plot(range(1, learning_count),loss,marker='+',label='loss')
plt.plot(range(1, learning_count),val_loss,marker='.',label='val_loss')
plt.legend(loc = 'best', fontsize=10)
plt.xlabel('learning_count')
plt.ylabel('loss')
plt.show()


accuracy = history.history['accuracy']
val_accuracy = history.history['val_accuracy']

plt.plot(range(1, learning_count),accuracy,marker='+',label='accuracy')
plt.plot(range(1, learning_count),val_accuracy,marker='.',label='val_accuracy')
plt.legend(loc = 'best', fontsize=10)
plt.xlabel('learning_count')
plt.ylabel('accuracy')
plt.show()
VGG16学習モデルの評価


非常に早い段階で損失値(loss)0.1以下、正解率(accuracy)0.85以上のモデルが構築できています。
しかし最終的なモデルの性能として損失値(loss)0.05以下、正解率(accuracy)0.95以上のCNNモデルが優勢に見えます。
下記に今回のCNNモデルを用いた実際のアプリリンクを記載しますので気が向いたらご覧ください。
リンク:https://dogcatimage.herokuapp.com/
反省
AE(AutoEncoder)などほかにも様々なモデルのアルゴリズムがあります。
それぞれを検証して性能の比較を行いたかったのですが今回はCNNモデルとVGG16モデルのみとなりました。
次回以降はさらに複雑な判別ができるよう精進していきたいです。