Aurora serverlessのData APIを使ってデータ管理している環境で、DBのスキーマのバージョン管理を行う方法を調べてみたのでその記録メモ。
概要
様々なDBマイグレーションツールはあるもののDataAPI経由で管理できるのが少なそうだったが、
PythonのAlembicというDBマイグレーションツールがSQLAlchemy経由での処理が実装されていて、SQLAlchemyがDataAPIに対応しているため管理が実現可能だったので試してみた。
事前準備
AWS上での設定
- Aurora serverlessのクラスタを作成済み
- DBへの接続方法としてDataAPIが有効になっている
- 接続のための認証情報はSecretで管理されている
- alembicで処理実行する環境からDataAPIを呼び出せるIAM権限が付与されている
alembic関連のインストール
- alembicおよびsqlalchemyでDataAPI対応のためのライブラリのインストールを実施
pip install alembic sqlalchemy-aurora-data-api
alembicの設定
ここから、実際にalembicを使ってリビジョン管理する実態のコードを作ります。
初期化
alembic initというコマンドを用いることでalembic実行に必要なファイル群が生成されます。
alembicをインストールした環境で、任意のディレクトリ上で、以下のようにコマンド実行します。
alembic init ディレクトリ名
実際に手元で実行したコマンドは以下。
alembic init migrations
すると以下のようなファイル群が作成されます。
./
├── alembic.ini
└── migrations
    ├── env.py
    ├── README
    ├── script.py.mako
    └── versions
alembic.iniはalembic実行時の設定ファイルになります。
重要なのはenv.pyです。
この中身はデフォルトでは以下のようになります。
from logging.config import fileConfig

from sqlalchemy import engine_from_config
from sqlalchemy import pool

from alembic import context

# this is the Alembic Config object, which provides
# access to the values within the .ini file in use.
config = context.config

# Interpret the config file for Python logging.
# This line sets up loggers basically.
fileConfig(config.config_file_name)

# add your model's MetaData object here
# for 'autogenerate' support
# from myapp import mymodel
# target_metadata = mymodel.Base.metadata
target_metadata = None

# other values from the config, defined by the needs of env.py,
# can be acquired:
# my_important_option = config.get_main_option("my_important_option")
# ... etc.


def run_migrations_offline():
    """Run migrations in 'offline' mode.

    This configures the context with just a URL
    and not an Engine, though an Engine is acceptable
    here as well.  By skipping the Engine creation
    we don't even need a DBAPI to be available.

    Calls to context.execute() here emit the given string to the
    script output.

    """
    url = config.get_main_option("sqlalchemy.url")
    context.configure(
        url=url,
        target_metadata=target_metadata,
        literal_binds=True,
        dialect_opts={"paramstyle": "named"},
    )

    with context.begin_transaction():
        context.run_migrations()


def run_migrations_online():
    """Run migrations in 'online' mode.

    In this scenario we need to create an Engine
    and associate a connection with the context.

    """
    connectable = engine_from_config(
        config.get_section(config.config_ini_section),
        prefix="sqlalchemy.",
        poolclass=pool.NullPool,
    )

    with connectable.connect() as connection:
        context.configure(
            connection=connection, target_metadata=target_metadata
        )

        with context.begin_transaction():
            context.run_migrations()


if context.is_offline_mode():
    run_migrations_offline()
else:
    run_migrations_online()
ポイントは、run_migrations_online関数の中です。
この処理はupgradeやdowngrade実行する際の最初のDBへの接続処理の部分になります。
つまり、このrun_migrations_onlineの関数の中で、Aurora serverlessのData APIに接続できるようにすればいいということです。
(なお、似たようなrun_migrations_offlineというのがありますが、こちらはオンライン実行ではなく、upgradeするための処理をSQL文として吐き出す際に呼ばれる関数で、実際にDBに接続にいくわけではないようなのでこちらは特に変更の必要はないと思います。)
alembicはDBの接続部分をSQLAlchemyのライブラリを経由してつなぎます。
SQLAlchemyはsqlalchemy-aurora-data-apiをインストールすることで、Aurora serverlessのData API経由でつないでDB処理が可能になります。
このライブラリを使って以下のようにrun_migration_onlineを定義します。
Aurora Serverless Data APIへの接続設定
まず接続に必要なパラメータ系をalembic.iniのファイルに追記します。
追記は、デフォルトで作成される[alembic]のカテゴリの中に行います。
[alembic]
・・・省略
# sqlalchemy.url = driver://user:pass@localhost/dbname #←デフォルトで記載されているのをコメントアウト
sqlalchemy.url = mysql+auroradataapi://:@/ #←ここにsqlalchemy-aurora-data-apiでサポートされるURL形式で設定を記載
# 以下はAurora serverlessの接続処理に必要な情報に対して適当な名前を付与して追記
db_name = sampledb
aws_default_region = us-west-1
cluster_arn = arn:aws:rds:us-west-1:xxxxxxxxxxx:cluster:sample-db-cluster
secret_arn = arn:aws:secretsmanager:us-west-1:xxxxxxxxxxxxx:secret:sample-db-cluster-AuroraUserSecret-XXXX
・・・省略
これらの設定を使ってsqlalchemyでcreate_engineを行いAurora serverless Data APIにつなぐ設定をenv.pyに記載します。
from logging.config import fileConfig

from sqlalchemy import engine_from_config
from sqlalchemy import create_engine # ←ここを追加
import os
from sqlalchemy import pool

from alembic import context

# this is the Alembic Config object, which provides
# access to the values within the .ini file in use.
config = context.config

# Interpret the config file for Python logging.
# This line sets up loggers basically.
fileConfig(config.config_file_name)

# add your model's MetaData object here
# for 'autogenerate' support
# from myapp import mymodel
# target_metadata = mymodel.Base.metadata
target_metadata = None

# other values from the config, defined by the needs of env.py,
# can be acquired:
# my_important_option = config.get_main_option("my_important_option")
# ... etc.


def run_migrations_offline():
    """Run migrations in 'offline' mode.

    This configures the context with just a URL
    and not an Engine, though an Engine is acceptable
    here as well.  By skipping the Engine creation
    we don't even need a DBAPI to be available.

    Calls to context.execute() here emit the given string to the
    script output.

    """
    url = config.get_main_option("sqlalchemy.url")
    context.configure(
        url=url,
        target_metadata=target_metadata,
        literal_binds=True,
        dialect_opts={"paramstyle": "named"},
    )

    with context.begin_transaction():
        context.run_migrations()


def run_migrations_online():
    """Run migrations in 'online' mode.

    In this scenario we need to create an Engine
    and associate a connection with the context.

    """
    # ここから
    aws_region = config.get_main_option('aws_default_region')
    cluster_arn = config.get_main_option('cluster_arn')
    secret_arn = config.get_main_option('secret_arn')
    db_name = config.get_main_option('db_name')
    sqlalchemy_url = config.get_main_option('sqlalchemy.url')
    os.environ['AWS_DEFAULT_REGION'] = aws_region

    connectable = create_engine(
                f'{sqlalchemy_url}{db_name}',
                echo=True,
                connect_args=dict(aurora_cluster_arn=cluster_arn, secret_arn=secret_arn))
    # ここまでを変更
    with connectable.connect() as connection:
        context.configure(
            connection=connection, target_metadata=target_metadata
        )

        with context.begin_transaction():
            context.run_migrations()


if context.is_offline_mode():
    run_migrations_offline()
else:
    run_migrations_online()
これで接続設定が完了です。
ここからは実際にDBのスキーマ定義を作成していきます。
versionファイルの作成
alembicコマンドを使って、スキーマバージョンの定義ファイルを作ることが可能です。
以下のようにコメント文とともにrevision作成することでひな形ファイルがversionsディレクトリ配下に作られます。
alembic revision -m 'create sample table'
versionsフォルダ下に以下のようなファイルが作られます。
- versions/deb04adc7bd7_create_sample_table.py
この中身はデフォルトだと以下のようになっています。
"""create sample table

Revision ID: deb04adc7bd7
Revises:
Create Date: 2021-09-28 12:46:06.811480

"""
from alembic import op
import sqlalchemy as sa


# revision identifiers, used by Alembic.
revision = 'deb04adc7bd7'
down_revision = None
branch_labels = None
depends_on = None


def upgrade():
    pass


def downgrade():
    pass
このリビジョンに対してupgrade処理が走ったときにはupgrade関数が、downgrade処理が走ったときにはdowngradeが呼ばれる仕組みです。
ここを例えば以下のように書き換えて上げればupgradeでテーブル作成、切り戻しのためのdowngrade実行時にはテーブル削除が実行されることになります。
"""create sample table

Revision ID: deb04adc7bd7
Revises:
Create Date: 2021-09-28 12:46:06.811480

"""
from alembic import op
import sqlalchemy as sa


# revision identifiers, used by Alembic.
revision = 'deb04adc7bd7'
down_revision = None
branch_labels = None
depends_on = None


def upgrade():
    op.execute('CREATE TABLE sample (id int, name varchar(10))')


def downgrade():
    op.drop_table('sample')
upgrade, downgradeの中に記述する実行処理のサポート関数はこちらにまとまっているので参考に記述します。
op.executeのようにクエリをそのまま記述することもできます。
これで設定は完了です。
upgrade/downgrade処理の実行
実際にDBに適用する場合には以下のように実行します。
alembic upgrade head
上記の例の場合は、alembicで管理されている最新の変更まですべてupgradeするという定義です。
特定の時点にまで上げたければheadと記載している部分はリビジョン番号で指定します。
リビジョン番号は先程作成したversions配下のファイル内のRevision IDとして記載されている番号です。
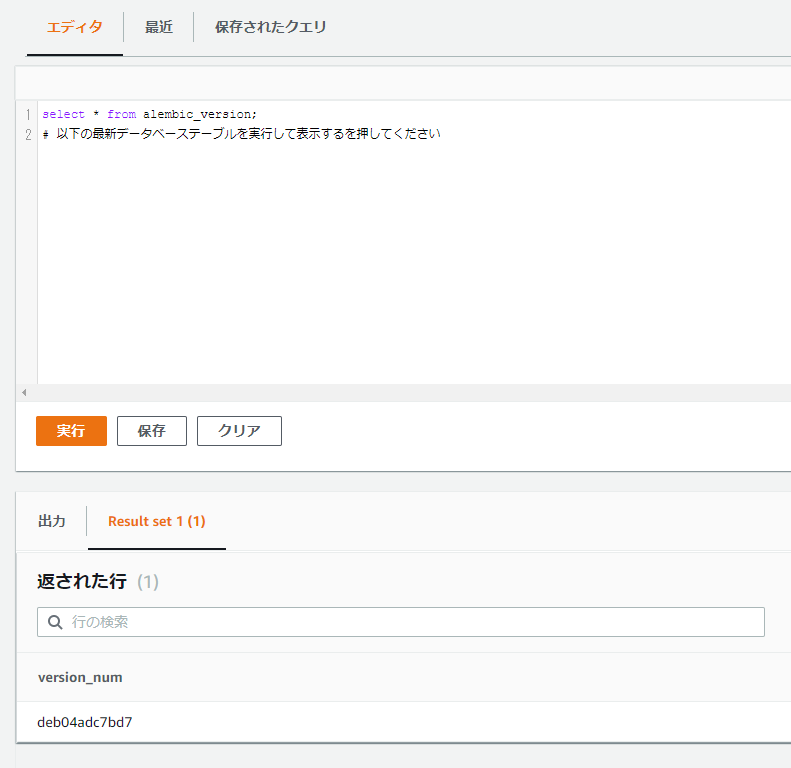
このリビジョン番号がDB上にalembic_versionというテーブル上に記録され、現在DBに対してどのリビジョンまでクエリが適用されたかが管理されます。
downgradeしたい場合には以下のように戻したい場所のリビジョン指定して実行するだけでOKです。
alembic downgrade リビジョン番号
まとめ
Aurora serverless Data APIを経由してDB管理する場合でもSQLAlchemyは対応しており、SQLAlchemy対応しているAlembicというDBマイグレーションツールを使うことでスキーマ管理が可能になります。
あとはこの処理をうまくCI/CDと組み合わせて実行すれば自動管理も可能になるのではないでしょうか。