fastlaneを使ってBetaへアップロードしてみたいと思います。
今回は公式のセットアップ手順を元に作業を行いました。
- セットアップ
- iOSプロジェクトにfastlaneを導入する(init)
- Fastfileの編集
- 実行
公式ページはこちら↓
https://docs.fastlane.tools/getting-started/ios/setup/
1. セットアップ
最新のコマンドラインツールをインストール
まずは最新のコマンドラインツールをインストールします。
$ xcode-select --install
fastlaneのインストール
RubyGemsを使う方法とHomebrewを使う方法があるようですが、今回はRubyGemsを使ってインストールしました。
# インストール
$ sudo gem install fastlane -NV
...
Successfully installed fastlane-2.106.2
53 gems installed

# バージョン確認
$ fastlane --version
fastlane installation at path:
/usr/local/lib/ruby/gems/2.4.0/gems/fastlane-2.106.2/bin/fastlane
-----------------------------
[]
fastlane 2.106.2
2. iOSプロジェクトにfastlaneを導入する(init)
iOSプロジェクトに移動してfastlaneのセットアップを行います。
# プロジェクトディレクトリに移動
$ cd {プロジェクトディレクトリ}

# init
$ fastlane init
実行するとプロジェクトディレクトリの直下にfastlaneディレクトリが出来上がりました。この中のFastfileにコマンドを記述していくことになります。
3. Fastfileの編集
目的の「自動ビルド > Betaへアップロード > Slackへ結果の通知」ができるように記述しました。
default_platform(:ios)
platform :ios do
before_all do
# Gitのステータスチェック
ensure_git_status_clean
# pod install
cocoapods
end
desc "Crashlytics Betaへのアップロード"
lane :beta do
# 最終コミット取得
commit = last_git_commit
# Config -> Debug
configuration = "Debug"
ENV["GYM_CONFIGURATION"] = configuration
# AdHoc用プロビジョニングプロファイルの取得
sigh(
app_identifier: "xx.xxx.xxxxxx",
username: "xxxxxx@xxxx.xx",
force: false,
adhoc: true
)
# アプリのビルド
build_app(
clean: true,
scheme: "xxxxx",
export_method: "ad-hoc",
workspace: "xxxxxx.xcworkspace"
)
# Betaにアップロード
crashlytics(
api_token: "api_token",
build_secret: "build_secret",
crashlytics_path: "./Pods/Crashlytics/iOS/Crashlytics.framework",
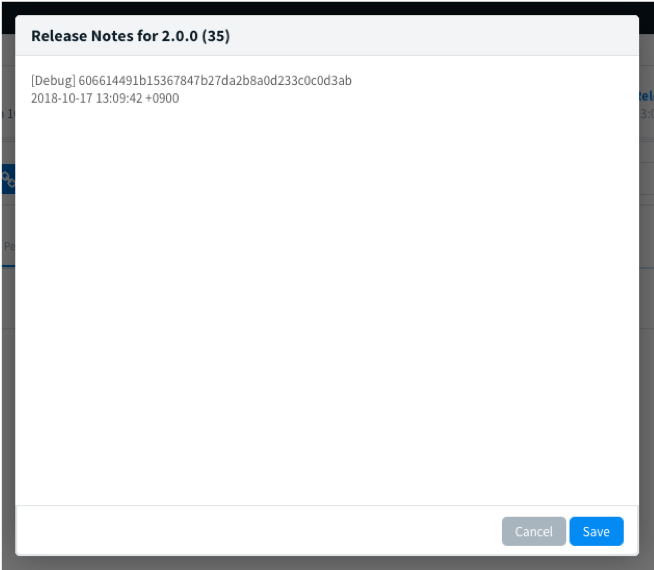
notes: "[#{configuration}] #{commit[:commit_hash]}\n#{Time.new.to_s}"
)
end
end
説明
before_all
ビルド実行前の処理になります。
Gitのステータスがクリーンな時のみビルド実行を行うようにしています。
あとはpod installも毎回するようにしています。
lane :beta
こちらがbetaアップロードするためのlaneになります。
| Action | 説明 | オプション |
|---|---|---|
| sigh | プロビジョニングプロファイルを取得します。(ここではAdHoc用) ※初回実行時はパスワードを聞かれました。(キーチェーンに登録されるので次回からは省略できると思います) |
app_identifier: Bundle ID username: Apple Developer Accountのユーザ名を記述 |
| build_app | このアクションでアプリをビルド(アーカイブ)します。 |
schme: ビルド対象のTARGET名を記述します。 export_method: ad-hoc用のプロビジョニングプロファイルでアーカイブするので「ad-hoc」としています。 workspace: workspace名を記述します。 |
| crashlytics | build_appでアーカイブしたものをBetaにアップロードします。 |
api_token, build_secret: Crashlyticsで取得したapiトークンとシークレットを設定します。 crashlytics_path: crashlyticsのライブラリのpathを指定します。cocoapodsで管理している場合は記載のままで大丈夫です。 notes: リリースノートです。ここでは「[Debug] commit_hash (改行) アップロード日時」という感じで掲載されます。 |
4. 実行
ここまでできたらlaneを実行してみます。
# プロジェクトのTOPディレクトリに移動して実行
$ bundle exec fastlane beta
...
[13:10:01]: fastlane.tools just saved you 6 minutes! 🎉
成功するとちゃんとBetaにアップされていることが確認できます。