NIFTY Advent Calendar 2017 17日目の記事です。
昨日は@megane42さんの「我々のチームのコードレビューガイドラインを共有します」でした。
今日は、「Swift + CollectionView + StoryBoardをなしでカレンダーをつくる」です。
よろしくお願いします。
やること
概要
- CollectionViewでカレンダーをつくる
- サンプルAPIを叩き、JSONを取得してカレンダーに表示する
- StoryBoardは使わない
- AutoLayoutは使わない
どんなかんじか
AdventCalendarっぽく日付ごとに"〇〇さん"を表示してみる

環境
- macOS Sierra (10.12.5)
- Xcode 8.3.2
- Swift 3.1
謝辞
本投稿は以下の記事と著書を参考に作成しました。大変お世話になりました。ありがとうございました。
- 【Swift】Calendarアプリを作る @sakuran
- Swift実践入門
つくりかた
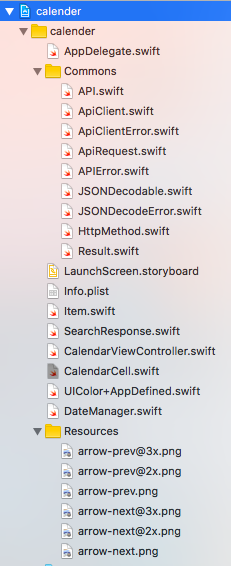
ファイル郡
結構多いですね。
Commons配下はただのAPIClientなので、Alamofireなどで代替すれば作る必要はありません。
手順
1)カレンダーをつくる
https://qiita.com/sakuran/items/3c2c9f22cbcbf4aff731
こちらの記事に載っている内容と重複してしまうので、一つ一つの説明は上記の記事におまかせします。
ただし、上記の記事はSwift2.1ですので、Xcode8.3以上では動きません。
Swift2.1→Swift3.1の書き換えるべき部分とStoryBoard使わないために変更した部分を共有します。
カスタムセルの作成
@sakuranさんの記事と同じ
Dateを扱うクラスの作成
import UIKit

extension Date {
    func monthAgoDate() -> Date {
        let addValue = -1
        let calendar = Calendar.current
        var dateComponents = DateComponents()
        dateComponents.month = addValue
        return calendar.date(byAdding: dateComponents, to: self)!
    }
    func monthLaterDate() -> Date {
        let addValue: Int = 1
        let calendar = Calendar.current
        var dateComponents = DateComponents()
        dateComponents.month = addValue

        return calendar.date(byAdding: dateComponents, to: self)!
    }
}

class DateManager: NSObject {

    var currentMonthOfDates = [Date]() //表記する月の配列
    var selectedDate = Date()
    let daysPerWeek: Int = 7
    var numberOfItems: Int = 0 //セルの個数 nilが入らないようにする

    //月ごとのセルの数を返すメソッド
    func daysAcquisition() -> Int {
        let rangeOfWeeks = Calendar.current.range(of: .weekOfMonth, in: .month, for: firstDateOfMonth() as Date)
        guard let unwrapedRangeOfWeeks = rangeOfWeeks else {
            return numberOfItems
        }

        let numberOfWeeks = unwrapedRangeOfWeeks.count //月が持つ週の数

        numberOfItems = numberOfWeeks * daysPerWeek //週の数×列の数
        return numberOfItems
    }
    //月の初日を取得
    func firstDateOfMonth() -> Date {
        var components = Calendar.current.dateComponents([.year, .month, .day], from:selectedDate)
        components.day = 1
        let firstDateMonth = Calendar.current.date(from: components)!
        return firstDateMonth
    }

    //表記する日にちの取得
    func dateForCellAtIndexPath(numberOfItem: Int) {
        let ordinalityOfFirstDay = Calendar.current.ordinality(of: .day, in: .weekOfMonth, for: firstDateOfMonth())

        for i in 0 ..< numberOfItems {
            //「月の初日」と「indexPath.item番目のセルに表示する日」の差を計算する
            var dateComponents = DateComponents()
            dateComponents.day = i - (ordinalityOfFirstDay! - 1)
            // 表示する月の初日から計算した差を引いた日付を取得
            let date = Calendar.current.date(byAdding: dateComponents as DateComponents, to: firstDateOfMonth() as Date)!

            currentMonthOfDates.append(date)
        }
    }
    // 省略
}
Swift3.1対応として、NSDate()→Date()、NSCalendar()->Calendar()、返却されたOptionalをguard、for文の変更などをしたりしています。
が、ロジックは本家とほぼ同じです。
ViewControllerの作成
import UIKit

extension UIColor {
    class var theme: UIColor { return #colorLiteral(red: 0.9143123627, green: 0.2565262914, blue: 0.3365804255, alpha: 1) }
    class var lightBlue: UIColor {
        return UIColor(red: 92.0 / 255, green: 192.0 / 255, blue: 210.0 / 255, alpha: 1.0)
    }

    class var lightRed: UIColor {
        return UIColor(red: 195.0 / 255, green: 123.0 / 255, blue: 175.0 / 255, alpha: 1.0)
    }
}

class CalnendarViewController: UIViewController, UICollectionViewDataSource, UICollectionViewDelegate, UICollectionViewDelegateFlowLayout{

    // 省略

    override func viewDidLoad() {
        super.viewDidLoad()

        // 先月、次月ボタンとタップ時のセレクタを追加
        let headerPrevButton = UIBarButtonItem(image: UIImage(named: "arrow-prev.png"), style: .plain, target: self, action: #selector(self.tappedHeaderPrevButton))
        let headerNextButton = UIBarButtonItem(image: UIImage(named: "arrow-next.png"), style: .plain, target: self, action: #selector(self.tappedHeaderNextButton))

        headerPrevButton.tintColor = .theme
        headerNextButton.tintColor = .theme

        // NavigationBarにボタン表示
        self.navigationItem.leftBarButtonItem = headerPrevButton
        self.navigationItem.rightBarButtonItem = headerNextButton

        // CollectionViewを生成
        let layout = UICollectionViewFlowLayout()
        calenderCollectionView = UICollectionView(frame: self.view.frame, collectionViewLayout: layout)
        calenderCollectionView.register(CalendarCell.self, forCellWithReuseIdentifier: "cell")
        calenderCollectionView.delegate = self
        calenderCollectionView.dataSource = self
        calenderCollectionView.backgroundColor = UIColor.white

        self.navigationItem.title = currentHeaderTitle(headerDateFormat)
        self.view.addSubview(calenderCollectionView)
    }

    // 省略
    // CollectionViewのDelegateなど

}
以上の3ファイルがあればStoryBoardを使わずにカレンダーが完成します。
@sakuranさんの記事の内容を上記のように書き換えたら一度ビルドしてみましょう。
2)JSONを取得する
以下のJSONが返却されると想定します。
{
  "count": 25,
  "items": [
    {
      "author": "Aさん",
      "publishDate": "2017-12-01"
    },
    {
      "author": "Bさん",
      "publishDate": "2017-12-02"
    },

    // 省略

    {
      "author": "Yさん",
      "publishDate": "2017-12-25"
    }
  ]
}
JSONを取得するためのAPIClientを作ります。
以下、Swift実践入門にすべてソースが載っていますので、一部割愛します。
ただ、この部分はただのJSON取得用ですので、Alamofireなど便利なライブラリで代替してもらえれば問題ありません。
import Foundation

final class API {
    struct SearchItems: ApiRequest {
        typealias Response = SearchResponse<Item>

        var method: HTTPMethod {
            return .get
        }

        var path: String {
            return "https://*******/nifty-adventcal2017/items.json"
        }

        var parameters: Any? {
            return nil
        }
    }
}
JSONをオブジェクト化
取得したJSONをひとつづつオブジェクトに変換します。
import Foundation

class Item: NSObject, JSONDecodable {
    let author: String
    let publishDate: String

    let keyAuthor = "author"
    let keyPublishDate = "publishDate"

    required init(json: Any) throws {
        guard let dictionary = json as? [String: Any] else {
            throw JSONDecodeError.invalidFormat(json: json)
        }
        guard let author = dictionary[keyAuthor] as? String else{
            throw JSONDecodeError.missingValue(key: keyAuthor, actualValue: dictionary[keyAuthor])
        }
        guard let publishDate = dictionary[keyPublishDate] as? String else{
            throw JSONDecodeError.missingValue(key: keyPublishDate, actualValue: dictionary[keyPublishDate])
        }

        self.author = author
        self.publishDate = publishDate
    }
}
import Foundation

struct SearchResponse<jsonItem: JSONDecodable>: JSONDecodable {
    let totalCount: Int
    let items: [jsonItem]

    init(json: Any) throws {
        guard let dictionary = json as? [String: Any] else {
            throw JSONDecodeError.invalidFormat(json: json)
        }

        guard let itemCount = dictionary["count"] as? Int else {
            throw JSONDecodeError.missingValue(key: "count", actualValue: dictionary["count"])
        }

        guard let itemObject = dictionary["items"] as? [[String: Any]] else {
            throw JSONDecodeError.missingValue(key: "items", actualValue: dictionary["items"])
        }

        self.totalCount = itemCount
        self.items = try itemObject.map {
            return try jsonItem(json: $0)
        }
    }
}
- JSONで取得したものは必ずオブジェクト化しましょう。連想配列で持っていたりするとどんどんソースが汚くなっていきます。
- ここでpublishDateをDateで持たずにStringにしてしまっているのはただのサボりです。きちんと扱いやすくDate型に変換したほうが美しいですね。
- その他のCommonsに配置されていたファイル郡に関しては割愛します。Swift実践入門をご参照ください。
CalendarViewControllerでJSONを取得
import UIKit

class CalnendarViewController: UIViewController, UICollectionViewDataSource, UICollectionViewDelegate, UICollectionViewDelegateFlowLayout{

    // 省略

    var dailyItems: [Item]? // 取得したJSONをItemオブジェクトの配列に変換し、保持するための変数

    override func viewDidLoad() {
        // 省略
        loadItems() // ①JSONの取得処理を追加
    }

    func loadItems() {
        // Alamofireなどで取得してもよい
        let client = ApiClient()
        let request = API.SearchItems()
        client.send(request: request) {result in
            switch result {
            case let .success(response):
                // 取得した内容をdailyItemsに格納
                self.dailyItems = response.items

                //取得成功時に画面描画し直すためにメインスレッドでリロードを行う
                DispatchQueue.main.async {
                    self.calenderCollectionView.reloadData()
                }
            case let .failure(error):
                print(error)
            }
        }
    }
3)カレンダーにJSONの中身を表示する
カスタムセルの変更
著者を表示するためのラベルを追加
class CalendarCell: UICollectionViewCell {

    var textLabel: UILabel?
    var dailyItems:[Item]?
    var itemTitleLabel: UILabel?

    required init(coder aDecoder: NSCoder) {
        super.init(coder: aDecoder)!
    }

    override init(frame: CGRect) {
        super.init(frame: frame)
        textLabel = UILabel(frame: CGRect(x:0, y:5, width:self.frame.width, height:15))
        textLabel?.font = UIFont(name: "HiraKakuProN-W3", size: 12)
        textLabel?.textAlignment = NSTextAlignment.center
        textLabel?.text = "none"

        itemTitleLabel  = UILabel()
        itemTitleLabel?.frame  = CGRect(x: 0, y: 20, width: self.frame.width, height: 10)
        itemTitleLabel?.font  = UIFont(name: "HiraKakuProN-W3", size: 9)
        itemTitleLabel?.textAlignment = NSTextAlignment.center
        itemTitleLabel?.lineBreakMode  = .byClipping
        setTitleLabelIsHidden(true)

        self.addSubview(textLabel!)
        self.addSubview(itemTitleLabel!)
    }
    func setItemNameLabel(){
        self.itemTitleLabel?.text  = ""

        if let items = self.dailyItems{
            for (index, item) in items.enumerated(){
                if index == 0 {
                    self.itemTitleLabel?.text = item.author
                }
            }
        }
    }

    func setTitleLabelIsHidden(_ bool:Bool){
        itemTitleLabel?.isHidden  = bool;
    }
}
CalendarViewControllerの変更
セルに表示する著者を流し込みます。
import UIKit

class CalnendarViewController: UIViewController, UICollectionViewDataSource, UICollectionViewDelegate, UICollectionViewDelegateFlowLayout{

    // 省略

    func collectionView(_ collectionView: UICollectionView, cellForItemAt indexPath: IndexPath) -> UICollectionViewCell {
        let cell = collectionView.dequeueReusableCell(withReuseIdentifier: "cell", for: indexPath) as! CalendarCell

        if (indexPath.row % 7 == 0) {
            cell.textLabel?.textColor = .lightRed
        } else if (indexPath.row % 7 == 6) {
            cell.textLabel?.textColor = .lightBlue
        } else {
            cell.textLabel?.textColor = UIColor.gray
        }

        if indexPath.section == 0 {
            cell.textLabel?.text = weekArray[indexPath.row]

            // labelをhiddenにしないとcellの再利用が効いてしまって、うまく表示されない
            // 曜日の行は本来、collectionViewである必要性はないので、
            // UIViewなどに移行すればここの処理は必要ない。
            cell.setTitleLabelIsHidden(true)
        } else {
            let dayLabelText:String = dateManager.conversionDateFormat(indexPath: indexPath, dateFormat: "d")
            cell.textLabel?.text = dayLabelText
            if let items = self.dailyItems {
                let cellDate:String = dateManager.conversionDateFormat(indexPath: indexPath, dateFormat: "yyyy-MM-dd")
                 // Cellに表示されているyyyy-MM-ddとpublishDateを比較し、
                 // 一致したものだけCellのdailyItemsに格納。ラベルにセット。
                 let currentCellDailyItems:[Item] = items.filter({$0.publishDate == cellDate})
                cell.dailyItems = currentCellDailyItems
                cell.setItemNameLabel()
            }
            // 非表示状態を解除して表示する
            cell.setTitleLabelIsHidden(false)
        }
        return cell
    }
以上で完了です。
ビルドすると最初のスクリーンショットのように名前がセルに並ぶはずです!
最後に
- 想定していたよりも長く冗長に書いてしまいました。ソースペタペタでわかりづらく申し訳ないです…。
- カレンダーアプリはオープンソースのライブラリなどもあるかと思いますが、細やかにコントロールしたい場合は自分で実装するのが一番だと感じています。本記事がみなさまの参考になれば幸いです。
明日は @jimmysharp さんがTangoのお話をしていただけるようです。
よろしくお願いします!
