[PONOS Advent Calendar 2021][link-1] の13日目の記事です。
[link-1]:https://qiita.com/advent-calendar/2021/ponos
昨日は @ackyla さんでした。
はじめに
Unityでの開発を行う際に、複数のシーンを使用する場合が多々あるかと思います。
- 画面ごとにシーンを分けている
- 実行シーンとテストシーンを分けている
- プランナー、デザイナー用シーンがある
など、開発環境や状況によってシーンが追加、削除されていくと思います。
作業シーンから実行シーンを開いて確認し、また作業シーンに戻るなどシーンの行き来が発生してしまう場合に、今回紹介する特定シーン再生ボタンを用意することで、シーンの行き来を減らすことができます。
完成図
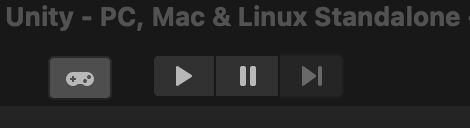
画像のようなゲームコントローラーのボタンを押すことで、特定のシーンを再生させることができます。
実装
Unityのツールバーを取得する設定
    /// <summary>
    /// UnityEditor.ToolbarのType取得
    /// </summary>
    static readonly Type ToolbarType = typeof(UnityEditor.Editor).Assembly.GetType("UnityEditor.Toolbar");
    /// <summary>
    /// UnityEditor.GUIViewのType取得
    /// </summary>
    static readonly Type GUIViewType = typeof(UnityEditor.Editor).Assembly.GetType("UnityEditor.GUIView");
    /// <summary>
    /// UnityEditor.IWindowBackendのType取得
    /// </summary>
    static readonly Type BackendType = typeof(UnityEditor.Editor).Assembly.GetType("UnityEditor.IWindowBackend");
    /// <summary>
    /// 変数取得用Bigding設定
    /// </summary>
    static readonly BindingFlags BigdingAttr = BindingFlags.Instance | BindingFlags.Public | BindingFlags.NonPublic;
    /// <summary>
    /// UnityEditor.GUIViewのwindowBackend取得
    /// </summary>
    static readonly PropertyInfo GUIBackend = GUIViewType.GetProperty("windowBackend", BigdingAttr);
    /// <summary>
    /// UnityEditor.GUIViewのwindowBackend、visualTree取得
    /// </summary>
    static readonly PropertyInfo VisualTree = BackendType.GetProperty("visualTree", BigdingAttr);
    /// <summary>
    /// IMGUIContainerのGUIHandler取得
    /// </summary>
    static readonly FieldInfo ImguiContainerOnGuiHandler = typeof(IMGUIContainer).GetField("m_OnGUIHandler", BigdingAttr);
直接取得等ができないため、GetPropertyなどでプロパティの取得を行う必要があります。
Unityのツールバーに対して描画を登録する
    /// <summary>
    /// 現在描画中のツールバー
    /// </summary>
    static ScriptableObject currentToolbar = null;

    /// <summary>
    /// スクリプトコンパイル後に呼び出せる処理
    /// </summary>
    [InitializeOnLoadMethod]
    static void InitializeOnLoad()
    {
        EditorApplication.update -= OnUpdate;
        EditorApplication.update += OnUpdate;
    }

    /// <summary>
    /// Editorの描画更新に合わせて描画を更新する処理
    /// </summary>
    static void OnUpdate()
    {
        if (currentToolbar == null)
        {
            var toolbars = Resources.FindObjectsOfTypeAll(ToolbarType);
            currentToolbar = toolbars.Length > 0 ? (ScriptableObject)toolbars[0] : null;
            if (currentToolbar != null)
            {
                AddHandler(currentToolbar);
            }
        }
    }

    /// <summary>
    /// ツールバーに描画ハンドラーの追加処理
    /// </summary>
    /// <param name="toolbar">描画されているツールバー</param>
    static void AddHandler(object toolbar)
    {
        var backend = GUIBackend.GetValue(toolbar);
        var elements = VisualTree.GetValue(backend, null) as VisualElement;
        var container = elements[0];
        var handler = ImguiContainerOnGuiHandler.GetValue(container) as Action;
        handler -= OnGUI;
        handler += OnGUI;

        ImguiContainerOnGuiHandler.SetValue(container, handler);
    }
OnGUIや、OnUpdateの登録を削除してから追加しているのは、重複登録を避けるために行っています。
ボタンの描画設定
    /// <summary>
    /// ツールバー描画更新
    /// </summary>
    static void OnGUI()
    {
        var screenWidth = EditorGUIUtility.currentViewWidth;
        var toolbarRect = new Rect(0, 0, screenWidth, 30.0f);
        toolbarRect.xMin += 400.0f;
        toolbarRect.xMax = (screenWidth -150.0f) / 2;
        toolbarRect.xMin += 15.0f;
        toolbarRect.xMax -= 15.0f;
        toolbarRect.yMin += 5.0f;
        toolbarRect.yMax -= 3.0f;

        if (toolbarRect.width <= 0)
        {
            return;
        }
        using (new GUILayout.AreaScope(toolbarRect))
        using (new GUILayout.HorizontalScope())
        {

            GUILayout.FlexibleSpace();
            if (GUILayout.Button(EditorGUIUtility.IconContent("UnityEditor.GameView"),
                    new GUIStyle("Command")
                    {
                        fontSize = 16,
                        alignment = TextAnchor.MiddleCenter,
                        imagePosition = ImagePosition.ImageAbove,
                        fontStyle = FontStyle.Bold
                    }
                ))
            {
                if (!EditorApplication.isPlaying)
                {
                        PlayScene();
                }
                else
                {
                        EditorApplication.isPlaying = false;
                }
            }
        }
    }
RectのxMin,xMax,yMin,xMaxに加算、減算していますが、これは描画位置の調整を行ってます。
他の拡張などでボタンを追加している場合は、値の調整が必要になります。
EditorGUIUtility.IconContent("UnityEditor.GameView")
上記コードで描画するボタンのアイコンを設定しています。
Unityにデフォルトで入っているアイコンを指定することで環境関係なく表示が可能になります。
特定シーンの再生処理
今回は、シーンを指定する形ではなく、EditorBuildSettingsの先頭に登録されているシーンを呼び出すようにしてます。
    /// <summary>
    /// Scene実行処理
    /// </summary>
    static void PlayScene()
    {
        string scenePath = EditorBuildSettings.scenes[0].path;
        SceneAsset sceneAsset = AssetDatabase.LoadAssetAtPath<SceneAsset>(scenePath);

        if (sceneAsset == null)
        {
            Debug.Log($"{scenePath} シーンアセットが存在しません");
            return;
        }

        EditorSceneManager.playModeStartScene = sceneAsset;

        EditorApplication.isPlaying = true;
    }
シーンの取得方法をEditorBuildSettingsの先頭から、シーン名での検索取得やパスの直接指定を行うようにすることで、任意のシーンを再生させるボタンへと変えることができます。
実装時の注意点
EditorBuildSettingsの先頭シーンが正しく取得できない場合があります。
これは、EditorBuildSettingsに登録しているシーンを削除した場合に、EditorBuildSettingsには空のデータだけが残ることがあるからです。
シーンがあるのに取得できない現象が発生した場合は、assetファイルを編集し空のデータを削除する必要があります。
Unityプロジェクト/ProjectSettings/EditorBuildSettings.asset
まとめ
Unityのツールバーにボタンを追加することで、複数のシーンで開発を行う上で快適な作業が行えるようになると思います。
また、今回はシーン再生ボタンの追加でしたが、実行する処理を変えることで任意のボタンを増やすことができます。
明日は、 @honeniq さんです。