Lambdaを使ったプロジェクトの移行に伴い、せっかくだからServerlessとTypeScriptで開発できる環境を作ろうぜ!
と思ったら結構ハマったので環境構築手順を記録しておきます。
基本編
Serverlessのインストール
serverlessをインストールします。TypeScriptが使えるのは v1.21.0 からなので注意してください。
# serverlessのインストール
npm i -g serverless
# バージョン確認
sls -v
# -> 1.32.0
プロジェクトの作成
# プロジェクトディレクトリの作成場所に移動
cd 任意のディレクトリ
# TypeScriptプロジェクトの作成
sls create -t aws-nodejs-typescript -p sls-test
sls create コマンドでプロジェクトの雛形を作成できます。
各パラメータの意味は次のとおりです。
-
-t- テンプレートのタイプ。TypeScriptの場合はaws-nodejs-typescriptを指定します。 -
-p- プロジェクトの名前。今回はsls-testとしました。
プロジェクトの作成に成功すると、プロジェクト名と同じフォルダが作成されます。
中身の確認
まずはserverless.ymlファイルを開いてみてください。
service:
  name: sls-test

# Add the serverless-webpack plugin
plugins:
  - serverless-webpack

provider:
  name: aws
  runtime: nodejs8.10

functions:
  hello:
    handler: handler.hello
    events:
      - http:
          method: get
          path: hello
functionキー以下に、このプロジェクトで管理するLambda関数の定義を並べていきます。
デフォルトでは、雛形としてhelloという関数が用意されていて、handler.helloがこの関数のエントリポイントとして設定されています。
このhandler.helloは、 「handler.tsファイル内のhello関数を呼び出すよ」 という意味で、その具体的な実装はhandler.tsファイル内に書かれています。
import { APIGatewayEvent, Callback, Context, Handler } from 'aws-lambda';

export const hello: Handler = (event: APIGatewayEvent, context: Context, cb: Callback) => {
  const response = {
    statusCode: 200,
    body: JSON.stringify({
      message: 'Go Serverless Webpack (Typescript) v1.0! Your function executed successfully!',
      input: event,
    }),
  };

  cb(null, response);
}
関数を増やす場合はエントリポイントのコードを追加して、serverless.ymlにそのエントリコードへのパスを記述します。
デプロイ
雛形がインストールできたので、動作確認してみます。
AWSにプロジェクト全体をデプロイするにはsls deployコマンドを実行します。
sls deploy
すると、こんなエラーが発生しました。
  Serverless Error ---------------------------------------

  Serverless plugin "serverless-webpack" not found. Make sure it's installed and listed in the "plugins" section of your serverless config file.

  Get Support --------------------------------------------
     Docs:          docs.serverless.com
     Bugs:          github.com/serverless/serverless/issues
     Issues:        forum.serverless.com

  Your Environment Information -----------------------------
     OS:                     win32
     Node Version:           9.2.0
     Serverless Version:     1.32.0
「serverless-webpack プラグインがない」と言われています。
package.jsonを見ると、serverless-webpackの記載がありますが、プロジェクトフォルダ内にnode_modulesフォルダがありません。
デフォルトではインストールされていないようです。
(もしくは事前にグローバルインストールしておくのが前提?)
{
  "name": "sls-test",
  "version": "1.0.0",
  "description": "Serverless webpack example using Typescript",
  "main": "handler.js",
  "scripts": {
    "test": "echo \"Error: no test specified\" && exit 1"
  },
  "dependencies": {},
  "devDependencies": {
    "@types/aws-lambda": "8.10.1",
    "@types/node": "^8.0.57",
    "serverless-webpack": "^5.1.1",
    "source-map-support": "^0.5.6",
    "ts-loader": "^4.2.0",
    "typescript": "^2.9.2",
    "webpack": "^4.5.0"
  },
  "author": "The serverless webpack authors (https://github.com/elastic-coders/serverless-webpack)",
  "license": "MIT"
}
ということで、まずプロジェクトフォルダ内でnpm installコマンドを実行し、改めてsls deployコマンドを実行します。
npm install
sls deploy
Serverless: Bundling with Webpack...
Time: 4047ms
Built at: 2018-10-09 10:28:45
         Asset      Size  Chunks             Chunk Names
    handler.js  33.5 KiB       0  [emitted]  handler
handler.js.map   170 KiB       0  [emitted]  handler
Entrypoint handler = handler.js handler.js.map
 [1] ./node_modules/source-map-support/node_modules/source-map/lib/source-map-generator.js 14 KiB {0} [built]
 [2] ./node_modules/source-map-support/node_modules/source-map/lib/base64-vlq.js 4.6 KiB {0} [built]
 [3] ./node_modules/source-map-support/node_modules/source-map/lib/array-set.js 3.12 KiB {0} [built]
 [4] multi ./source-map-install.js ./handler.ts 40 bytes {0} [built]
 [5] ./source-map-install.js 41 bytes {0} [built]
 [6] ./node_modules/source-map-support/source-map-support.js 17.5 KiB {0} [built]
 [7] ./node_modules/source-map-support/node_modules/source-map/source-map.js 405 bytes {0} [built]
[10] ./node_modules/source-map-support/node_modules/source-map/lib/source-map-consumer.js 39.6 KiB {0} [built]
[12] ./node_modules/source-map-support/node_modules/source-map/lib/quick-sort.js 3.53 KiB {0} [built]
[13] ./node_modules/source-map-support/node_modules/source-map/lib/source-node.js 13.5 KiB {0} [built]
[14] external "path" 42 bytes {0} [built]
[15] external "fs" 42 bytes {0} [optional] [built]
[16] ./node_modules/buffer-from/index.js 1.56 KiB {0} [built]
[17] external "module" 42 bytes {0} [optional] [built]
[18] ./handler.ts 310 bytes {0} [built]
    + 4 hidden modules
Serverless: Packaging service...
Serverless: Creating Stack...
Serverless: Checking Stack create progress...
.....
Serverless: Stack create finished...
Serverless: Uploading CloudFormation file to S3...
Serverless: Uploading artifacts...
Serverless: Uploading service .zip file to S3 (68.59 KB)...
Serverless: Validating template...
Serverless: Updating Stack...
Serverless: Checking Stack update progress...
..............................
Serverless: Stack update finished...
Service Information
service: sls-test
stage: dev
region: us-east-1
stack: sls-test-dev
api keys:
  None
endpoints:
  GET - https://*****.execute-api.us-east-1.amazonaws.com/dev/hello
functions:
  hello: sls-test-dev-hello
実行結果の最後のほうをみると、API GatewayのエンドポイントURLと、Lambda関数名のようなものが見えます。
AWSコンソールから確認してみます。
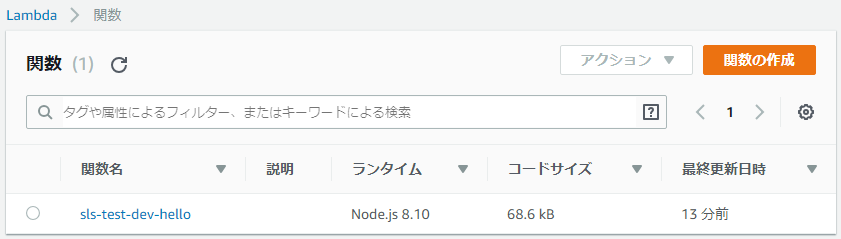
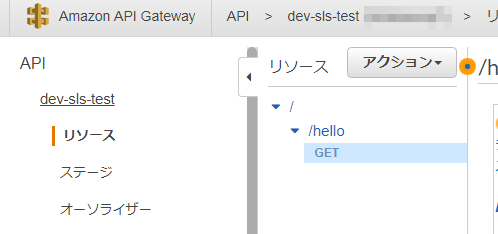
sls-test-dev-helloというLambdaができていて、それがAPI Gatewayから呼び出されるようになっています。
※注意
serverlessが生成したLambdaやAPI Gatewayのエンドポイントを手動で削除しないでください。同期が取れなくなり、以降のデプロイに失敗します。
関数を削除するには、serverless.ymlから関数の定義を削除して、sls deployコマンドで全体デプロイをしなおします。
動作確認
API Gatewayのエンドポイントにアクセスしてもいいですが、コマンドからLambda関数を直接実行して動作確認することもできます。
sls invoke -f hello
{
    "statusCode": 200,
    "body": "{\"message\":\"Go Serverless Webpack (Typescript) v1.0! Your function executed successfully!\",\"input\":{}}"
}
設定しておくと良いかも編
外部モジュールを1つのファイルにまとめないようにする
redis接続用のモジュールを使おうとインストールしたあと、デプロイコマンドを実行するとこんなエラーが起きました。
ERROR in ./node_modules/redis-parser/lib/hiredis.js
Module not found: Error: Can't resolve 'hiredis' in 'C:\Users\miyamoto.masanao\Documents\KITARO\GitHub\KITARO\server\sls-test\node_modules\redis-parser\lib'
 @ ./node_modules/redis-parser/lib/hiredis.js 3:14-32
 @ ./node_modules/redis-parser/lib/parser.js
 @ ./node_modules/redis-parser/index.js
 @ ./node_modules/redis/index.js
 @ ./handler.ts
 @ multi ./source-map-install.js ./handler.ts
どうもwebpackが外部モジュールも含めて1つのファイルにまとめようとするときに起きているエラーのようです。ということでnode_modulesの中のファイルはまとめないようにしてみます。
設定手順
webpack-node-externalsをインストールし、
webpack.config.jsに「★追加」コメントのある行を追加します。
# webpack-node-externalsをインストール
npm install webpack-node-externals -D
const path = require("path");
const slsw = require("serverless-webpack");
const nodeExternals = require("webpack-node-externals"); // ★追加
const entries = {};

Object.keys(slsw.lib.entries).forEach((key) => (entries[key] = ["./source-map-install.js", slsw.lib.entries[key]]));

module.exports = {
  /* 中略 */
  target: "node",
  externals: [nodeExternals()], // ★追加
  module: {
    rules: [
      // all files with a `.ts` or `.tsx` extension will be handled by `ts-loader`
      { test: /\.tsx?$/, loader: "ts-loader" },
    ],
  },
};
package.json内にあるsource-map-supportの定義を
devDependenciesからdependenciesに移動させます。
  "dependencies": {
    "source-map-support": "^0.5.9" // ★devDependenciesから移動
  },
  "devDependencies": {
    "@types/aws-lambda": "8.10.1",
    "@types/node": "^8.0.57",
    "serverless-webpack": "^5.1.1",
    "ts-loader": "^4.2.0",
    "typescript": "^2.9.2",
    "webpack": "^4.5.0",
    "webpack-node-externals": "^1.7.2"
  },
serverless.yml に「★追加」コメントのある行を追加します。
service:
  name: sls-test

# Add the serverless-webpack plugin
plugins:
  - serverless-webpack

provider:
  name: aws
  runtime: nodejs8.10

custom:                         # ★追加
  webpack: webpack.config.js    # ★追加
  webpackIncludeModules: true   # ★追加

# 以下略
これで外部モジュールがまとめられないようになります。
自前の共通モジュールをコンパイル対象にする
私はよくこういうフォルダ構成で開発をやっています。
/node_modules  # 外部モジュール。コンパイル対象にしたくない
/src
  ├ /node_modules # プロジェクト内で使う共有モジュール。コンパイル対象にしたい
  │  ├ /my-module1
  │  │  ├ hoge.ts
  │  │  └ piyo.ts
  │  └ /my-module2
  ├ /huga
  │  └ mogu.ts
  └ handler.ts
プロジェクト内のどこからでも使う共通処理があるとき、外部モジュールとは別の高さにあるnode_modulesの中に定義しておくと、読み込むときに階層を気にしなくていいので便利です。
上の例の場合ならhandler.tsからもmogu.tsからも、こんな感じで読み込めます。
import * as hoge from "my-module1/hoge";
import * as piyo from "my-module1/piyo";
ただ、serverless & TypeScript のデフォルト構成ではnode_modulesフォルダ内のコードはコンパイル対象にならないので、そのままではエラーになります。
ERROR in ./src/node_modules/my-module1/hoge.ts
Module build failed (from ./node_modules/ts-loader/index.js):
Error: Typescript emitted no output for *******\src\node_modules\my-module1\hoge.ts. By default, ts-loader will not compile .ts files in node_modules.
You should not need to recompile .ts files there, but if you really want to, use the allowTsInNodeModules option.
See: https://github.com/Microsoft/TypeScript/issues/12358
    at successLoader (*********\node_modules\ts-loader\dist\index.js:41:15)
    at Object.loader (*********\node_modules\ts-loader\dist\index.js:21:12)
設定手順
tsconfig.json に include プロパティを追加し、コンパイル対象にしたいパスを指定します。
{
  "compilerOptions": {
    "sourceMap": true,
    "target": "es6",
    "lib": ["esnext"],
    "moduleResolution": "node"
  },
  "exclude": ["node_modules"],
  "include": [                     // ★追加
      "src/**/*",                  // ★追加
      "./src/node_modules/**/*"    // ★追加
   ]                               // ★追加
}
webpack.json に allowTsInNodeModules オプションを追加します。
const path = require("path");
/* 中略 */

module.exports = {
  mode: slsw.lib.webpack.isLocal ? "development" : "production",
  /* 中略 */
  module: {
    rules: [
      // all files with a `.ts` or `.tsx` extension will be handled by `ts-loader`
      {
          test: /\.tsx?$/,
          loader: "ts-loader",
          options: { allowTsInNodeModules: true } // ★追加
      },
    ],
  },
};
以上です。他にも良いカスタマイズ方法が見つかれば追記していきます。