我是ideagear的weiwei。
今天学习VirtualBox+Ubuntu下运行webserver。
环境
windows10 Home/Professional x86/x64
VertualBox 6.0.1
Ubuntu 18.04.3
下载安装包
安装VirtualBox
1.打开安装包进行安装。安装完成后启动VirtualBox。
2.点击新建,输入名称,选择类型为Linux,版本为Ubuntu(64-bit),点击下一步。

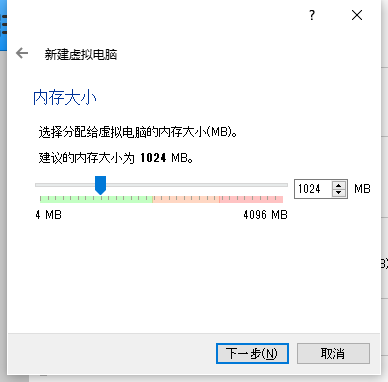
3.分配内存大小我选择为1G。点击下一步。
4.选择现在创建虚拟键盘,点击下一步。
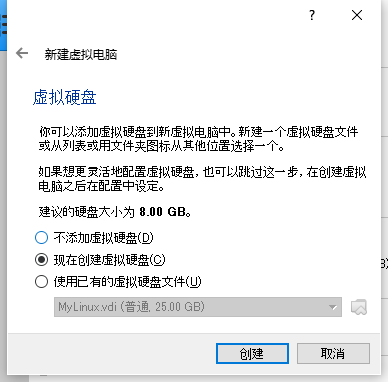
5.磁盘类型选择默认第一个,下一步。

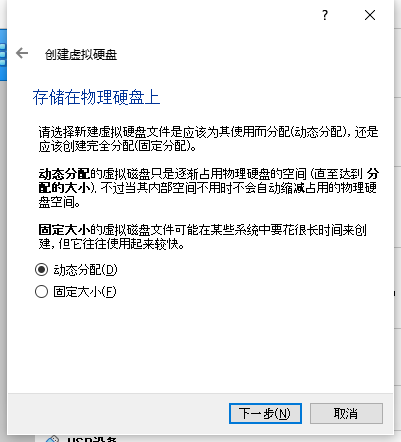
6.选择动态分配,下一步。
7.设置硬盘大小为25G,下一步。
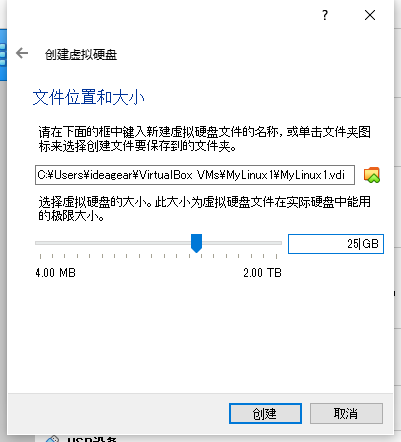
!
8.创建成功。接下来安装Ubuntu。
安装Ubuntu18.04
1.点击启动。
2.选择已经下载好的ubuntu安装包,点击启动,等待加载系统。
3.安装语言选择中文(简体),点击继续。
4.键盘布局选择汉语,点击继续。
5.选择最小安装,其它默认,继续。
6.清除整个磁盘并安装Ubuntu,现在安装。
7.默认上海,继续。
8.设置用户名和密码,自动登录,继续。
9.安装系统,等待系统完成。
10.重启后再进行一些设置后就可以使用Ubuntu了。
安装apache2 web server
先设置VirtualBox的双向复制粘贴。点击设置,在常规-高级里面把共享粘贴板和拖放设置为双向,再在存储-控制器:SATA中勾选使用主机输入输出缓存,再在控制器:SATA下面的XXX.vdi中勾选固态驱动器。再开启虚拟机,在设备-安装增强设备中安装增强设备,安装完后重启就可以使用了,再点击安装增强设备会提示错误,可以无视。
在中国更新源很慢,可以通过替换源列表文件的方式来加速。
- 先使用
sudo apt install vim安装vim。 - 再使用
sudo su使用户拥有修改文件的权限。 - 接着使用
vim /etc/apt/sources.list进入文件,dd在vim中为删除光标所在行命令。可使用它清空文件。
i在vim中为进入编辑模式,复制以下内容到文件中。
# deb cdrom:[Ubuntu 16.04 LTS _Xenial Xerus_ - Release amd64 (20160420.1)]/ xenial main restricted
deb-src http://archive.ubuntu.com/ubuntu xenial main restricted #Added by software-properties
deb http://mirrors.aliyun.com/ubuntu/ xenial main restricted
deb-src http://mirrors.aliyun.com/ubuntu/ xenial main restricted multiverse universe #Added by software-properties
deb http://mirrors.aliyun.com/ubuntu/ xenial-updates main restricted
deb-src http://mirrors.aliyun.com/ubuntu/ xenial-updates main restricted multiverse universe #Added by software-properties
deb http://mirrors.aliyun.com/ubuntu/ xenial universe
deb http://mirrors.aliyun.com/ubuntu/ xenial-updates universe
deb http://mirrors.aliyun.com/ubuntu/ xenial multiverse
deb http://mirrors.aliyun.com/ubuntu/ xenial-updates multiverse
deb http://mirrors.aliyun.com/ubuntu/ xenial-backports main restricted universe multiverse
deb-src http://mirrors.aliyun.com/ubuntu/ xenial-backports main restricted universe multiverse #Added by software-properties
deb http://archive.canonical.com/ubuntu xenial partner
deb-src http://archive.canonical.com/ubuntu xenial partner
deb http://mirrors.aliyun.com/ubuntu/ xenial-security main restricted
deb-src http://mirrors.aliyun.com/ubuntu/ xenial-security main restricted multiverse universe #Added by software-properties
deb http://mirrors.aliyun.com/ubuntu/ xenial-security universe
deb http://mirrors.aliyun.com/ubuntu/ xenial-security multiverse
- 使用
exit退出权限模式,执行sudo apt update -
sudo apt install apache2以便安装Apache2及其所需的依赖项 - 通过输入
apache2 -version判断是否成功输出。 - 在自带的火狐浏览器中输入localhost并按回车可看到apache2的默认选项说明安装成功了。
配置UFW防火墙
使用sudo ufw app list列出UFW应用程序配置文件。
输出如下:
可用应用程序:
  Apache
  Apache Full
  Apache Secure
  CUPS
配置Apache Web服务器
- 使用
sudo systemctl status apache2验证Apache2服务是否在您的系统上启动并运行。结果如下:
apache2.service - LSB: Apache2 web server
   Loaded: loaded (/etc/init.d/apache2; generated)
  Drop-In: /lib/systemd/system/apache2.service.d
           └─apache2-systemd.conf
   Active: active (running) since Tue 2019-09-03 18:44:21 CST; 10min ago
     Docs: man:systemd-sysv-generator(8)
  Process: 627 ExecStart=/etc/init.d/apache2 start (code=exited, status=0/SUCCE
    Tasks: 55 (limit: 1123)
   CGroup: /system.slice/apache2.service
           ├─715 /usr/sbin/apache2 -k start
           ├─718 /usr/sbin/apache2 -k start
           └─719 /usr/sbin/apache2 -k start

9月 03 18:44:20 weiwei-VirtualBox systemd[1]: Starting LSB: Apache2 web server.
9月 03 18:44:20 weiwei-VirtualBox apache2[627]:  * Starting Apache httpd web se
9月 03 18:44:21 weiwei-VirtualBox apache2[627]: AH00558: apache2: Could not rel
9月 03 18:44:21 weiwei-VirtualBox apache2[627]:  *
9月 03 18:44:21 weiwei-VirtualBox systemd[1]: Started LSB: Apache2 web server.
active(running)说明apache2服务正在运行。
- 验证Apache是否正常运行并侦听IP地址
使用以下命令了解服务器的IP:hostname -I
如果有多个IP的话,在Web浏览器中逐个尝试IP,如下所示:
http://server_IP
结果是正常显示apache网页。
在Apache中设置虚拟主机
默认情况下启用的服务器块能够提供来自/var/www/html的文档。
但是,我们可以在/var/www/创建一个目录,保留默认目录。
通过sudo mkdir -p /var/www/ideagear.com/html命令创建此目录,将ideagear.com替换为你想要的域名。
接着通过以下命令分配目录的所有权:
sudo chown -R $USER:$USER /var/www/ideagear.com/html
sudo chmod -R 755 /var/www/ideagear.com
- 现在创建一个索引页面,如果Apache运行了域名,我们可以访问索引页面等进行测试。 通过vim编辑器创建HTML文件:
vim /var/www/ideagear.com/html/index.html
为index.html输入以下代码然后保存:
<html>
<head>
<title>欢迎来到www.ideagear.com</title>
</head>
<body>
<h1>ideagear.com的服务器块已启动!</h1>
</body>
</html>
如果在文件中打开index.html,会发现中文乱码,解决办法是:
输入sudo vim /etc/apache2/conf-available/charset.conf
把AddDefaultCharset UTF-8前面的#去掉,保存文件,再使用
sudo systemctl restart apache2重启apache即可。
再次打开index.html发现中文乱码问题解决了。
- Apache已经创建了用于提供服务器的内容的默认配置文件,但现在我们创建一个自定义的新配置文件。
使用以下代码创建配置文件:
sudo vim /etc/apache2/sites-available/ideagear.com.conf
把以下内容复制进配置文件中:
<VirtualHost *:80>
ServerAdmin webmaster@ideagear.com
ServerName www.ideagear.com
ServerAlias ideagear.com
DocumentRoot /var/www/ideagear.com/html
ErrorLog ${APACHE_LOG_DIR}/error.log
CustomLog ${APACHE_LOG_DIR}/access.log combined
</VirtualHost>
- 启用域配置文件
使用以下代码
sudo a2ensite ideagear.com.conf
sudo a2dissite 000-default.conf
echo "ServerName ideagear.com" | sudo tee /etc/apache2/conf-available/servername.conf
sudo a2enconf servername
sudo systemctl restart apache2
sudo apache2ctl configtest
激活配置文件并检查是否有错误。如果输出Syntax OK则没有错误。
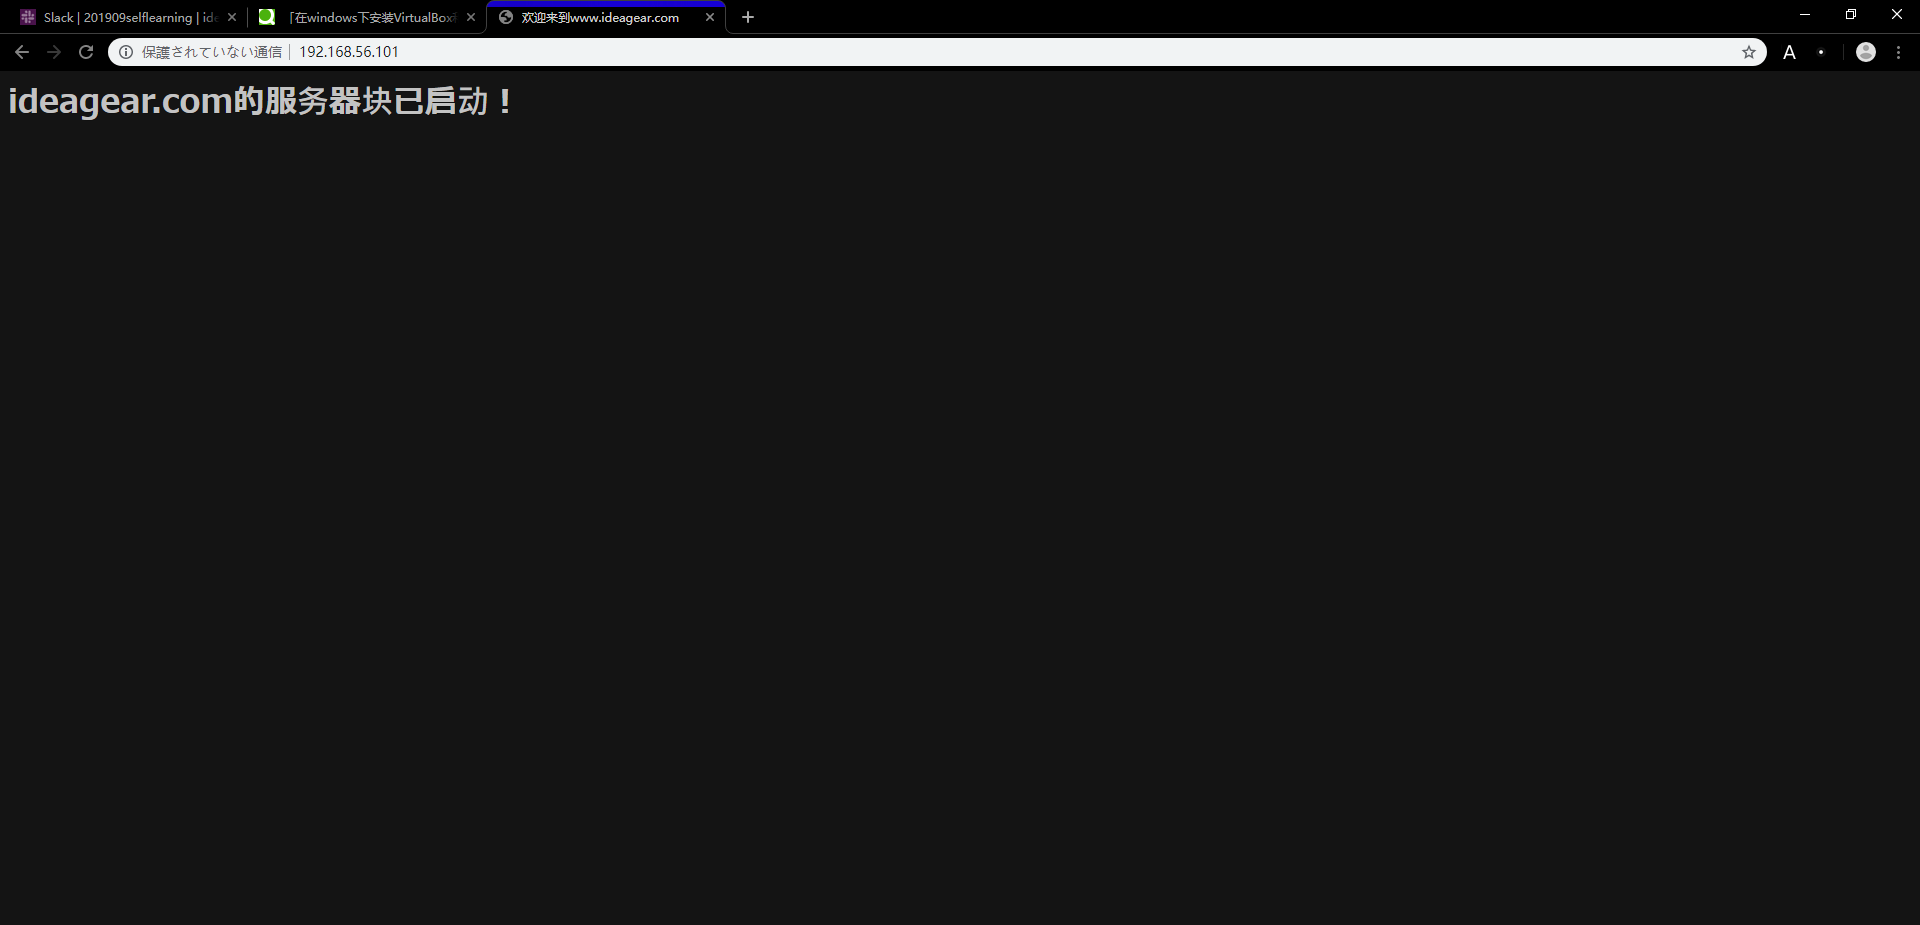
测试Apache是否为新建的域名提供服务
在自带浏览器中输入http://www.ideagear.com,发现没有连接到指定网站,但是使用localhost连接到了index.html。
在windows的浏览器中显示VirtualBox里面的Ubuntu的网页
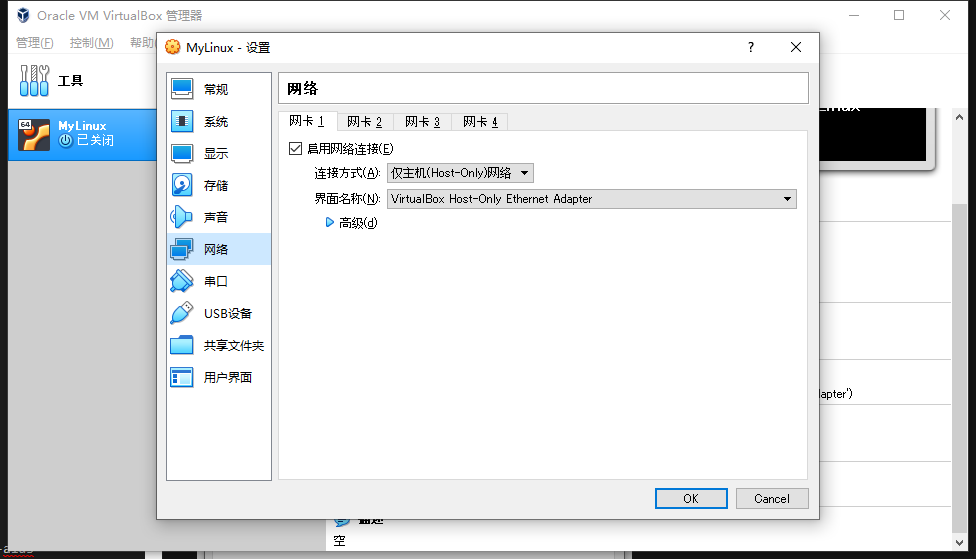
- 首先把能和互联网连接的网络设置成共享,家庭网络是
VirtualBox Host-Only Network 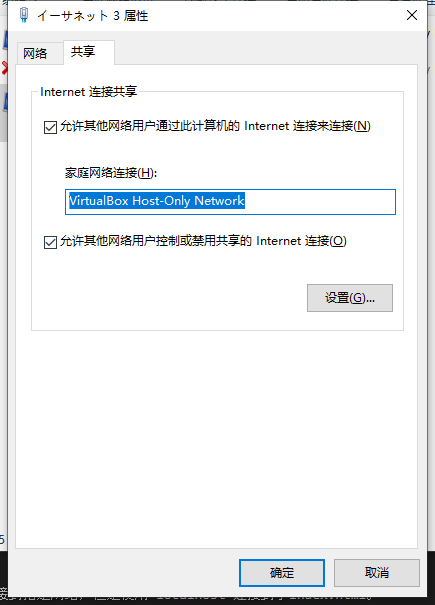
- 把网络设置连接方式改成(host-only)
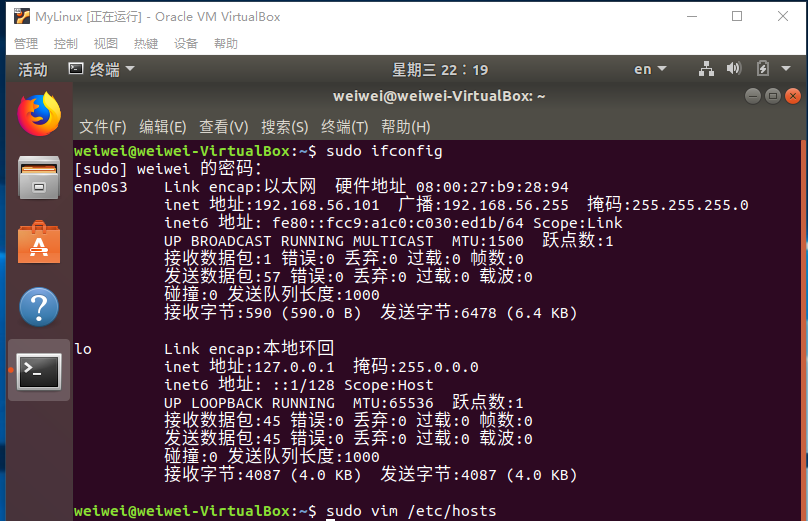
使用命令sudo apt install net-tools安装nettools
启动后在终端使用sudo ifconfig
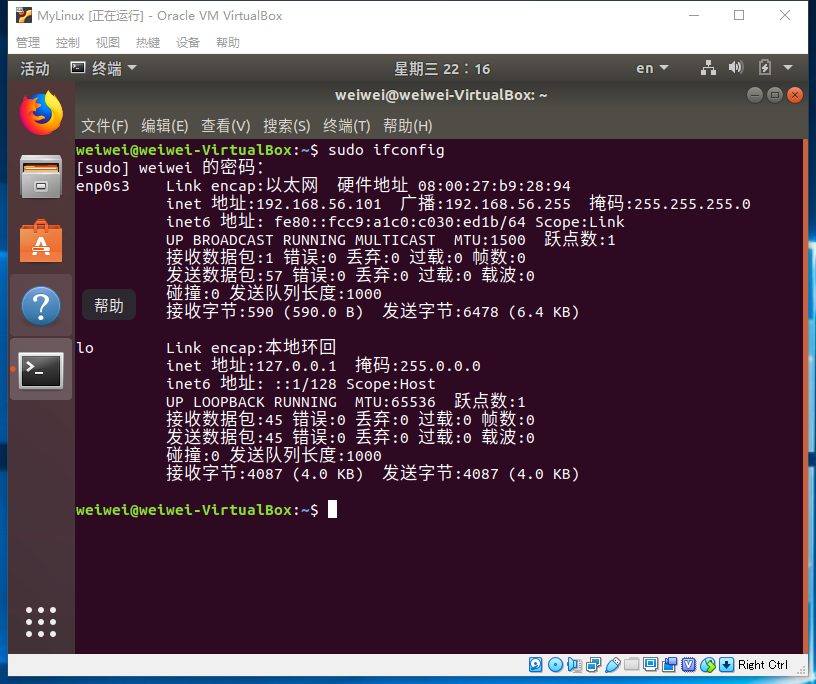
可以看到ip为192.168.56.101。
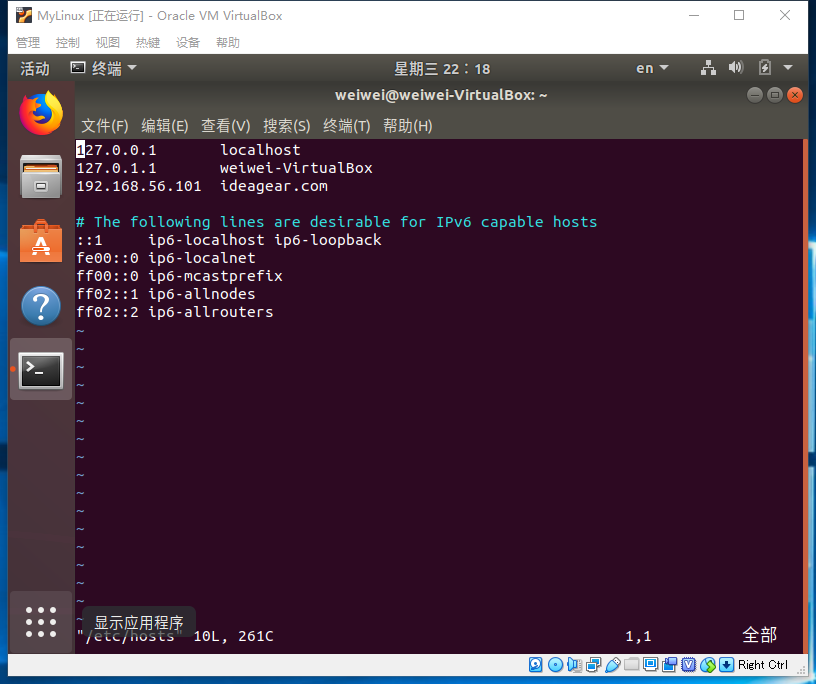
现在,在Ubuntu主机中使用vim打开主机文件:
把ip和网址加进去
保存退出后sudo systemctl restart apache2重启apache就可以通过windows的浏览器访问了。