はじめに
2019/06/15 いろいろと不備がありましたので、書き換えました。
開発するサービスは、なんらかのメールを送信する必要があります。
例えば、会員登録をする場合は、メールアドレスが会員IDになり、そのメールアドレスがただしいかどうか、一度、送信を行います。
また、クリティカルなシステムだと、ログインをしただけでもメールを送って、ログインがあったことを伝えます。
最後にこちらが本命なのですが、私の務めている会社が提供するサービスは、メールをバンバン送ります。このためメールの受信環境を構築することが重要になります。
TL;DR
Githubにあげていますので、こちらでのStep8 => Step9を御覧ください。
https://github.com/idani/nginx-http2-php-mysql
システム構成
前回用意した、DockerでPHP5-Alpineの開発環境(MySQL、Redis)に続きを作っていきます。
- nginx
- php-fpm
- php5/php7
- mysql
- redis
- maildev
メールのテスト環境
さっさっと調べた感じ、
- mailhog https://github.com/mailhog/MailHog
- go 実装
- SMTP
- sendmail置き換えのバイナリもあるらしい。Goなのでバイナリを導入するだけ
- MailHogを利用してメール送信テスト環境をdockerコンテナ上に作る
- maildev https://danfarrelly.nyc/MailDev/
- node.js実装
- SMTP
- sendmail対応はなさそう
- maildev (SMTP mock server) を使ってハイパーメール開発
が検索してでてきました。
所感
どちらも使ってみましたが、SMTP経由でのメール送信では大差ありませんでした。
ただし、どちらも本文や差出人は日本語(iso-2022-jp)でOKなのですが、どちらもサブジェクトが文字化けをするという現象を確認しました。
※これが私の設定不足なのか、不具合なのかわかりません。
サブジェクトの日本語が表示できればいいなぁっと探していたら、ISO-2022-JP に対応した maildev の dockerイメージ を作るを発見。
これでmaildevを選ぶことにしました。
Dockerイメージなので導入するだけでハッピーになれました。
maildevの導入
docker-compose.ymlに追加するだけです。
最後にコンテナを追記しました。
version: '3'
services:
 ・・・(他のコンテナの設定を省略)・・・
  maildev:
    image: kanemu/maildev-with-iconv
    ports:
      - "1025:25"
      - "8025:80"
・・・
この「docker-compose up -d」をしてコンテナを起動し、「127.0.0.1:8025」にアクセスをすると、以下の画面が表示されます。

SMTPのメール送信
MailDevが起動したのですが、メールを送れないと、正しく動いているかわからないですよね。
PHPでSMTP配信をする場合は、PHPMailerがよいです。
ComposerもDockerのコンテナとして使う方が便利そうです。
- Laravelで最適なDocker環境を作る
- Docker を使って、Composer をインストールせずに済ませる方法
- composer(Docker Hub上のイメージ)
- composerのDockerイメージの使い方
data/html/composer.jsonを作成して、PHPMailerを追加します。
{
    "require": {
        "phpmailer/phpmailer": "^6.0"
    }
}
docker-compose.ymlにもcomposerを追加します。
「volumes」には、「composer install」を実行したいパスを指定します。
・・・
  composer:
    restart: 'no'
    image: composer/composer
    command: install
    volumes:
      - ./data/html:/app
これで「docker-compose up」をした時に、composer コンテナが起動してcomposer install を実行してくれます。
# docker-compose up composer
Starting step8-php5-xdebug-redis-mail_composer_1 ... done
Attaching to step8-php5-xdebug-redis-mail_composer_1
composer_1  | Loading composer repositories with package information
composer_1  | Installing dependencies (including require-dev) from lock file
composer_1  |   - Installing phpmailer/phpmailer (v6.0.7)
composer_1  |     Loading from cache
composer_1  |
composer_1  | phpmailer/phpmailer suggests installing hayageek/oauth2-yahoo (Needed for Yahoo XOAUTH2 authentication)
composer_1  | phpmailer/phpmailer suggests installing league/oauth2-google (Needed for Google XOAUTH2 authentication)
composer_1  | phpmailer/phpmailer suggests installing psr/log (For optional PSR-3 debug logging)
composer_1  | phpmailer/phpmailer suggests installing stevenmaguire/oauth2-microsoft (Needed for Microsoft XOAUTH2 authentication)
composer_1  | phpmailer/phpmailer suggests installing symfony/polyfill-mbstring (To support UTF-8 if the Mbstring PHP extension is not enabled (^1.2))
composer_1  | Generating autoload files
step8-php5-xdebug-redis-mail_composer_1 exited with code 0
次に、メールの配信テストを記述していきます。
PHPMailerのSMTPサンプルそのままになっています。
       //////////////////////////////////////////////////////
        // メール
        //////////////////////////////////////////////////////
        // https://github.com/PHPMailer/PHPMailer
        use PHPMailer\PHPMailer\PHPMailer;
        use PHPMailer\PHPMailer\Exception;

        // Load Composer's autoloader
        require 'vendor/autoload.php';

        // Instantiation and passing `true` enables exceptions
        $mail = new PHPMailer;

        try {
            //Server settings
            echo '<pre class="log">';
            echo 'SMTPでメール配信' . PHP_EOL;

            $mail->SMTPDebug = 2;                                       // Enable verbose debug output
            $mail->isSMTP();                                            // Set mailer to use SMTP
            $mail->Host       = 'maildev';  // Specify main and backup SMTP servers
            // $mail->SMTPAuth   = false;                                   // Enable SMTP authentication
            // $mail->Username   = 'user@example.com';                     // SMTP username
            // $mail->Password   = 'secret';                               // SMTP password
            $mail->SMTPSecure = false;                                  // Enable TLS encryption, `ssl` also accepted
            $mail->SMTPAutoTLS = false;
            $mail->Port       = 25;                                    // TCP port to connect to

            //Recipients
            $mail->setFrom('from@example.com');
            $mail->addAddress('smtp@example.net');     // Add a recipient

            // Attachments
            // $mail->addAttachment('/var/www/html/index.php');         // Add attachments
            $mail->addAttachment('/var/www/html/img.jpg', 'img.jpg');    // Optional name

            // // Content
            // $mail->isHTML(true);                                  // Set email format to HTML
            // $mail->Subject = 'Here is the subject';
            // $mail->Body    = 'This is the HTML message body <b>in bold!</b>';
            // $mail->AltBody = 'This is the body in plain text for non-HTML mail clients';

            $mail->Subject = mb_encode_mimeheader('日本語サブジェクト(SMTP)');
            $mail->Encoding = '7bit';
            $mail->CharSet ='ISO-2022-JP';

$mailBody =<<< EOL
日本語のメールのテストです。

改行も問題ないと思います。

SMTPで配信しています。
EOL;

            $mail->Body = mb_convert_encoding($mailBody, "JIS", "UTF-8");

            $mail->send();
            echo 'Message has been sent';
        } catch (Exception $e) {
            echo "Message could not be sent. Mailer Error: {$mail->ErrorInfo}";
        }
        echo '</pre>';
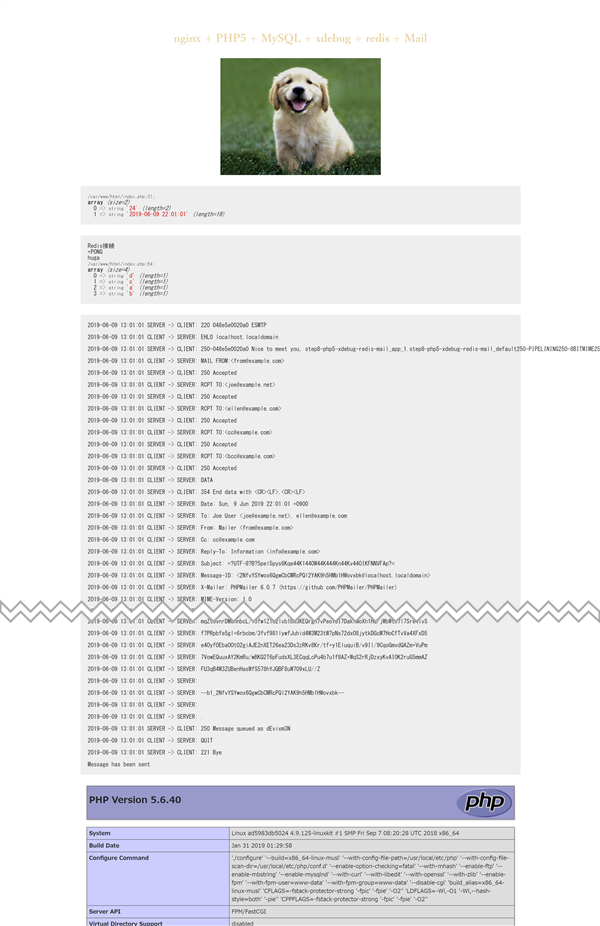
これで「127.0.0.1」にアクセスをすると以下のような画面が表示されます。
「data/html/index.php」にテスト配信のサンプルコードを記述しています。
PHPMailerのデバッグモードのログが出力されます。
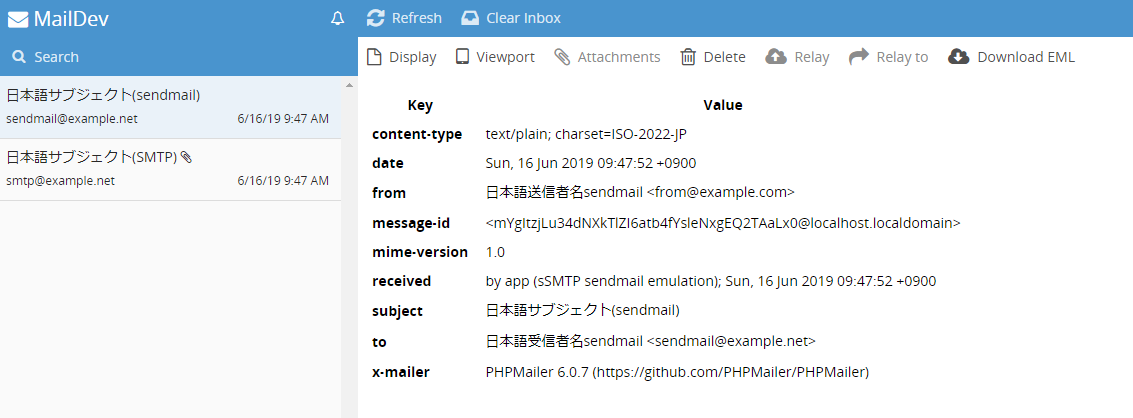
そして、「maildev」に、以下のようにメールが届きます。
サブジェクトも本文も日本語で読めますね。
sendmailでメール送信
alpine linuxでは、sendmailもbusyboxで実現されています。
# docker exec -it step8-php5-xdebug-redis-mail_app_1 /bin/ash
/var/www/html # which sendmail
/usr/sbin/sendmail
/var/www/html # sendmail -V
sendmail: unrecognized option: V
BusyBox v1.28.4 (2018-12-31 18:05:13 UTC) multi-call binary.

Usage: sendmail [-tv] [-f SENDER] [-amLOGIN 4<user_pass.txt | -auUSER -apPASS]
                [-w SECS] [-H 'PROG ARGS' | -S HOST] [RECIPIENT_EMAIL]...

Read email from stdin and send it

Standard options:
        -t              Read additional recipients from message body
        -f SENDER       For use in MAIL FROM:<sender>. Can be empty string
                        Default: -auUSER, or username of current UID
        -o OPTIONS      Various options. -oi implied, others are ignored
        -i              -oi synonym, implied and ignored

Busybox specific options:
        -v              Verbose
        -w SECS         Network timeout
        -H 'PROG ARGS'  Run connection helper. Examples:
                openssl s_client -quiet -tls1 -starttls smtp -connect smtp.gmail.com:25
                openssl s_client -quiet -tls1 -connect smtp.gmail.com:465
                        $SMTP_ANTISPAM_DELAY: seconds to wait after helper connect
        -S HOST[:PORT]  Server (default $SMTPHOST or 127.0.0.1)
        -amLOGIN        Log in using AUTH LOGIN (-amCRAM-MD5 not supported)
        -auUSER         Username for AUTH
        -apPASS         Password for AUTH

If no -a options are given, authentication is not done.
If -amLOGIN is given but no -au/-ap, user/password is read from fd #4.
Other options are silently ignored; -oi is implied.
Use makemime to create emails with attachments.
「-S HOST[:PORT] Server (default $SMTPHOST or 127.0.0.1)」でsendmailのリレー先を設定できます。
しかも、「$SMTPHOST」という環境変数で指定できます。
「.env」ファイルにSMTPHOSTを追記します。
MYSQL_RANDOM_ROOT_PASSWORD=yes
MYSQL_DATABASE=step3
MYSQL_USER=db_user
MYSQL_PASSWORD=password

# REDIS関係
REDIS_PORT=6379
REDIS_PASSWORD=password

# mail
SMTPHOST=maildev
これでsendmailの設定も完了です。
index.phpにsendmailの送信サンプルを追記しました。
こちらもPHPMailer/sendmailサンプルをほぼコピーしています。
        echo '<pre class="log">';
        echo 'sendmailでメール配信' . PHP_EOL;
        $mail2 = new PHPMailer;
        $mail2->isSendmail();
            //Recipients
            $mail2->setFrom('from@example.com');
            $mail2->addAddress('sendmail@example.net');     // Add a recipient

            $mail2->Subject = mb_encode_mimeheader('日本語サブジェクト(sendmail)');
            $mail2->Encoding = '7bit';
            $mail2->CharSet ='ISO-2022-JP';

$mailBody =<<< EOL
日本語のメールのテストです。

改行も問題ないと思います。

sendmailで配信しています。
EOL;

            $mail2->Body = mb_convert_encoding($mailBody, "JIS", "UTF-8");

            $mail2->send();
            echo 'Message has been sent';
        echo '</pre>';
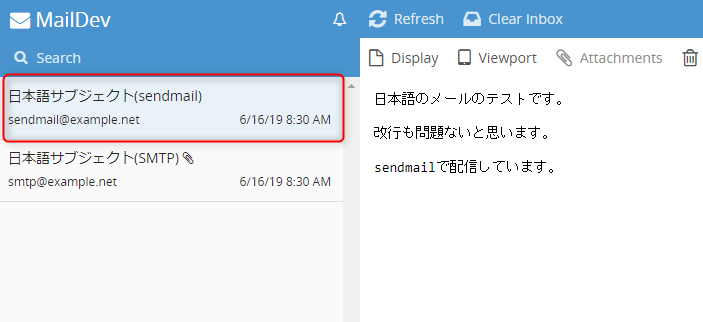
これで「127.0.0.1」をリロードすると、sendmailでのメールも届いています。
sendmailに問題が。。。。(2019/06/16 追記)
sendmailの準備ができたので、開発を進めていましたが、メールが送信できない事象がありました。
実は、busyboxのsendmailは、受信者名にメールアドレスしか指定ができないようです。
どういうことかというと
To: sendmail@example.net
はOKのなのですが、
To: sendmail user <sendmail@example.net>
``

では送信ができないのです。

以下のように「/data/html/index2.php」を用意しました。
index.phpとの差分は、アドレスの指定方法の違いになります。


```php:data/html/index2.php
・・・・
            $mail->setFrom('from@example.com', 'Mailer');
            $mail->addAddress('smtp@example.net', 'Smtp User');     // Add a recipient
・・・
            $mail2->setFrom('from@example.com', 'Mailer');
            $mail2->addAddress('sendmail@example.net', 'Sendmail User');     // Add a recipient
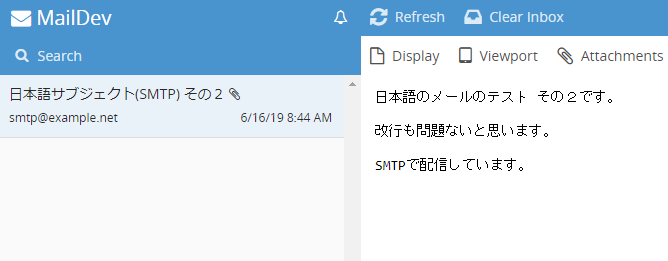
127.0.0.1/index2.phpを開くと、SMTP/Sendmaiilで2通届くはずなのですが、SMTPの1通しか届きません><
Dockerのログを確認すると、「stderr: "sendmail: bad address 'sendmail@example.net>'」とあり、アドレスの指定が悪いようです。
# docker logs step8-php5-xdebug-redis-mail_app_1
[16-Jun-2019 08:30:33] NOTICE: fpm is running, pid 1
[16-Jun-2019 08:30:33] NOTICE: ready to handle connections
172.18.0.5 -  16/Jun/2019:08:30:43 +0900 "GET /index.php" 200
[16-Jun-2019 08:44:29] WARNING: [pool www] child 8 said into stderr: "sendmail: bad address 'sendmail@example.net>'"
172.18.0.5 -  16/Jun/2019:08:44:29 +0900 "GET /index2.php" 200
SSMTPの導入
ここからのサンプルは、step9になります。
sendmailとして、ssmtpを導入します。
FROM php:5-fpm-alpine

# timezone
ARG TZ=Asia/Tokyo

# Composer install
RUN set -eux && \
  apk add --update --no-cache --virtual=.build-dependencies \
    autoconf \
    gcc \
    g++ \
    make \
    tzdata && \
  cp /usr/share/zoneinfo/Asia/Tokyo /etc/localtime && \
  echo ${TZ} > /etc/timezone && \
  apk add --no-cache ssmtp && \ <-ここ
  pecl install redis xdebug-2.5.5 && \
  apk del .build-dependencies && \
  docker-php-ext-install pdo_mysql mysqli mbstring && \
  docker-php-ext-enable redis xdebug
ssmtp.confを以下のようにします。
hostnameとmailhubが環境変数から取得できるとよいのですが、今回は直接指定します。
root=postmaster
mailhub=maildev:25
hostname=app
FromLineOverride=YES
ssmtp.confの共有していをDocker-compose.ymlに記載します。
・・・
  app:
    build: ./app
    env_file: .env
    environment:
      DATABASE_HOST: db
      REDIS_HOST: redis
    depends_on:
      - db
      - redis
    volumes:
      - ./data/html:/var/www/html
      - ./app/xdebug.ini:/usr/local/etc/php/conf.d/xdebug.ini
      - ./app/ssmtp.conf:/etc/ssmtp/ssmtp.conf <-ここ
・・・
サンプルのindex.phpも送信者名、受信者名に日本語が指定するように修正をしました。
これでsendmailでも送信者名をつけて送ることができるようになりました。
index.phpの詳細はGithubを参照してください。
https://github.com/idani/nginx-http2-php-mysql/blob/master/step9-php5-xdebug-redis-mail2/data/html/index.php#L72
まとめ
たぶん、これで一通りの開発ができる状態になりました。


