はじめに
私はVue.js + Vue-routerで開発経験はあります。
結構、複雑なルーティングもVue-routerの機能を駆使して実現してきました。
今回、Nuxt.js + Vuetifyで開発をはじめてみて、Nuxt.js/Vuetifyというフレームワークのお作法みたいなものが見えて来たのでまとめて見ようと思います。
一番は、/user/<user_id>/friendや/user/<user_id>/friend/<friend_id>などのパスを生成する方法を確認したかったというのがあります。
あと、以下のサンプルソースは、ローカルでの開発環境で記載しています。実際にレンタルサーバーにデプロイした場合に、リンク切れなどの問題が発生しました。
そちらは、Nuxt.jsのSPAモードのファイルをレンタルサーバーにデプロイした時にリンク切れが起きる場合の対処法で記載しています。
前提
今回、サンプルとして作成したプロジェクトは、以下の設定となっています。
UIフレームワークとして、Vuetify.jsを選択しています。
基礎知識
作成したプロジェクトでyarn devしますと、http://localhost:3000/で以下の画面が表示されます。
自動生成されたフォルダリストは、下記の画像にあるとおりです。
そして、初期表示されるページは、pages/index.vueファイルになります。
Nuxt.jsは、ディレクトリ構造からルーティングファイルを自動生成しています。
この自動生成されたファイルがどこにあるかというと、.nuxtフォルダの中のrouter.jsになります。
import Vue from 'vue'

~~~省略~~~

const _6ab8c138 = () => interopDefault(import('..\\pages\\inspire.vue' /* webpackChunkName: "pages_inspire" */))
const _a0f196a0 = () => interopDefault(import('..\\pages\\index.vue' /* webpackChunkName: "pages_index" */))

~~~省略~~~

  routes: [{
    path: "/inspire",
    component: _6ab8c138,
    name: "inspire"
  }, {
    path: "/",
    component: _a0f196a0,
    name: "index"
  }],

  fallback: false
}

~~以下省略~~~
routes配列の中にある path: "/"に対応するコンポーネントは_a0f196a0です。
この_a0f196a0が何かというと、import('..\\pages\\index.vue'に対応しています。
このファイルの構成については、Vue-routerのはじめにの項目なので、ここがわからない方は、一読されるとよいです。
ルーティングの基礎
それではNux.jsのドキュメントのルーティングの基礎に戻って作っていきましょう。
userディレクトリを作成し、その中にindex.vueとone.vueを作成します。

<template>
  <div>/user/index.vue</div>
</template>

<script>
export default {
  name: 'index'
}
</script>

<style scoped></style>
<template>
  <div>/user/one.vue</div>
</template>

<script>
export default {
  name: 'index'
}
</script>

<style scoped></style>
yarn devをしているとpages/user/index.vueとpages/user/one.vueが新規に作成されたことを自動検知して、.nuxt/router.jsが自動更新されます。
~~~省略~~~

const _6ab8c138 = () =>
  interopDefault(
    import('..\\pages\\inspire.vue' /* webpackChunkName: "pages_inspire" */)
  )
const _7e712405 = () =>
  interopDefault(
    import(
      '..\\pages\\user\\index.vue' /* webpackChunkName: "pages_user_index" */
    )
  )
const _7ee72b4e = () =>
  interopDefault(
    import('..\\pages\\user\\one.vue' /* webpackChunkName: "pages_user_one" */)
  )
const _a0f196a0 = () =>
  interopDefault(
    import('..\\pages\\index.vue' /* webpackChunkName: "pages_index" */)
  )

~~~ 省略~~~

  routes: [
    {
      path: '/inspire',
      component: _6ab8c138,
      name: 'inspire'
    },
    {
      path: '/user',
      component: _7e712405,
      name: 'user'
    },
    {
      path: '/user/one',
      component: _7ee72b4e,
      name: 'user-one'
    },
    {
      path: '/',
      component: _a0f196a0,
      name: 'index'
    }
  ],

  fallback: false
}

~~~省略~~~
}
path: '/user'に対応するcomponentは_7e712405となっており、変数_7e712405を探すと、'..\\pages\\user\\index.vue'をimportしたものになっています。
同じく、path: '/user/one'に対応するcomponentは_7ee72b4eとなっており、こちらは、'..\\pages\\user\\one.vue'をimportしたものになっています。
実際にブラウザでhttp://localhost:3000/user/を開くとpages/user/index.vueが表示されました。
同じくブラウザでhttp://localhost:3000/user/oneを開くとpages/user/one.vueが表示されました。
さて、ここで確認して欲しいことがあります。
このようにURLの末尾にスラッシュがありなしでも、pages/user/index.vueが表示されます。
同じく、pages/user/one.uveでも、末尾にスラッシュありなしでも表示されます。
http://localhost:3000/user/one
http://localhost:3000/user/one/
つまり、特定のパスを表示したい場合は、パスを示すファイルを作成するか、パスを示すフォルダ+index.vueを作成すれば良いことがわかります。
ここまでのソースは、githubで確認ができます。
動的なルーティング
次に、動的なルーティングを見ていきましょう。
冒頭に書かれています、この文章、大切です。
動的なルーティングを定義するには .vue ファイル名またはディレクトリ名に アンダースコアのプレフィックス を付ける必要があります。
アンダースコアのプレフィックスのファイルを作成する
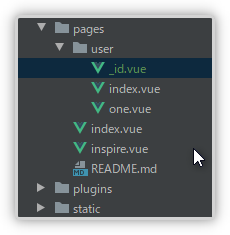
まずは、アンダースコアのプレフィックスのファイルとして、pages/user/_id.vue作成します。
よくある画面イメージは管理画面で、index.vueでユーザ一覧、_id.vueで各ユーザの詳細を表示します。
まとめると以下の機能構成になります。
| URL | ファイル | 機能 |
|---|---|---|
| /user | /user/index.vue | ユーザ一覧 |
| /user/<user_id> | /user/_id.vue | 各ユーザの詳細画面 |
pages/user/index.vueの修正
まずは、pages/user/index.vueを以下のように書き換えます。
以下は掲載するには長いので一部省略をしています。
全部閲覧したい方は、Githubのこちらを参照してください。
<template>
  <v-simple-table>
    <template v-slot:default>
      <thead>
        <tr>
          <th class="text-left" width="50">id</th>
          <th class="text-left">Name</th>
          <th width="200"></th>
        </tr>
      </thead>
      <tbody>
        <tr v-for="user in users" :key="user.id">
          <td class="text-right">{{ user.id }}</td>
          <td>{{ user.name }}</td>
            <v-btn color="primary" small :to="`user/${user.id}`">
              <v-icon left>mdi-account-details</v-icon>
              詳細
            </v-btn>
        </tr>
      </tbody>
    </template>
  </v-simple-table>
</template>

<script>
export default {
  name: 'index',
  data() {
    return {
      users: [
        {
          name: 'Frozen Yogurt',
          id: 159
        },
~~~省略~~~
  }
}
</script>

<style scoped></style>
Vuetifyのシンプル・テーブルのサンプルを流用して、ユーザ一覧を作成しました。
そしてユーザの詳細画面にリンクをするために、以下のようにv-btnを使った詳細ボタンを追加しています。
<v-btn color="primary" small :to="`user/${user.id}`">
  <v-icon left>mdi-account-details</v-icon>
  詳細
</v-btn>
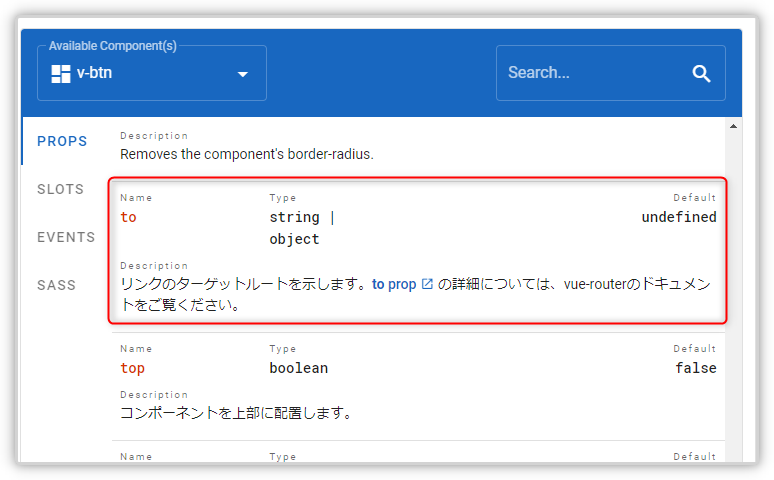
ちなみにVuetifyでは、リンクの作成はtoプロパティで行います。
v-btnのAPIのtoプロパティを確認すると、
vue-routerのtoプロパティに対応しています。
vue-routerのtoプロパティを確認すると、toとして、以下のように記述ができるということですが、今回の目的の/user/<user_id>を実現するには、名前付きルートが良さそうです。
<!-- 文字列 -->
<router-link to="home">Home</router-link>
<!-- 次のように描画される -->
<a href="home">Home</a>

<!-- `v-bind` を使った javascript 式-->
<router-link v-bind:to="'home'">Home</router-link>

<!-- 他のプロパティのバインディングのような `v-bind` の省略表現 -->
<router-link :to="'home'">Home</router-link>

<!-- 上記と同じ -->
<router-link :to="{ path: 'home' }">Home</router-link>

<!-- 名前付きルート -->
<router-link :to="{ name: 'user', params: { userId: 123 }}">User</router-link>

<!-- 結果的に `/register?plan=private` になるクエリ-->
<router-link :to="{ path: 'register', query: { plan: 'private' }}">Register</router-link>
ところが、Nuxt.jsでは、ルーティングは自動生成されるため、名前付きルートを利用するnameは、.nuxt/router.jsを参照して確認する必要があり面倒です。
この結果、リンクの記述方法は、相対パスを直接記述するスタイルがよさそうなので、:to="`user/${user.id}`"として、pages/user/_id.vueにリンクをしています。
これでhttp://localhost:3000/userにアクセスをすると以下の表示になりました。

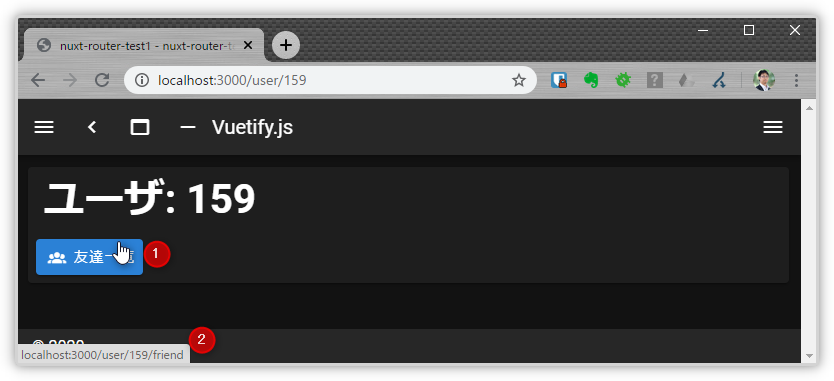
詳細ボタンにマウスを持ってくると、ブラウザの一番下に、以下のようにlocalhost:3000/user/<user_id>というリンク先が表示されました。
pages/user/_id.vueを作成
次に、以下のようにpages/user/_id.vueを作成します。
<template>
  <div>/user/{{ userId }}</div>
</template>

<script>
export default {
  name: 'UserDetail',
  computed: {
    userId() {
      return this.$route.params.id
    }
  }
}
</script>

<style scoped></style>
pages/user/_id.vueを作成したら、自動生成された.nuxt/router.jsを確認します。
~~~省略~~~
const _7e712405 = () =>
  interopDefault(
    import(
      '..\\pages\\user\\index.vue' /* webpackChunkName: "pages_user_index" */
    )
  )
const _699263ad = () =>
  interopDefault(
    import('..\\pages\\user\\_id.vue' /* webpackChunkName: "pages_user__id" */)
  )
~~~省略~~~
 // Routes配列は見やすいように不要なオブジェクトを削除しています。
 routes: [
    {
      path: '/user',
      component: _7e712405,
      name: 'user'
    },
    {
      path: '/user/:id',
      component: _699263ad,
      name: 'user-id'
    },
  ],
~~~省略~~~
path: '/user/:id'は、'..\\pages\\user\\_id.vue'に対応付されていることがわかります。
_id.vueを作成しましたので、各ユーザの詳細ボタンをクリックしたら、詳細画面に表示されるようになりました。
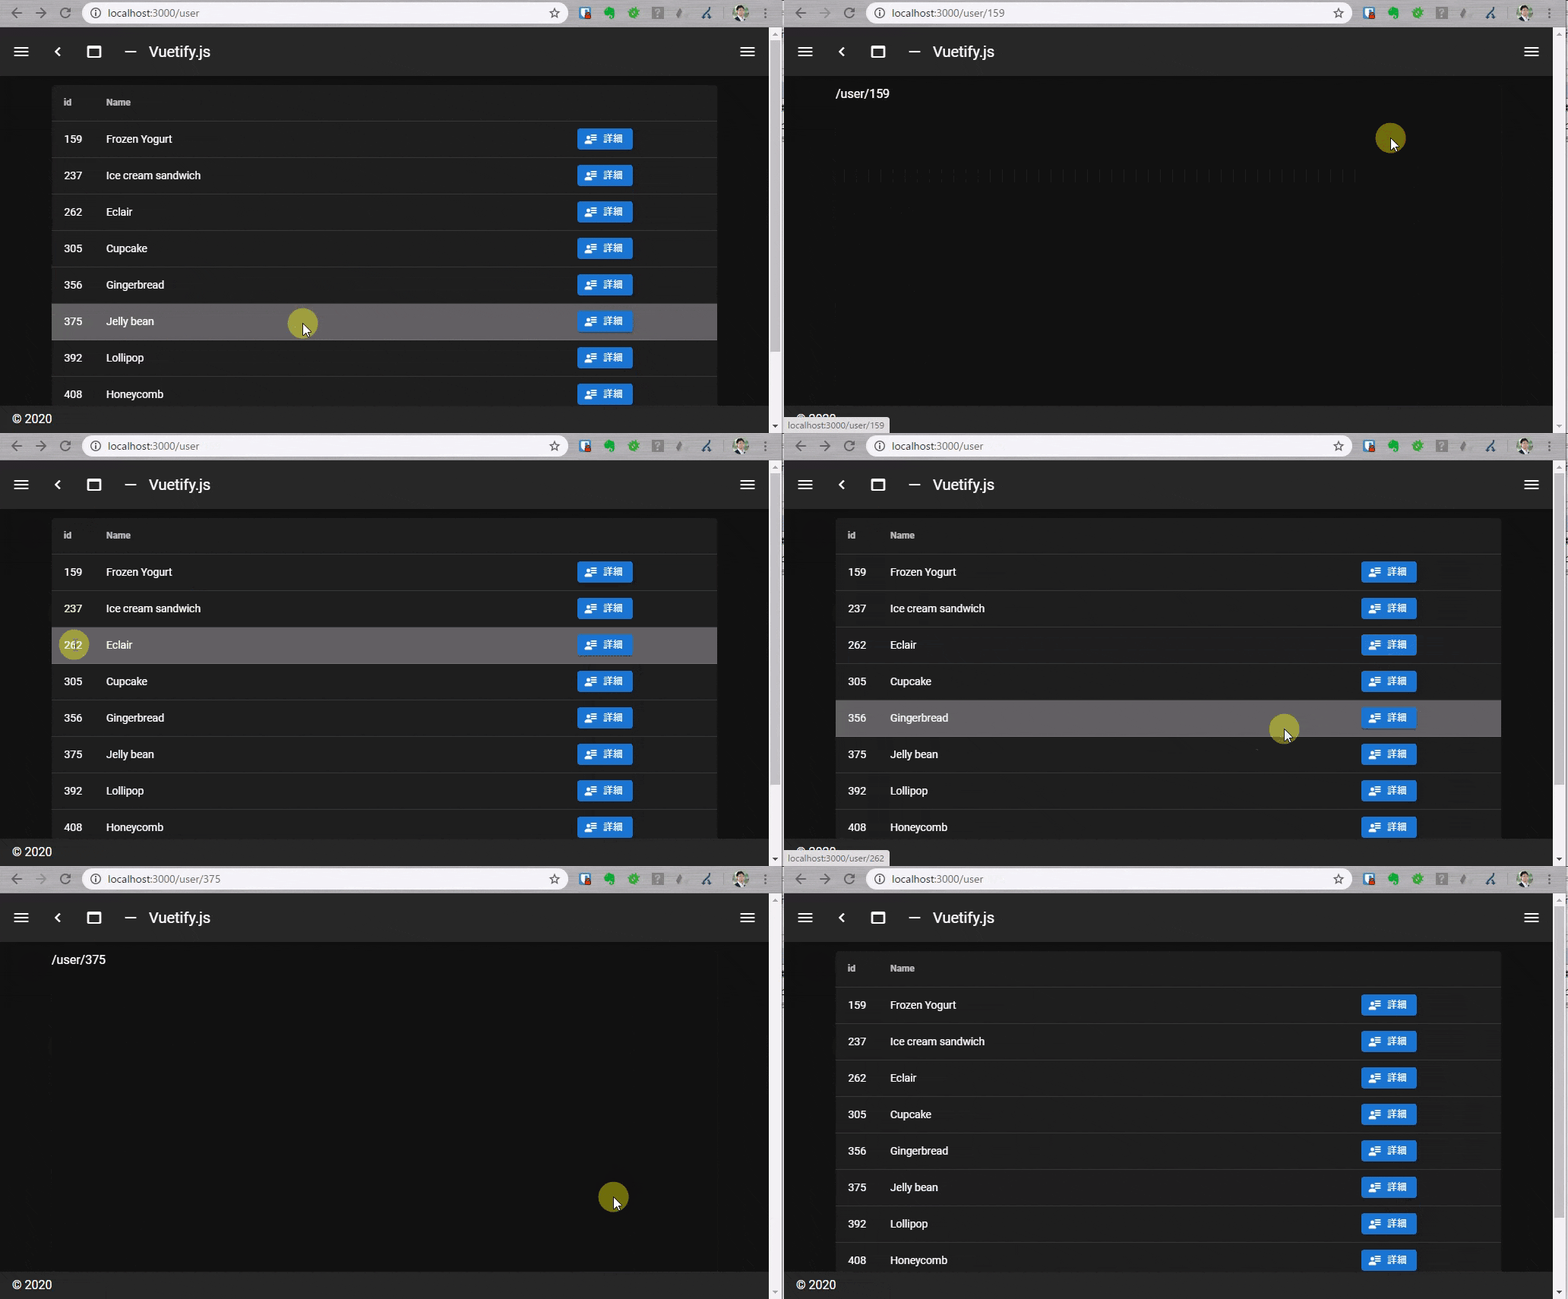
※戻るときは、ブラウザのバックボタンで戻っています。
ルーティングパラメータのバリデーション
これでユーザ一覧ページからユーザ詳細ページを閲覧する画面ができました。
さて、想像して見ください。
この場合、勘がいい管理者さんでしたら、http://localhost/user/<user_id>としてユーザの詳細ページが表示されますから、直接入力をしたくなります。
それでは、user_id = abcとして、http://localhost:3000/user/abcをブラウザに入力をしてみましょう。

何事もなく表示されてしまいました(汗)
ユーザIDは、数値として制限したいです。
この場合に、ルーティングのパラメータのバリデーションを記述します。
公式ドキュメントの通り_id.vueにvalidateを追加します。
<template>
  <div>/user/{{ userId }}</div>
</template>

<script>
export default {
  name: 'UserDetail',
  validate({ params }) {
    // 数値でなければならない
    return /^\d+$/.test(params.id)
  },
  computed: {
    userId() {
      return this.$route.params.id
    }
  }
}
</script>

<style scoped></style>
この結果、http://localhost:3000/user/abcをリロードすると、404 Not Foundになりました。

ルーティングパラメータの取得
ルーティングパラメータとは、URLに含まれる情報になります。
Nuxt.jsの公式ドキュメントのルートパラメータへのローカルアクセスを見ると、this.$route.params.{parameterName}を参照できました。
今回は、user_idが取得したいので、computedに記載しています。
  computed: {
    userId() {
      return this.$route.params.id
    }
  }
余談ですが、vue-routerの公式ドキュメントのルートコンポーネントにプロパティを渡すには、以下のように記載されています。
コンポーネントで $route を使うとコンポーネントとルートの間に密結合が生まれ、コンポーネントが特定のURLでしか使用できないなど柔軟性が制限されます。コンポーネントをルーターから分離するために props オプションを使います
Nuxt.jsの場合も、propsで渡せないか試してみましたが、できませんでした。
Nuxt.jsの便利な機能を使うためのトレードオフとして割り切るしかないですね。
以上のソースは、github上のtag:アンダースコアプレフィックスファイルで参照ができます。
アンダースコアプレフィックスをつけたディレクトリ
次にシチューエーションとしては、Facebookを想像して、各ユーザが友達となっている人の一覧、友達の詳細画面を作成するとします。
URLとしては、以下を考えます。
| URL | ファイル | 機能 |
|---|---|---|
| /user | /user/index.vue | ユーザ一覧 |
| /user/<user_id> | /user/_id.vue | 各ユーザの詳細画面 |
| /user/<user_id>/friend | ? | 各ユーザの友達一覧 |
| /user/<user_id>/friend/<friend_id> | ? | 各ユーザの友達詳細 |
ファイルはどうしたらよいでしょうか?
ここで一番初めに紹介した言葉を思い出します。
パラメータを使って動的なルーティングを定義するには .vue ファイル名またはディレクトリ名に アンダースコアのプレフィックス を付ける必要があります。
_id.vueをアンダースコアプレフィックスを付けたフォルダにすればよいのです。
以下のように書き換えていきます。
| URL | ファイル | 機能 |
|---|---|---|
| /user | /user/index.vue | ユーザ一覧 |
| /user/<user_id> | /user/_id/index.vue | 各ユーザの詳細画面 |
| /user/<user_id>/friend | /user/_id/friend/index.vue | 各ユーザの友達一覧 |
| /user/<user_id>/friend/<friend_id> | /user/_id/friend/_fId.vue | 各ユーザの友達詳細 |
_id.vueを_id/index.vueに書き換える。
まずは、_id.vueを_id/index.vueに書き換えます。

自動更新後の.nuxt/router.jsを確認すると、path: '/user/:id'は、..\\pages\\user\\_id\\index.vue'に対応付けられていることがわかります。
~~~省略~~~
const _5805e435 = () =>
  interopDefault(
    import(
      '..\\pages\\user\\_id\\index.vue' /* webpackChunkName: "pages_user__id_index" */
    )
  )
~~~省略~~~
routes: [
    {
      path: '/user/:id',
      component: _5805e435,
      name: 'user-id'
    },
  ],
~~~省略~~~
一応、ブラウザでも動作確認をして、動作として問題ないことを確認します。

友達一覧ページの作成
友達一覧を表示するURLは、/user/<user_id>/friendとしました。
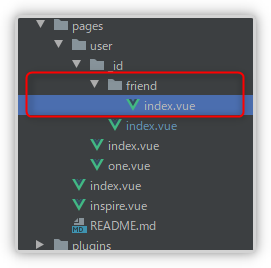
pages/user/_id/friendディレクトリを作成後、以下のようにpages/user/_id/firiend/index.vueを作成します。
<template>
  <v-card>
    <v-card-title>
      <h1>ユーザID: {{ userId }}の友達一覧</h1>
    </v-card-title>
    <v-card-actions>
      <v-btn small color="primary" :to="`/user/${userId}`">戻る</v-btn>
    </v-card-actions>

    <v-card-text>
      <v-simple-table>
        <template v-slot:default>
          <thead>
            <tr>
              <th class="text-left" width="50">fid</th>
              <th class="text-left">Name</th>
              <th width="200"></th>
            </tr>
          </thead>
          <tbody>
            <tr v-for="user in users" :key="user.id">
              <td class="text-right">{{ user.id }}</td>
              <td>{{ user.name }}</td>
              <td>
                <v-btn color="primary" small :to="`user/${user.id}`">
                  <v-icon left>mdi-account-details</v-icon>
                  詳細
                </v-btn>
              </td>
            </tr>
          </tbody>
        </template>
      </v-simple-table>
    </v-card-text>
  </v-card>
</template>

<script>
export default {
  name: 'index',
  validate({ params }) {
    // 数値でなければならない
    return /^\d+$/.test(params.id)
  },
  data() {
    return {
      users: [
        {
          name: 'Frozen Yogurt',
          id: 159
        },
~~~省略~~~
      ]
    }
  },
  computed: {
    userId() {
      return this.$route.params.id
    }
  }
}
</script>

<style scoped></style>
ブラウザにhttp://localhost:3000/user/159/friendと入力をすると、以下のような友達一覧が表示されました。

ユーザ詳細のURLは/user/<user_id>です、
友達一覧のURLは、/user/<user_id>/friendです。
リンクとしては、1階層上に上がることになります。
パスの記法として、1階層下がる場合は、相対リンクで記述ができるのですが、1階層上がるということを相対リンクで記述する方法がわからないため、以下のような絶対リンクで記述しています。
<v-btn small color="primary" :to="`/user/${userId}`">戻る</v-btn>
絶対リンクですと、後々パスの周りで不具合がでそうです。名前付きルートで記載した方が良いかもしれませんね。
ただ、先に書いたようにルート名は、Nuxtで自動生成されます。なので、Nuxtの自動生成ルールを覚えておくか、毎回、.nuxt/router.jsを確認する必要があります。このあたり、どうしたらよいかな?って思案しています。
ユーザ詳細画面から友達一覧にリンクを追加する
友達一覧からユーザ詳細にリンクができましたので、逆にユーザ詳細から友達一覧にリンクを作成します。
以下のように、pages/user/_id/index.vueの<template>を書き変えます。
<template>
  <v-card>
    <v-card-title>
      <h1>ユーザ: {{ userId }}</h1>
    </v-card-title>
    <v-card-actions>
      <v-btn color="primary" to="friend" append>
        <v-icon left>mdi-account-group</v-icon>友達一覧
      </v-btn>
    </v-card-actions>
  </v-card>
</template>
余談ですが、<template>を見ていただいてわかりますが、v-cardを使ってレイアウトしています。
Vuetifyを使う場合は、v-cardをパーツブロックのように使っていくのがよいように思います。
ポイントは、友達一覧ページへのリンクの記述方法になります。
現在のURLにサブディレクトリ名を追加したい場合は、toにサブディレクトリ名を追加し、さらにappendプロパティを追加します。
<v-btn color="primary" to="friend" append>

※Vuetifyの公式ドキュメントのv-btnのプロパティを参照
これでユーザ詳細ページから友達一覧ページの相互の行き来ができるようになりました。

友達詳細ページ
最後に、友達詳細を作成して、友達一覧からリンクを作成し、相互に行き来できるようにします。
以下のようにpages/user/_id/friend/_fid.vueを作成します。
<template>
  <v-card>
    <v-card-title>
      <h1>ユーザ: {{ userId }}の友達: {{ friendId }}の詳細</h1>
    </v-card-title>
    <v-card-actions>
      <v-btn color="primary" :to="`/user/${userId}/friend`">
        <v-icon left>mdi-account-group</v-icon>友達一覧に戻る
      </v-btn>
    </v-card-actions>
  </v-card>
</template>

<script>
export default {
  name: 'friendDetail',
  validate({ params }) {
    // 数値でなければならない
    return /^\d+$/.test(params.id)
  },
  computed: {
    userId() {
      return this.$route.params.id
    },
    friendId() {
      return this.$route.params.fid
    }
  }
}
</script>

<style scoped></style>
また、pages/user/_id/index.vueの友達詳細のリンク部分を修正します。
<v-btn color="primary" small :to="`${user.id}`" append>
  <v-icon left>mdi-account-details</v-icon>
  友達詳細
</v-btn>
以上のソースは、github上のtag:アンダースコアプレフィックスフォルダで参照ができます。
ネストされたルート
次はネストされたルートを考えます。
公式ドキュメントにネストについて、以下のように記載されています。
ネストされたルートの親コンポーネントを定義するには、子ビューを含む ディレクトリと同じ名前 の Vue ファイルを作成する必要があります。
さきほどまでのサンプルの自動生成された.nuxt/router.jsを確認すると、以下のようになっていてネストしていません。
~~~省略~~
//以下、一部routesの中身を省略
 routes: [
    {
      path: '/user',
      component: _7e712405,
      name: 'user'
    },
    {
      path: '/user/:id',
      component: _5805e435,
      name: 'user-id'
    },
    {
      path: '/user/:id/friend',
      component: _22619457,
      name: 'user-id-friend'
    },
    {
      path: '/user/:id/friend/:fid',
      component: _1f41cd66,
      name: 'user-id-friend-fid'
    },
    {
      path: '/',
      component: _a0f196a0,
      name: 'index'
    }
  ],
~~~省略~~~
試しに、friendをネストさせてみましょう。
ネストさせるには、friendフォルダと同じ名前のfriend.vueファイルを作成します。

<template>
  <div></div>
</template>

<script>
export default {
  name: 'friend'
}
</script>

<style scoped></style>
そして自動生成されたroute.jsを確認します。
routes配列のpath: '/user/:id/friend'がネストされているのがわかります。
~~~省略~~~
 // 配列の中身を一部削除しています。
  routes: [
    {
      path: '/user/:id/friend',
      component: _1619b5cb,
      children: [
        {
          path: '',
          component: _22619457,
          name: 'user-id-friend'
        },
        {
          path: ':fid',
          component: _1f41cd66,
          name: 'user-id-friend-fid'
        }
      ]
    }
  ],
~~~省略~~~
さて、ユーザ詳細から友達一覧のリンクはどうなったでしょうか?
予想通り、友達一覧が表示されなくなりました。
Nuxt.jsの公式ドキュメントの警告を抜かしていました。
警告: <nuxt-child/> を親コンポーネント内(.vue ファイル内)に書くことを忘れないでください。
以下のように<template>の<nuxt-child />を追加しました。
<template>
  <div>
    <nuxt-child />
  </div>
</template>

<script>
export default {
  name: 'friend'
}
</script>

<style scoped></style>
ただ、これではネストしてもネストしなくても動作が変わらないので、ネストしたありがたみがわかりません。
個人的には、ネストした場合のありがたみは、friendフォルダのファイルに専用のちょっとしたレイアウトを追加できることだと思います。
以下のように、pages/user/_id/friend.vueを書き換えます。
<template>
  <v-card>
    <v-card-title>
      <h1>ユーザ: {{ userId }}</h1>
    </v-card-title>
    <v-card-text>
      <nuxt-child />
    </v-card-text>
  </v-card>
</template>

<script>
export default {
  name: 'friend',
  computed: {
    userId() {
      return this.$route.params.id
    }
  }
}
</script>

<style scoped></style>
friend/index.vueとfriend/_fid.vueで、ユーザIDを表示していましたが、これが不要になりますね。
以上のソースは、githubのtag:ネストされたルートにあります。
最後に
Nuxt.jsのルーティングの自動生成の挙動を確認するためにサンプルを作成してみました。
動的ルーティングと未知の動的でネストされたルートは公式サイトのドキュメントで分かりづらい部分はないので、割愛しています。
これがNuxt.jsのルーティングの理解の一助になれば幸いです。
こういうのがライブコーディングで、スラスラかければ動画にするんですけどね(苦笑)


