Twitter APIを使っているとき、自分のAPIキーであるアカウントのAccess TokenとAccess Token Secretを確認したいときありませんか?私はあります。ありますよね。(強制)
最近Twitter Developperの登録のハードルが上がり、**何日も承認待ちしてる暇なんかねぇ!**っていう時、Access Tokenを確認できたら良いなぁ~と思っていました。
なので任意のアカウントのAccess Tokenを確認するツールを公開しましたので紹介します。
※事前に各自で利用規約に違反しないかだけご確認ください。
紹介と使い方
ページにアクセスする前にまずはAPIの設定を変えてください。
TwitterDevのDashboardで該当APIのコールバックURLを以下に変更してください。(使い終わったら切って構いません)
https://tools.ic731.net/check_twitter_key/confirm.php

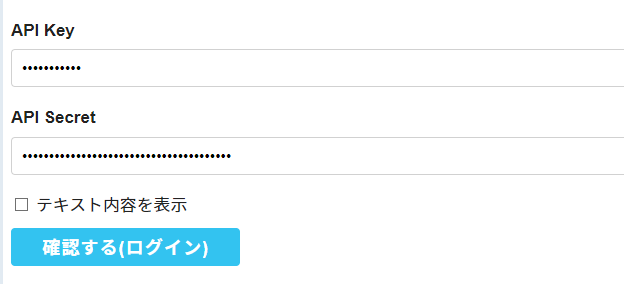
変更したらページにアクセスして、APIキーとAPIシークレットを入力します。

下のチェックボックスを入れると隠してあるキーのinputが見られます。
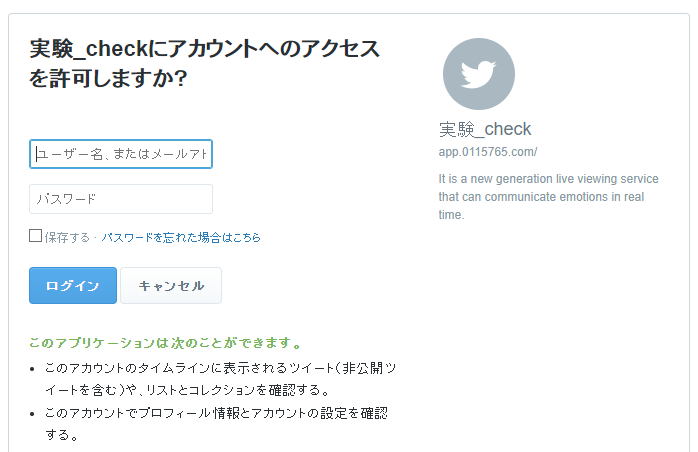
入力したら**確認する(ログイン)**をクリック。そうするとTwitterのログイン画面orアプリケーションの許可を問われるいつもの画面になりますので任意のアカウントでログイン。

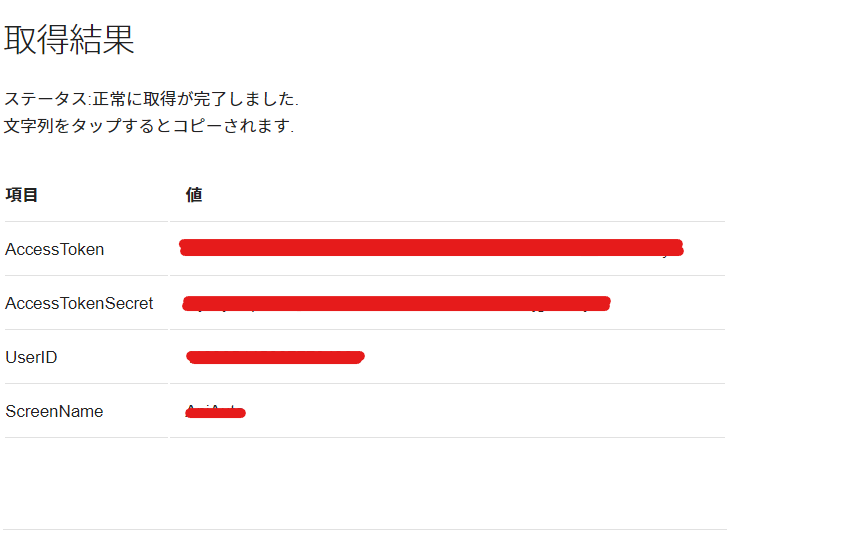
ログイン出来たらAccess TokenとAccess Token Secretが帰ってきます。該当テーブルをクリックすると自動コピーされます。

※一度でもリロードすると情報が破棄されますので御注意を︙
以上簡単ですので是非お試しください。
信頼できない人向けソースコード
まぁ情報取られる!と思う方は以下にソースコードを貼っておきますので各自ダウンロードしてPHPの動く環境にホストして使ってください…
仕様
【フロントエンド】
- HTML & JS
- Customized SkeletonCSS
- Clipboard.js
【バックエンド】
- PHP
- abraham/twitteroauth
ダウンロード&ソースコードはこちら
以下のコードを使うなら実行前にcomposer require abraham/twitteroauthを実行してください。
index.php
<?php
function getCSRFToken()
{
    $bytes = function_exists('random_bytes') ?
        random_bytes(48) : openssl_random_pseudo_bytes(48);
    $nonce = base64_encode($bytes);

    if (empty($_SESSION['csrf_tokens'])) {
        $_SESSION['csrf_tokens'] = [];
    }

    $_SESSION['csrf_tokens'][$nonce] = true;

    return $nonce;
}

session_start();
$token = getCSRFToken();
$token = htmlspecialchars($token, ENT_QUOTES, 'UTF-8');
?>

<!DOCTYPE html>
<html lang="ja">

<head>
    <meta charset="UTF-8">
    <meta http-equiv="X-UA-Compatible" content="IE=edge">
    <meta name="viewport" content="width=device-width, initial-scale=1.0">
    <title>Twitter Access Token確認ツール</title>
    <link rel="stylesheet" href="../frameworks/skeleton_custom.min.css">
    <link rel="preconnect" href="https://fonts.gstatic.com" crossorigin>
    <link href="https://fonts.googleapis.com/css2?family=Noto+Sans+JP&display=swap" rel="stylesheet">
</head>

<body>
    <div class="six columns">
        <h2>Twitter Access Token確認ツール</h2>
        <p>自分のAPIキーでアカウントのアクセストークンを取得するツールです. ここ最近TwitterDevの審査が大変なのでこのツールで発行できます.
        </p>
        <form action="login.php" method="POST">
            <label for="ck">API Key</label>
            <input class="u-full-width" type="password" id="ck" name="ck" required>
            <label for="cs">API Secret</label>
            <input class="u-full-width" type="password" id="cs" name="cs" required>
            <input type="hidden" name="csrf_token" value="<?php echo $token; ?>" required>
            <input type="checkbox" id="show" value="1">
            <span>テキスト内容を表示</span><br>
            <input class="button-primary" type="submit" value="確認する(ログイン)">
        </form>

        <div class="row">
            <h4>使い方</h4>
            <p>Callback URLを以下に指定して御利用ください.</p>
            <p style="word-wrap: break-word;"><b>https://tools.ic731.net/check_twitter_key/confirm.php</b></p>
            <img alt="コールバック指定" src="assets/callback.png" width="100%">
        </div>
        <br>
        <hr>
        <p style="margin-bottom: 20px;">© 2020-21 IchiiLab by 市井P All Rights Reserved.</p>
    </div>
    <script>
        const ck = document.getElementById("ck");
        const cs = document.getElementById("cs");
        const keysCheck = document.getElementById("show");
        keysCheck.addEventListener("change", function() {
            if (keysCheck.checked) {
                ck.setAttribute("type", "text");
                cs.setAttribute("type", "text");
            } else {
                ck.setAttribute("type", "password");
                cs.setAttribute("type", "password");
            }
        }, false);
    </script>
</body>

</html>
login.php
<?php
require_once "vendor/autoload.php";
use Abraham\TwitterOAuth\TwitterOAuth;

function validateCSRFToken($token)
{
    if (isset($_SESSION['csrf_tokens'][$token])) {
        unset($_SESSION['csrf_tokens'][$token]);
        return true;
    }

    return false;
}

session_start();
$callback = 'https://tools.ic731.net/check_twitter_key/confirm.php';

if (isset($_POST['csrf_token']) && validateCSRFToken($_POST['csrf_token'])) {
    $ck = htmlspecialchars($_POST['ck']);
    $cs = htmlspecialchars($_POST['cs']);
    $_SESSION['ck'] = $ck;
    $_SESSION['cs'] = $cs;
    try {
        $connection = new TwitterOAuth($ck, $cs);
        $request = $request_token = $connection->oauth('oauth/request_token', ['oauth_callback' => $callback]);
        $_SESSION['oauth_token'] = $request_token['oauth_token'];
        $_SESSION['oauth_token_secret'] = $request_token['oauth_token_secret'];
        $url = $connection->url('oauth/authenticate', ['oauth_token' => $request_token['oauth_token']]);
        header('location: ' . $url);
    } catch (\Throwable $th) {
        error();
    }
} else {
    error();
}

function error(){
    echo <<<EOM
    <meta name="viewport" content="width=device-width, initial-scale=1.0">
    <h3>アクセスエラー</h3>
    <p>以下のことが考えられます.トップへお戻りください.</p>
    <ul>
        <li>このページに直接アクセスした</li>
        <li>CallbackのURLが間違っている</li>
        <li>APIキーの入力ミス</li>
        <li>CSRFトークンが不正</li>
    </ul>
    EOM;
}
confirm.php
<?php

session_start();
require_once 'vendor/autoload.php';

use Abraham\TwitterOAuth\TwitterOAuth;

try {
    $request_token['oauth_token'] = $_SESSION['oauth_token'];
    $request_token['oauth_token_secret'] = $_SESSION['oauth_token_secret'];

    $connection = new TwitterOAuth($_SESSION['ck'], $_SESSION['cs'], $request_token['oauth_token'], $request_token['oauth_token_secret']);
    $token = $connection->oauth("oauth/access_token", array("oauth_verifier" => $_REQUEST['oauth_verifier']));

    $status = "正常に取得が完了しました.<br>文字列をタップするとコピーされます.";
    $clipboard = "new ClipboardJS('.copy');";
    $info = ["at" => $token['oauth_token'], "ats" => $token['oauth_token_secret'], "id" => $token['user_id'], "name" => $token['screen_name']];
    session_destroy();
} catch (\Throwable $th) {
    $status = "取得に失敗しました.安全のため,セッションは更新すると削除されます.";
    $clipboard = "";
    $info = ["at" => " - - ", "ats" => " - - ", "id" => " - - ", "name" => " - - "];
    session_destroy();
}
?>

<!DOCTYPE html>
<html lang="ja">

<head>
    <meta charset="UTF-8">
    <meta http-equiv="X-UA-Compatible" content="IE=edge">
    <meta name="viewport" content="width=device-width, initial-scale=1.0">
    <title>AccessToken取得結果</title>
    <link rel="stylesheet" href="../frameworks/skeleton_custom.min.css">
    <link rel="preconnect" href="https://fonts.gstatic.com" crossorigin>
    <link href="https://fonts.googleapis.com/css2?family=Noto+Sans+JP&display=swap" rel="stylesheet">
    <style>
        .copy:hover {
            background: #f2fafc;
        }

        .copy {
            cursor: pointer;
        }
    </style>
</head>

<body>
    <div class="six columns">
        <h2>Twitter Access Token確認ツール</h2>
        <p>自分のAPIキーでアカウントのアクセストークンを取得するツールです. ここ最近TwitterDevの審査が大変なのでこのツールで発行できます.
        </p>
        <h4>取得結果</h4>
        <p>ステータス:<?=$status;?></p>
        <table class="u-full-width" style="width: 100%;">
            <thead>
                <tr>
                    <th style="width: 20%">項目</th>
                    <th>値</th>
                </tr>
            </thead>
            <tbody>
                <tr>
                    <td>AccessToken</td>
                    <td class="copy" data-clipboard-text="<?=$info["at"];?>"><?=$info["at"];?></td>
                </tr>
                <tr>
                    <td>AccessTokenSecret</td>
                    <td class="copy" data-clipboard-text="<?=$info["ats"];?>"><?=$info["ats"];?></td>
                </tr>
                <tr>
                    <td>UserID</td>
                    <td class="copy" data-clipboard-text="<?=$info["id"];?>"><?=$info["id"];?></td>
                </tr>
                <tr>
                    <td>ScreenName</td>
                    <td class="copy" data-clipboard-text="<?=$info["name"];?>"><?=$info["name"];?></td>
                </tr>
            </tbody>
        </table>
        <br>
        <hr>
        <p style="margin-bottom: 20px;">© 2020-21 IchiiLab by 市井P All Rights Reserved.</p>
    </div>
    <script src="https://unpkg.com/clipboard@2/dist/clipboard.min.js"></script>
    <script><?=$clipboard;?></script>
</body>
</html>