日常業務において、Pythonスクリプトを使用してExcelのデータをWord文書に自動統合することで、表のスマートな移行を実現し、さまざまなシナリオでのデータ表示の専門的な要件を満たすことができます。表の内容を直接Wordに挿入することで、重要なデータを素早く伝達でき、情報を正確に届けることが可能です。また、表のスタイルやフォーマットを完全にコピーすることで、元のデータの視覚的な表現を保持し、公式なレポートの厳格なレイアウト基準を満たすことができます。さらに、OLEオブジェクトとして表を埋め込むことで、ドキュメントの動的な更新が可能になり、元のデータが変更された場合でも、オブジェクトをダブルクリックすることで直接Excelを開いて編集できます。このインタラクティブな設計は、長期的に維持するコラボレーションファイルに特に適しています。
本記事では、以下の3つの方法でPythonを使用してExcel表をWord文書に挿入する方法を紹介します。
本記事で使用するWord文書の操作には、Free Spire.Doc for Python(PyPI:pip install spire.doc.free)が必要です。また、Excelワークシートのデータを読み取るには、Free Spire.XLS for Python(PyPI:pip install spire.xls.free)を使用します。
ExcelワークシートのデータをWord文書に挿入する
Excelワークシートのデータを直接読み取り、Word文書内に表を作成してデータを挿入することで、Excelの表をWord文書に組み込むことができます。以下の手順で操作を行います。
-
Excelファイルを読み込む
-
Workbookインスタンスを作成し、LoadFromFile()を使用してExcelファイルを読み込む。 -
Worksheets.get_Item(0)を使用して最初のワークシートを取得する。 -
AllocatedRangeを使用して使用済みのセル範囲を取得する。
-
-
Word文書を作成し、表を追加する
-
Documentインスタンスを作成し、AddSection()を使用してセクションを追加する。 -
AddTable()を使用して表を追加する。
-
-
ExcelのヘッダーをWordにコピーする
-
AddRow()を使用してヘッダー行を追加する。 -
AddCell().AddParagraph().AppendText()を使用してヘッダーテキストを挿入する。
-
-
Excelのデータ行をWordにコピーする
- Excelのデータ行をループ処理し、
AddRow()を使用してデータ行を追加する。 -
Cells.get_Item(col).AddParagraph().AppendText()を使用してセルの内容を挿入する。 - セルに数式が含まれる場合は、
FormulaValueを使用し、それ以外はValueを使用する。
- Excelのデータ行をループ処理し、
-
表のスタイルを調整し、Word文書を保存する
-
AutoFit(AutoFitBehaviorType.AutoFitToWindow)を使用して表をウィンドウに合わせる。 -
ApplyStyle(DefaultTableStyle.GridTable1LightAccent6)を使用して表のスタイルを設定する。 -
SaveToFile(path, FileFormat.Docx2019)を使用してWord文書を保存する。
-
コード例
from spire.doc import Document, AutoFitBehaviorType, FileFormat, DefaultTableStyle
from spire.xls import Workbook

# 指定されたExcelファイルパスと出力先Word文書パス
excel_file = "Sample.xlsx"
word_file = "output/ExcelDataToWord.docx"

# Excelを読み込む
with Workbook() as workbook:
    workbook.LoadFromFile(excel_file)
    worksheet = workbook.Worksheets.get_Item(0)
    allocated_range = worksheet.AllocatedRange

    # Word文書を作成する
    with Document() as doc:
        section = doc.AddSection()
        table = section.AddTable()

        # ヘッダー行を追加する
        header_row = table.AddRow()
        for col in range(allocated_range.ColumnCount):
            cell = header_row.AddCell()
            paragraph = cell.AddParagraph()
            paragraph.AppendText(allocated_range.get_Item(1, col + 1).Text)

        # データ行を追加する
        for row in range(1, allocated_range.RowCount):
            data_row = table.AddRow()
            for col in range(allocated_range.ColumnCount):
                cell = data_row.Cells.get_Item(col)
                paragraph = cell.AddParagraph()
                cell_value = allocated_range.get_Item(row + 1, col + 1)
                text = cell_value.FormulaValue if cell_value.HasFormula else cell_value.Value
                paragraph.AppendText(text)

        # 表の自動調整とスタイルの適用
        table.AutoFit(AutoFitBehaviorType.AutoFitToWindow)
        table.ApplyStyle(DefaultTableStyle.GridTable1LightAccent6)

        # Word文書を保存する
        doc.SaveToFile(word_file, FileFormat.Docx2019)
結果

ExcelワークシートのデータとフォーマットをWord文書にコピーする
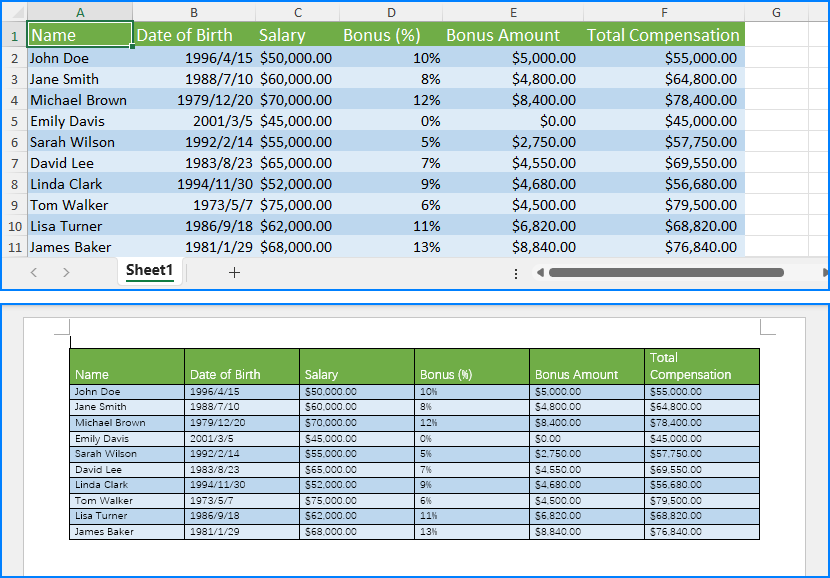
ExcelのデータをWord文書にコピーすると同時に、セルのフォーマットやテキストのスタイルも維持することで、高い再現度でExcel表をWord文書に挿入できます。以下の手順で操作を行います。
-
Excelファイルを読み込む
-
Workbookインスタンスを作成し、LoadFromFile()を使用してExcelファイルを読み込む。 - 最初のワークシート
sheetを取得する。
-
-
Word文書を作成し、ページの向きを設定する
-
Documentインスタンスを作成し、AddSection()を追加する。 -
section.PageSetup.Orientation = PageOrientation.Landscapeを設定する。
-
-
Word表を作成する
-
AddTable(True)を使用して表を作成する。 -
ResetCells(sheet.LastRow, sheet.LastColumn)で行数と列数を設定する。
-
-
セルの結合を実行する
-
merge_cells(sheet, table)を使用して、Excelの結合セルをWordに反映させる。
-
-
ExcelのデータとスタイルをWord表にコピーする
- Excelの各セルをループ処理し、
AddParagraph().AppendText()でデータを挿入する。 -
copy_style(text_range, x_cell, w_cell)でExcelのスタイルを適用する。
- Excelの各セルをループ処理し、
-
Word文書を保存する
-
SaveToFile("output/CopyExcelDataStyleToWord.docx", FileFormat.Docx2019)で保存する。
-
-
リソースを解放する
-
doc.Dispose()とworkbook.Dispose()を呼び出す。
-
コード例
from spire.xls import *
from spire.doc import *


def merge_cells(sheet, table):
    """Excelの結合セル情報に基づき、Word表に対応する結合操作を実行します。"""
    if not sheet.HasMergedCells:
        return

    for cell_range in sheet.MergedCells:
        start_row, start_col = cell_range.Row, cell_range.Column
        row_count, col_count = cell_range.RowCount, cell_range.ColumnCount

        # 横方向の結合処理
        if col_count > 1:
            for row in range(start_row, start_row + row_count):
                table.ApplyHorizontalMerge(row - 1, start_col - 1, start_col - 1 + col_count - 1)

        # 縦方向の結合処理
        if row_count > 1:
            table.ApplyVerticalMerge(start_col - 1, start_row - 1, start_row - 1 + row_count - 1)


def copy_style(text_range, excel_cell, word_cell):
    """ExcelのセルのスタイルをWordセルにコピーします。"""
    font = excel_cell.Style.Font
    text_range.CharacterFormat.TextColor = Color.FromRgb(font.Color.R, font.Color.G, font.Color.B)
    text_range.CharacterFormat.FontSize = float(font.Size)
    text_range.CharacterFormat.FontName = font.FontName
    text_range.CharacterFormat.Bold = font.IsBold
    text_range.CharacterFormat.Italic = font.IsItalic

    # セルの背景色を設定
    if excel_cell.Style.FillPattern != ExcelPatternType.none:
        word_cell.CellFormat.BackColor = Color.FromRgb(excel_cell.Style.Color.R, excel_cell.Style.Color.G,
                                                       excel_cell.Style.Color.B)

    # 水平配置を設定
    align_map = {
        HorizontalAlignType.Left: HorizontalAlignment.Left,
        HorizontalAlignType.Center: HorizontalAlignment.Center,
        HorizontalAlignType.Right: HorizontalAlignment.Right
    }
    if excel_cell.HorizontalAlignment in align_map:
        text_range.OwnerParagraph.Format.HorizontalAlignment = align_map[excel_cell.HorizontalAlignment]

    # 垂直配置を設定
    valign_map = {
        VerticalAlignType.Top: VerticalAlignment.Top,
        VerticalAlignType.Center: VerticalAlignment.Middle,
        VerticalAlignType.Bottom: VerticalAlignment.Bottom
    }
    if excel_cell.VerticalAlignment in valign_map:
        word_cell.CellFormat.VerticalAlignment = valign_map[excel_cell.VerticalAlignment]


# Excelファイルを読み込む
workbook = Workbook()
workbook.LoadFromFile("Sample.xlsx")

# 最初のシートを取得
sheet = workbook.Worksheets[0]

# Word文書を作成する
doc = Document()
section = doc.AddSection()
section.PageSetup.Orientation = PageOrientation.Landscape

# Word表を作成する
table = section.AddTable(True)
table.ResetCells(sheet.LastRow, sheet.LastColumn)

# セルの結合を実行する
merge_cells(sheet, table)

# ExcelのデータとスタイルをWord表にコピーする
for r in range(1, sheet.LastRow + 1):
    table.Rows[r - 1].Height = float(sheet.Rows[r - 1].RowHeight)

    for c in range(1, sheet.LastColumn + 1):
        x_cell = sheet.Range[r, c]
        w_cell = table.Rows[r - 1].Cells[c - 1]

        # テキストを追加し、スタイルをコピーする
        text_range = w_cell.AddParagraph().AppendText(x_cell.NumberText)
        copy_style(text_range, x_cell, w_cell)

# Word文書を保存する
doc.SaveToFile("output/CopyExcelDataStyleToWord.docx", FileFormat.Docx2019)
doc.Dispose()
workbook.Dispose()
結果
ExcelワークシートをOLEオブジェクトとしてWord文書に埋め込む
OLEオブジェクトとしてExcelワークシートをWord文書に埋め込むことで、Word文書内で表を表示しながら、Excelの高度な機能も利用できます。以下の手順で操作を行います。
-
ファイルパスを定義する
- Excelファイルのパス
excel_pathと、出力するWordファイルのパスoutput_doc_pathを定義する。 - 画像の保存パス
image_pathを定義する。
- Excelファイルのパス
-
Word文書を作成し、ページの向きを設定する
-
Documentインスタンスを作成し、AddSection()を追加する。 -
section.PageSetup.Orientation = PageOrientation.Landscapeを設定する。
-
-
Excelファイルを読み込み、ワークシートを取得する
-
Workbookインスタンスを作成し、LoadFromFile()を使用してExcelファイルを読み込む。 -
Worksheets.get_Item(0)を使用して最初のワークシートを取得する。
-
-
Excel表を画像に変換し、保存する
-
sheet.ToImage()を使用してワークシートを画像に変換し、image_pathに保存する。
-
-
ワークシート画像を作成して読み込む
-
DocPictureインスタンスを作成し、LoadImage()を使用して画像を読み込む。
-
-
ExcelワークシートをOLEオブジェクトとしてWordに挿入する
-
paragraph.AppendOleObject()を使用してExcelワークシートをOLEオブジェクトとして挿入する。 -
OleObjectType.ExcelWorksheetを設定し、ole.DisplayAsIcon = Falseにする。
-
-
Word文書を保存する
-
SaveToFile(output_doc_path, FileFormat.Docx2019)で保存する。
-
コード例
import os
from spire.doc import Document, DocPicture, FileFormat, OleObjectType, PageOrientation
from spire.xls import Workbook

# ファイルパスの定義
excel_path = "Sample.xlsx"
output_doc_path = os.path.join("output", "InsertExcelOleToWord.docx")
image_path = "SheetImage.png"

# Word文書を作成し、ページ方向を設定
with Document() as doc:
    section = doc.AddSection()
    section.PageSetup.Orientation = PageOrientation.Landscape
    paragraph = section.AddParagraph()

    # Excelファイルを読み込み、最初のシートを取得
    with Workbook() as workbook:
        workbook.LoadFromFile(excel_path)
        sheet = workbook.Worksheets.get_Item(0)

        # Excelシートを画像に変換して保存
        image_stream = sheet.ToImage(0, 0, sheet.AllocatedRange.RowCount, sheet.AllocatedRange.ColumnCount)
        image_stream.Save(image_path)

        # DocPictureオブジェクトを作成し、シート画像をロード
        pic = DocPicture(doc)
        pic.LoadImage(image_path)

        # OLEオブジェクト(Excelシート)をWord文書に挿入
        ole = paragraph.AppendOleObject(excel_path, pic, OleObjectType.ExcelWorksheet)
        # OLEオブジェクトをアイコンとして表示しない設定
        ole.DisplayAsIcon = False

    # Word文書を保存
    doc.SaveToFile(output_doc_path, FileFormat.Docx2019)
結果

本記事では、Pythonを使用してExcel表をWord文書に挿入する3つの方法(データの挿入、データとフォーマットのコピー、OLEオブジェクトの埋め込み)について解説しました。