表は、Word文書において重要なツールです。 表は文書中のデータの表示や分類に大きな役割を担っており、様々な文書で表を目にすることが多い。この記事では、Spire.Doc for C++を使用して、C++でWordドキュメントに表を作成する方法について説明します。
【依存関係の追加】
Spire.Doc for C++は、NuGetを使用するか、公式サイトからパッケージをダウンロードすることでインストールできます。詳しいインストール手順はこちらをご覧ください。
Word ドキュメントに表を作成する
Spire.Doc for C++では、Wordドキュメントのセクションに表を追加するための Section->AddTable() メソッドを用意しています。詳しい手順は以下の通りです。
- Document のインスタンスを作成します。
- Document->AddSection() メソッドを使用して、ドキュメントにセクションを追加します。
- ヘッダー行と残りの行のデータを定義し、それぞれ1次元ベクトルと2次元ベクトルに格納します。
- Section->AddTable() メソッドを使用して、セクションに表を追加します。
- Table->ResetCells(int, int) メソッドを使用して、表の行数、列数を指定します。
- ヘッダー行に一次元ベクトルのデータを追加し、書式を設定します。
- 残りの行に2次元ベクトルのデータを追加し、書式を設定します。
- Document->SaveToFile() メソッドを使用して、ドキュメントを保存します。
C++
#include "Spire.Doc.o.h"

using namespace Spire::Doc;
using namespace Spire::Common;
using namespace std;

int main()
{
	//Documentのインスタンスを作成する
	Document* doc = new Document();

	//ドキュメントにセクションを追加する
	Section* section = doc->AddSection();

	//セクションのページ余白を設定する
	section->GetPageSetup()->GetMargins()->SetAll(72);

	//ヘッダー行のデータを定義する
	vector<wstring> header = { L"国名", L"首都", L"大陸", L"面積", L"人口" };

	//その他の行のデータを定義する
	vector<vector<wstring>> data =
	{
		{L"Argentina", L"Buenos Aires", L"South America", L"2777815", L"32300003"},
		{L"Bolivia", L"La Paz", L"South America", L"1098575", L"7300000"},
		{L"Brazil", L"Brasilia", L"South America", L"8511196", L"150400000"},
		{L"Canada", L"Ottawa", L"North America", L"9976147", L"26500000"},
		{L"Chile", L"Santiago", L"South America", L"756943", L"13200000"},
		{L"Colombia", L"Bogota", L"South America", L"1138907", L"33000000"},
		{L"Cuba", L"Havana", L"North America", L"114524", L"10600000"},
		{L"Ecuador", L"Quito", L"South America", L"455502", L"10600000"},
		{L"El Salvador", L"San Salvador", L"North America", L"20865", L"5300000"},
		{L"Guyana", L"Georgetown", L"South America", L"214969", L"800000"},
		{L"Jamaica", L"Kingston", L"North America", L"11424", L"2500000"},
		{L"Mexico", L"Mexico City", L"North America", L"1967180", L"88600000"},
		{L"Nicaragua", L"Managua", L"North America", L"139000", L"3900000"},
		{L"Paraguay", L"Asuncion", L"South America", L"406576", L"4660000"},
		{L"Peru", L"Lima", L"South America", L"1285215", L"21600000"},
		{L"United States", L"Washington", L"North America", L"9363130", L"249200000"},
		{L"Uruguay", L"Montevideo", L"South America", L"176140", L"3002000"},
		{L"Venezuela", L"Caracas", L"South America", L"912047", L"19700000"}
	};

	//セクションに表を追加する
	Table* table = section->AddTable(true);

	//表の行数、列数を指定する
	table->ResetCells(data.size() + 1, header.size());

	//最初の行をヘッダー行として設定する
	TableRow* row = table->GetRows()->GetItem(0);
	row->SetIsHeader(true);

	//ヘッダー行の高さと背景色を設定する
	row->SetHeight(20);
	row->SetHeightType(TableRowHeightType::Exactly);
	row->GetRowFormat()->SetBackColor(Color::FromArgb(142, 170, 219));

	//ヘッダー行にデータを追加し、書式を設定する
	for (int i = 0; i < header.size(); i++)
	{
		//段落を追加する
		Paragraph* p1 = row->GetCells()->GetItem(i)->AddParagraph();
		//段落の配置を設定する
		p1->GetFormat()->SetHorizontalAlignment(HorizontalAlignment::Center);
		row->GetCells()->GetItem(i)->GetCellFormat()->SetVerticalAlignment(VerticalAlignment::Middle);
		//データを追加する
		TextRange* tR1 = p1->AppendText(header[i].c_str());
		//データ形式を設定する
		tR1->GetCharacterFormat()->SetFontName(L"Yu Mincho");
		tR1->GetCharacterFormat()->SetFontSize(12);
		tR1->GetCharacterFormat()->SetBold(true);
	}

	//残りの行にデータを追加し、書式を設定する
	for (int r = 0; r < data.size(); r++)
	{
		//残りの行の高さを設定する
		TableRow* dataRow = table->GetRows()->GetItem(r + 1);
		dataRow->SetHeight(20);
		dataRow->SetHeightType(TableRowHeightType::Exactly);

		for (int c = 0; c < data[r].size(); c++)
		{
			//段落を追加する
			Paragraph* p2 = dataRow->GetCells()->GetItem(c)->AddParagraph();
			//段落の配置を設定する
			dataRow->GetCells()->GetItem(c)->GetCellFormat()->SetVerticalAlignment(VerticalAlignment::Middle);
			//データを追加する
			TextRange* tR2 = p2->AppendText(data[r][c].c_str());
			//データ形式を設定する
			tR2->GetCharacterFormat()->SetFontName(L"Calibri");
			tR2->GetCharacterFormat()->SetFontSize(11);
		}
	}

	//ドキュメントを保存する
	doc->SaveToFile(L"表の作成.docx", FileFormat::Docx2013);
	doc->Close();
	delete doc;
}

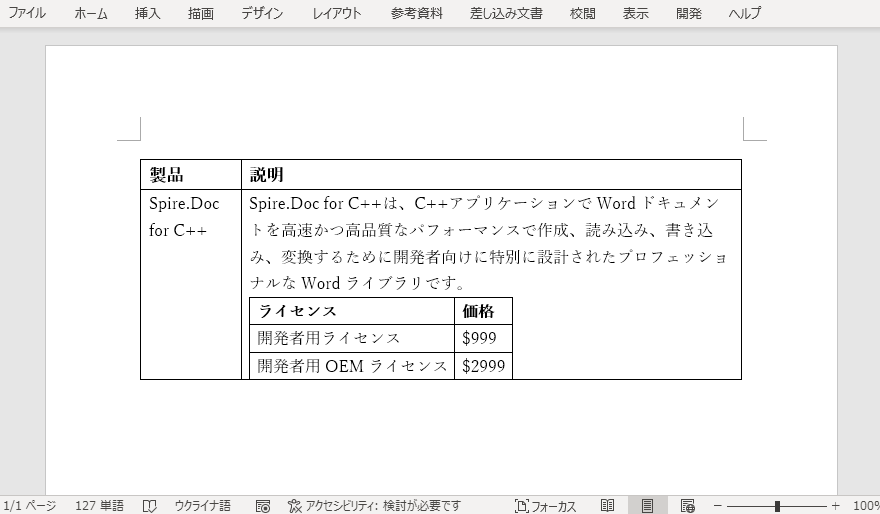
Word ドキュメントにネストした表を作成する
Spire.Doc for C++では、特定の表のセルにネストした表を追加するために、TableCell->AddTable() メソッドを用意しています。詳しい手順は以下の通りです。
- Document のインスタンスを作成します。
- Document->AddSection() メソッドを使用して、ドキュメントにセクションを追加します。
- Section.AddTable() メソッドを使用して、セクションに表を追加します。
- Table->ResetCells(int, int) メソッドを使用して、表の行数および列数を指定します。
- 表の行を取得し、各行のセルにデータを追加します。
- TableCell->AddTable() メソッドを使用して、特定の表セルにネストした表を追加します。
- ネストした表の行数、列数を指定します。
- ネストされた表の行を取得し、各行のセルにデータを追加します。
- Document->SaveToFile() メソッドを使用して、ドキュメントを保存します。
C++
#include "Spire.Doc.o.h"

using namespace Spire::Doc;

int main()
{
	//Documentのインスタンスを作成する
	Document* doc = new Document();

	//ドキュメントにセクションを追加する
	Section* section = doc->AddSection();

	//セクションのページ余白を設定する
	section->GetPageSetup()->GetMargins()->SetAll(72);

	//セクションにテーブルを追加する
	Table* table = section->AddTable(true);

	//表の行数、列数を設定する
	table->ResetCells(2, 2);

	//表の幅をウィンドウに自動調整する
	table->AutoFit(AutoFitBehaviorType::AutoFitToWindow);

	//表の行を取得する
	TableRow* row1 = table->GetRows()->GetItem(0);
	TableRow* row2 = table->GetRows()->GetItem(1);

	//表のセルにデータを追加する
	TableCell* cell1 = row1->GetCells()->GetItem(0);
	TextRange* tR = cell1->AddParagraph()->AppendText(L"製品");
	tR->GetCharacterFormat()->SetFontName(L"Yu Mincho");
	tR->GetCharacterFormat()->SetFontSize(13);
	tR->GetCharacterFormat()->SetBold(true);
	TableCell* cell2 = row1->GetCells()->GetItem(1);
	tR = cell2->AddParagraph()->AppendText(L"説明");
	tR->GetCharacterFormat()->SetFontName(L"Yu Mincho");
	tR->GetCharacterFormat()->SetFontSize(13);
	tR->GetCharacterFormat()->SetBold(true);
	TableCell* cell3 = row2->GetCells()->GetItem(0);
	tR = cell3->AddParagraph()->AppendText(L"Spire.Doc for C++");
	tR->GetCharacterFormat()->SetFontName(L"Yu Mincho");
	TableCell* cell4 = row2->GetCells()->GetItem(1);
	tR = cell4->AddParagraph()->AppendText(L"Spire.Doc for C++は、C++アプリケーションで"
		L"Wordドキュメントを高速かつ高品質なパフォーマンスで"
		L"作成、読み込み、書き込み、変換するために開発者向けに"
		L"特別に設計されたプロフェッショナルなWordライブラリです。");
	tR->GetCharacterFormat()->SetFontName(L"Yu Mincho");

	//4つ目のセルにネストした表を追加する
	Table* nestedTable = cell4->AddTable(true);

	//ネストした表の行数、列数を設定する
	nestedTable->ResetCells(3, 2);

	//表の幅をコンテンツに自動調整する
	nestedTable->AutoFit(AutoFitBehaviorType::AutoFitToContents);

	//表の行を取得する
	TableRow* nestedRow1 = nestedTable->GetRows()->GetItem(0);
	TableRow* nestedRow2 = nestedTable->GetRows()->GetItem(1);
	TableRow* nestedRow3 = nestedTable->GetRows()->GetItem(2);

	//ネストした表のセルにデータを追加する
	TableCell* nestedCell1 = nestedRow1->GetCells()->GetItem(0);
	tR = nestedCell1->AddParagraph()->AppendText(L"ライセンス");
	tR->GetCharacterFormat()->SetBold(true);
	tR->GetCharacterFormat()->SetFontName(L"Yu Mincho");
	TableCell* nestedCell2 = nestedRow1->GetCells()->GetItem(1);
	tR = nestedCell2->AddParagraph()->AppendText(L"価格");
	tR->GetCharacterFormat()->SetBold(true);
	tR->GetCharacterFormat()->SetFontName(L"Yu Mincho");
	TableCell* nestedCell3 = nestedRow2->GetCells()->GetItem(0);
	tR = nestedCell3->AddParagraph()->AppendText(L"開発者用ライセンス");
	tR->GetCharacterFormat()->SetFontName(L"Yu Mincho");
	TableCell* nestedCell4 = nestedRow2->GetCells()->GetItem(1);
	tR = nestedCell4->AddParagraph()->AppendText(L"$999");
	tR->GetCharacterFormat()->SetFontName(L"Yu Mincho");
	TableCell* nestedCell5 = nestedRow3->GetCells()->GetItem(0);
	tR = nestedCell5->AddParagraph()->AppendText(L"開発者用OEMライセンス");
	tR->GetCharacterFormat()->SetFontName(L"Yu Mincho");
	TableCell* nestedCell6 = nestedRow3->GetCells()->GetItem(1);
	tR = nestedCell6->AddParagraph()->AppendText(L"$2999");
	tR->GetCharacterFormat()->SetFontName(L"Yu Mincho");

	//ドキュメントを保存する
	doc->SaveToFile(L"ネストされた表の作成.docx", FileFormat::Docx2013);
	doc->Close();
	delete doc;
}
Spire.Doc for C++は、Wordドキュメントに表を作成する以外にも、C++プログラムに統合可能な多くのドキュメント操作を行うことができます。詳細はSpire.Doc for C++のサイトにてご確認ください。