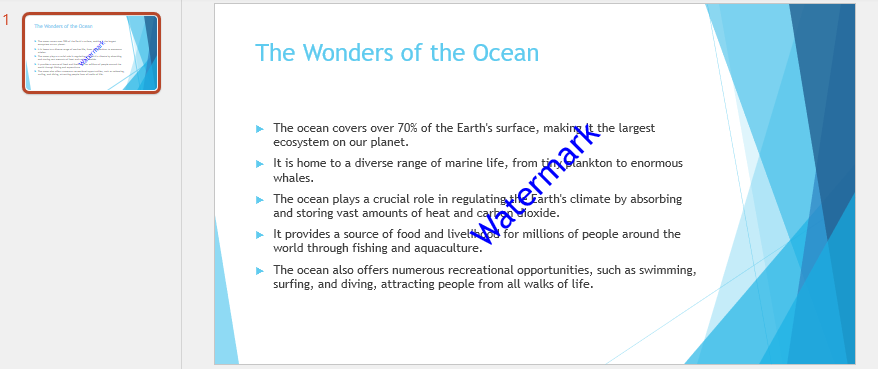
PowerPointプレゼンテーションにテキストの透かしを挿入することは、著作権を保護し、ドキュメントの信頼性を確保する効果的な方法です。Pythonを使用することで、開発者はPowerPointスライドに簡単に透かしを追加し、バッチ処理を行うことができ、透かしの位置や外観を精密にコントロールすることが可能です。この手法は、大規模なアプリケーションに統合しやすいという利点もあります。この記事では、PythonでPowerPointプレゼンテーションにテキストおよび画像の透かしを挿入する方法を紹介します。
- PythonでPowerPointにテキストの透かしを追加
- PythonでPowerPointに繰り返しテキストの透かしを追加
- PythonでPowerPointに画像の透かしを追加
- PythonでPowerPointに繰り返し画像の透かしを追加
この記事で紹介する手法は、Spire.Presentation for Pythonライブラリを使用しています。PyPIからインストールできます:pip install spire.presentation。
PythonでPowerPointにテキストの透かしを追加
PowerPointプレゼンテーションにテキストの透かしを追加するには、スライドに透明なテキストボックスを挿入し、その中に透かしテキストを入力します。以下は操作手順です:
- 必要なクラスをインポート:
Presentation、FileFormat、RectangleF、ShapeType、FillFormatType、Color。 - 入力ファイルと出力ファイルのパスを定義:
input_file、output_file。 - PowerPointドキュメントを読み込む:
Presentation()、LoadFromFile()。 - 透かしの位置を計算:
SlideSize.Size.Width、SlideSize.Size.Height。 - 矩形の透かしを追加:
Shapes.AppendShape()、RectangleF()。 - 矩形のスタイルを設定:
FillType、LineColor.Color、Rotation、SelectionProtection、Line.FillType。 - 矩形にテキストを追加:
TextFrame.Text。 - テキストのスタイルを設定:
FillType、SolidColor.Color、FontHeight。 - ドキュメントを保存して閉じる:
SaveToFile()、Dispose()。
コード例
from spire.presentation import Presentation, FileFormat, RectangleF, ShapeType, FillFormatType, Color

# 入力ファイルと出力ファイルのパスを定義
input_file = "Sample.pptx"
output_file = "output/SingleTextWatermark.pptx"

# プレゼンテーションを作成し、読み込む
presentation = Presentation()
presentation.LoadFromFile(input_file)

# 透かしの位置を計算
slide_width = presentation.SlideSize.Size.Width
slide_height = presentation.SlideSize.Size.Height
watermark_width = 336.4
watermark_height = 110.8
left = (slide_width - watermark_width) / 2
top = (slide_height - watermark_height) / 2

# 矩形シェイプを追加して透かしに使用
rect = RectangleF(left, top, watermark_width, watermark_height)
shape = presentation.Slides[0].Shapes.AppendShape(ShapeType.Rectangle, rect)

# 矩形のスタイルを設定
shape.Fill.FillType = FillFormatType.none
shape.ShapeStyle.LineColor.Color = Color.get_White()
shape.Rotation = -45
shape.Locking.SelectionProtection = True
shape.Line.FillType = FillFormatType.none

# 矩形にテキストを追加
shape.TextFrame.Text = "Watermark"
text_range = shape.TextFrame.TextRange

# テキストのスタイルを設定
text_range.Fill.FillType = FillFormatType.Solid
text_range.Fill.SolidColor.Color = Color.get_Blue()
text_range.FontHeight = 50

# ドキュメントを保存して閉じる
presentation.SaveToFile(output_file, FileFormat.Pptx2010)
presentation.Dispose()
PythonでPowerPointに繰り返しテキストの透かしを追加
単一のテキスト透かしを挿入するだけでなく、PowerPointスライドに指定した間隔で繰り返しテキスト透かしを追加して、複数行のテキスト透かしを実現することもできます。以下にコード例を示します:
from spire.presentation import Presentation, FileFormat, RectangleF, ShapeType, FillFormatType, Color

# 入力と出力ファイルパスを定義
input_file = "Sample.pptx"
output_file = "output/MultipleTextWatermarks.pptx"

# プレゼンテーションを作成して読み込む
presentation = Presentation()
presentation.LoadFromFile(input_file)

# 透かしのパラメータ
watermark_width = 150.0
watermark_height = 100.0
grid_spacing_x = (presentation.SlideSize.Size.Width - watermark_width) / 4
grid_spacing_y = (presentation.SlideSize.Size.Height - watermark_height) / 4

# 全てのスライドをループ
for slide in presentation.Slides:
    # 3×3グリッドに透かしを追加
    for row in range(3):
        for col in range(3):
            # 透かしの位置を計算
            left = col * grid_spacing_x + (col * watermark_width)
            top = row * grid_spacing_y + (row * watermark_height)
            rect = RectangleF(left, top, watermark_width, watermark_height)

            # 長方形の形状を透かしとして追加
            shape = slide.Shapes.AppendShape(ShapeType.Rectangle, rect)

            # 長方形のスタイルを設定
            shape.Fill.FillType = FillFormatType.none
            shape.ShapeStyle.LineColor.Color = Color.get_White()
            shape.Rotation = -45
            shape.Locking.SelectionProtection = True
            shape.Line.FillType = FillFormatType.none

            # 長方形にテキストを追加
            shape.TextFrame.Text = "Watermark"
            text_range = shape.TextFrame.TextRange

            # テキストのスタイルを設定
            text_range.Fill.FillType = FillFormatType.Solid
            text_range.Fill.SolidColor.Color = Color.get_Blue()
            text_range.FontHeight = 20

# ドキュメントを保存して閉じる
presentation.SaveToFile(output_file, FileFormat.Auto)
presentation.Dispose()
PythonでPowerPointに画像の透かしを追加
画像をPowerPointスライドの背景として設定し、プレゼンテーションに画像の透かしを追加することもできます。以下は操作手順です:
- 必要なクラスをインポート:
Presentation、FileFormat、BackgroundType、FillFormatType、PictureFillType、Stream、RectangleAlignment。 - 入力ファイル、出力ファイル、画像ファイルのパスを定義:
input_file、output_file、logo_path。 - プレゼンテーションを作成し、読み込む:
Presentation()、LoadFromFile(input_file)。 - 画像をメモリストリームに読み込み、PPTに追加:
Stream(logo_path)、presentation.Images.AppendStream(stream)。 - スライドの背景をカスタムに設定し、画像で塗りつぶす:
slide.SlideBackground.Type = BackgroundType.Custom、slide.SlideBackground.Fill.FillType = FillFormatType.Picture、slide.SlideBackground.Fill.PictureFill.FillType = PictureFillType.Stretch、slide.SlideBackground.Fill.PictureFill.Picture.EmbedImage = image。 - ドキュメントを保存して閉じる:
presentation.SaveToFile(output_file, FileFormat.Pptx2013)、presentation.Dispose()。
コード例
from spire.presentation import Presentation, FileFormat, BackgroundType, FillFormatType, PictureFillType, Stream, \
    RectangleAlignment

# 入力ファイルと出力ファイルのパスを定義
input_file = "Sample.pptx"
output_file = "output/AddImageWatermark.pptx"
logo_path = "Image.png"

# プレゼンテーションを作成し、読み込む
presentation = Presentation()
presentation.LoadFromFile(input_file)

# 画像を読み込み、PPTに追加
with Stream(logo_path) as stream:
    image = presentation.Images.AppendStream(stream)

# スライドの背景をカスタムに設定し、画像で塗りつぶす
slide = presentation.Slides[0]
slide.SlideBackground.Type = BackgroundType.Custom
slide.SlideBackground.Fill.FillType = FillFormatType.Picture
slide.SlideBackground.Fill.PictureFill.FillType = PictureFillType.Stretch
slide.SlideBackground.Fill.PictureFill.Picture.EmbedImage = image

# ドキュメントを保存して閉じる
presentation.SaveToFile(output_file, FileFormat.Pptx2013)
presentation.Dispose()
PythonでPowerPointに繰り返し画像の透かしを追加
PowerPointスライドに繰り返し画像の透かしを挿入するには、ISlide.SlideBackground.Fill.PictureFill.FillTypeプロパティをPictureFillType.Tileに設定します。画像が密集しすぎないように、透かし画像には十分な空白が必要です。以下にコード例を示します:
from spire.presentation import Presentation, FileFormat, BackgroundType, FillFormatType, PictureFillType, Stream

# 入力と出力ファイルパスを定義
input_file = "Sample.pptx"
output_file = "output/MultipleImageWatermark.pptx"
logo_path = "Watermark.png"

# プレゼンテーションを作成して読み込む
presentation = Presentation()
presentation.LoadFromFile(input_file)

# 画像を読み込みPowerPointに追加
with Stream(logo_path) as stream:
    image = presentation.Images.AppendStream(stream)

# スライドの背景をカスタムに設定し、画像を透かしとして配置
slide = presentation.Slides[0]
slide.SlideBackground.Type = BackgroundType.Custom
slide.SlideBackground.Fill.FillType = FillFormatType.Picture
slide.SlideBackground.Fill.PictureFill.FillType = PictureFillType.Tile
slide.SlideBackground.Fill.PictureFill.Picture.EmbedImage = image

# ドキュメントを保存して閉じる
presentation.SaveToFile(output_file, FileFormat.Auto)
presentation.Dispose()
この記事では、Pythonを使用してPowerPointプレゼンテーションに透かしを追加する方法について説明しました。


