初めに
こんにちは。CYBIRDエンジニア Advent Calendar 2021の12日目を担当します、新卒1年目の@ice_matcha3です。11日目は@naotwuさんの「PHPでのサーバー間通信について」でした。サーバ間の通信って当たり前にやっていることですが、改めて仕組みを考えると奥が深いものですね。
itamaeとは?
itamaeとは、一言で言えば、「サーバ構成管理ツール」です。Rubyで記述することができ、他の構成管理ツールである 「chef」などと比べて、軽量で学ぶハードルが低いというメリットがあります。
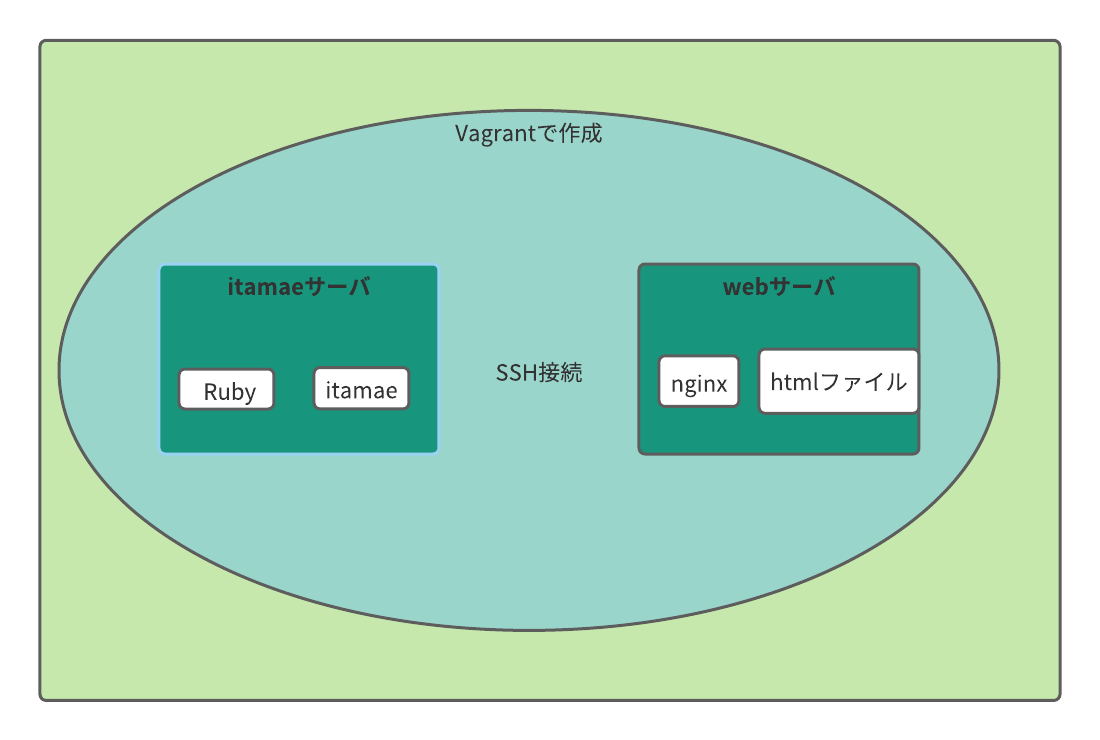
今回作成するサーバの構成図
itamae学習のために、今回はこの図のようなサーバ構成を作っていこうと思います!
今回使用した環境
ホスト
MacBook Pro (16-inch, 2019)
macOS Catalina 10.15.7
itamaeサーバ (Virtualbox)
OS centos/7
webサーバ (Virtualbox)
OS centos/7
※Virtualboxは事前にインストールしています。
サーバの構成管理
Vagrantの準備
Vagrantとは?
Vagrant(ベイグラント)とは、Virtualboxなどの仮想化ソフトを「CUI(キャラクタユーザインタフェース)」で操作するソフト。
Vagrantのインストール
https://www.vagrantup.com/downloads.html
上記URLからmac版のVagrantをダウンロードします。
インストーラを起動し、インストールが完了するまでOKを押し続けます。
インストールが成功したらPCを再起動させます。
最後にインストールが成功しているかを確認します。
$ vagrant -v
成功していればVagrant 2.2.18のようにvagrantのバージョンが表示されます。
Vagrantfileの作成
自身が作業したいディレクトリに、Vagrantfileを作成します。
(ここではcentos/7のBoxをインストールしてVagrantfileを作成しています)
$ vagrant init Centos/7
==> vagrant: A new version of Vagrant is available: 2.2.19 (installed version: 2.2.18)!
==> vagrant: To upgrade visit: https://www.vagrantup.com/downloads.html

A `Vagrantfile` has been placed in this directory. You are now
ready to `vagrant up` your first virtual environment! Please read
the comments in the Vagrantfile as well as documentation on
`vagrantup.com` for more information on using Vagrant.
Vagrantfileの修正
先ほど作成した、Vagrantfileを修正していきます。
$ vi Vagrantfile
各サーバごとboxの設定を行うため、Vagrantfile内のconfig.vm.boxをコメントアウトします。
# config.vm.box = "Centos/7"
itamaeサーバとwebサーバを作成するために、Vagrantfileに以下の記述を追記します。
config.vm.define "itamae" do |node|
    node.vm.box = "Centos/7"
    node.vm.hostname = "itamae"
    node.vm.network :private_network, ip: "192.168.30.1"
  end

  config.vm.define "web" do |node|
    node.vm.box = "Centos/7"
    node.vm.hostname = "web"
    node.vm.network :private_network, ip: "192.168.30.2"
  end
最終的には、このようになります。
Vagrant.configure("2") do |config|
  # The most common configauration options are documented and commented below.
  # For a complete referene, please see the online documentation at
  # https://docs.vagrantup.com.

  # Every Vagrant development environment requires a box. You can search for
  # boxes at https://vagrantcloud.com/search.
  # config.vm.box = "Centos/7"

  config.vm.define "itamae" do |node|
    node.vm.box = "Centos/7"
    node.vm.hostname = "itamae"
    node.vm.network :private_network, ip: "192.168.30.1"
  end

  config.vm.define "web" do |node|
    node.vm.box = "Centos/7"
    node.vm.hostname = "web"
    node.vm.network :private_network, ip: "192.168.30.2"
  end
Vagrantでのサーバの立ち上げ
Vagrantfileの修正が完了したので、itamae、webサーバを立ち上げていきます。
$ vagrant up
少し時間がかかりますが、処理が完了します。
処理が完了した後、正常にサーバが立ち上がっているかを確認します。
$ vagrant status
Current machine states:

itamae                    running (virtualbox)
web                       running (virtualbox)

This environment represents multiple VMs. The VMs are all listed
above with their current state. For more information about a specific
VM, run `vagrant status NAME`.
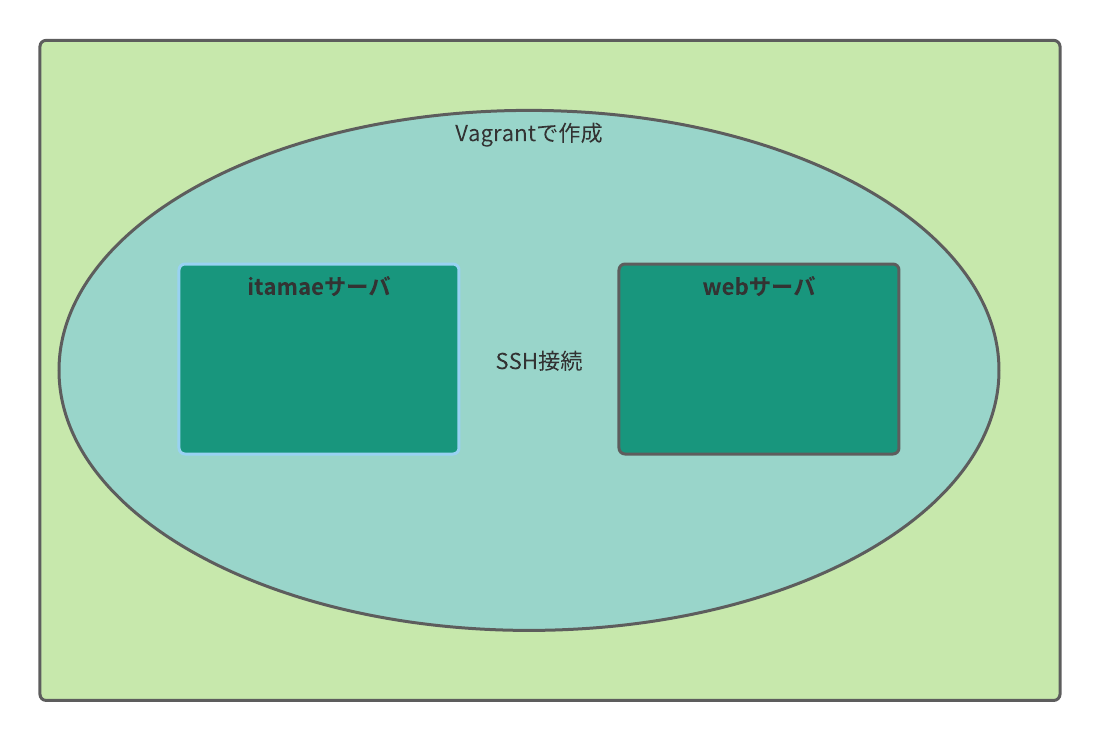
現在の構成図

ssh周りの作業
webサーバにssh接続
事前準備を行うために先にwebサーバにssh接続します。
$ vagrant ssh web
後々、itamaeサーバからwebサーバに公開鍵を送るのですが、centOS7からパスワード認証がデフォルトで無効になっているので、パスワード認証を行うコマンド系が問答無用で弾かれてしまいます。
そのため一旦、パスワード認証を有効にしておきます。
$ vi /etc/ssh/sshd_config
/etc/ssh/sshd_config の PasswordAuthentication の項目を一旦 yes に変更します。
PasswordAuthentication yes
設定を反映させるためにsshdを再読み込みさせます。
$ systemctl reload sshd
再読み込み後、webサーバへの接続を終了します。
$ exit
itamaeサーバからwebサーバにssh接続
itamaeサーバに、まずssh接続を行います。
$ vagrant ssh itamae
ssh接続が確立したら、itamaeサーバでの作業を行っていきます。
itamaeサーバからwebサーバにssh接続するために、itamaeサーバの.ssh/configファイル を編集します。
$ vi .ssh/config
Host web
  HostName 192.168.30.2
次に作成したconfigファイルのパーミッションを変更していきます。
$ chmod 600 .ssh/config
鍵認証でssh接続を行いたいので、公開鍵と秘密鍵を作成します。
$ ssh-keygen -t rsa
.ssh 配下に下記のようなファイルが作成されたことが確認できます。
-rw-------. 1 vagrant vagrant 1679 Dec  7 05:57 id_rsa
-rw-r--r--. 1 vagrant vagrant  394 Dec  7 05:57 id_rsa.pub
作成した公開鍵をwebサーバ側に転送します。
$ ssh-copy-id web
パスワード入力を求められるので、vagrantのデフォルトのパスワードであるvagrantを入力します。
これで、webサーバへ公開鍵の転送が完了しました。
最後にsshでwebサーバに接続します。
$ ssh web
現在の構成図
itamaeサーバの設定
Ruby導入に必要なパッケージの導入
必要なパッケージ( openssl-devel, readline-devel, zlib-devel, gcc)のインストール
下記コマンドを実行することで「git, openssl-devel, readline-devel, zlib-devel, gcc」のインストールを行うことができます。
$ yum install -y openssl-devel readline-devel zlib-devel gcc
-
openssl-devel
- OpenSSL は暗号をサポートするためのツールキット
- パッケージには各種の暗号化アルゴリズムとプロトコルをサポートした アプリケーションを開発するために必要な静的ライブラリとヘッダーファイルが 含んでいる
-
readline-devel
- Readline ライブラリは入力されたコマンドラインをユーザーが編集できるようにするアプリケーションにおいて使用することのできる機能のセットを提供する。
- Readline ライブラリを使用したプログラムを開発したい場合には、 readline-devel パッケージをインストールする必要がある
-
zlib-devel
- zlib-devel パッケージには zlib 圧縮/伸張ライブラリを使用したプログラムを 開発するためのヘッダーファイルとライブラリが含んでいる
- gcc
- GCCとは、GNUプロジェクトが開発および配布している、さまざまなプログラミング言語のコンパイラ集のことである
gitの導入
Rubyの導入にgitが必要なのでgitを導入していきます。
$ yum install -y git
rbenvの導入
Ruby導入前に Rubyのバージョンを管理してくれるツールも導入します。
下記コマンドで、.rbenvをhomeディレクトリ配下に持ってきます。
$ git clone https://github.com/sstephenson/rbenv.git ~/.rbenv
bash_profileへPATHの追加しておきます。
$ echo 'export PATH="$HOME/.rbenv/bin:$PATH"' >> ~/.bash_profile
$ echo 'eval "$(rbenv init -)"' >> ~/.bash_profile
その後、シェルの再読み込みを行います。
$ exec $SHELL -l
Rubyの導入
インストール可能なRubyのバージョンを確認します。
$ rbenv install --list
2.6.9
2.7.5
3.0.3
jruby-9.3.2.0
mruby-3.0.0
rbx-5.0
truffleruby-21.3.0
truffleruby+graalvm-21.3.0

Only latest stable releases for each Ruby implementation are shown.
Use 'rbenv install --list-all / -L' to show all local versions.
その後、任意のバージョンのRubyを導入していきます。(ここでは3.0.3)
$ rbenv install -v 3.0.3
Rubyを導入した後、環境全体のRubyのバージョンを設定します。
$ rbenv global 3.0.3
itamaeの導入に必要なパッケージの導入
bundlerの導入
bundlerとは?
gem同士の互換性を保ちながら各gemの導入、管理を行ってくれるのがbundlerです。
gemとは
決まったフォーマットで提供されるRuby言語用のライブラリのことです。
gemには以下のようなものがあります。
- Rails(Webフレームワーク)
- Sinatra(Webフレームワーク)
- omniauth(認証機能)
- unicorn(アプリケーションサーバ)
- Rspec(テストフレームワーク)
- itamae ...etc
bundlerのインストール
bundlerをインストールしていきます。
$ gem install bundler
次に、itamaeを導入するためのGamfileを作成します。
bundlerを導入したため、bundleコマンドを利用することができます。
$ bundle init
Gemfileに下記の内容を追記し、修正を行います。
group :itamae do
  gem 'artii'
  gem 'htauth'
  gem 'itamae'
  gem 'itamae-plugin-recipe-rbenv'
  gem 'itamae-plugin-recipe-selinux'
  gem 'itamae-plugin-resource-authorized_keys'
  gem 'itamae-plugin-resource-pip'
  gem 'itamae-relative-recipe-graph'
  gem 'itamae-secrets'
  gem 'sshkey'
  gem 'stackprof'
  gem 'toml-rb'
  gem 'unix-crypt'
end
Gemfileの内容を読み込みます。
$ bundle install --path vendor/bundle
これで、itamaeサーバにRubyとitamaeを導入することができました。
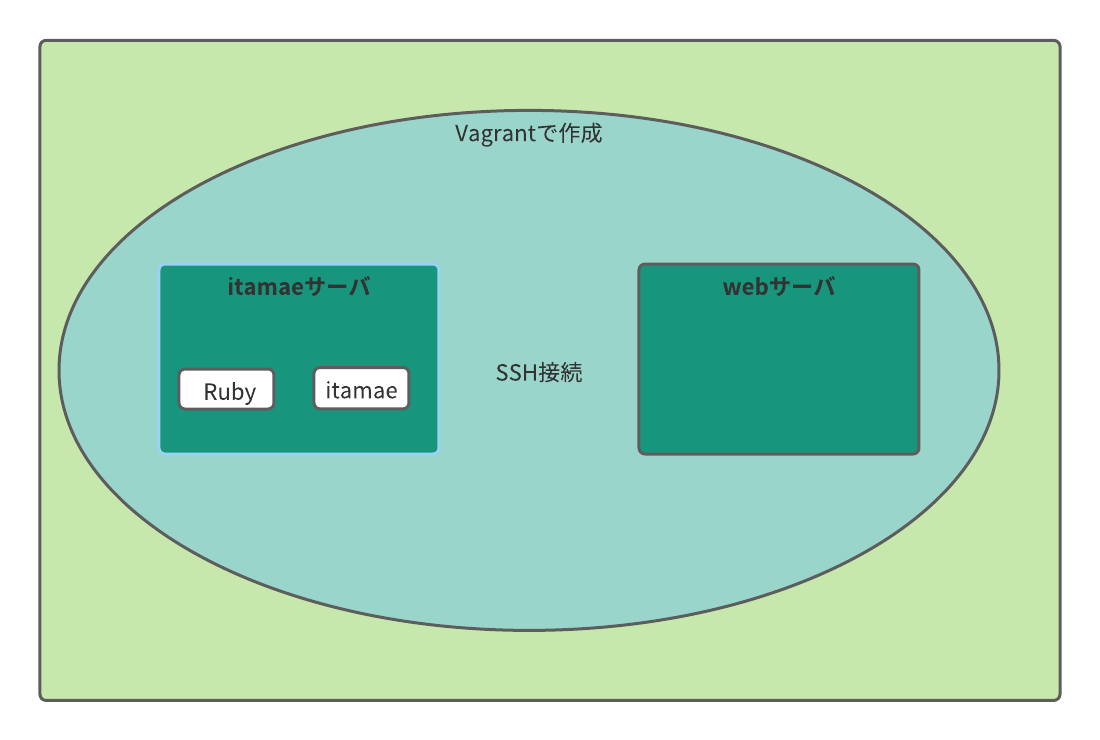
現在の構成図
webサーバの設定
ここからは、itamaeを用いてwebサーバの構成を管理していきます。
まずはitamaeーバに作業用のディレクトリを作成します。
$ mkdir cookbook
cookbookディレクトリに移動し、recipe.rbファイルを作成、編集していきます。
nginxの導入
まずはwebサーバにnginxを導入していこうと思います。
$ vi recipe.rb
package "nginx" do
  action :install
end

service "nginx" do
 action [:enable, :start]
end
webサーバに設定を反映させる前に正しく反映させることができるかを確認します。
--dry-runをコマンドの末尾につけることで実際には実行せずに結果だけが返ってきます。
 $ bundle exec itamae ssh -h web recipe.rb --dry-run
 INFO : Starting Itamae... (dry-run)
 INFO : Recipe: /home/vagrant/cookbook/recipe.rb
 INFO :   package[nginx] installed will change from 'false' to 'true'
 INFO :   service[nginx] enabled will change from 'false' to 'true'
 INFO :   service[nginx] running will change from 'false' to 'true'
 INFO :   service[nginx] enabled will change from 'false' to 'true'
正常に動作していそうなので、実際に反映させます。
 $ bundle exec itamae ssh -h web recipe.rb
 INFO : Starting Itamae...
 INFO : Recipe: /home/vagrant/cookbook/recipe.rb
 INFO :   package[nginx] installed will change from 'false' to 'true'
 INFO :   service[nginx] enabled will change from 'false' to 'true'
 INFO :   service[nginx] running will change from 'false' to 'true'
 INFO :   service[nginx] enabled will change from 'false' to 'true'
index.htmlを設置
作業ディレクトリにtemplatesディレクトリを作成します。
$ mkdir templates
templatesディレクトリに移動し、index.html.erbファイルを作成します。
<html>
hello <%= @msg%>!
</html>
次に、一つ前の階層のrecipe.rbを修正していきます。
下記の内容を追記していきます。
template ' /usr/share/nginx/html/index.html' do
  action :create
  source 'templates/index.html.erb'
  owner 'nginx'
  group 'nginx'
  variables(msg: '@ice_matcha3')
end
現在のrecipe.rbの内容は以下のようになっています。
package "nginx" do
  action :install
end

service "nginx" do
 action [:enable, :start]
end

template '/usr/share/nginx/html/index.html' do
  action :create
  source 'templates/index.html.erb'
  owner 'nginx'
  group 'nginx'
  variables(msg: '@ice_matcha3')
end
webサーバに反映させる前に記述が正しいか確認します。
$ bundle exec itamae ssh -h web recipe.rb --dry-run
 INFO : Starting Itamae... (dry-run)
 INFO : Recipe: /home/vagrant/cookbook/recipe.rb
 INFO :   template[/usr/share/nginx/html/index.html] exist will change from 'false' to 'true'
 INFO :   template[/usr/share/nginx/html/index.html] modified will change from 'false' to 'true'
 INFO :   template[/usr/share/nginx/html/index.html] owner will be 'nginx'
 INFO :   template[/usr/share/nginx/html/index.html] group will be 'nginx'
 INFO :   diff:
 INFO :   --- /dev/null	2021-12-07 09:17:43.398000000 +0000
 INFO :   +++ /tmp/itamae_tmp/1638871768.2353954	2021-12-07 10:09:28.389878160 +0000
 INFO :   @@ -0,0 +1,3 @@
 INFO :   +<html>
 INFO :   +hello <$= @msg%>!
 INFO :   +</html>
正常に動作していそうなので、実際に反映させます。
$ bundle exec itamae ssh -h web recipe.rb
 INFO : Starting Itamae...
 INFO : Recipe: /home/vagrant/cookbook/recipe.rb
 INFO :   template[/usr/share/nginx/html/index.html] modified will change from 'false' to 'true'
 INFO :   template[/usr/share/nginx/html/index.html] owner will change from 'root' to 'nginx'
 INFO :   template[/usr/share/nginx/html/index.html] group will change from 'root' to 'nginx'
 INFO :   diff:
 INFO :   --- /usr/share/nginx/html/index.html	2021-11-16 15:03:30.000000000 +0000
 INFO :   +++ /tmp/itamae_tmp/1638872177.2741113	2021-12-07 10:16:17.458523006 +0000
 INFO :   @@ -1,25 +1,3 @@
 INFO :   -<!DOCTYPE html>
 INFO :    <html>
 INFO :   -<head>
 INFO :   -<title>Welcome to nginx!</title>
 INFO :   -<style>
 INFO :   -    body {
 INFO :   -        width: 35em;
 INFO :   -        margin: 0 auto;
 INFO :   -        font-family: Tahoma, Verdana, Arial, sans-serif;
 INFO :   -    }
 INFO :   -</style>
 INFO :   -</head>
 INFO :   -<body>
 INFO :   -<h1>Welcome to nginx!</h1>
 INFO :   -<p>If you see this page, the nginx web server is successfully installed and
 INFO :   -working. Further configuration is required.</p>
 INFO :   -
 INFO :   -<p>For online documentation and support please refer to
 INFO :   -<a href="http://nginx.org/">nginx.org</a>.<br/>
 INFO :   -Commercial support is available at
 INFO :   -<a href="http://nginx.com/">nginx.com</a>.</p>
 INFO :   -
 INFO :   -<p><em>Thank you for using nginx.</em></p>
 INFO :   -</body>
 INFO :   +hello <$= @msg%>!
 INFO :    </html>
元々webサーバに存在していたindex.htmlとの差分が出ていますが、正常にindex.html.erbを設置することができました。
index.htmlの確認
確認のためにブラウザから192.168.30.2と入力し検索します。
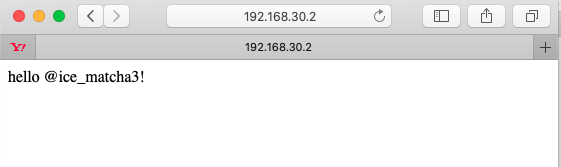
うまく表示されていることを確認できました!
最終的な構成図

終わりに
itamaeを学習し始めて、もうすぐ二ヶ月が経過しそうですが、初学者の私にはとても難しいものです。
今回は簡単な構成で作っていますが、実際のサーバ構成は比べ物にならないくらい複雑で、いつも頭を抱えながらの作業になっています笑。
これからのインフラ生活ではさらに複雑なものがいっぱい出てくると思いますが、全て吸収して来年には「1.5人前のエンジニアになっているかも?」という気持ちで頑張っていきます。
明日のCYBIRDエンジニア Advent Calendar 2021 13日目は、@ohmihaさんの「ポケモンのデータ設計をしてみた」です!
お楽しみに!