前回に引き続き、Amazon Rekognitonを使って同一人物の検出を行ってみました。
概要
Amazon Rekognitionのcompare_facesというAPIを使って同一人物の検出を行います。compare_facesに2つの画像を入力するのですが、1つ目が検出したい人物の映った画像、2つ目が検出対象の画像となります。
実行環境
OS:Windows10
言語:Python3.7
事前準備
AWS CLI(aws configure)にて、以下の認証情報をセットしておきます。
AWS Access Key ID
AWS Secret Access Key
Default region name
Default output format
ソースコード(face_compare.py)
face_compare.py
import boto3
import sys
from PIL import Image,ImageDraw

# 引数のチェック
if len(sys.argv) != 3:
	print('2つの画像ファイルを引数に指定してください。')
	exit()

# Rekognitionのクライアントを作成
client = boto3.client('rekognition')

# 画像ファイル2つを引数としてcompare_facesを実行
with open(sys.argv[1],'rb') as source:
	with open(sys.argv[2],'rb') as target:
		response = client.compare_faces(SourceImage={'Bytes':source.read()},TargetImage={'Bytes':target.read()})

# 同一人物が検出されない場合は処理終了
if len(response['FaceMatches'])==0:
	print('同一人物は検出されませんでした。')
else:
	# 2つ目の画像ファイルを元に、矩形セット用の画像ファイルを作成
	img = Image.open(sys.argv[2])
	imgWidth,imgHeight = img.size
	draw = ImageDraw.Draw(img)

	# 検出された顔の数分、矩形セット処理を行う
	for faceMatch in response['FaceMatches']:

		# BoundingBoxから顔の位置・サイズ情報を取得
		box = faceMatch['Face']['BoundingBox']
		left = imgWidth * box['Left']
		top = imgHeight * box['Top']
		width = imgWidth * box['Width']
		height = imgHeight * box['Height']

		# 矩形の位置・サイズ情報をセット
		points = (
			(left,top),
			(left + width,top + height)
		)

		# 顔を矩形で囲む
		draw.rectangle(points,outline='lime')

		# 画像ファイルを保存
		img.save('detected_' + sys.argv[2])

		# 画像ファイルを表示
		img.show()
簡単な解説
概略としては以下のような処理を行っています。
①プログラム実行時の引数からRekognitionに入力する2つの画像ファイルを取得する。
②上記①の画像ファイルを引数としてRekognitionのcompare_facesを実行する。
③Rekognitionから返却されるJsonのFaceMatches・BoundingBoxから、認識された顔の位置・サイズ情報を取得する。
④上記③から矩形付きの画像ファイルを作成し、表示する。
実行結果
コマンド
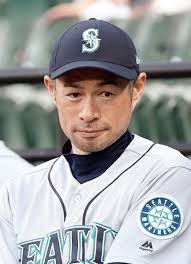
python face_compare.py ichiro1.jpg ichiro2.jpg
入力画像1(ichiro1.jpg)
入力画像2(ichiro2.jpg)

出力画像(detected_ichiro2.jpg)
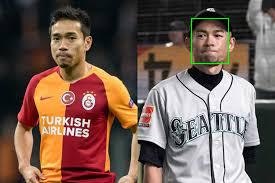
イチロー選手を検出してくれました。
まとめ
前回のdetect_facesと同様に、APIを使って簡単に画像認識を行うことができます。compare_facesを使うことで、大量の画像から探したい人物が映っているものを簡単に抽出することができると思います。AWSのサイトによると、日本では新聞社や写真サービスの会社などで使われているようです。