続き・・・
5.動作確認
Switch Scienceさんの"Arduino Leonardoで遊んでみる"のコードを参考に、プログラムを書き込んで、ターゲットデバイスに接続すると動作が確認できる
ただし、これを動かすと止めることができなくなってしまうので、プログラムリセットの方法を先に覚えておくこと!
(同じリンク先に書かれている)
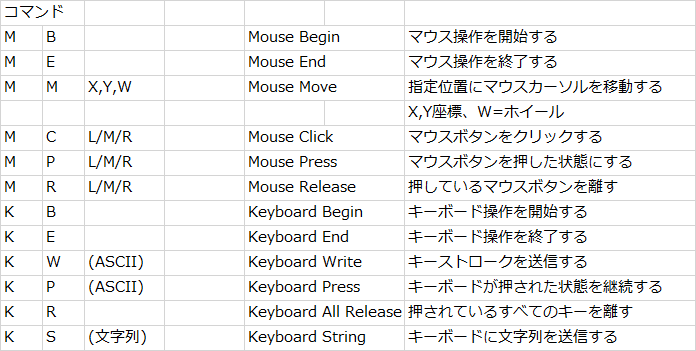
6.コマンド体系を考える
- M(マウス)、K(キーボード)とArduinoライブラリに用意されているコマンドとの組合せが網羅できるようにする
- 基本的にはASCII文字列のやり取りで通信できる方がデバッグが楽なので、そうすることにする
- MMコマンド(MouseMove)の場合は、相対移動座標XYとマウスホイールの回転をカンマ区切りとする
- MC, MP, MRのコマンドは0:左ボタン、1:右ボタン、2:中央ボタンの割り付けとする
- ドラッグ操作の場合は、MPしてMMしてMRするような感じで記述すればよい
7.実装の注意点
- Arduino本体と接続されているのは"Serial"の名前。追加したUSBポートは"Serial1"になるので注意
- MMコマンドについては、移動量がUnsigned Charなので、127を超える移動は複数回に分けて行う
- スケッチはArudino Leonardoを選択する
- Arudinoへの書込みの際は、ArudinoとホストPCを接続する必要あり(当たり前)
8.コードサンプル
(あんまりきれいなコードじゃないのでご容赦 mm)
# include <Mouse.h>
# include <Keyboard.h>
# include <String.h>
/*
 *   Serial:内蔵シリアルポート(USB-MicroB)
 *   Serial1:外付けシリアルポートFTD1232使用(USB-MiniB)
 *   baud rate:115200
 */
String inData;
//int len = 0;

// the setup function runs once when you press reset or power the board
void setup() {
  // initialize digital pin LED_BUILTIN as an output.
  pinMode(LED_BUILTIN, OUTPUT);
  Serial1.begin(115200);
}

int incomingByte = 0; // for incoming serial data

// the loop function runs over and over again forever
void loop() {
 if (Serial1.available()) {
//    dat[count] = Serial1.read();
    inData = Serial1.readStringUntil('\r');

    //受信データの解析
    analyzeRcvData();

    delay(100);
 }
}

/*
 * 受信文字列を分解してコマンドを解析する
 */
void analyzeRcvData(){
  int x = 0;
  int y = 0;
  int w = 0;
  bool isOk = false;
  int mouseButton = 0;
  int keyCode = 0;
  String keyString = "";

    //受信データの解析処理
    isOk = false;

    switch(inData.charAt(0)){
      case 'M':
        //マウス操作
        switch(inData.charAt(1)){
          case 'B':
            //Mouse Begin
            Mouse.begin();
            isOk = true;
            break;
          case 'E':
            //Mouse End
            Mouse.end();
            isOk = true;
            break;
          case 'M':
            //Mouse Move(x, y, wheel)相対座標
            //xywの各座標はUINTのため、-127~+127を超えて移動できないので分割して移動する
            isOk = GetMousePos(&x, &y, &w);
            while((x!=0)||(y!=0)||(w!=0)){
              int dx, dy, dw;
              dx = x;
              dy = y;
              dw = w;
              if (x > 127) dx = 127;
              if (x < -127) dx = -127;
              if (y > 127) dy = 127;
              if (y < -127) dy = -127;
              if (w > 127) dw = 127;
              if (w < -127) dw = -127;
              Mouse.move(dx, dy, dw);
              x -= dx;
              y -= dy;
              w -= dw;
              delay(10);
            }
            break;
          case 'C':
            //Mouse Click
            mouseButton = GetMouseButton();
            Mouse.click(mouseButton);
            isOk = true;
            break;
          case 'P':
            //Mouse Press
            mouseButton = GetMouseButton();
            Mouse.press(mouseButton);
            isOk = true;
            break;
          case 'R':
            //Mouse Release
            mouseButton = GetMouseButton();
            Mouse.release(mouseButton);
            isOk = true;
            break;
        }
        break;
      case 'K':
        //キーボード操作
        switch(inData[1]){
          case 'B':
            //Keyboard Begin
            Keyboard.begin();
            isOk = true;
            break;
          case 'E':
            //Keyboard End
            Keyboard.end();
            isOk = true;
            break;
          case 'W':
            //Keyboard Write
            keyCode = GetKeyCode();
            Keyboard.write(keyCode);
            isOk = true;
            break;
          case 'P':
            //Keyboard Press
            keyCode = GetKeyCode();
            Keyboard.press(keyCode);
            isOk = true;
            break;
          case 'R':
            //Keyboard All Release
            Keyboard.releaseAll();
            isOk = true;
            break;
          case 'S':
            //Keyboard String
            keyString = GetKeyString();
            Keyboard.print(keyString);
            isOk = true;
            break;
        }
        break;

    }

    if(isOk){
      Serial1.println ("OK");
    }else{
      Serial1.println ("ER");
    }
  }

/*
 * 受信文字列からマウスカーソルの移動先を求める
 */
bool GetMousePos(int* xx, int* yy, int* ww){
    //マウス座標の取得処理
    int index = 2;
    int start = index;
    int item = 0;
    String temp = "";

    while(index < inData.length()){

      switch (inData[index]){
        case ',':
        case '\0':
          //temp.setCharAt(pos,'\0');
          switch(item){
            case 0:
              temp = inData.substring(start, index);
              Serial1.println(temp);
              *xx = temp.toInt();
              break;
            case 1:
              temp = inData.substring(start, index);
              *yy = temp.toInt();
              break;
          }
          //初期化しておく
          item++;
          start = index + 1;
          break;
        default:
          break;
      }
      index++;
    }
    temp = inData.substring(start, index);
    *ww = temp.toInt();

    return true;
  }

/*
 * 受信文字列からマウスボタン(0:左、1:右、2:中央)を選択する
 */
  int GetMouseButton(){

    String temp = inData.substring(2,3);
    int param = temp.toInt();

    switch(param){
      case 0: return MOUSE_LEFT;
      case 1: return MOUSE_RIGHT;
      case 2: return MOUSE_MIDDLE;
    }
    return MOUSE_LEFT;
  }

/*
 * 受信文字列からキーボードに送信するキーコードを取得する
 */
unsigned char GetKeyCode(){

    String temp = inData.substring(2,inData.length());
    int param = temp.toInt();

    return param;
}

/*
 * 受信文字列からキーボードに送信する文字列を取得する
 */
String GetKeyString(){
  return inData.substring(2,inData.length());
}
9.自動実行プログラムの実装
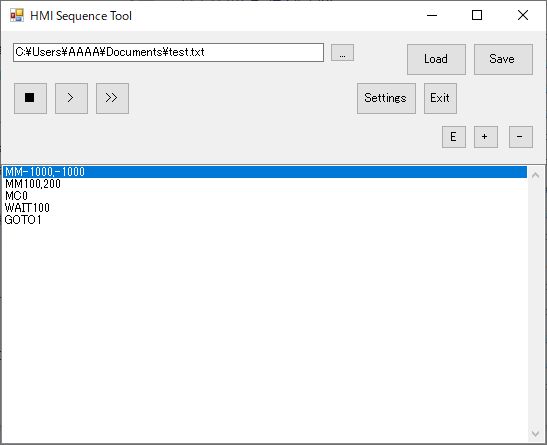
C#.Netで実装しているが、なんでもいいので割愛。
下記は開発中の画面サンプルです。
マウス、キーボード制御以外に、コントロールコード(ウェイトやループ処理)もあるといいですね
おわり。

