KUSANAGI for ConoHaを使っての環境構築手順を記載します。
前提
- VPSではConohaは契約済みで、IPや秘密鍵、rootのPASSは取得済み。
- ドメインも取得済み&ネームサーバ登録済み
URL : http://sample.com/
IP xxx.xxx.xxx.xxx
User : root
PASS : pass
Key : sample.pem
構築概要
- Wordpress導入
- https化 & http→httpsリダイレクト処理追加
- ファイルアップロードを可能にする。(FTP)
- SiteGuard WP PluginでのXMLRPC防御制御
- CloudFlareによるCDN導入
ステップ1 : 事前準備
秘密鍵を使ってログインするのに楽するために.ssh/配下に秘密鍵を記載していきます。
- 秘密鍵を
.ssh/に配置してください。 -
.ssh/configに下記を記載してください。
# sample.com
Host xxx.xxx.xxx.xxx
        HostName       xxx.xxx.xxx.xxx
        Port    22
        User    root
        IdentityFile    ~/.ssh/sample.pem
- sshでログインできることを確認
$ ssh root@xxx.xxx.xxx.xxx
// Kusanagiマークがでてきてログインできたら成功
ステップ2 初期設定
PHP,remiインストール
$ yum --enablerepo=remi,remi-php56 update -y
再起動
$ reboot
KUSANAGI仮想マシンにおけるLinuxやデータベースのユーザーパスワードの設定、変更を行います。
指示に従って、kusanagiのパスワードやmysqlのパスワードを入力していきます。
ここからパスワードなどはメモしておいてください。あとで利用します。
$ kusanagi init
ステップ3 Wordpress導入
Wordpress install
こちらも指示にしたがって、FQND、Let's Encrypt、DB情報を入力していきます。
$ kusanagi provision sample
ここまでの手順で、Wordpressにログインできるはずなのでhttp://sample.comにアクセスしてください。Wordpressの管理画面は表示されたら成功です。
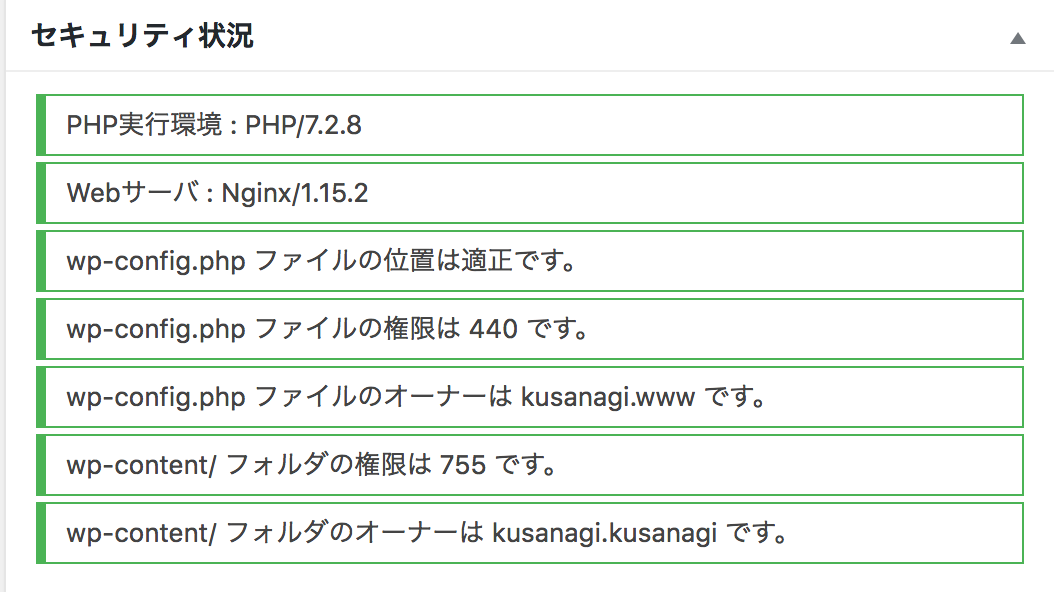
ステップ4 : セキュリティー状態をオールグリーンにする。
初回ログイン時は、wp-config.php等で警告が出ているので警告通りに修正していきます。
下記のようになればOKです。

ステップ5 : https化 & http→httpsリダイレクト処理追加
kusanagiではひとつのコマンドでhttps化及びttp→httpsリダイレクト処理追加が実現できます。
下記を実行してください。
$ kusanagi ssl --https redirect sample
ステップ6 : ファイルアップロードを可能にする。(FTP)
デフォルトでは、Wordpressの環境に対してFTPできないので可能にします。
wp-config.phpに追記
//追記
define('FS_METHOD','direct');
権限を修正する
$ cd wp-content
$ mkdir upgrade
$ useradd nginx
$ chown -R nginx:nginx plugins/ uploads/ themes/ upgrade/
$ chmod -R 777 plugins/ uploads/ themes/ upgrade/ languages/
SiteGuard WP PluginでのXMLRPC防御制御する
WordpressはXMLRPCの攻撃が多いため対応が必要です。
こちらは、Wordpresssより『SiteGuard WP Plugin』のプラグインをインストールすればデフォルトで防御可能になります。
ステップ7 : CloudFlareによるCDN導入
Webサーバを構築する際にCDNを使って、サーバの負荷を下げる際にCloudFlareを使うことがあると思うのですがの際、CloudFlare→Nginxを経由するとアクセスログのIPがすべてCloudFlareのIPになってしまい、正しいリクエストIPがわからなくなってしまいます。
nginx確認
今回は、NginxのHttpRealipModuleを利用します。そのため、まずNginxにHttpRealipModuleの「--with-http_realip_module」が入っているか確認します。
$ nginx -V
$ nginx -V
nginx version: nginx/1.13.12
built by gcc 4.8.5 20150623 (Red Hat 4.8.5-16) (GCC)
built with OpenSSL 1.0.2o  27 Mar 2018
TLS SNI support enabled
configure arguments: --prefix=/etc/nginx --sbin-path=/usr/sbin/nginx --conf-path=/etc/nginx/nginx.conf --error-log-path=/var/log/nginx/error.log --http-log-path=/var/log/nginx/access.log --pid-path=/var/run/nginx.pid --lock-path=/var/run/nginx.lock --http-client-body-temp-path=/var/cache/nginx/client_temp --http-proxy-temp-path=/var/cache/nginx/proxy_temp --http-fastcgi-temp-path=/var/cache/nginx/fastcgi_temp --http-uwsgi-temp-path=/var/cache/nginx/uwsgi_temp --http-scgi-temp-path=/var/cache/nginx/scgi_temp --user=nginx --group=nginx --with-http_ssl_module --with-http_realip_module --with-http_addition_module --with-http_sub_module --with-http_dav_module --with-http_flv_module --with-http_mp4_module --with-http_gunzip_module --with-http_gzip_static_module --with-http_random_index_module --with-http_secure_link_module --with-http_stub_status_module --with-http_auth_request_module --with-mail --with-mail_ssl_module --with-file-aio --with-http_v2_module --with-http_image_filter_module --with-http_geoip_module --with-http_perl_module --add-module=./extensions/ngx_cache_purge --add-module=./extensions/nginx-ct --add-module=./extensions/ngx_brotli --add-module=./extensions/passenger/src/nginx_module --with-cc-opt='-O2 -g -pipe -Wp,-D_FORTIFY_SOURCE=2 -fexceptions -fstack-protector --param=ssp-buffer-size=4 -m64 -mtune=generic -I/usr/local/openssl/include' --with-ld-opt=-L/usr/local/openssl/lib
IP記載
上で、HttpRealipModuleの「--with-http_realip_module」が入っていることが確認できたら、NginxのconfにCloudFlareのIPを記載していきます。
    # Cloudflare
    set_real_ip_from 103.21.244.0/22;
    set_real_ip_from 103.22.200.0/22;
    set_real_ip_from 103.31.4.0/22;
    set_real_ip_from 104.16.0.0/12;
    set_real_ip_from 108.162.192.0/18;
    set_real_ip_from 131.0.72.0/22;
    set_real_ip_from 141.101.64.0/18;
    set_real_ip_from 162.158.0.0/15;
    set_real_ip_from 172.64.0.0/13;
    set_real_ip_from 173.245.48.0/20;
    set_real_ip_from 188.114.96.0/20;
    set_real_ip_from 190.93.240.0/20;
    set_real_ip_from 197.234.240.0/22;
    set_real_ip_from 198.41.128.0/17;
    set_real_ip_from 2400:cb00::/32;
    set_real_ip_from 2600:4700::/32;
    set_real_ip_from 2803:f800::/32;
    set_real_ip_from 2405:b500::/32;
    set_real_ip_from 2405:8100::/32;
    set_real_ip_from 2c0f:f248::/32;
    set_real_ip_from 2a06:98c0::/29;
    real_ip_header CF-Connecting-IP;
1点注意点として上記のCloudFlareのIPは変わるので下記のページに記載があるIPを適用するようにしてください。
https://www.cloudflare.com/ips/
こちらでサーバサイド側の設定は終わります。あとでデザイン・テンプレートを適応していけばサイトしてできあがります。