はじめに
決済アプリで QR コードを相手に見せる時に画面がくるんと反転するの。いいなーと思っていました。相手への敬意というか、やさしさというかが現れてて。で、自分で QR コードを見せるアプリを作る機会があったので挑戦してみました。
つくったもの
こんな画面が、、

相手に見せるために端末を向こう側に倒すと、、、

こうなります。
作り方
QR コードの表示には qr_flutter パッケージを使わせてもらいました。
こんな感じで QR コードを表示しています。
const logoUrl = 'https://nanairo-inc.jp/media/images/logo_header.png';
const logoRatio = 0.1339; // 画像の縦横比

final qrWidth = MediaQuery.of(context).size.width * 0.8;
final logoSize = Size(qrWidth * 0.8, qrWidth * 0.8 * logoRatio);

return Scaffold(
  appBar: AppBar(title: const Text('QR コード')),
  body: Center(
    child: QrImage(
      data: 'https://nanairo-inc.jp/',
      version: QrVersions.auto,
      size: qrWidth,
      foregroundColor: Colors.blueGrey,
      gapless: true,
      embeddedImage: Image.network(logoUrl).image,
      embeddedImageStyle: QrEmbeddedImageStyle(size: logoSize),
    ),
  ),
);
Android の場合は Image.network() の対応で、android/app/src/main/AndroidManifest.xml に下記を追記しなきゃですね。
AndroidManifest.xml
<uses-permission android:name="android.permission.INTERNET" />
<uses-permission android:name="android.permission.ACCESS_NETWORK_STATE" />
次に端末の向きを検知するために sensors_plus パケージを使わせてもらいました。
こんな感じで書くと、、
accelerometerEvents.listen((AccelerometerEvent event) {
  print(event);
});
こんな感じでリアルタイムにセンサーの値が出力されます。
[AccelerometerEvent (x: -0.06699903309345245, y: 8.357531547546387, z: 5.143372058868408)]
今回は y の値のみ利用します。
端末が真上を向いていると event.y = 10 となります。
端末の "画面" が真上を向いていると event.y = 0 となります。
端末が真下を向いている時には event.y = -10 となります。
端末の向きを変えるたびにくるくるしすぎるのも使い勝手が悪いので、y が 1.0 より大きければ自分向きに回転させ、-1.0 より小さければ相手向きに回転させる。とするために次のようにしました。
// 縦向き(自分が見やすい)側に倒れたこと検知
if (event.y > 1.0 && _orientation == DeviceOrientation.portraitDown) {
  _orientation = DeviceOrientation.portraitUp;
  SystemChrome.setPreferredOrientations([_orientation]);
}

// 上下逆さま向き(相手が見やすい)側に倒れたことを検知
if (event.y < -1.0 && _orientation == DeviceOrientation.portraitUp) {
  _orientation = DeviceOrientation.portraitDown;
  SystemChrome.setPreferredOrientations([_orientation]);
}
_orientation には現在の向きを保持しておき、判定に使っています。
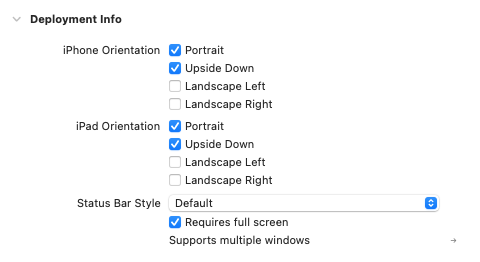
また、iPhone でもくるくるするために Xcode で次のように設定しています。
画面全体のコードは次の通りです。
qr_page.dart
import 'dart:async';

import 'package:flutter/material.dart';
import 'package:flutter/services.dart';
import 'package:qr_flutter/qr_flutter.dart';
import 'package:sensors_plus/sensors_plus.dart';

class QrPage extends StatefulWidget {
  const QrPage({Key? key}) : super(key: key);

  @override
  State<QrPage> createState() => _QrPageState();
}

class _QrPageState extends State<QrPage> {
  // センサーリスナー
  late StreamSubscription<AccelerometerEvent> _listener;

  // 現在の端末の向き(上 or 下)
  var _orientation = DeviceOrientation.portraitUp;

  @override
  void initState() {
    super.initState();

    // センサーの読み取りを開始
    _listener = accelerometerEvents.listen((AccelerometerEvent event) {
      /*
       * [AccelerometerEvent (x: -0.06699903309345245, y: 8.357531547546387, z: 5.143372058868408)]
       * 端末が真上を向いている: event.y = 10
       * 画面が真上を向いている: event.y = 0
       * 端末が真下を向いている: event.y = -10
       */
      print(event);

      // 縦向き(自分が見やすい)側に倒れたこと検知
      if (event.y > 1.0 && _orientation == DeviceOrientation.portraitDown) {
        _orientation = DeviceOrientation.portraitUp;
        SystemChrome.setPreferredOrientations([_orientation]);
      }

      // 上下逆さま向き(相手が見やすい)側に倒れたことを検知
      if (event.y < -1.0 && _orientation == DeviceOrientation.portraitUp) {
        _orientation = DeviceOrientation.portraitDown;
        SystemChrome.setPreferredOrientations([_orientation]);
      }
    });
  }

  @override
  void dispose() {
    super.dispose();

    // センサーの読み取りを終了
    _listener.cancel();

    // 縦向きに戻す
    SystemChrome.setPreferredOrientations([DeviceOrientation.portraitUp]);
  }

  @override
  Widget build(BuildContext context) {
    const logoUrl = 'https://nanairo-inc.jp/media/images/logo_header.png';
    const logoRatio = 0.1339; // 画像の縦横比

    final qrWidth = MediaQuery.of(context).size.width * 0.8;
    final logoSize = Size(qrWidth * 0.8, qrWidth * 0.8 * logoRatio);

    return Scaffold(
      appBar: AppBar(title: const Text('QR コード')),
      body: Center(
        child: QrImage(
          data: 'https://nanairo-inc.jp/',
          version: QrVersions.auto,
          size: qrWidth,
          foregroundColor: Colors.blueGrey,
          gapless: true,
          embeddedImage: Image.network(logoUrl).image,
          embeddedImageStyle: QrEmbeddedImageStyle(size: logoSize),
        ),
      ),
    );
  }
}
おわりに
いい感じにくるくるできるようになりました。やさしさ大事。すてき。