1. はじめに
本編は以下記事の続編になります。
前の記事ではAWS側のロールを経由して、GCP側からAWSへキーなし認証を実現することができました。
本編ではその逆で、AWS側からGCPへキーなし認証を実現していきます。
AWSとGCP間はよいお友達笑笑
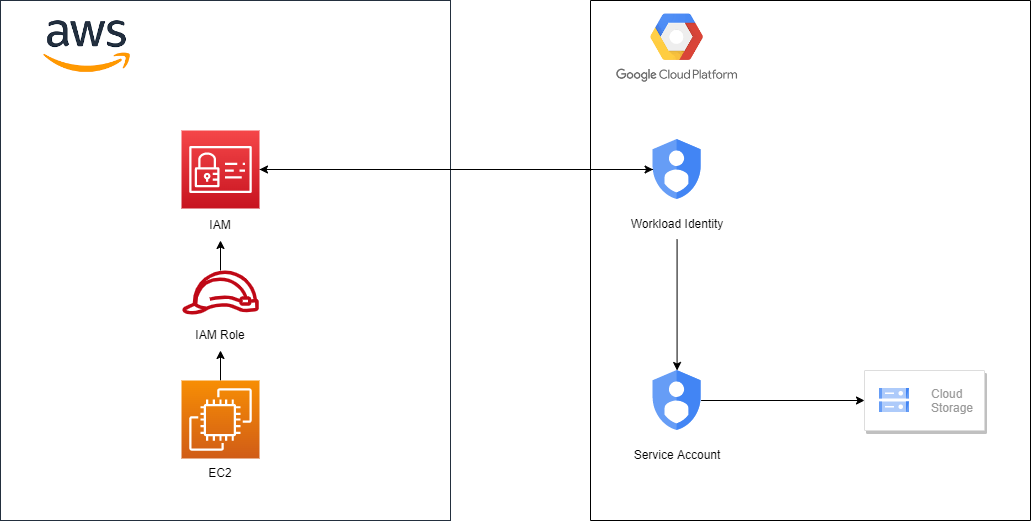
2. 構成図
GCP側のWorkload IdentityがAWS側のIAMとマッピングします。
マッピング後、Service Accountと連携します。Service Account側でアクセスできるロールを制御しています。
AWS側のEC2が、IAM Roleを利用して、Workloan Identity→Service Account経由し、最終的にCloud Storageを作ることになります。
3. AWS側構築
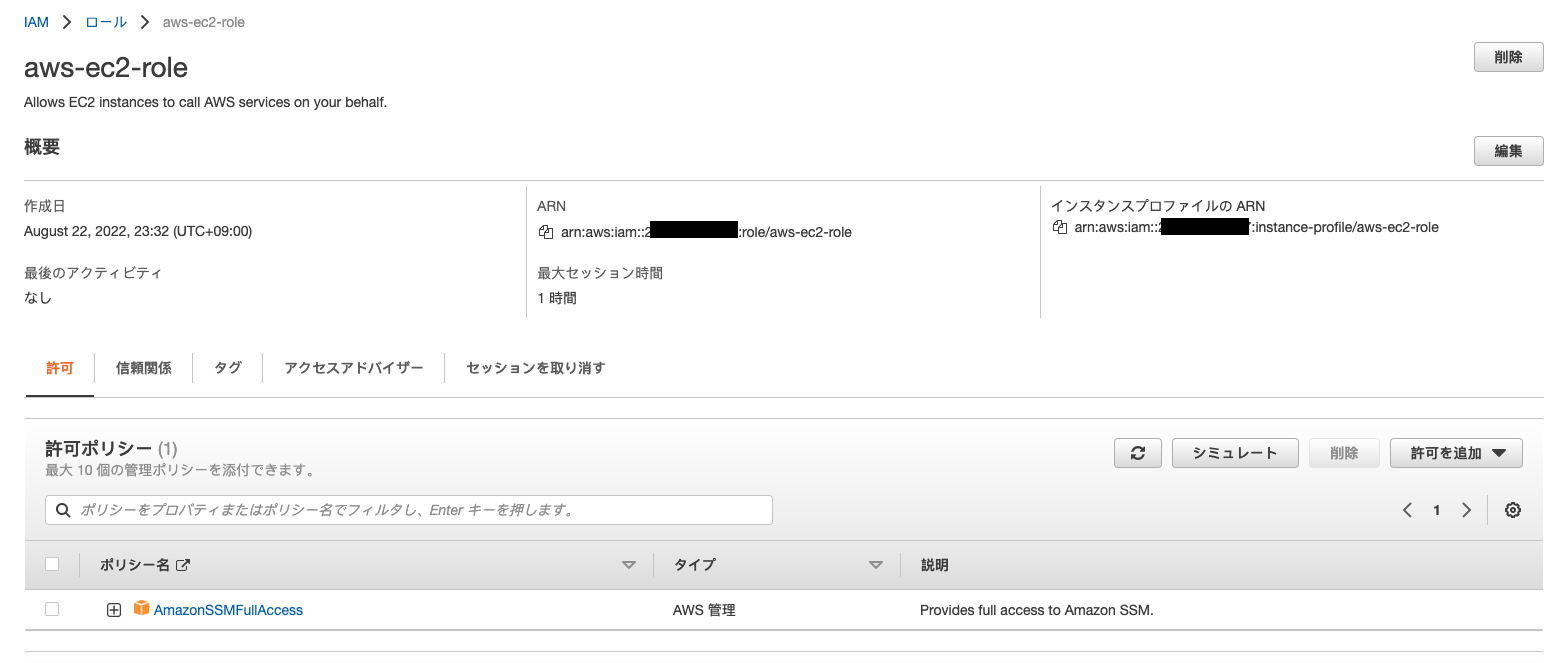
1.IAM Roleを作成
- ユースケース:EC2
- 権限:
AmazonSSMFullAccess(EC2にSSMエージェントがあり、セッションマネージャー接続のため)
2.EC2を作成
- OS:Amazon Linux 2
- ミドルウェアのインストール:
#google-cloud-skdをインストール
$ curl https://sdk.cloud.google.com | bash

#上記インストール完了後に、下記のコマンドを実行
$ source .bash_profile

#下記のコマンドを叩いて、gcloudのバージョンが表示されていればOK
$ gcloud version
Google Cloud SDK 398.0.0
bq 2.0.75
core 2022.08.12
gcloud-crc32c 1.0.0
gsutil 5.12
4. GCP側構築
1.APIs へのアクセスの有効化
こちらのURLを開き、APIを有効化しておきます。
- Identity and Access Management (IAM) API
- Cloud Resource Manager API
- IAM Service Account Credentials API
- Security Token Service API
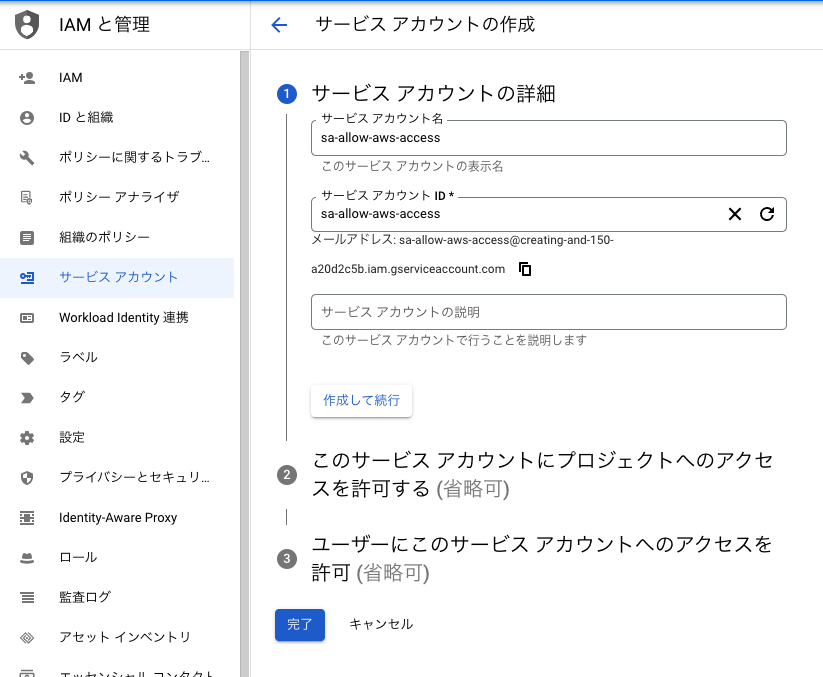
2.サービスアカウントを作成。
サービスアカウントを作成をクリックします。

3.サービスアカウント名とサービスアカウントIDを入力の上、作成して続行を押下を押下します。
4.Cloud Storage作成するため、ロールにストレージ管理者権限を付与し、完了を押下します。

5.IAMと管理配下のWorkload Identityに遷移し、ワークロードプロバイダーとプールを作成します。
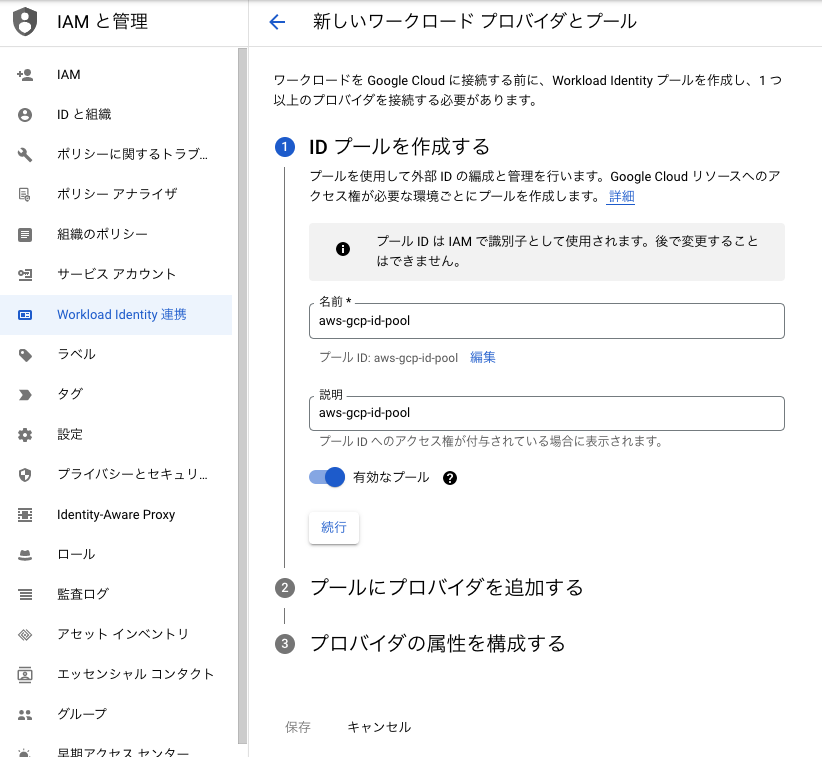
6.以下を入力します。
-
プロバイダの選択にAWSを選択 -
プロバイダ名に設定したい名前を入力 -
AWSアカウントIDにAWSの12桁アカウントIDを入力
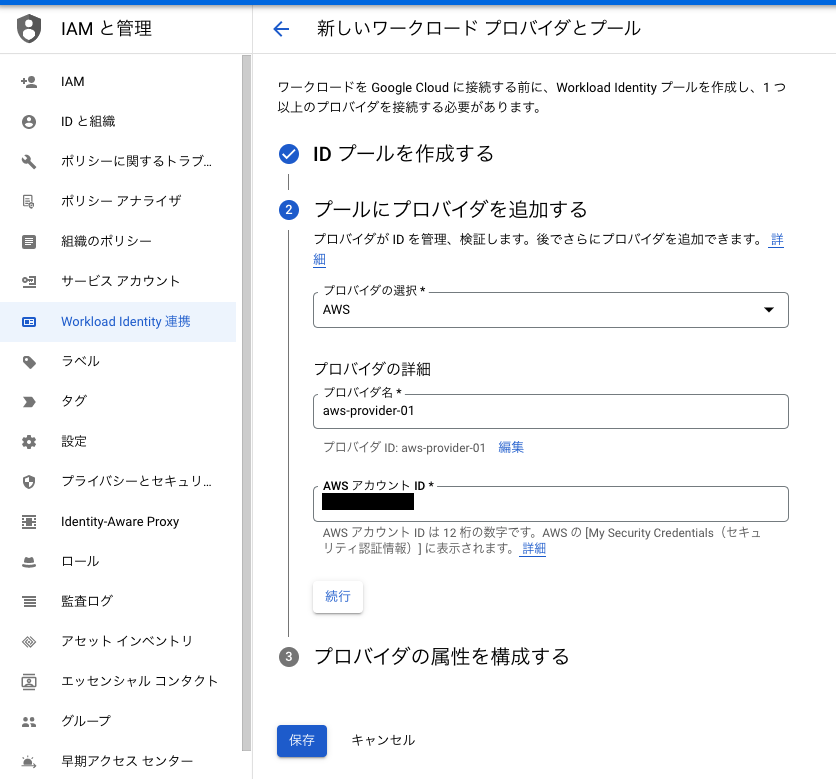
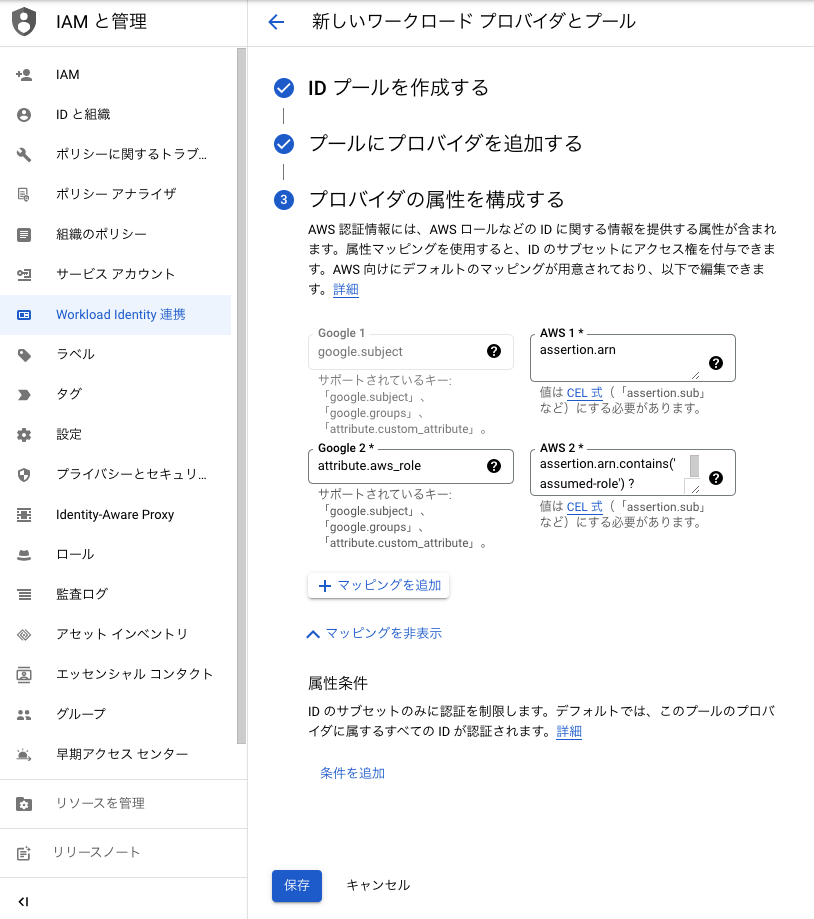
7.こちらは自動的にAWSの認証情報を、GCP側とマッピングすることになりますので、基本は追加不要なので、保存ボタンをクリックします。
※詳細はプロバイダの属性にご参照ください。
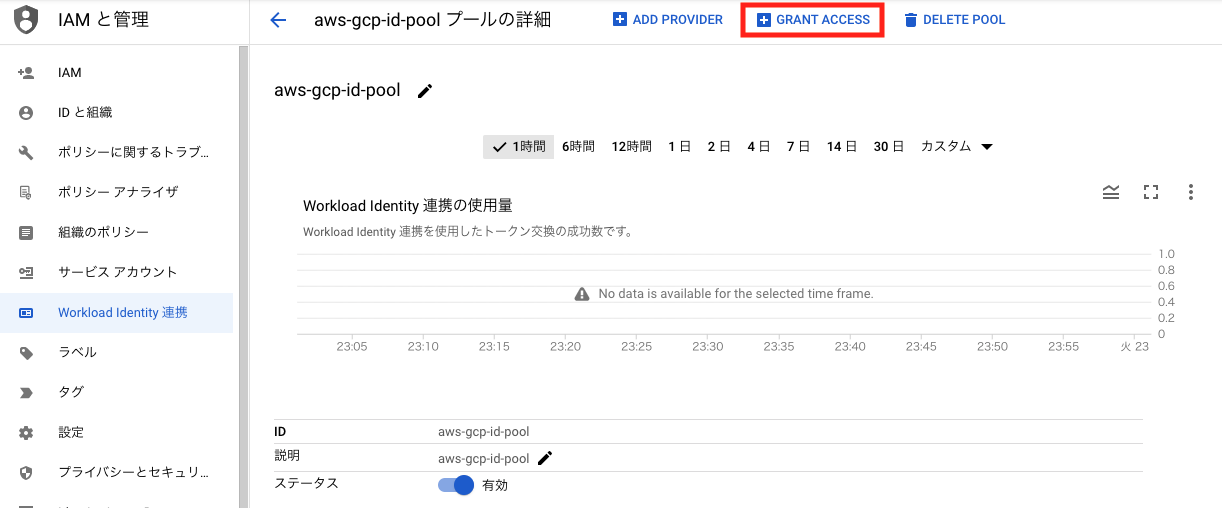
8.作ったプロバイダーを選択し、GRANT ACCESSを押下します。
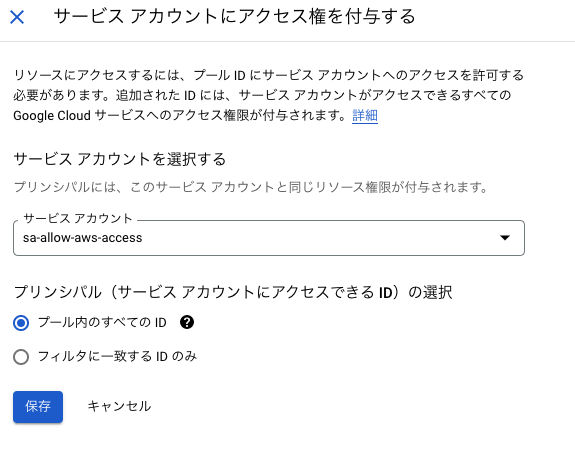
9.先ほど作成したサービスアカウントを選択して、保存をクリックします。
※今回テストのため、プリンシパルはすべてのIDを選択しているが、実際の業務要件によって、プリンシパルIDを絞ることができます。
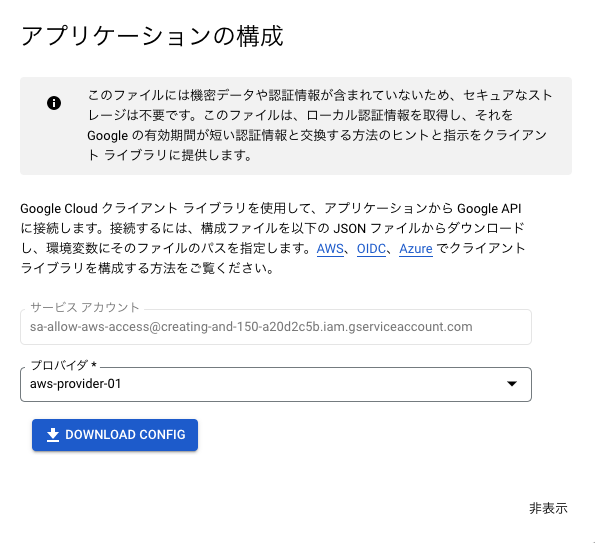
10.上記作成したプロバイダを選択の上、configファイル(json)をダウンロードします。
11.jsonファイルの中身を見ていると、以下のような構成になっています。
{
  "type": "external_account",
  "audience": "//iam.googleapis.com/projects/xxxxxxxxxxx/locations/global/workloadIdentityPools/aws-gcp-id-pool/providers/aws-provider-01",
  "subject_token_type": "urn:ietf:params:aws:token-type:aws4_request",
  "service_account_impersonation_url": "https://iamcredentials.googleapis.com/v1/projects/-/serviceAccounts/sa-allow-aws-access@creating-and-xxxxxxxxxxxxxx.iam.gserviceaccount.com:generateAccessToken",
  "token_url": "https://sts.googleapis.com/v1/token",
  "credential_source": {
    "environment_id": "aws1",
    "region_url": "http://169.254.169.254/latest/meta-data/placement/availability-zone",
    "url": "http://169.254.169.254/latest/meta-data/iam/security-credentials",
    "regional_cred_verification_url": "https://sts.{region}.amazonaws.com?Action=GetCallerIdentity&Version=2011-06-15"
  }
}
5. AWS上EC2での操作
1.上記のjsonファイルを、viコマンドを利用して、EC2内に貼り付けしておきます。
$ cat clientLibraryConfig-aws-provider-01.json
{
  "type": "external_account",
  "audience": "//iam.googleapis.com/projects/xxxxxxxxxxx/locations/global/workloadIdentityPools/aws-gcp-id-pool/providers/aws-provider-01",
  "subject_token_type": "urn:ietf:params:aws:token-type:aws4_request",
  "service_account_impersonation_url": "https://iamcredentials.googleapis.com/v1/projects/-/serviceAccounts/sa-allow-aws-access@creating-and-xxxxxxxxxxxxxx.iam.gserviceaccount.com:generateAccessToken",
  "token_url": "https://sts.googleapis.com/v1/token",
  "credential_source": {
    "environment_id": "aws1",
    "region_url": "http://169.254.169.254/latest/meta-data/placement/availability-zone",
    "url": "http://169.254.169.254/latest/meta-data/iam/security-credentials",
    "regional_cred_verification_url": "https://sts.{region}.amazonaws.com?Action=GetCallerIdentity&Version=2011-06-15"
  }
}
2.以下のコマンドを叩いて、認証を取り込みます。
#コマンド
gcloud auth login --cred-file=[jsonファイル名] --project [GCPのプロジェクト]
#例:
gcloud auth login --cred-file=clientLibraryConfig-aws-provider-01.json --project xxxxxxxx
3.Cloud Storageを作成します。
$ gsutil mb gs://skjdfkjsafjllsajglkXXXXX
Creating gs://skjdfkjsafjllsajglkXXXXX/...
$ gsutil ls
gs://skjdfkjsafjllsajglXXXXX/
上記Cloud Storageが作成されたことを確認できました。
6. GCP側トークンの取得仕組みについて
Workload IdendityはどうやってSTSトークン情報を取得してくるかというと、公式ドキュメントは以下のように説明しています。
Workload Identity プールとプロバイダを使用して、有効期間の短い認証情報を取得する方法について説明します。このプロセスは次のとおりです。
- 信頼できる ID プロバイダから認証情報を取得します。
- Security Token Service から取得したトークンと認証情報を交換します。
- Security Token Service のトークンを使用してサービス アカウントの権限を借用し、有効期間の短い Google アクセス トークンを取得します。
つまり、GCPからAWSのIAMに認証情報を取得し、その上、Security Token Service から取得したトークンと認証情報を交換します。交換後、Security Token Service のトークンを使用してサービス アカウントの権限を借用し、有効期間の短い Google アクセス トークンを取得することになります。
参考資料
1.キーなしの API 認証 - サービス アカウント キーを必要としない Workload Identity 連携によるクラウド セキュリティの向上
2.AWS IAM Role を GCP から STS 認証で利用する設定例
3.GCP Service Account を AWS から STS 認証で利用する設定例
4.gcp-sa-to-aws-iam-role