2
1

Delete article

Deleted articles cannot be recovered.

Draft of this article would be also deleted.

Are you sure you want to delete this article?

More than 1 year has passed since last update.

VS Code + Anacondaのデバッグ環境 Windows10(2022年3月版)

Last updated at Posted at 2022-03-19

はじめに

VS Code+Anacondaでデバッグを行う記事が既にありますが、2022年3月現在では設定も非常に簡単になっていますので、ミニマムの手順を書いてみました。

1. 環境

Windows: Windows 10 Pro バージョン21H2 ビルド19044.1586 Anaconda: 2021.11 (Navigator 2.1.1) Visual Studio Code: 1.65.2 PowerShellでcondaコマンドが実行できるようにPATHが設定されています。

2. Anacondaのインストール

Anacondaのインストールは多数の解説がある為省略します。
上のAnacondaをクリックするとダウンロードリンクに飛びます

3. Python Extensionのインストール

左側にあるアクティビティーバーにある拡張機能のアイコンをクリック、または[Ctrl]+[Shift]+[X]でサイドバーが現れます。サイドバーからPythonをインストールします。
ExtFunc.png

4. Python サンプルプログラムの作成

以下のようなPythonプログラムを作成してVS Codeで開きます。
python:hello.py print("Hello Python from Visual Studio Code")

5. Python インタープリターの設定

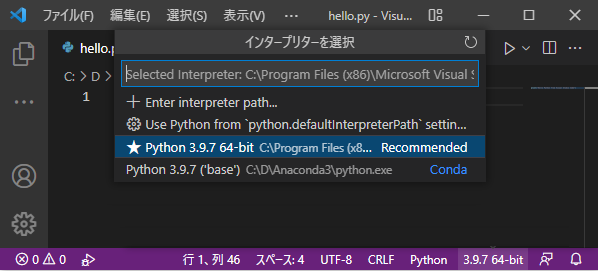
下のステータスバーに言語モード「Python」と表示されている左側の部分「3.9.7 64bit」1をクリックして、上部に表示されるプルダウンでインタープリターを選択します。
Anaconda.png

6. Python の実行

左上の右三角の右横をクリックして「Debug Python File」2を選択します。実行結果は下のターミナルに表示されます。ブレークポイントを設定してデバッグが可能です。
RunAnaconda.png

  1. Pythonのプログラムを始めて開いたときにPythonインタープリターのフォルダーが自動的に検索されます。検索には数分かかります。

  2. 「Run Python File」で実行するとターミナルで結果が見れないようです。

2
1
1

Register as a new user and use Qiita more conveniently

  1. You get articles that match your needs
  2. You can efficiently read back useful information
  3. You can use dark theme
What you can do with signing up
2
1

Delete article

Deleted articles cannot be recovered.

Draft of this article would be also deleted.

Are you sure you want to delete this article?