VMインストール作成
php-vm
Name: php-vm
Region: us-central1
Zone: us-central1-a
Boot disk: Debian GNU/Linux 9 (stretch)
Access scopes: Allow default access
Firewall: Allow HTTP traffic(受信HTTPトラフィックを許可します)
更に、ゾーン間のVMインスタンスを接続を参考
利用情報: VM IP addressをコピー
Cloud Storageにデータ保存
Cloud Shell開いてgsutilコマンドラインでBucket作成
mb - Make buckets
gsutil mb [-b <on|off>] [-c class] [-l location] [-p proj_id]
          [--retention time] url...
LOCATION変数設定するコマンド
export LOCATION=us or
export LOCATION=eu or
export LOCATION=asia
bucket作成するコマンド
gsutil mb -l $LOCATION gs://$DEVSHELL_PROJECT_ID or
gsutil mb -l us gs://bucket-name
DEVSHELL_PROJECT_ID固定変数の値はproject ID
更にgsutilのコマンドガイドを参考
cp - Copy
gsutil cp [OPTION]... src_url dst_url
gsutil cp [OPTION]... src_url... dst_url
gsutil cp [OPTION]... -I dst_url
[gs://cloud-training/gcpfci/]は公開するストレージデータ
![]() データ情報を取得するコマンド
データ情報を取得するコマンド
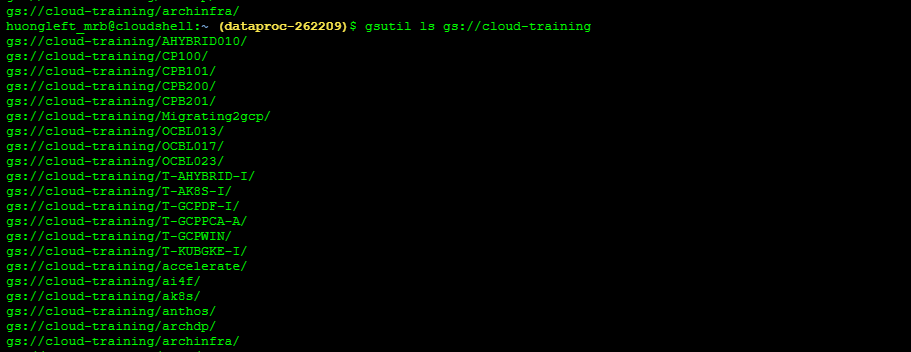
gsutil ls gs://cloud-training/gcpfci
banner imageを作成
gsutil cp gs://cloud-training/gcpfci/my-excellent-blog.png banner-image.png
[gs://cloud-training/gcpfci/my-excellent-blog.png]:公開させる画像
[banner-image.png]:バナー画像
bucketへバナー画像をコピー
gsutil cp banner-image.png gs://$DEVSHELL_PROJECT_ID/myExcellentBlog.png
[gs://$DEVSHELL_PROJECT_ID/]:画像を保存するbucket
Gcloud SQL作成
データベース作成
Choose your database engine: MySQL
Instance ID: php-sql
Root password: @php-sql (自分が決める値)
データベース設定
- Public IP addressをコピー
-
user accountを作成:usersタブを開いて以下の情報を設定(自分が決める値)
- User name:
phpsqluser - Password:
phpsqluser
- User name:
-
Networkを設定:Connections タブを開いて以下の情報を設定
- name:
php web - Password:
[VM IP address]/32(32はデフォルト値)
- name:
VMインスタンスでPHPウェブサーバー構築しGCSとGSQL利用
PHPウェブサーバーインストール
php-vmのSSHを開いてPHPウェブサーバーインストール
sudo apt-get update sudo apt-get install apache2 php php-mysql -y sudo service apache2 restart
GSQL利用
ソースフォルダへディレクトリー
cd /var/www/html
index.phpファイルを修正する為、nanoコマンドで開く
sudo nano index.php
以下のように編集する
<html>
<head><title>Welcome to my excellent blog</title></head>
<body>
<h1>Welcome to my excellent blog</h1>
<?php
$dbserver = "CLOUDSQLIP";
$dbuser = "blogdbuser";
$dbpassword = "DBPASSWORD";
// In a production blog, we would not store the MySQL
// password in the document root. Instead, we would store it in a
// configuration file elsewhere on the web server VM instance.
$conn = new mysqli($dbserver, $dbuser, $dbpassword);
if (mysqli_connect_error()) {
echo ("Database connection failed: " . mysqli_connect_error());
} else {
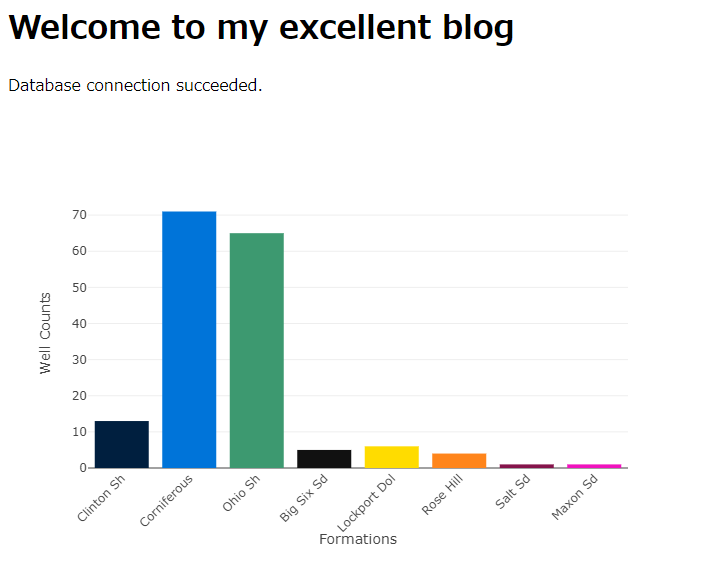
echo ("Database connection succeeded.");
}
?>
</body></html>
「Ctrl+O → Enter → Ctrl+X」で編集が終わり
Database connection failed: ...
データベースへ接続できる為、index.phpファイル直し
sudo nano index.php
以下の情報を修正
dbserver = "DBのPublic IP address";
dbuser = "phpsqluser";
dbpassword = "phpsqluser";
サーバー再起動
sudo service apache2 restart
Database connection succeeded.
GCS利用
index.phpファイルを開いてindexページにストレージから取る画像を表示する
sudo nano index.php
<img src='myExcellentBlog.pngのLink URL'>
完成、indexページは以下のように