Introduction to the current state of accessibility devices
The market for accessibility devices for the deaf or hard of hearing is large and well established. When I got my first accessibility device as a teenager - a bed shaker device linked to an alarm clock so that I could wake up on time for school (my parents no longer would drive me from high school), I was amazed that such purpose built devices existed. With them, we could gain a modicum of independence. That was followed by other devices like a doorbell signaler, a telephone signaler, a fire alarm signaler that could pick up other alarm-like sounds, and even a portable vibrating alarm clock for travel. All these devices were presumably designed and developed for a pre-Internet age - and there was no talk of standards or interoperability. If you wanted to use the doorbell signaler, you'd have to run a wire from a custom installed button on your doorstop all the way to the signaling light. If you bought devices from the same manufacturer, there could be some interoperability. But, if you introduced a second manufacturer into the mix, nothing would quite work together well. Another inconvenience was that for this far from cutting edge technology (actuating lights, motors, etc from analog input signals), you'd have to pay hundreds of dollars for each device. Given the small and captive market, and the need to recoup R&D costs, that is unavoidable, I suppose. In many cases though, there is funding from governmental and non-profit organizations to cover some of these costs.
Can smartphones and smartwatches serve the same role?
Over time though, smart home devices, wearable devices, and smartphones became popular. People began clamoring for common standards, interoperability, etc. The Internet became the common protocol. There still remains some divisions such as Google Home, or Alexa ecosystems, etc but nothing compared to the fragmentation from before. Gone is the portable alarm clock - now, I just use my smartwatch with a vibrating motor. I don't have a landline anymore - the phone itself rings with vibration signals, or also send an alert to my smartwatch, which will also vibrate in the same way. Smartphones themselves have built in sound detection - such as iOS's Sound Recognition or Android's Sound Notifications. These apps are not so reliable perhaps as the analog circuits in the purpose-built devices of yesteryear, but they are vastly more flexible and ubiquitous in a number of situations.
That said though, at times, I dislike being too dependent on my smartphone and watch, and having to carry it everywhere. At home, there are times that I just want to "digital detox" - and not be carrying or in close proximity with a device. When I moved this year in to a larger place, I began thinking of how to replicate the functionality of these older analog style devices with modern devices etc. I already had an old Google Nest Hub Max as well as some smart plugs that could act as a simple relay for a light, etc. I also had an old bed shaker alarm clock that I had brought from Canada, but it relied on synchronizing with the alternating current frequency to keep time, which meant that the 60hz it was designed for would fail to keep accurate time in Japan's 50hz power supply.
Designing a new system centered around Home Assistant and Zigbee
All the features that I want are already available in various devices, so I just need a way to tie everything together. One could just write a program from scratch but it's a lot of work to figure out protocols, and UI. So, I settled on Home Assistant, which is an open-source home automation system, with a huge community that has already figured out how to integrate various devices. The final system design consists of a main controller based on, and various peripheral devices.
Controller
The controller is the brains of the operation - it's where I'll configure all the alerts and notifications, and tie all the devices together. For this, I settled on:
- Raspberry Pi 4 (I originally used a 4GB model, which is plenty for Home Assistant, but swapped it with an 8GB model since I wanted to run other Docker containers as well)
- Sonoff Zigbee 3.0 USB Dongle Plus (EFR32MG21)

Excuse the cable mess - you can see the Sonoff dongle connected to a Raspberry Pi 4, and stashed behind my TV
It's not too important which distribution of Linux you choose - I used Raspbery Pi OS (Raspbian). I also decided to use Docker to manage everything. You could follow the guide here to setup Raspberry Pi OS with Home Assistant running on Docker. There are other ways to deploy Home Assistant such as using Home Assistant Operating System, which I've not yet tried.
One of the biggest decisions you'll need to make is the interconnecting protocol of all your devices. There are a couple of big standards out there, such as Zigbee, Z-Wave, or Wifi - which is not any single set of standards but all work as networked devices, etc. It's hard to make a decision - many people might end up running more than one kind of devices (for me, I ended up setting up both Zigbee and Wifi devices). I started out this project with the goal to use Philips Hue devices, which are Zigbee compatible, so I decided to build my network around Zigbee (in the end, I settled on the much more affordable Ikea Tradfri system though, which is also Zigbee under the hood).
A Raspberry Pi doesn't speak Zigbee though, so you need a Zigbee Coordinator - which is a device that can pair with Zigbee devices. Another source of confusion is that there are two ways to integrate Zigbee devies with Home Assistant - through ZHA or Zigbee2MQTT. I tried both - but I ended up settling on ZHA because it had slightly better compatibility with a particular Tradfri device that I was having trouble getting recognized in Zigbee2MQTT. However, they both work very similarly. You can browse the list of compatible devies for ZHA and Zigbee2MQTT. The Sonoff Zigbee 3.0 USB Dongle Plus works with both stacks - it may be possible to get it from Aliexpress under ¥2000 or so. In hindsight though, although I was able to eventually get everything working, you might benefit from using a more well tested Zigbee coordinator like the CC2652* based coordinators.
The ZHA integration is also much easier to setup since it's built into Home Assistant - just follow the GUI configuration method. You'll also need to add each device, which we'll describe below.
Signalling lights
I started this adventure with only a smart plug (the Iris Ohyama SMT-PL1), controlling a single light. Originally, I worked on reverse engineering the proprietary manufacturer protocol, and figuring out how to send RPCs to their cloud service. However, I eventually realized that these were simply just rebadged Broadlink smart plugs, and was already supported in Home Assistant via the python-broadlink project. There was a catch though - the Broadlink integration didn't recognize the SMT-PL1 because of a slightly different product ID, so I submitted a pull request to add it. At the time of this article's writing, it's still not yet integrated yet, so I had to manually patch my Home Assistant installation with it. Using the python-broadlink libraries, it's no longer necessary to be connected to the internet, and the entire network can be run only locally instead. Even now, this smart plug is only one of two wifi devices on my network - and illustrates the weakness of wifi devices, which is that every device needs to negotiate its own protocol and API with Home Assistant. It's easy if someone has already figured out how to connect it and written the integration, but can be frustrating if otherwise.
The weakness of smart plugs is that they are mostly only just binary on/off switches, and don't support the full range of output that a Philips Hue light can support. Philips was definitely a pioneer in this area being one of the first to develop and market "smart" bulbs. But, today, they are expensive and still carry a significant price premium. If I was building an ecosystem from scratch, and also committed to using Home Assistant, instead of the Philips developed apps, etc, was it really necessary to start with Hue devices? I ended up going with Ikea Tradfri, which is also supported by Home Assistant. There's a lot of different Tradfri products, and the naming can be confusing to distinguish it. Although more expensive, I wanted colour bulbs, so that I can use different colours to represent different signals. I picked up:
- TRÅDFRI LED bulb E26 810 lumen - a large bright colour bulb in E26 size
- TRÅDFRI LED bulb E17 440 lumen - a smaller E17 sized colour bulb
- TRÅDFRI shortcut button - a simple on off switch that could be used like a light switch for one of the above lights (working Home Assistant blueprint via ZHA)
- STYRBAR remote control - a more complex switch that could also be used as a dimmer controller, etc (working Home Assistant blueprint via ZHA)
The convenience with Ikea lights is that there a lot of light fixtures for each bulb. For example:
- LERSTA Floor/reading lamp
- a simple affordable floor light that can hold an E26 bulb.
- GRÖNÖ Table lamp - a stylish affordable table light that can hold an E17 bulb.
Tradfri E17 bulb in an older Ikea lamp I had from the past controllable via the Tradfri shortcut button in the foreground
Both bulbs have rather complex pairing sequences (example) but once done, you can control them via Home Assistant.
To get the buttons and controllers working, you will want to use Home Assistant blueprints - which are prebuilt automations that you configure in the GUI. It really depends on your home layout, but I opted to use the Styrbar remote to control the larger E26 bulb with dimmable controls. For the Tradfri shortcut button, since the automation allows distinguishing short vs long button presses, a short press toggles the SMT-PL1 light, whereas a long press toggles the smaller E17 bulb.
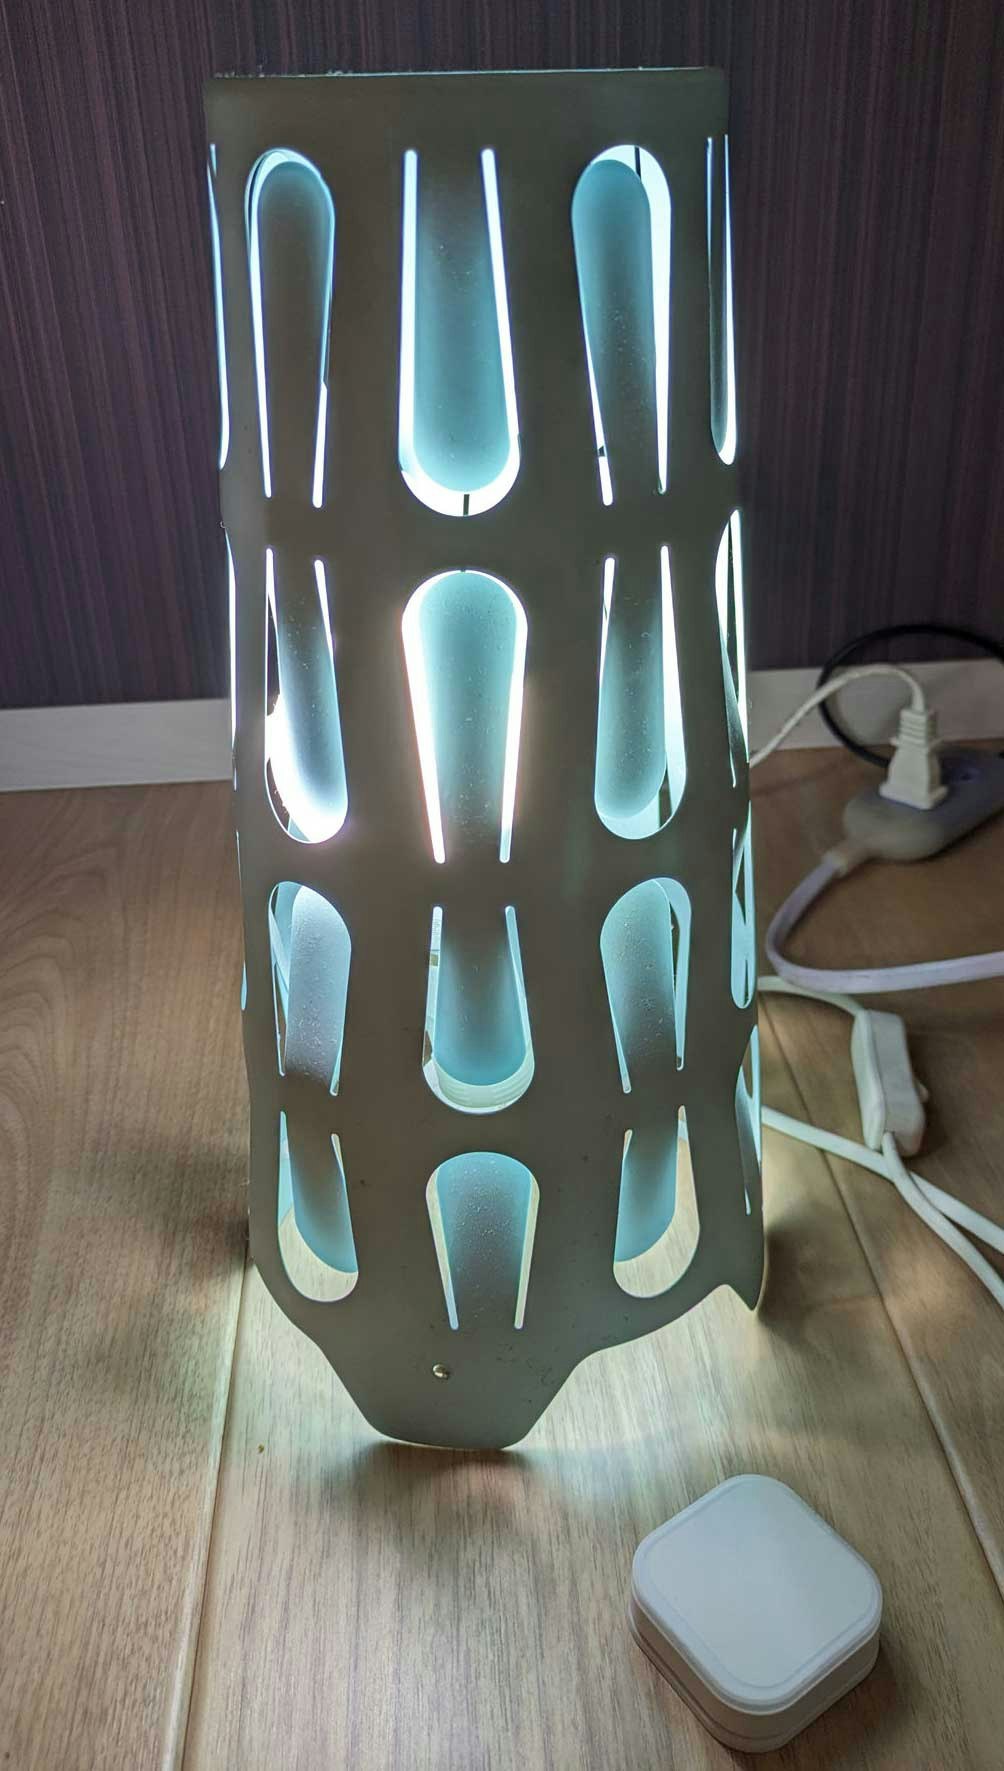
Bed Shaker
Even though my old alarm clock was no longer working properly on Japan's 50hz AC electrical supply, it still had a bed shaker that was still working fine. But, it isn't smart at all - and we need a way to somehow make Home Assistant aware of this device. The device is pretty simple - it's basically just a weighted motor driven by 12V of DC power. The controlling device needs to toggle the electrical flow on and off to get the desired duration and vibration pattern. Essentially, we need an electrical relay to toggle this.
Years ago, when I first came to Japan and discovered my alarm clock wasn't working, I ended up building a very hacky contraption based on Arduino and a now deprecated Arduino ADK integration with Android. The Arduino had an electromechanical relay that switched 12V of power to the bed shaker. I wrote a small Android alarm clock app running on an old Android phone that communicated with the Arduino to be able to set the time and snooze as well! That alarm clock with ADK integration I wrote was not network aware at all, so it would have to be extended to work with Home Assistant. But it is a very complicated setup and lots of hardware just to drive a simple relay over the network. There had to be a better way. The relay that I'm trying to switch is no more complex than any of the cheap smartplugs that exist everywhere, and it can be done with much less hardware! But on the other hand, I'm trying to switch just a 12V device, and not a normal appliance using 100V electrical mains power.
First of all, you need a 12V AC/DC adapter to convert the 100V AC mains power to 12V DC power. Next, there are multiple ways to solve this - you could simply just use the same smart plug as before (SMT-PL1), and have the plug switch the adapter, connected to the bed shaker. Since I was trying to build a Zigbee network, I could have gotten a Zigbee smart plug as well. Instead, I wanted to experiment, and decided on a Zigbee connected relay (Zigbee 1CH 7-32V). The switch itself can run on any input voltage between 7-32V, which means that I could run the switch on the same 12V used for the bed shaker.

This hacky cabling job won't win any awards but at least it's only 12V, so I don't have to worry about fires... I hope?
There are other ways you could construct this - for instance, using an old phone with built in vibration features as a signalling device or a smart watch, etc. Using a smart watch might be easiest if you're already wearing one to track sleep. Or some combination of the above.
Doorbell
There are multiple ways to design an accessible doorbell:
- Install a separate Zigbee enabled button for your doorbell. The button would completely replace your existing doorbell button, and seemlessly trigger the appropriate automations in Home Assistant to flash lights, or play a sound on a speaker. The downside is of course, anything linked to your old doorbell would stop working - including the video intercom, integration with the building's "autolock", etc.
- Detect the doorbell chime using some kind of sound detection (which we'll talk a bit about later), and trigger the automation in Home Assistant. This is a nice option that requires no extra hardware, and doesn't break functionality in your existing doorbell system.
- Try to detect the existing doorbell signal natively somehow.
When I first moved into my new place, I discovered that the doorbell system, a Panasonic VL-SWH705, was already Internet enabled and had an called Doorphone Connect. With the app installed and configured, it's possible to talk and communicate with the person ringing the doorbell, even when one was away from the house. When the doorbell is rung, an Android notification is generated, and the user can open the app to respond. Given it's an app, there's an option to try to reverse engineer the Internet protocol to try to get the doorbell notification natively. However, instead of reverse engineering the app, I thought about trying to intercept the Android notification instead, since I was already planning to do this for sound notifications.
There are a couple of ways to intercept Android notifications such as writing your own Android app. But there are more turnkey options such as IFTTT and Tasker. IFTTT is more general purpose, but Tasker is specifically centered around automating Android tasks. I think it's probably possible to do something similar using iOS' Shortcuts as well. Tasker is a paid app though, and combined with AutoNotification, has a one-time cost of about ¥640.
With Tasker, you define events that trigger tasks. In this case, the event is an AutoNotification Intercept that is listening non-persistent notifications from the app "ドアホンコネクト". When triggered (i.e., when someone presses the doorbell), we can perform some kind of action. Tasker has no built in Home Assistant integration, but Home Assistant supports Webhook triggers, which Tasker can invoke easily. In this case, on the Home Assistant side, I defined a simple Webhook trigger, for instance /api/webhook/doorbell, and on the Tasker side, I defined a task to make an HTTP POST request to the defined webhook, and also cancel the notification on Android with AutoNotification Cancel. In this way, anytime someone pressed the doorbell, it could trigger a Home Assistant automation to flash the desired signaling devices, etc.


Defining relaying doorbell events in Tasker (ignore the mention of Discord, it actually invokes Home Assistant!)
Sound Notifications
Back then, sound notifications was fairly flaky using dedicated devices listening for a specific frequency and volume. Nowadays, iOS's Sound Recognition or Android's Sound Notifications can classify sounds and flash or vibrate the phone for desired kinds of sounds like a fire alarm, or even a dog barking. They are based on recent advances in machine learning and sound classifiers that allow such features to become ubiquitous and everywhere.
For a recent hackathon project, my team tried to use some of the underlying technology that might be used in Sound Notifications using the default YamNet model in MediaPipe. We developed a simple proof of concept in JavaScript that ran a YamNet model, checked for a few classes that we were interested in, and invoked a Discord webhook whenever the conditions matched. However, the main problem we encountered was that the recall of the YamNet model was just not very good for the kinds of sounds we were interested in - YamNet is primarily trained on YouTube data, and is good for classifying all kinds of sounds like music, animal sounds, speech, etc, whereas we specifically want to detect a few sounds like telephones, chimes from household appliances, fire alarms, etc. So, even though we played sounds in close proximity with the microphone, it was not reliable in detecting when there was a siren, etc. On the other hand, the recognizers in iOS and Android were fairly good at detecting these sounds - presumably because they were trained on a much narrowly focused set of sounds, and probably hand tuned by engineers. One option would have been to do the same and try to replicate the same accuracy achieved by these systems.

The toggle that enables Sound Notifications, and the one we will automate below
However, I was already using Tasker to intercept doorbell notifications, and so it made sense to also intercept notifications from Sound Notification too! Much in the same way as before, I used the same Tasker + AutoNotification integration to intercept notifications from the app "Live Transcribe & Sound Notifications" and trigger a Webhook in Home Assistant. There are 10 such sound classes described here such as "Water running" and "Smoke and fire alarms". The type of sound get filled in the title of the notification (%antitle using AutoNotifications template variables). Here, it's important to also propagate this data to Home Assistant, so that we can write more intelligent automations based on the type. In this case, I defined a Home Assistant webhook listening on /api/webhook/sound and expecting a JSON payload of {"antitle":"%antitle", "antext","%antext"}.


Defining relaying sound notifications in Tasker (ignore the mention of Discord, it actually invokes Home Assistant!)
One caveat I found with Android's Sound Notifications is that there is an automatic disabling of it every ~24 hours, which I can find no official reference to in the product's usage guide. This was extremely frustrating because it meant that if you turned on Sound Notifications, it would stop detecting and sending events to Home Assistant after 24 hours! I ended up with another hacky solution - using AutoInput (another Tasker plugin which costs an additional ¥200), it's possible to automate toggling Sound Notifications off and back on again, which resets the 24 hour shutoff counter and in this way, Sound Notifications always stays enabled. This is very brittle and likely to break if the UI is ever reorganized, but I found the necessary config by examining the manifest inside the Sound Notifications APK and also experimenting with diagnostic tools provided by AutoInput (such as outputting the screen layout and UI identifiers to clipboard):
- AutoInput Unlock Screen
- Send Intent (package:
com.google.audio.hearing.visualization.accessibility.scribe, class:com.google.audio.hearing.visualization.accessibility.dolphin.ui.DolphinSettingsPreferenceActivity) - AutoInput UI Query (App Package:
com.google.audio.hearing.visualization.accessibility.scribe, Only Clickable: true) - outputs clickable element IDs to%aiid() - AutoInput Action (click on
%aiid(3)) - toggles radio button for Use Sound Notifications - Wait (500ms)
- AutoInput UI Query
- AutoInput Action (click on
%aiid(3)IF%aitext(3) EQ off) - toggles radio button for Use Sound Notifications if the radio button is off - Back Button


Defining a profile and task for reenabling Sound Notifications every 12 hours
Other devices (Discord, Google Home, etc)
Even after incorporating signaling devices such as lights and bedshakers, it'd be nice to have more modern ways to see the alerts, such as on my phone, or through other smart devices. By the way, if one installs the Home Assistant app on the phone, you can also easily script custom notifications to the phone app, which will also propagate to paired smartwatches.
Discord has an easy low-effort webhook integration making it easy to send messages - which I was already familiar with since we had used this for the hackathon earlier. Home Assistant can not only define webhooks triggers but also invoke external webhooks easily. Once a message is sent to Discord, we can use built in config within the Discord app to trigger desktop/phone notifications and it'll be sent to a paired smartwatch.

Alerts received from Home Assistant via Discord webhooks. Majel (the voice actor of the Star Trek computer!) are the events from Home Assistant, and Captain Hook (the main villain from Peter Pan!) are the events sent from IFTTT using a similar notification capture scheme.
I already have a Google Nest Hub Max in my kitchen with an always on screen, so I wanted to also show information on it. Unfortunately, the protocol is closed and not so flexible, but it's possible to manipulate the Google Cast protocol in a way to send or even speak custom messages such as what this user did. Borrowing their idea, I tweaked it slightly to make it simpler and remove the dependency on VLC:
alias: Google Home - 10 seconds with picture and information
description: Script to send a picture and text to a player with screen
icon: mdi:cast-audio
mode: parallel
max: 20
sequence:
  - alias: Send text message with picture
    service: media_player.play_media
    target:
      entity_id: "{{ target }}"
    data:
      media_content_id: http://192.168.1.19/~hung_yao/alert/10-seconds.mp3
      media_content_type: audio/mp3
      extra:
        metadata:
          metadataType: 3
          title: "{{ large_text }}"
          artist: "{{ small_text }}"
          images:
            - url: "{{ picture_url }}"
  - alias: Wait 10 seconds
    delay:
      seconds: 10
  - alias: Turn it off
    service: media_player.turn_off
    target:
      entity_id: "{{ target }}"
What this does is plays a silent 10 second audio file, using template variables to fill in the "song" metadata and album art. We can replace this with other strings and image assets based on the automation we want.

Sound alerts of a home appliance (actually, my oven) beeping and reflected on the Google Nest Hub Max. Please ignore the reflection of my disembodied finger on the display.
There are a lot of other ideas I have to incorporate other visual alerting devices, such as LED signs, cool retro flip-disc displays, strobe lights, etc, but I just haven't gotten around to them yet!
Defining automations for visual signaling
So far, we have been describing various input and signaling devices, but we haven't described fully how everything is integrated. In Home Assistant we will define Automations that listen for a trigger and if optional conditions are satisfied, will execute actions (it's similar to Tasker's events and tasks, just using different nomenclature).
The triggering conditions invoked from sound detection and the doorbell both arrive in Home Assistant as Webhook triggers. You can choose how exactly to invoke the range of signaling devices. For example, when someone presses my doorbell, it will:
- Send a notification to Discord
- Blink the light in my bedroom 3 times
- Blink the light in my living room 3 times
- Send a message on my Google Home device that the doorbell is being rung
- Vibrate the bedshaker 10 times

The doorbell invokes mostly every single signalling device in my house
What does it mean to blink or vibrate something N times? For a light, you can simply define a looping toggle action for 2N times:
- Repeat an action 2N times:
- Toggle light
- Delay for 1 second
For lights, this makes a lot of sense because if a light is on already, it will be switched off, and vice versa. 2N is an even number so that means at the end of the automation, the light will be restored to its previous state (so, a light that is on already will flash the desired number of times, and then go back to on). You can also invoke the bedshaker (which is just a switch/relay) using similar logic.
For sound notifications, we likely want different behaviour based on the kind of sound. For this, we'll "conditionally execute an action" using the if template condition, {{ trigger.json.antitle == 'Appliance beeping'}} or similar. In this way, we can show different messages, or flash lights different colours or times depending on the urgency.

On receiving a sound notification webhook, it conditionally executes the Appliance Beeping actions if the notification title matches
Finally then, we can say everything is now tied together via automations.

A diagram showing the full system with all devices
What's next?
The total cost of the system may be less than the existing assistive devices but the effort and knowledge to configure it is not trivial - there is definitely a need for some person or company to provide something more turnkey and user friendly. The largest cost, which is that of a Raspberry Pi, is not even needed if you have an older computer or laptop to run the system on.
Defining each kind of automation is still a lot of manual work in the Home Automation UI, so I have not yet fully gone through the effort of customizing the full range of colours for each kind of alert, etc. One could also incorporate the Zigbee buttons as ways to flash lights to alert the attention of other people in the room.
The doorbell system has an app, which right now, we only use to capture the ring notification. Just like how talking to people on the telephone is difficult, similarly, figuring out what people are saying into the intercom is also challenging too. I would like to also be able to feed the video and audio from the intercom into a speech recognition/synthesis system so that we can easily read and respond to the person at the door. This would probably require some reverse engineering of the manufacturer app to figure out the video streaming URL, etc. At a place I used to live at, the intercom system was not Internet connected but had what looked like an external headset jack, potentially allowing redirecting audio to a computer in a more direct way.
That said, we live in interesting times, and I am excited for what the future may bring in terms of new accessibility related devices and technologies.