どうも、shoheiです。
大阪在住のフリーランスエンジニアで業務委託でiOS、Webアプリの開発をしています。また、ブロックチェーンNEMを用いたプロダクト開発も行っております。
概要
前回の記事ではNEMウォレットの作成方法を紹介しました。
Vue CLI 3.0とTypeScriptを使ってNEMウォレットを作ってみた
続いて同じ開発環境でEthereumウォレットの作り方を紹介します。
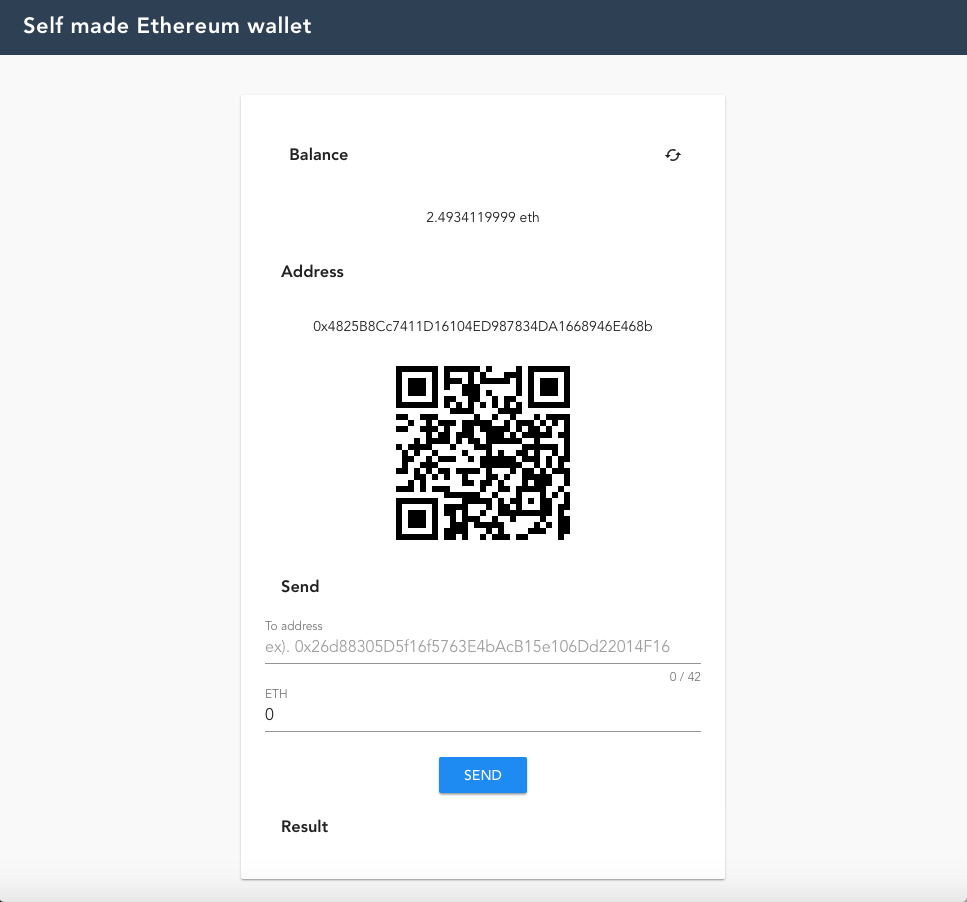
完成イメージはこんな感じです。
完成コード
GitHub
GitHub Pages
開発環境
- macOS High Sierra 10.13.6
- Google Chrome
- Vue CLI 3.01
- TypeScript
- PWA
- yarn
Ethereumとは
Ethereumとは分散型アプリケーション(DApps)のプラットフォームです。Ethereumのブロックチェーン上ではイーサ(Ether)と呼ばれる基軸通貨があり、トランザクション発生時の手数料として必要になります。単位はETHで、取引所等で売買できます。
コンセンサスアルゴリズムはPoW(Proof of Work)であり、今後はPoS(Proof of Stake)へ変更するようです。
・Proof of Work
Nonceと言われる不可逆の値を正しい値に計算できた人がブロック作成の権限を得る。膨大な計算が必要なため高性能マシンが必要。BTCも同様。
・Proof of Stake
ブロック作成者の保有量など元にブロック作成の権限が与えられる。
Ethereumの有名な機能としてはスマートコントラクト(賢い契約)です。
スマートコントラクトとはブロックチェーン上で様々なやりとりを実装でき、第三者を介さずに信用が担保された状態でトランザクションの処理が行えます。
SolidityというJavaScriptライクなプログラミング言語を使用してコントラクトを実装します。実装したコードはEthereum上で扱える様にビルド、マイグレーションを行いEthereumへデプロイすることで誰でもそのコントラクトを使用することができます。
また独自トークンもスマートコントラクトを使用して開発します。ERCXXXという規格をベースに開発します(現在はERC20〜ERC1449まで存在する?)
スマートコントラクト開発をWeb開発で例えるとバックエンド開発のイメージです。
フロントエンドはそのコントラクトを扱うことができ、コントラクトを簡単に扱えるようライブラリ化されたWeb3があります。
本記事ではスマートコントラクトの開発には触れませんが、Web3を用いてイーサ(ETH)を送受信できるウォレットを作ります。
環境構築
Vue CLI 3.0をインストール
Vue CLI 3.0をインストールします。インストールにはnpmが必要です。
$ npm install -g @vue/cli
$ vue --version
3.0.1
バージョンが確認できたらひとまず成功です。
次はプロジェクトを作成します。
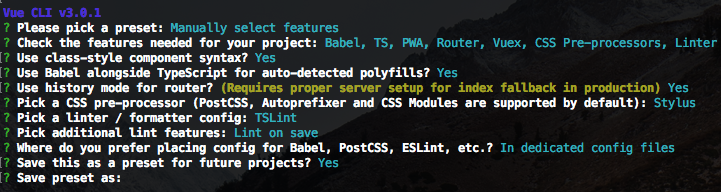
$ vue create eth-wallet
色々と聞いてくるので以下のように選択します。
TypeScript以外はお好みで選んでいただいて大丈夫です。
作成されると一度serveしてlocalhostで立ち上がるか確認してください。
なお本記事ではyarnを使ってビルドしますのでインストールしておいてください。
$ yarn serve
ちなみにtslint.jsonの設定はこんな感じにしています。ここもお好みでどうぞ。
{
  "defaultSeverity": "warning",
  "extends": [
    "tslint:recommended"
  ],
  "linterOptions": {
    "exclude": [
      "node_modules/**"
    ]
  },
  "rules": {
    "quotemark": [true, "single"],
    "semicolon": [
      false,
      "always"
    ],
    "no-console": [
      false
    ],
    "indent": [true, "spaces", 2],
    "max-line-length": [false, 120],
    "trailing-comma": [true, {"multiline": "always", "singleline": "never"}],
    "interface-name": false,
    "ordered-imports": false,
    "object-literal-sort-keys": false,
    "no-consecutive-blank-lines": false
  }
}
ライブラリのインストールと設定
ウォレットに必要なライブラリをインストールします。
$ yarn add web3 ethereumjs-tx dotenv-webpack localforage vue-qriously vue2-toast vuetify
| ライブラリ | 概要 | 用途 |
|---|---|---|
| web3 | Ethereumを利用するためのライブラリ | アカウント作成、残高取得、送金など |
| ethereumjs-tx | トランザクションデータの作成 | ETHの送金時 |
| dotenv-webpack | .envのwebpack版 | Ethereumのノードの設定定義 |
| localforage | ブラウザのローカルストレージ操作 | アカウントの保存 |
| vue-qriously | QRコード表示 | ウォレット情報のQRコード表示 |
| vue2-toast | AndroidのToast | メッセージ表示 |
| vuetify | マテリアルデザイン | フォーム作成 |
問題なくインストールできたらプロジェクト内でライブラリを扱えるよう設定していきます。
src/main.ts
import Vue from 'vue'
import App from './App.vue'
import router from './router'
import store from './store'
import './registerServiceWorker'
import Vuetify from 'vuetify'
import colors from 'vuetify/es5/util/colors'
import 'vue2-toast/lib/toast.css'
import Toast from 'vue2-toast'
import VueQriously from 'vue-qriously'

Vue.use(Vuetify, {
  theme: {
    original: colors.purple.base,
    theme: '#FFDEEA',
    background: '#FFF6EA',
    view: '#ffa07a',
    select: '#FF7F78',
    button: '#5FACEF',
  },
  options: {
    themeVariations: ['original', 'secondary'],
  },
})
Vue.use(Toast, {
  defaultType: 'bottom',
  duration: 3000,
  wordWrap: true,
  width: '280px',
})
Vue.use(VueQriously)

Vue.config.productionTip = false;

new Vue({
  router,
  store,
  render: (h) => h(App),
}).$mount('#app')
src/shims-vue.d.ts
declare module '*.vue' {
  import Vue from 'vue';
  export default Vue;
}

declare module 'web3'
declare module 'ethereumjs-tx'
declare module "vuetify/es5/util/colors"
declare module 'localforage'
declare module 'vue-qriously'
declare module 'vue2-toast'
public/index.html
<!DOCTYPE html>
<html lang="en">
  <head>
    <meta charset="utf-8">
    <meta http-equiv="X-UA-Compatible" content="IE=edge">
    <!-- 追加 -->
    <link href='https://fonts.googleapis.com/css?family=Roboto:300,400,500,700|Material+Icons' rel="stylesheet" type="text/css">
    <link href="https://cdn.jsdelivr.net/npm/vuetify@1.2.6/dist/vuetify.min.css" rel="stylesheet">
    <!-- ここまで -->
    <meta name="viewport" content="width=device-width,initial-scale=1.0">
    <link rel="icon" href="<%= BASE_URL %>favicon.ico">
    <title>eth-wallet</title>
  </head>
  <body>
    <noscript>
      <strong>We're sorry but eth-wallet doesn't work properly without JavaScript enabled. Please enable it to continue.</strong>
    </noscript>
    <div id="app"></div>
    <!-- built files will be auto injected -->
  </body>
</html>
プロジェクトのルート上に.envとvue.config.jsを作成します。
.env
# Node URL (ex) local is 'ws://localhost:7545'
ETH_PROVIDER_URL = 'wss://ropsten.infura.io/ws/v3/f1cd14beb0774d7599bdc94c703928f0'
Ethereumにもmainnetとtestnetの2種類のネットワークがあります。
パブリックチェーンで取引所で扱われてるネットワークをmainnet、パブリックチェーンですがテスト用として扱われているネットワークをtestnetです。
これらのネットワークを使用するためにはノードへアクセスする必要があります。EthereumではノードホスティングサービスのInfuraを利用します。
今回はtestnetである、Ropstenというネットワークを利用してウォレットを作ります。
vue.config.jsは以下のように設定します。.envの設定とGitHub Pagesで使えるようにするための設定をします
vue.config.js
const Dotenv = require('dotenv-webpack')

module.exports = {
  baseUrl: process.env.NODE_ENV === 'production'
    ? '/eth-wallet/'
    : '/',
  outputDir: 'docs',
  configureWebpack: {
    plugins: [new Dotenv()]
  }
}
こちらはGitHub Pagesを使用できるよう "start_url" を "./index.html" に変更しています。
public/manifest.json
{
  "name": "eth-wallet",
  "short_name": "eth-wallet",
  "icons": [
    {
      "src": "/img/icons/android-chrome-192x192.png",
      "sizes": "192x192",
      "type": "image/png"
    },
    {
      "src": "/img/icons/android-chrome-512x512.png",
      "sizes": "512x512",
      "type": "image/png"
    }
  ],
  "start_url": "./index.html",
  "display": "standalone",
  "background_color": "#000000",
  "theme_color": "#4DBA87"
}
これでライブラリの設定は完了です。
モジュール作成
まずは下回りから作っていきます。
web3を扱うクラス
web3と直接やりとりを行うラッパークラスを作成します。web3の使い方はこちらから確認できます。
src/wrapper/EthWrapper.ts
import Web3 from 'web3'
import Tx from 'ethereumjs-tx'

// Bufferがないよって怒られるため定義.
declare const Buffer: any

export default class EthWrapper {
    public host: string = process.env.ETH_PROVIDER_URL
    public web3: any
    constructor() {
        this.web3 = new Web3(this.host)
    }

    public createAccount(): any {
        const account = this.web3.eth.accounts.create()
        console.log(account)
        return account
    }

    public getAccountFromPrivateKey(privateKey: string): any {
        const account = this.web3.eth.accounts.privateKeyToAccount(privateKey)
        console.log(account)
        return account
    }

    public async getBalance(address: string) {
        const balance = await this.web3.eth.getBalance(address)
        console.log(balance)
        return this.web3.utils.fromWei(balance, 'ether')
    }

    // 署名付トランザクション.
    public async sendEthWithSign(fromAddress: string, toAddress: string, privateKey: string, amount: number) {
        const amountVal = this.web3.utils.toWei(`${amount}`, 'ether')
        console.log(amountVal)
        const gasParams = {
            from: fromAddress,
            to: toAddress,
            value: amountVal,
        }
        const gasLimit = await this.web3.eth.estimateGas(gasParams)
        const gasPrice = await this.web3.eth.getGasPrice()
        const count = await this.web3.eth.getTransactionCount(fromAddress)
        const params = {
            nonce: count,
            gasPrice: this.web3.utils.toHex(gasPrice),
            gasLimit: this.web3.utils.toHex(gasLimit),
            to: toAddress,
            value: this.web3.utils.toHex(amountVal),
        }
        const tx = new Tx(params)
        if (privateKey.slice(0, 2) === '0x') {
            privateKey = privateKey.slice(2)
        }
        console.log('privateKey', privateKey)
        tx.sign(new Buffer.from(privateKey, 'hex'))
        const rawTx = '0x' + tx.serialize().toString('hex')
        const result = await this.web3.eth.sendSignedTransaction(rawTx)
        console.log(result)
        return result
    }
}
イーサの最小単位はweiであり、1ETH = 10^18wei となります。
ETHからweiへの変換は以下の関数を使用します。
const amountVal = this.web3.utils.toWei(`${amount}`, 'ether')
weiからETHへの変換は以下の関数を使用します。
const ether = this.web3.utils.fromWei(balance, 'ether')
イーサを送金する際はGas(トランザクション発行時に必要な手数料)を設定する必要があります。Gasの計算もWeb3にお任せします。
        const gasLimit = await this.web3.eth.estimateGas(gasParams)
        const gasPrice = await this.web3.eth.getGasPrice()
        const count = await this.web3.eth.getTransactionCount(fromAddress)
        const params = {
            nonce: count,
            gasPrice: this.web3.utils.toHex(gasPrice),
            gasLimit: this.web3.utils.toHex(gasLimit),
            to: toAddress,
            value: this.web3.utils.toHex(amountVal),
        }
モデルクラス作成
次にアカウント情報の保持とアカウント情報を更新するためのビジネスロジックを持ったモデルクラスを作成します。
作成したアカウントはlocalforageを用いてブラウザ上のストレージへ保存します。大事な秘密鍵をそのまま保存することになるのでカスタマイズする際は秘密鍵を暗号化して保存するか、もしくはストレージに保存せずに紙に写すなどしてください。
src/model/WalletModel.ts
import localForage from 'localforage'
import EthWrapper from '@/wrapper/EthWrapper'

export default class WalletModel {
    public balance: number = 0
    public address: string = ''
    public privateKey: string = ''

    private eth = new EthWrapper()
    private localStorageKey = 'eth-wallet'

    constructor() {
        // クラス生成時にローカルストレージからアカウント情報を取得
        this.load()
        .then((result) => {
            console.log(result)
            if (result === null) {
                const account = this.eth.createAccount()
                this.address = account.address
                this.privateKey = account.privateKey
                this.save()
            } else {
                this.address = result.address
                this.privateKey = result.privateKey
                this.getAccount()
            }
        }).catch((error) => {
            console.error(error)
        })
    }

    // ローカルストレージへ保存
    public async save() {
        return await localForage.setItem(this.localStorageKey, this.toJSON())
    }

    // ローカルストレージから取得
    public async load() {
        const result: any = await localForage.getItem(this.localStorageKey)
        if (result !== null) {
            this.address = result.address
            this.privateKey = result.privateKey
        }
        return result
    }

    // ローカルストレージから削除
    public async remove() {
        return await localForage.removeItem(this.localStorageKey)
    }

    // アカウント情報を取得
    public async getAccount() {
        this.balance = await this.eth.getBalance(this.address)
    }

    // 送金(ETH)
    public async sendEth(toAddress: string, amount: number)  {
        return await this.eth.sendEthWithSign(this.address, toAddress, this.privateKey, amount)
    }

    public toJSON() {
        return {
            address: this.address,
            privateKey: this.privateKey,
        }
    }
}
WalletModelが生成されたタイミングでストレージ上のデータを取得します。
もしデータがなければアカウントを作成して保存します。データがあれば保存されたアカウント情報をキャッシュ上に設定しています。
画面作成
必要なモジュールは完成したので次は画面を作っていきます。
コンポーネント作成
Vue.jsコンポーネントとしてウォレットフォームを作成します。
フォームにはマテリアルデザインライブラリのVuetifyを使っています。HTMLの構文はVuetifyを確認してください。
src/components/Wallet.vue
<template>
<div class="wallet">
    <v-flex xs12 sm6 offset-sm3>
    <v-card>
      <v-container fluid>
        <v-card flat>
          <v-card-actions>
            <v-card-title>
              <h3>Balance</h3>
            </v-card-title>
            <v-spacer />
            <v-btn fab small flat @click="getAccount()" :loading="isLoading"><v-icon>cached</v-icon></v-btn>
          </v-card-actions>
          <v-card-text>{{ wallet.balance }} eth</v-card-text>
          <v-card-title>
            <h3>Address</h3>
          </v-card-title>
          <v-card-text>{{ wallet.address }}</v-card-text>
          <v-card flat>
            <qriously v-model="qrJson" :size="qrSize" />
          </v-card>
        </v-card>
        <v-card flat>
          <div v-for="(item, index) in validation" :key="index" class="errorLabel">
            <div v-if="item!==true">{{ item }}</div>
          </div>
          <v-card-title>
            <h3>Send</h3>
          </v-card-title>
          <v-text-field
            label="To address"
            v-model="toAddr"
            :counter="42"
            required
            placeholder="ex). 0x26d88305D5f16f5763E4bAcB15e106Dd22014F16"
          ></v-text-field>
          <v-text-field
            label="ETH"
            v-model="toAmount"
            type="number"
            required
          ></v-text-field>
          <v-flex>
            <v-btn
              color="blue"
              class="white--text"
              @click="tapSend()"
              :loading="isLoading"
              :disabled="isLoading">SEND</v-btn>
          </v-flex>
          <v-flex>
            <v-card-title>
              <h3>Result</h3>
            </v-card-title>
            {{ resultMessage }}
          </v-flex>
        </v-card>
      </v-container>
    </v-card>
    </v-flex>
</div>
</template>

<script lang="ts">
import { Component, Prop, Watch, Vue } from 'vue-property-decorator'
import WalletModel from '@/model/WalletModel'

@Component
export default class Wallet extends Vue {
    private isLoading: boolean = false
    private wallet: WalletModel = new WalletModel()
    private qrSize: number = 200
    private toAmount: number = 0
    private toAddr: string = ''
    private qrJson: string = ''
    private validation: any[] = []
    private resultMessage: string = ''
    private rules: any = {
      senderAddrLimit: (value: string) => (value && (value.length === 42)) || '送金先アドレスは0x含めた42文字です。',
      senderAddrInput: (value: string) => {
        const pattern = /^[a-zA-Z0-9-]+$/
        return pattern.test(value) || '送金先の入力が不正です'
      },
      amountLimit: (value: number) => (value >= 0) || '数量を入力してください',
      amountInput: (value: string) => {
        const pattern = /^[0-9.]+$/
        return (pattern.test(value) && !isNaN(Number(value))) || '数量の入力が不正です'
      },
    }

    @Watch('wallet.address')
    private onValueChange(newValue: string, oldValue: string): void {
      console.log(`watch: ${newValue}, ${oldValue}`)
      this.qrJson = 'ethereum:\n' + newValue
    }

    private mounted() {
      console.log('hello')
      Vue.prototype.$toast('Hello self made Ethereum wallet')
    }

    private async getAccount() {
      this.isLoading = true
      await this.wallet.getAccount()
      this.isLoading = false
    }

    private async tapSend() {
      if (this.isValidation() === true) {
        console.log('OK')
        this.resultMessage = ''
        this.isLoading = true
        try {
          const result = await this.wallet.sendEth(this.toAddr, this.toAmount)
          let message
          if (result.status) {
            message = `SUCCESS\n${result.transactionHash}`
            this.resultMessage = result.transactionHash
          } else {
            message = 'Failed'
            this.resultMessage = message
          }
          this.wallet.getAccount()
          Vue.prototype.$toast(message)
        } catch (error) {
          console.error(error)
          this.resultMessage = error
          Vue.prototype.$toast(error)
        }
        this.isLoading = false
      }
      console.log(this.isValidation())
    }

    private isValidation(): boolean {
      this.validation = []
      this.validation.push(this.rules.senderAddrLimit(this.toAddr))
      this.validation.push(this.rules.senderAddrInput(this.toAddr))
      this.validation.push(this.rules.amountLimit(this.toAmount))
      this.validation.push(this.rules.amountInput(`${this.toAmount}`))
      const error: any[] = this.validation.filter((obj: any) => obj !== true )
      return (error.length === 0) ? true : false
    }
}
</script>
<style lang="stylus" scoped>
.wallet
  word-break: break-all

.errorLabel
  color red

</style>
Vue.jsやTypeScriptの基本的な書き方については割愛します。
QRコードのフォーマットは標準に定められたものはないため、今回はMetaMaskのQRコードのjson形式と同じものにしました。
this.qrJson = 'ethereum:\n' + newValue
送金時にバリデーションを入れていますが、Ethereum側でバリデーションがかかっているので無くても大丈夫です。
    private isValidation(): boolean {
      this.validation = []
      this.validation.push(this.rules.senderAddrLimit(this.toAddr))
      this.validation.push(this.rules.senderAddrInput(this.toAddr))
      this.validation.push(this.rules.amountLimit(this.toAmount))
      this.validation.push(this.rules.amountInput(`${this.toAmount}`))
      const error: any[] = this.validation.filter((obj: any) => obj !== true )
      return (error.length === 0) ? true : false
    }
送金に成功するとResult欄にトランザクションIDを表示するようにしています。このIDはTESTNET Ropstenエクスプローラでトランザクションの承認状況を確認できます。
        <v-flex>
          <v-card-title>
            <h3>Result</h3>
          </v-card-title>
          {{ resultMessage }}
        </v-flex>
    private async tapSend() {
      if (this.isValidation() === true) {
        console.log('OK')
        this.resultMessage = ''
        this.isLoading = true
        try {
          const result = await this.wallet.sendEth(this.toAddr, this.toAmount)
          let message
          if (result.status) {
            message = `SUCCESS\n${result.transactionHash}`
            this.resultMessage = result.transactionHash
          } else {
            message = 'Failed'
            this.resultMessage = message
          }
          this.wallet.getAccount()
          Vue.prototype.$toast(message)
        } catch (error) {
          console.error(error)
          this.resultMessage = error
          Vue.prototype.$toast(error)
        }
        this.isLoading = false
      }
      console.log(this.isValidation())
    }
なおWeb3のsendSignedTransactionの振る舞いを確認したところ、トランザクションの承認が完了すると応答が返ってきました。
そのため応答が返ってくるまではフロント側でLoading状態にして、応答が返ってきたタイミングで残高を取得するようにしています。
App.vue変更
VueのルートページにあたるApp.vueに先ほど作ったWallet.vueを反映させます。
CSSの部分はお好みでどうぞ。
src/App.vue
<template>
  <v-app>
    <header>
      <span>{{ title }} </span>
    </header>
    <main>
      <Wallet/>
      <!-- <router-view></router-view> -->
    </main>
  </v-app>
</template>
<script lang="ts">
import { Component, Prop, Vue } from 'vue-property-decorator'
import Wallet from '@/components/Wallet.vue'; // @ is an alias to /src

@Component({
  components: {
    Wallet,
  },
})
export default class App extends Vue {
  private title = 'Self made Ethereum wallet'
}
</script>
<style lang="stylus">
# app
  font-family 'Avenir', Helvetica, Arial, sans-serif
  -webkit-font-smoothing antialiased
  -moz-osx-font-smoothing grayscale
  text-align center
  color #2c3e50

body
  margin 0

main
  text-align center
  margin-top 40px
  margin-bottom 40px

header
  margin 0
  height 56px
  padding 0 16px 0 24px
  background-color #35495E
  color #ffffff

header span
  display block
  position relative
  font-size 22px
  line-height 1
  letter-spacing .02em
  font-weight 700
  box-sizing border-box
  padding-top 16px
  text-align left

</style>
これで実装は完了です。
最後にyarn serveでlocalhost上で立ち上がるか確認してください。
GitHub Pagesに公開
せっかく作ったのでGitHub Pagesへデプロイして作ったウォレットを公開しましょう。
yarn serveで問題なくlocalhost上で立ち上がれば問題なくビルドできます(そのはず)。
$ yarn build
ビルドが終わるとプロジェクトのルート上にdocsフォルダが作成されます。
この状態でGitHubへデプロイします。
デプロイ後はGitHub Pagesを有効にします。GitHubのSettingから設定できます、詳しくはこちらで。
数分経つと以下のように表示されます。

テストネット用のETHを取得
テストネットの場合、無料でテストネット用のイーサをゲットできます。
Ropstenネットワークのイーサの取得します。
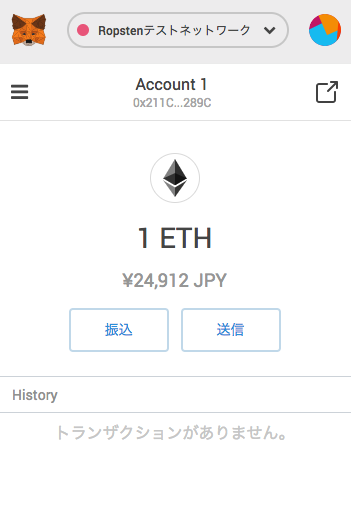
Ethereumのブラウザ上で動作するウォレットのMetaMaskをインストールしてアカウントを作成します。
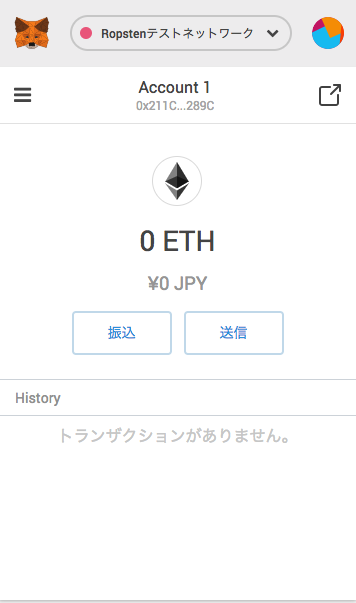
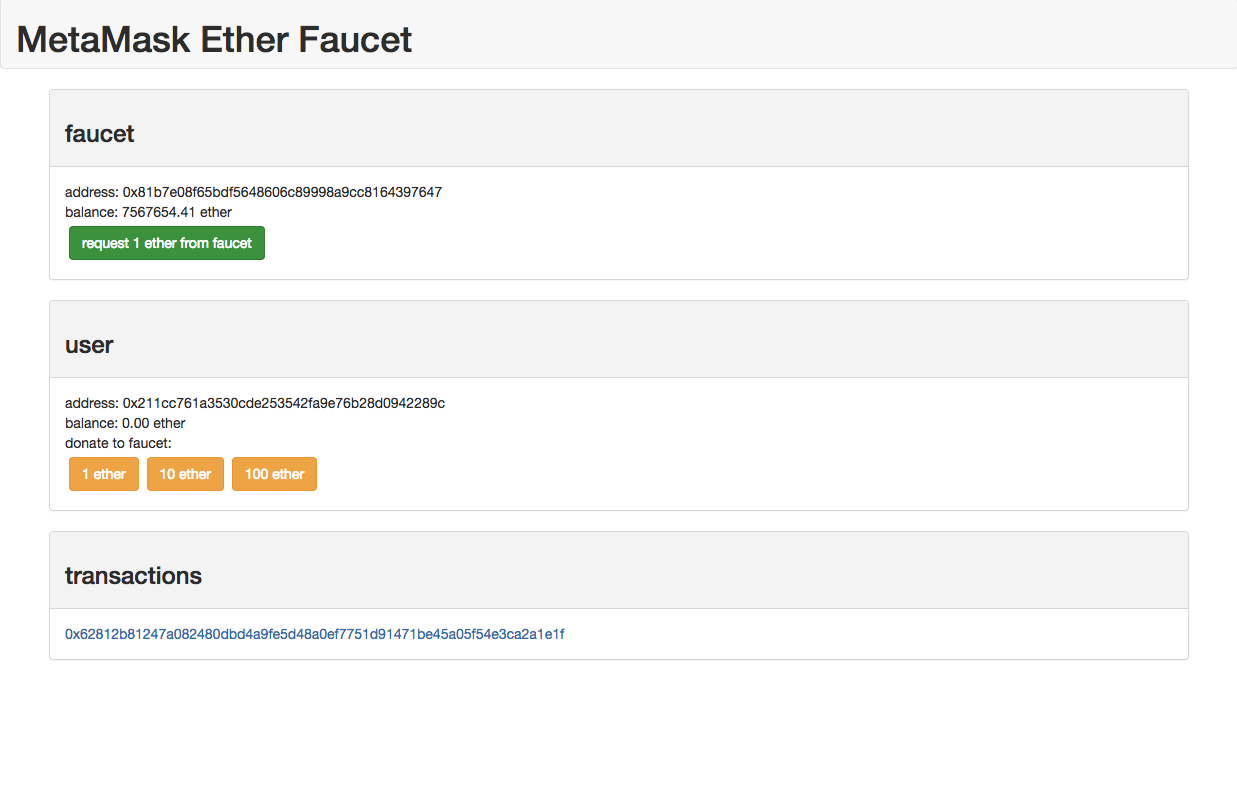
インストールしてアカウントを作成できたらTest Ether Faucetからイーサを入手します。
MetaMaskウォレットの送金先アドレスをコピーすると、Test Ether Faucet上に送金先アドレスが反映されます。その後、Faucetのrequestをクリックするとtransactions欄にトランザクションIDが表示されます。
数分待つと、1ETH取得できていることを確認できます。
先ほど作ったウォレットへ送金したりして遊んでみてください。
終わりに
Vue CLI 3.0とTypeScriptを用いてEthereumウォレットを作ってみました。
Ethereumといえば前述で紹介したスマートコントラクトであり、独自トークンもスマートコントラクトで作成することができます。
次回はスマートコントラクトを利用して独自トークンを作り、独自トークンを扱えるウォレットを作成してみたいと思います。