Flamingoが Firebase Open Source に掲載されましたm(__)m
どうも、shoheiです。
株式会社Neverの代表(兼エンジニア)をしております。
主にWeb/モバイルアプリケーションプ開発や技術顧問・コンサルティングを事業をしております。
今回はFlutter用のFirebase Firestoreのモデルライブラリ Flamingo🐤 を作ったので紹介させてください。
・Dart pub
https://pub.dev/packages/flamingo
・Github
https://github.com/hukusuke1007/flamingo
Flamingoを利用したサンプルコードはこちらです。
sample code
概要
Firebase Firestoreを使う上で各ドキュメント毎にモデルクラスを作るかと思います。
モデルクラスが属するDocumentReferenceとその親のCollectionReferenceも管理し、さらにFirestoreへのデータの作成・取得・更新・削除(以降、CRUD)をラップしたインターフェースを作れば便利だと思いこのライブラリを作りました。
高専のパイセンがBallcapというライブラリを作っていたので、それをベースに作りました。
動作環境
flutter --version
Flutter 2.2.1 • channel stable • https://github.com/flutter/flutter.git
Framework • revision 02c026b03c (8 days ago) • 2021-05-27 12:24:44 -0700
Engine • revision 0fdb562ac8
Tools • Dart 2.13.1
Flamingo
Flamingoを利用したサンプルコードはこちらです。
事前準備
予め利用するプロジェクトへFirebaseの設定を行います。公式リファレンスのステップ1〜ステップ3までを実施してください。
インストール
pubspec.yamlへFlamingoをインストールします。
dependencies:
  flamingo:
  flamingo_annotation:

dev_dependencies:
  build_runner:
  flamingo_generator:
使い方
初期設定
ルートとなるコレクションとFirestoreとCloudStorageのインスタンスを設定します。
import 'package:flamingo/flamingo.dart';

void main() async {
  WidgetsFlutterBinding.ensureInitialized();
  await Flamingo.initializeApp();
  ...
}
モデルクラスの作成
Userのモデルクラスを作成します。
Firestoreへ書き込みするデータを設定するオーバーライドメソッド(toData)と、Firestoreからデータを取得してモデルクラスのフィールドへマッピングするオーバーライドメソッド(fromData)を実装します。
手動で実装もできますが、ここはflamingo_generatorを使ってマッピングコードの自動生成します。
まずは次のようにモデルクラスを作ります。
import 'package:flamingo/flamingo.dart';
import 'package:flamingo_annotation/flamingo_annotation.dart';

part 'user.flamingo.dart';

class User extends Document<User> {
  User({
    String? id,
    DocumentSnapshot<Map<String, dynamic>>? snapshot,
    Map<String, dynamic>? values,
  }) : super(id: id, snapshot: snapshot, values: values);

  @Field()
  String? name;

  @override
  Map<String, dynamic> toData() => _$toData(this);

  @override
  void fromData(Map<String, dynamic> data) => _$fromData(this, data);
}
自動生成したいフィールドに対してはアノテーションを付与します。
- @Field()
- @StorageField()
- @ModelField()
- @SubCollection()
モデルクラスを実装後、ターミナルから次のコマンドを実行してコードを自動生成します。
flutter pub run build_runner build
自動生成されたコードは *.flamingo.dart のファイル名で作成されます。
// GENERATED CODE - DO NOT MODIFY BY HAND

part of 'user.dart';

// **************************************************************************
// FieldValueGenerator
// **************************************************************************

/// Field value key
enum UserKey {
  name,
}

extension UserKeyExtension on UserKey {
  String get value {
    switch (this) {
      case UserKey.name:
        return 'name';
      default:
        throw Exception('Invalid data key.');
    }
  }
}

/// For save data
Map<String, dynamic> _$toData(User doc) {
  final data = <String, dynamic>{};
  Helper.writeNotNull(data, 'name', doc.name);

  return data;
}

/// For load data
void _$fromData(User doc, Map<String, dynamic> data) {
  doc.name = Helper.valueFromKey<String>(data, 'name');
}
[Option] build.yaml
build.yaml をプロジェクトのrootに設置すると、自動生成対象のディレクトリを指定できるようになるため自動生成が速くなります。
targets:
  $default:
    builders:
      flamingo_generator|field_value_generator:
        generate_for:
          include:
            - lib/model/*.dart
            - lib/model/**/*.dart
CRUD
Document への操作は、Flamingoが提供する DocumentAccessor を利用します。
final documentAccessor = DocumentAccessor();
書き込み
final user = User()
      ..name = 'hoge';

await documentAccessor.save(user);
Userの id を指定しなかった場合は自動で生成されます。例では'EYkOA3gBsWGbuWxOmbf0'が生成。
Firestoreへ次のように保存されます。

また、特定のフィールドKeyに対して保存することもできます。
await documentAccessor.saveRaw(
  <String, dynamic>{ UserKey.name.value: 'hogehoge' },
  user.reference,
);
読み込み
最新の状態を取得します。
final user = await documentAccessor.load<User>(User(id: 'userId'));
キャッシュから取得します。
final user = await documentAccessor.loadCache<User>(User(id: 'userId'));
fromCacheを利用すれば、最新の状態を取得する前にキャッシュから取得したデータを反映することができます。
String name = 'Anonymous';

final user = await documentAccessor.load<User>(
  User(id: 'userId'),
  fromCache: (cache) {
    setState(() {
      // 1. update state from cache
      if (cache != null) {
        name = cache.name;
      }
    });
  },
);
setState(() {
  // 2. update state from serverAndCache
  if (user != null) {
    name = user.name;
  }
});
更新
final user = User(id: 'EYkOA3gBsWGbuWxOmbf0')
      ..name = 'fuga';
await documentAccessor.update(user);
削除
await documentAccessor.delete(User(id: 'EYkOA3gBsWGbuWxOmbf0'));
Batchを使って一括操作
Batchを使えば複数のドキュメント操作を一括でできます。
final userA = User(id: '0')
      ..name = 'hoge';
final userB = User(id: '1')
      ..name = 'fuga';
final userC = User(id: '2');

final batch = Batch()
  ..save(userA)
  ..update(userB)
  ..delete(userC);
await batch.commit();
Get Collection Documents
CollectionPaging
CollectionPagingを使えばドキュメントのページング取得ができます。
final collectionPaging = CollectionPaging<User>(
  query: User().collectionRef.orderBy('createdAt', descending: true),
  limit: 20,
  decode: (snap) => User(snapshot: snap),
);

// Load
List<User> items = await collectionPaging.load();

// LoadMore
final _items = await collectionPaging.loadMore();
items.addAll(_items);
fromCacheを利用すれば、最新の状態を取得する前にキャッシュから取得したデータを反映することができます。
List<User> items = [];

final _items = await collectionPaging.load(
  fromCache: (caches) {
    setState(() {
      // 1. update state from cache
      items = caches;
    });
  },
);

// 2. update state from serverAndCache
setState(() {
  items = _items;
});
CollectionGroupを使う場合は次のようにQueryを設定します。
final collectionPaging = CollectionPaging<User>(
  query: firestoreInstance
    .collectionGroup('user')
    .orderBy('createdAt', descending: true),
  limit: 20,
  decode: (snap) => User(snapshot: snap),
);
CollectionPagingとSmartRefresherを使ったサンプルコードです。
上部のスクロールで最新の20件を取得し、下部のスクロールでページング取得をしてリスト表示します。
CollectionPagingListener
CollectionPagingListenerを使うことで、ドキュメントのリアルタイム操作(作成、更新、削除)による取得とページングによる取得ができます。
final collectionPagingListener = CollectionPagingListener<User>(
  query: User().collectionRef.orderBy('updatedAt', descending: true),
  initialLimit: 20,
  pagingLimit: 20,
  decode: (snap) => User(snapshot: snap),
);

// Fetch to set listener.
collectionPagingListener.fetch();

final items = <User>[];

// Get documents via listener. data is ValueStream.
collectionPagingListener.data.listen((event) {
    setState(() {
      items = event;
    });
  });

// Get document changes status and cache status.
collectionPagingListener.docChanges.listen((event) {
    for (var item in event) {
      final change = item.docChange;
      print('id: ${item.doc.id}, changeType: ${change.type}, oldIndex: ${change.oldIndex}, newIndex: ${change.newIndex} cache: ${change.doc.metadata.isFromCache}');
    }
  });

// LoadMore. To load next page data.
collectionPagingListener.loadMore();


// Dispose.
await collectionPagingListener.dispose();
firestoreInstance
Collection内のドキュメントを取得します。
Collectionから取得した DocumentSnapshot をモデルクラスのパラメータに渡すことでマッピングされます。また、Algoliaなどの外部サービスを使うことを考慮してMap型のvaluesもマッピングできるようにしています。
final path = Document.path<User>();
final snapshot = await firestoreInstance.collection(path).get();

// from snapshot
final listA = snapshot.docs.map((item) => User(snapshot: item)).toList()
  ..forEach((user) {
    print(user.id); // user model.
  });

// from values.
final listB = snapshot.docs.map((item) => User(id: item.documentID, values: item.data)).toList()
  ..forEach((user) {
    print(user.id); // user model.
  });
Snapshot Listener
モデルクラスの reference を用いることでドキュメントの作成、更新、削除のイベントを監視できます。
// Listen
final user = User(id: '0')
  ..name = 'hoge';

final disposer = user.reference.snapshots().listen((snap) {
  final user = User(snapshot: snap);
  print('${user.id}, ${user.name}');
});

// Save, update, delete
final documentAccessor = DocumentAccessor();
await documentAccessor.save(user);

user.name = 'fuga';
await documentAccessor.update(user);

await documentAccessor.delete(user);

await disposer.cancel();
コレクションのスナップショットも監視することができます。CollectionPagingListenerでもスナップショットを監視することができます。
// Listen
final path = Document.path<User>();
final query = firestoreInstance.collection(path).limit(20);
final dispose = query.snapshots().listen((querySnapshot) {
  for (var change in querySnapshot.documentChanges) {
    if (change.type == DocumentChangeType.added ) {
      print('added ${change.document.documentID}');
    }
    if (change.type == DocumentChangeType.modified) {
      print('modified ${change.document.documentID}');
    }
    if (change.type == DocumentChangeType.removed) {
      print('removed ${change.document.documentID}');
    }
  }
  final _ = querySnapshot.docs.map((item) => User(snapshot: item)).toList()
    ..forEach((item) => print('${item.id}, ${item.name}'));
});

// Save, update, delete
final user = User(id: '0')
  ..name = 'hoge';

DocumentAccessor documentAccessor = DocumentAccessor();
await documentAccessor.save(user);

user.name = 'fuga';
await documentAccessor.update(user);

await documentAccessor.delete(user);

await dispose.cancel();
Mapのモデル
Mapオブジェクトのモデルクラスを作成できます。
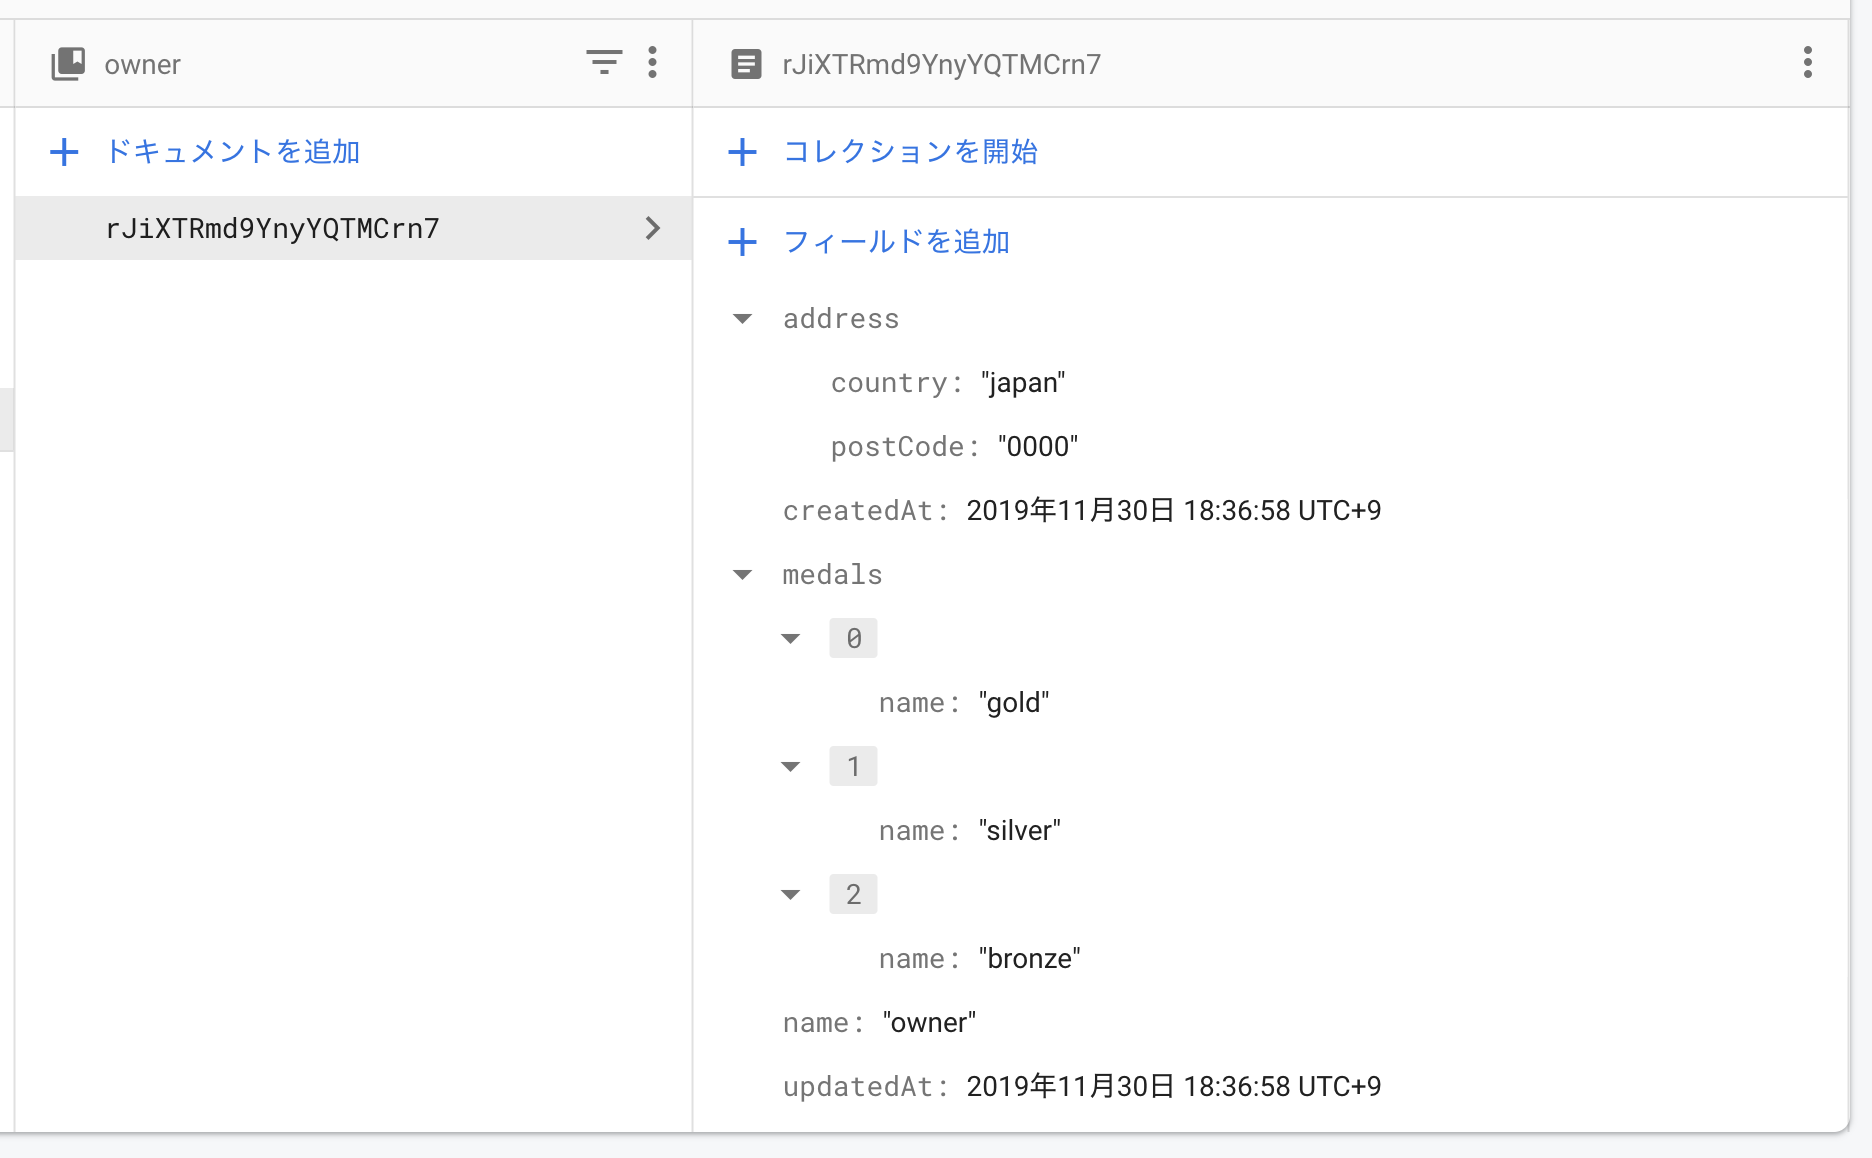
例として Owner のドキュメントが次のデータ構造の場合を考えてみます。
{
  "name": "owner",
  "address": {
    "postCode": "0000",
    "country": "japan"
  },
  "medals": [
    {"name": "gold"},
    {"name": "silver"},
    {"name": "bronze"}
  ]
}
実装例は次の通りです。
import 'package:flamingo/flamingo.dart';
import 'package:flamingo_annotation/flamingo_annotation.dart';

import 'address.dart';
import 'medal.dart';

part 'owner.flamingo.dart';

class Owner extends Document<Owner> {
  Owner({
    String? id,
    DocumentSnapshot<Map<String, dynamic>>? snapshot,
    Map<String, dynamic>? values,
  }) : super(id: id, snapshot: snapshot, values: values);

  @Field()
  String? name;

  @ModelField()
  Address? address;

  @ModelField()
  List<Medal>? medals;

  @override
  Map<String, dynamic> toData() => _$toData(this);

  @override
  void fromData(Map<String, dynamic> data) => _$fromData(this, data);
}
Mapオブジェクトを管理するモデルクラスを作成します。
import 'package:flamingo/flamingo.dart';
import 'package:flamingo_annotation/flamingo_annotation.dart';

part 'address.flamingo.dart';

class Address extends Model {
  Address({
    this.postCode,
    this.country,
    Map<String, dynamic>? values,
  }) : super(values: values);

  @Field()
  String? postCode;

  @Field()
  String? country;

  @override
  Map<String, dynamic> toData() => _$toData(this);

  @override
  void fromData(Map<String, dynamic> data) => _$fromData(this, data);
}
import 'package:flamingo/flamingo.dart';
import 'package:flamingo_annotation/flamingo_annotation.dart';

part 'medal.flamingo.dart';

class Medal extends Model {
  Medal({
    this.name,
    Map<String, dynamic>? values,
  }) : super(values: values);

  @Field()
  String? name;

  @override
  Map<String, dynamic> toData() => _$toData(this);

  @override
  void fromData(Map<String, dynamic> data) => _$fromData(this, data);
}
documentAccessor を使って保存取得する例です。
// save
final owner = Owner()
  ..name = 'owner'
  ..address = Address(
    postCode: '0000',
    country: 'japan',
  )
  ..medals = [
    Medal(name: 'gold',),
    Medal(name: 'silver',),
    Medal(name: 'bronze',),
  ];

await documentAccessor.save(owner);

// load
final _owner = await documentAccessor.load<Owner>(Owner(id: owner.id));
print('id: ${_owner.id}, name: ${_owner.name}');
print('address: ${_owner.id} ${_owner.address.postCode} ${_owner.address.country}');
print('medals: ${_owner.medals.map((d) => d.name)}');
Sub Collection
モデルクラスにCollectionを持たせることもできます。
例として、Rankingモデル が Countモデル のCollectionを持った構造を考えてみます。
モデルクラスを作成
Sub Collectionにしたいフィールドを Collection の型で指定します(※1)。
また、Sub Collectionに親のリファレンスとコレクション名を指定する必要があるため、Rankingのコンストラクタ内でCollectionの初期化をします(※2)。
import 'package:flamingo/flamingo.dart';
import 'package:flamingo_annotation/flamingo_annotation.dart';

import 'count.dart';

part 'ranking.flamingo.dart';

class Ranking extends Document<Ranking> {
  Ranking(
      {String? id,
      DocumentSnapshot<Map<String, dynamic>>? snapshot,
      Map<String, dynamic>? values,
      CollectionReference<Map<String, dynamic>>? collectionRef})
      : super(
            id: id,
            snapshot: snapshot,
            values: values,
            collectionRef: collectionRef) {
    count = Collection(this, RankingKey.count.value);
  }

  @Field()
  String? title;

  @SubCollection()
  late Collection<Count> count;

  @override
  Map<String, dynamic> toData() => _$toData(this);

  @override
  void fromData(Map<String, dynamic> data) => _$fromData(this, data);
}
Countのモデルクラスは次の通りです。
Sub Collectionされる場合はコンストラクタにCollectionReferenceのパラメータを設定できるようにします(※1)。
import 'package:flamingo/flamingo.dart';
import 'package:flamingo_annotation/flamingo_annotation.dart';

part 'count.flamingo.dart';

class Count extends Document<Count> {
  Count({
    String? id,
    DocumentSnapshot<Map<String, dynamic>>? snapshot,
    Map<String, dynamic>? values,
    CollectionReference<Map<String, dynamic>>? collectionRef,
  }) : super(
            id: id,
            snapshot: snapshot,
            values: values,
            collectionRef: collectionRef);

  @Field()
  String? userId;

  @Field()
  int count = 0;

  @override
  Map<String, dynamic> toData() => _$toData(this);

  @override
  void fromData(Map<String, dynamic> data) => _$fromData(this, data);
}
Sub Collectionの保存と取得
Sub Collectionとして保存したい場合は collectionRef のパラメータに親が保持するSub Collectionのリファレンスを指定します。例では、Rankingモデルが持つ ranking.count.ref をCountモデルへ指定しています(※1)。
Sub Collectionの取得する際のパスは ranking.count.ref.path を使います(※2)。
final ranking = Ranking(id: '20201007')
  ..title = 'userRanking';

// Save sub collection of ranking document
final countA = Count(collectionRef: ranking.count.ref) // ※1
  ..userId = '0'
  ..count = 10;
final countB = Count(collectionRef: ranking.count.ref) // ※1
  ..userId = '1'
  ..count = 100;
final batch = Batch()
  ..save(ranking)
  ..save(countA)
  ..save(countB);
await batch.commit();

// Get sub collection
final path = ranking.count.ref.path; // ※2
final snapshot = await firestoreInstance.collection(path).get();
final list = snapshot.docs.map((item) => Count(snapshot: item)).toList()
  ..forEach((count) {
    print('${count.userId}, ${count.count}');
  });
Cloud Storageへの保存
Flamingoを使えばCloud Storageへの保存と、保存されたURLなどの情報をFirestoreへ簡単に保存することができます。
対象となるフィールドを StorageFile 型で定義します。
import 'package:flamingo/flamingo.dart';
import 'package:flamingo_annotation/flamingo_annotation.dart';

part 'post.flamingo.dart';

class Post extends Document<Post> {
  Post({String? id}) : super(id: id);

  @StorageField()
  StorageFile? file;

  @StorageField()
  List<StorageFile>? files;

  @override
  Map<String, dynamic> toData() => _$toData(this);

  @override
  void fromData(Map<String, dynamic> data) => _$fromData(this, data);
}
Cloud Storageへの操作はFlamingoが提供する Storage を利用します。
final post = Post();
final storage = Storage();
final file = ... // load image.

// Fetch uploader stream
storage.fetch();

// Checking status
storage.uploader.listen((data){
  print('total: ${data.totalBytes} transferred: ${data.bytesTransferred}');
});

// Upload file into firebase storage and save file metadata into firestore
final path = '${post.documentPath}/${PostKey.file.value}';
post.file = await storage.save(path, file, mimeType: mimeTypePng, metadata: {'newPost': 'true'}); // 'mimeType' is defined in master/master.dart
await documentAccessor.save(post);

// Dispose uploader stream
storage.dispose();
削除は次の通りです。保存されたCloud Storage内のファイルとFirestoreへ保存されているStorageFileのフィールドを削除します。
// delete file in firebase storage and delete file metadata in firestore
await storage.delete(post.file);
await documentAccessor.update(post);
また、FlamingoではCloud StorageとFirestoreへまとめて操作できるインターフェースを提供しています。
// Save storage and document of storage data.
final storageFile = await storage.saveWithDoc(
    post.reference,
    PostKey.file.value,
    file,
    mimeType: mimeTypePng,
    metadata: {
      'newPost': 'true'
    },
    additionalData: <String, dynamic>{
      'key0': 'key',
      'key1': 10,
      'key2': 0.123,
      'key3': true,
    },
);

// Delete storage and document of storage data.
await storage.deleteWithDoc(post.reference, PostKey.file.value, post.file, isNotNull: true);
Increment
FieldValue.increment を使用する場合は、Flamingoが提供する Increment を使用します。
例として、CreditCardのドキュメントが point と score のIncrementを持ったモデルを考えます。
import 'package:flamingo/flamingo.dart';
import 'package:flamingo_annotation/flamingo_annotation.dart';

part 'credit_card.flamingo.dart';

class CreditCard extends Document<CreditCard> {
  CreditCard({
    String? id,
    DocumentSnapshot<Map<String, dynamic>>? snapshot,
    Map<String, dynamic>? values,
  }) : super(id: id, snapshot: snapshot, values: values);

  @Field()
  Increment<int> point = Increment<int>();

  @Field()
  Increment<double> score = Increment<double>();

  @override
  Map<String, dynamic> toData() => _$toData(this);

  @override
  void fromData(Map<String, dynamic> data) => _$fromData(this, data);

  /// Call after create, update, delete.
  @override
  void onCompleted(ExecuteType executeType) {
    point = point.onRefresh();
    score = score.onRefresh();
  }
}
point と score のインクリメント、デクリメント、クリアする実装は次の通りです。
// Increment
final card = CreditCard()
  ..point.incrementValue = 1
  ..score.incrementValue = 1.25;
await documentAccessor.save(card);
print('point ${card.point.value}, score: ${card.score.value}'); // point 1, score 1.25

final _card = await documentAccessor.load<CreditCard>(card);
print('point ${_card.point.value}, score: ${_card.score.value}'); // point 1, score 1.25


// Decrement
card
  ..point.incrementValue = -1
  ..score.incrementValue = -1.00;
await documentAccessor.update(card);
print('point ${card.point.value}, score: ${card.score.value}'); // point 0, score 0.25

final _card = await documentAccessor.load<CreditCard>(card);
print('point ${_card.point.value}, score: ${_card.score.value}'); // point 0, score 0.25


// Clear
card
  ..point.isClearValue = true
  ..score.isClearValue = true;
await documentAccessor.update(card);
print('point ${card.point.value}, score: ${card.score.value}'); // point 0, score 0.0

final _card = await documentAccessor.load<CreditCard>(card);
print('point ${_card.point.value}, score: ${_card.score.value}'); // point 0, score 0.0
また、DocumentAccessor のincrement関数を使えば、incrementデータのみの操作ができます。
final card = CreditCard();
final batch = Batch()
  ..save(card);
await batch.commit();

// Increment
card
  ..point = await documentAccessor.increment<int>(card.point, card.reference, fieldName: CreditCardKey.point.value, value: 10)
  ..score = await documentAccessor.increment<double>(card.score, card.reference, fieldName: CreditCardKey.score.value, value: 3.5);

// Decrement
card
  ..point = await documentAccessor.increment<int>(card.point, card.reference, fieldName: CreditCardKey.point.value, value: -5)
  ..score = await documentAccessor.increment<double>(card.score, card.reference, fieldName: CreditCardKey.score.value, value: -2.5);

// Clear
card
  ..point = await documentAccessor.increment<int>(card.point, card.reference, fieldName: CreditCardKey.point.value, isClear: true)
  ..score = await documentAccessor.increment<double>(card.score, card.reference, fieldName: CreditCardKey.score.value, isClear: true);
なお、Clear処理はドキュメントに0をセットして更新しているだけです。
トランザクション処理はしていないので、初めてそのドキュメントが作成される初期化処理以外での使用はしないでください。
分散カウンタ
Flamingoが提供する DistributedCounter を使えば簡単に分散カウンタを作れます。
対象となるフィールドを Counter 型で定義します。
import 'package:flamingo/flamingo.dart';
import 'package:flamingo_annotation/flamingo_annotation.dart';

part 'score.flamingo.dart';

class Score extends Document<Score> {
  Score({
    String? id,
  }) : super(id: id) {
    counter = Counter(this, ScoreKey.counter.value, numShards);
  }

  @Field()
  String? userId;

  /// DistributedCounter
  @SubCollection()
  late Counter counter;

  int numShards = 10;

  @override
  Map<String, dynamic> toData() => _$toData(this);

  @override
  void fromData(Map<String, dynamic> data) => _$fromData(this, data);
}
DistributedCounter を使った実装は次の通りです。
例では 10カウントアップさせています。
/// Create
final score = Score()
  ..userId = '0001';
await documentAccessor.save(score);

final distributedCounter = DistributedCounter();
await distributedCounter.create(score.counter);

/// Increment
for (var i = 0; i < 10; i++) {
  await distributedCounter.increment(score.counter, count: 1);
}

/// Load
final count = await distributedCounter.load(score.counter);
print('count $count ${score.counter.count}');
トランザクション
Flamingoではトランザクション処理の軽量なラップ関数を提供しています。
RunTransaction.scope((transaction) async {
  final hoge = User()
    ..name = 'hoge';

  // save
  await transaction.set(hoge.reference, hoge.toData());

  // update
  final fuge = User(id: '0')
    ..name = 'fuge';
  await transaction.update(fuge.reference, fuge.toData());

  // delete
  await transaction.delete(User(id: '1').reference);
});
様々なデータ型に対する実装
Map
import 'package:flamingo/flamingo.dart';
import 'package:flamingo_annotation/flamingo_annotation.dart';

part 'map_sample.flamingo.dart';

class MapSample extends Document<MapSample> {
  MapSample({
    String? id,
    DocumentSnapshot<Map<String, dynamic>>? snapshot,
    Map<String, dynamic>? values,
  }) : super(id: id, snapshot: snapshot, values: values);

  @Field()
  Map<String, String>? strMap;

  @Field()
  Map<String, int>? intMap;

  @Field()
  Map<String, double>? doubleMap;

  @Field()
  Map<String, bool>? boolMap;

  @Field()
  List<Map<String, String>>? listStrMap;

  @override
  Map<String, dynamic> toData() => _$toData(this);

  @override
  void fromData(Map<String, dynamic> data) => _$fromData(this, data);
}
final sample1 = MapSample()
  ..strMap = {'userId1': 'tanaka', 'userId2': 'hanako', 'userId3': 'shohei',}
  ..intMap = {'userId1': 0, 'userId2': 1, 'userId3': 2,}
  ..doubleMap = {'userId1': 1.02, 'userId2': 0.14, 'userId3': 0.89,}
  ..boolMap = {'userId1': true, 'userId2': true, 'userId3': true,}
  ..listStrMap = [
    {'userId1': 'tanaka', 'userId2': 'hanako',},
    {'adminId1': 'shohei', 'adminId2': 'tanigawa',},
    {'managerId1': 'ueno', 'managerId2': 'yoshikawa',},
  ];
await documentAccessor.save(sample1);

final _sample1 = await documentAccessor.load<MapSample>(MapSample(id: sample1.id));
List
import 'package:flamingo/flamingo.dart';
import 'package:flamingo_annotation/flamingo_annotation.dart';

part 'list_sample.flamingo.dart';

class ListSample extends Document<ListSample> {
  ListSample({
    String? id,
    DocumentSnapshot<Map<String, dynamic>>? snapshot,
    Map<String, dynamic>? values,
  }) : super(id: id, snapshot: snapshot, values: values);

  @Field()
  List<String>? strList;

  @Field()
  List<int>? intList;

  @Field()
  List<double>? doubleList;

  @Field()
  List<bool>? boolList;

  @StorageField(isWriteNotNull: false)
  List<StorageFile>? filesA;

  @StorageField()
  List<StorageFile>? filesB;

  @override
  Map<String, dynamic> toData() => _$toData(this);

  @override
  void fromData(Map<String, dynamic> data) => _$fromData(this, data);
}
保存と取得。
/// Save
final sample1 = ListSample()
  ..strList = ['userId1', 'userId2', 'userId3',]
  ..intList = [0, 1, 2,]
  ..doubleList = [0.0, 0.1, 0.2,]
  ..boolList = [true, false, true,]
  ..filesA = [
    StorageFile(
        name: 'name1', url: 'https://sample1.jpg', mimeType: mimeTypePng),
    StorageFile(
        name: 'name2', url: 'https://sample2.jpg', mimeType: mimeTypePng),
    StorageFile(
        name: 'name3', url: 'https://sample3.jpg', mimeType: mimeTypePng),
  ]
  ..filesB = [
    StorageFile(
        name: 'name1', url: 'https://sample1.jpg', mimeType: mimeTypePng),
    StorageFile(
        name: 'name2', url: 'https://sample2.jpg', mimeType: mimeTypePng),
    StorageFile(
        name: 'name3', url: 'https://sample3.jpg', mimeType: mimeTypePng),
  ];
await documentAccessor.save(sample1);

/// Load
final _sample1 = await documentAccessor.load<ListSample>(ListSample(id: sample1.id));
[WIP] ユニットテスト
※最新のバージョンでは動作しません。対応完了次第更新します。
次のプラグインをインストールします。
dev_dependencies:
  ...

  test: ^1.14.4
  cloud_firestore_mocks:
  firebase_storage_mocks:
FirestoreとCloud StorageのMockインスタンスを設定します。
import 'package:cloud_firestore_mocks/cloud_firestore_mocks.dart';
import 'package:firebase_storage_mocks/firebase_storage_mocks.dart';
import 'package:flamingo/flamingo.dart';
import 'package:test/test.dart';

void main() async {
  final firestore = MockFirestoreInstance();
  final storage = MockFirebaseStorage();
  await Flamingo.initializeApp(
      firestore: firestore,
      storage: storage,
      root: firestore.document('test/v1'));
  ...
}
Mockの設定が終わると後はテストコードを書くだけです。
サンプルコードはこちらです。