はじめに
副業でseleniumを使った実装をすることになったので、seleniumを動かすまでの手順について書いていきます。
手順
大まかな手順は以下の流れになります。
1.seleniumをインストール
2.Google Chromeのdriverをダウンロード
3.実装
各手順について説明してきます。
1.seleniumをインストール
以下のコマンドで、seleniumをインストールします。(今回のバージョンは3.141.0を使用)
pip install selenium==3.141.0
2.Google Chromeのdriverをダウンロード
seleniumを使用するには、ドライバーをダウンロードする必要があります。
また、使用しているブラウザと、ダウンロードするドライバーのバージョンを合わせる必要があります。
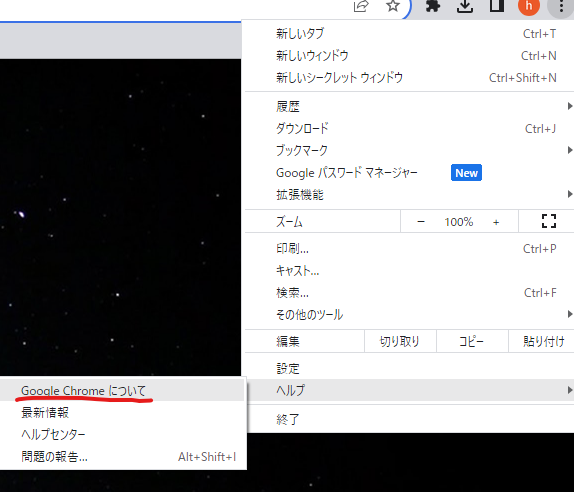
1.Chromeのバージョンを確認する。
Chromeの右上から、以下の「Google Chromeについて」を選択します。

3.以下のURLにアクセス。
https://github.com/GoogleChromeLabs/chrome-for-testing#check-a-specific-chrome-version-for-cft-binary-availability
4.以下の画像の赤枠の箇所を、確認したChormeのバージョンに合わせて、URLバーに貼り付ける

↓自分のChromeのバージョン番号を埋め込む。
3. 実装
以下が、サンプルのコードです。
Googleのトップページを開き、検索フォームに「Python」と自動で入力して、検索結果を表示させるコードになります。
from selenium import webdriver

# ドライバーの場所を指定
driver = webdriver.Chrome(R'(ドライバーがあるディレクトリを記載)'

# 起動したいサイトのURLを入力
driver.get('https://www.google.co.jp')

# 開いたページの要素を取得
search_bar = driver.find_element_by_name("q")
search_bar.send_keys("python")

# 検索ボタンを実行
search_bar.submit()
最後に
他にも色々な記事を書いているので、よければ読んでいってください、、、


