viewに値を渡すまで(〜#14)
http://dotinstall.com/lessons/basic_laravel/36114
http://bit.ly/29EvNEA
$ php artisan --version
Laravel Framework version 5.2.39
概要
1.データベースの設定
2.tableを作る
php artisan make:migration create_posts_table --create=posts

php artisan migrate
3.モデルを作る
php artisan make:model post
4.データ挿入
5.コントローラーを作る
php artisan make:Controller PostsController
6.ルーツを作る
7.ビューを作る

1.データベースの設定
.env
DB_CONNECTION=mysql
DB_HOST=localhost
DB_PORT=3306
DB_DATABASE=******
DB_USERNAME=dbuser
DB_PASSWORD=******
2.テーブルを作る(migrationファイルの作成)
php artisan make:migration create_posts_table --create=posts
追記する
<?php

use Illuminate\Database\Schema\Blueprint;
use Illuminate\Database\Migrations\Migration;

class CreatePostsTable extends Migration
{
    /**
     * Run the migrations.
     *
     * @return void
     */
    public function up()
    {
        Schema::create('posts', function (Blueprint $table) {
            $table->increments('id');
            $table->string('title');
            $table->text('body');
            $table->timestamps();
        });
    }

    /**
     * Reverse the migrations.
     *
     * @return void
     */
    public function down()
    {
        Schema::drop('posts');
    }
}
migrationファイルを実行する
php artisan migrate
mysql -u root -p
パスワード入力 ************
mysql> use test;
mysql> show columns from posts;

同じpostテーブルに新しいmigrationファイルを作る場合
php artisan make:migration add_summary_to_posts_table --table=posts
※既存のテーブルに変更を加える場合には--createオプションではなく、--tableオプションを使う
どのmigrationが実行されたのか調べる
php artisan migrate:status

前回の変更に戻る
php artisan migrate:rollback
3.モデルを作る
php artisan make:model Post
<?php

namespace App;

use Illuminate\Database\Eloquent\Model;

class Post extends Model
{
}
- app直下にPostモデルが作られる

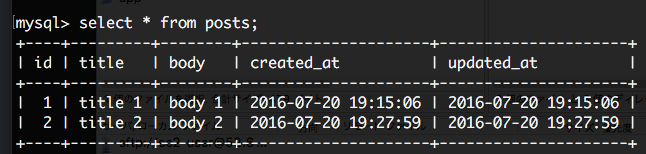
4.データ挿入
tinkerコマンドを使う
php artisan tinker
>>> $post = new App\Post();
=> App\Post {#624}
>>> $post->title = 'title 1';
=> "title 1"
>>>$post->body = 'body 1';
=> "body 1"
>>> $post->save();
=> true
createメドッドでデータを入れる
App\Post::create(['title'=>'title 2', 'body'=>'body 2']);
エラー表示(Mass Assignment)
Illuminate\Database\Eloquent\MassAssignmentException with message 'title'
Mass Assignmentの解除方法
Post.php
<?php

namespace App;

use Illuminate\Database\Eloquent\Model;

class Post extends Model
{
    protected $fillable = ['title', 'body'];
}
※データを挿入してもいいカラムを指定する
再びtinkerでcreateメソッドで挿入
>>> App\Post::create(['title'=>'title 2', 'body'=>'body 2']);

=> App\Post {#630
     title: "title 2",
     body: "body 2",
     updated_at: "2016-07-20 19:27:59",
     created_at: "2016-07-20 19:27:59",
     id: 2,
   }
5.Controllerを作る
php artisan make:controller PostsController
/myblog/app/Http/Controllers/PostsController.php
<?php

namespace App\Http\Controllers;

use Illuminate\Http\Request;

use App\Http\Requests;
use App\Http\Controllers\Controller;

//追加 useを使ってインポート
use App\Post;

class PostsController extends Controller
{
    //

    public function index() {
      // $posts = \App\Post::all();
      // $posts = Post::all();
      // $posts = Post::orderBy('created_at', 'desc')->get();
      $posts = Post::latest('created_at')->get();
      // $posts = [];
      // return view('posts.index', ['posts' => $posts]);
      return view('posts.index')->with('posts', $posts);
    }
}
6.ルーツの設定
/app/Http/routes.php
<?php

Route::get('/', function () {
    return view('welcome');
});


Route::get('/', function() {
return 'hello!';
});

// パラメータを受け取るパターン
//Route::get('/{name}', function($name) {
//return 'hello! ' . $name;
// });

//index.blade.phpを呼び出す
//Route::get('/', function() {
//  return view('posts.index');
//});

Route::get('/', 'PostsController@index');

});
7.viewを作る
/myblog/resources/views/posts/index.blade.php
@extends('layouts.default')

@section('title', 'Blog Posts')

@section('content')
<h1>Posts</h1>

<ul>
  @forelse ($posts as $post)
  <li><a href="">{{ $post->title }}</a></li>
  @empty
  <li>No posts yet</li>
  @endforelse
</ul>

@endsection
/myblog/resources/views/layouts/default.blade.php
<!DOCTYPE html>
<html lang="ja">
<head>
  <meta charset="utf-8">
  <title>@yield('title')</title>
  <link rel="stylesheet" href="css/styles.css">
</head>
<body>
  <div class="container">
    @yield('content')
  </div>
</body>
</html>
表示
