新人教育の開発環境として
CentOS6 + Cloud9 + Ruby + sinatra
を選定したので、開発環境の構築手順を以下にメモしておきます。
※ 便利なクラウドサービスであるCloud9ですが、やっぱりローカルで使いたいですよね。
Cloud9のgithubはここ
https://github.com/c9/core
いずれまるまるdockerのイメージにしたい。
CentOS6のインストール
VirtualBoxのインストール
https://www.virtualbox.org/
ここからDL
仮想マシンの作成
VirtualBox上で実行
- メモリ 2048MB
- ストレージ
- VDI
- サイズ:10GB程度
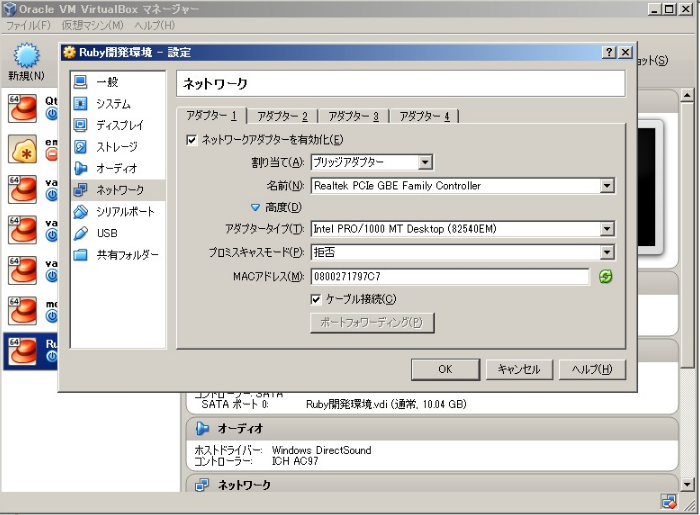
仮想マシンの設定変更
ネットワークのアダプター1をブリッジアダプターにしておきましょう。
CentOS6のインストール
CentOS-6.7-x86_64-minimal.iso
作成した仮想マシンにCentOS6.7をインストールしてください
VirtualBoxを使用してインストールしてください。
http://www.kakiro-web.com/memo/centos6-install.html
teratermからアクセス
CentOSにログインできたら、Terminal(端末)からifconfigを実行してIPアドレスを確認。
Window端末から、Teratermを用いて対象端末にSSH接続を行ってください。
service iptables stop
setenforce 0
vi /etc/ssh/sshd_config
# 以下のコメントアウトを外します。
Port 22
PermitRootLogin yes
service sshd restart
ネットワーク設定
vi /etc/sysconfig/network-scripts/ifcfg-eth0
DEVICE=eth0
ONBOOT=yes
BOOTPROTO=static
IPADDR=192.168.100.100
NETMASK=255.255.255.0
GATEWAY=192.168.100.1
DNS1=8.8.8.8
DNS2=8.8.4.4
[root@dlp ~]# /etc/rc.d/init.d/network restart
サーバ上に開発環境のインストール
いろいろインストール
yum install -y git gcc gcc-c++ openssl-devel readline-devel glibc-static
rbenv、という、Rubyのバージョンを自由自在に変更するソフトを入れましょう。
# rbenvの取得
git clone git://github.com/sstephenson/rbenv.git ~/.rbenv
# rbenvコマンドを実行可能に。
echo 'export PATH="$HOME/.rbenv/bin:$PATH"' >> ~/.bash_profile
echo 'eval "$(rbenv init -)"' >> ~/.bash_profile
exec $SHELL -l
rbenv -v
git clone https://github.com/sstephenson/ruby-build.git ~/.rbenv/plugins/ruby-build

# インストールできるRubyのリストを確認
rbenv install --list

# バージョンを指定してインストール(今回は2.3.0)
# 結構長いです(30分程度)。本でも読みましょう。
rbenv install 2.3.0

# 使用するRubyバージョンを指定
rbenv global 2.3.0
※先にRubyをインストールしてしまっている場合は、yum remove rubyしておきましょう。
cloud9のインストール
無敵のブラウザエディターです。
Python2.7インストール
どうやら必要らしいのでいれましょう
以下を参考にさせていただきました。
http://qiita.com/informationsea/items/2a91ca07157a94b8594b
python -V
sudo yum install centos-release-scl-rh -y
sudo yum install python27 -y
echo 'scl enable python27 bash' >> ~/.bash_profile
exec $SHELL -l
# Pythonのバージョンがあがっているはず
python -V
cloud9インストール
git clone git://github.com/c9/core.git c9sdk
cd c9sdk
# インストール開始
# 地獄みたいにながいので、20分位。本でも読むか、コーヒーでものんで待ちましょう。
scripts/install-sdk.sh
nodejs インストール
yum install epel-release
yum install nodejs npm --enablerepo=epel
作業スペースを作成
mkdir /opt/workspace
chmod 777 /opt/workspace
chmod 777 /root/.c9
cloud9 起動
前準備としてcd c9sdk でc9sdkディレクトリに移動
このコマンドでファイアーウォールを止める
node ./server.js -p 8081 -l 0.0.0.0 -a test:test -w /opt/workspace/
以下のURLにブラウザからアクセス
http://[IPアドレス]:8081
ユーザID: test
パスワード: test
sinatraのインストール
gem update --system
gem install rdoc
gem install sinatra
gem install sinatra-contrib
gem install sinatra-reloader
以上で完了です。
