はじめに
CP/M 8266 という、ESP8266 コアの ESP モジュールで動作する Z80 CP/M 2.2 エミュレータ があり、それを WSL でビルドしてみようという趣旨の記事です。
インストール、コンパイルそして実行
基本的には CP/M 8266 の README をなぞるだけです。
必要なもの
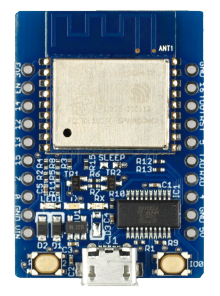
ESP-WROOM-02 (EP8266) モジュールの載ったボードが必要です。
ボードには スイッチサイエンスの ESPr Developer を推奨します。技適の通った ESP-WROOM-02 モジュールが使われており、自動プログラム機能もあるため楽ちんです。
CP/M 8266 を試す上で他に必要な部品はありません。
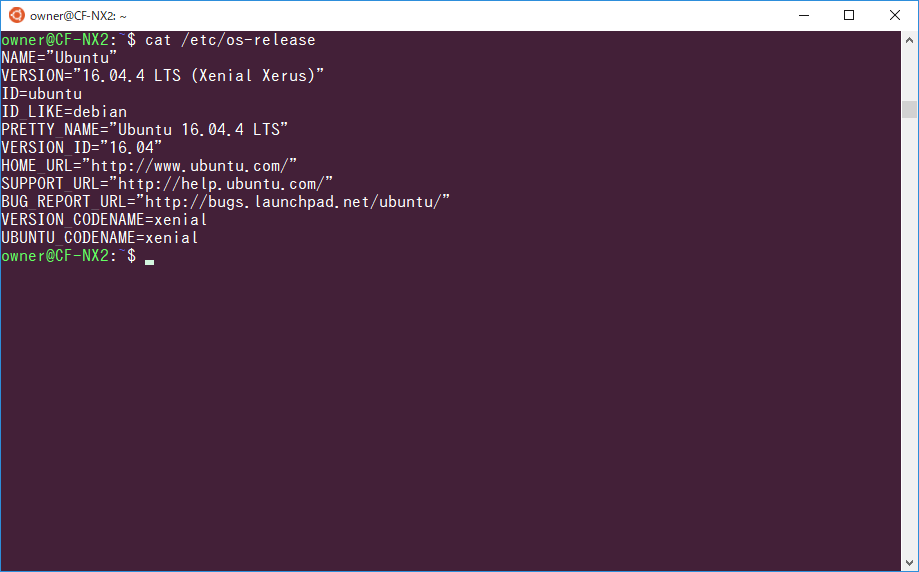
ビルド環境として Window 10 の WSL(Windows Subsystem for Linux) を利用します。Linux は Ubuntu の 16.04 を使います。
See also:
1.git のインストール
すでにインストールしてあればスキップしてください。インストールしていなければ 2. と合わせて一行で実行するといいでしょう。
$ sudo apt-get install git
2.esp-open-sdk と cpm8266 のビルドに必要なものをインストール
Qiita のコード表示の都合上、複数行にしてありますが、一行にまとめて実行しても構いません。
$ sudo apt-get install make unrar-free autoconf automake libtool gcc g++
$ sudo apt-get install gperf flex bison texinfo gawk ncurses-dev
$ sudo apt-get install libexpat-dev python-dev python python-serial
$ sudo apt-get install sed git unzip bash help2man wget bzip2 libtool-bin
$ sudo apt-get install z80asm cpmtools zip vim-common
3.esp-open-sdk のビルド
このビルドには相当時間が掛かります。下手すれば 2 時間以上なので、のんびりやりましょう。
$ git clone --recursive https://github.com/pfalcon/esp-open-sdk.git
$ cd esp-open-sdk
$ make
$ export PATH=~/esp-open-sdk/xtensa-lx106-elf/bin:$PATH
$ cd ..
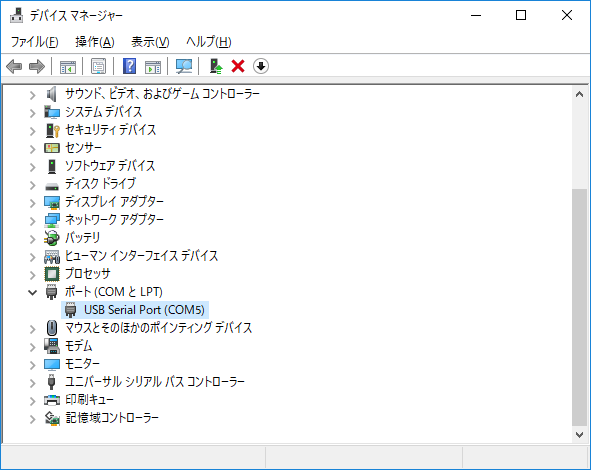
4.COM ポートの確認
ESP-WROOM-2 (ESP8266) ボードを PC に接続し、ポートを調べます。デバイスマネージャからでも Arduino IDE からでも構いません。
4.CP/M 8266 のビルド前設定
CP/M 8266 のクローンを行います。
$ git clone https://github.com/SmallRoomLabs/cpm8266.git
$ cd cpm8266/code
$ export ESP8266SDK=~/esp-open-sdk
$ export ESPTOOL=~/esp-open-sdk/esptool/esptool.py
$ export ESPPORT=/dev/ttySnnn
$ sudo chmod 666 /dev/ttySnnn
PC のシリアルポートは WSL で /dev/ttySnnn として透過的に見えます。例えば COM4 は /dev/ttyS4 のような具合です。なので export ESPPORT の行は適宜読み替えてください。また、そのままでは /dev/ttySnnn をアクセスする権限がないので chmod しておきます。
5.オプションの設定
必要なら Makefile を開いてオプションを設定します。
:
$ nano Makefile
エディタは vi でも emacs でもお好きなものをどうぞ (w
FLASHPARAM      =  --flash_freq 80m --flash_mode dout
FLASHBAUD       =  921600
EMULATIONBAUD   =  115200
PORT            =  23
EMULATIONBAUD を 115200 にするくらいですかね。ESP-WROOM-02 ボードの種類によっては FLASHBAUD を115200 とかに落とす必要があるかもしれません
6.CP/M 8266 のビルド
CP/M 8266 をビルドします (すぐ終わります)。
$ make full
しかしながら...
■ ets_isr_attach でエラーが出る場合
[CC] main.c
In file included from main.c:3:0:
espincludes.h:39:6: error: conflicting types for 'ets_isr_attach'
 void ets_isr_attach(int intr, void *handler, void *arg);
      ^
In file included from /home/xxxxx/esp-open-sdk/xtensa-lx106-elf/xtensa-lx106-elf/sysroot/usr/include/os_type.h:28:0,
                 from main.c:2:
/home/owner/esp-open-sdk/xtensa-lx106-elf/xtensa-lx106-elf/sysroot/usr/include/ets_sys.h:67:6: note: previous declaration of 'ets_isr_attach' was here
 void ets_isr_attach(int i, ets_isr_t func, void *arg);
      ^
Makefile:109: ターゲット 'main.o' のレシピで失敗しました
make: *** [main.o] エラー 1
このようなエラーが出たら以下の手順でソースにパッチを当てる必要があります。
$ wget https://github.com/SmallRoomLabs/cpm8266/files/2088791/cpm8266-master-2-local.diff.gz
$ gzip -d cpm8266-master-2-local.diff.gz
$ patch -p2 < cpm8266-master-2-local.diff
■ esptool.py で print エラーが出る場合
esptool.py で次のようなエラーが出る事があります。
[LINK]
   text    data     bss     dec     hex filename
  12900      10   70416   83326   1457e image.elf
  File "/home/xxxxx/esp-open-sdk/esptool/esptool.py", line 128
    print 'Connecting...'
                        ^
SyntaxError: Missing parentheses in call to 'print'. Did you mean print('Connecting...')?
Makefile:101: recipe for target 'bins' failed
make: *** [bins] Error 1
/home/xxxxx/esp-open-sdk/esptool にある esptool.py をテキストエディタで開き、
#!/usr/bin/env python
# NB: Before sending a PR to change the above line to '#!/usr/bin/env python2', please read https://github.com/themadinventor/esptool/issues/21
先頭行の python を、
#!/usr/bin/env python2
# NB: Before sending a PR to change the above line to '#!/usr/bin/env python2', please read https://github.com/themadinventor/esptool/issues/21
python2 に書き換えてください...2 行目に対処方法が書いてあるんですけどね。
See also:
■termios.error エラーが出る場合
さらに、コンパイルは通っても以下のエラーで書き込めない事があります。
termios.error: (5, 'Input/output error')
Makefile:173: ターゲット 'flash' のレシピで失敗しました
make: *** [flash] エラー 1
これは COM ポートにアクセスできない場合に発生します。COM ポートを別のアプリで開いていないか確認してください。Windows 再起動直後なら間違いなく大丈夫ですので、COM ポートを開いていないつもりなのにこのエラーが出る場合には PC を再起動した後、
$ cd cpm8266/code
$ export PATH=~/esp-open-sdk/xtensa-lx106-elf/bin:$PATH
$ export ESP8266SDK=~/esp-open-sdk
$ export ESPTOOL=~/esp-open-sdk/esptool/esptool.py
$ export ESPPORT=/dev/ttySnnn
$ sudo chmod 666 /dev/ttySnnn
$ make full
上記手順をやり直してください。
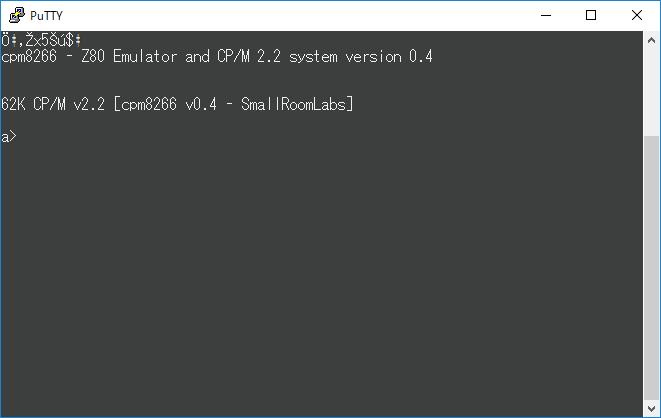
■ 正しくビルドできている場合
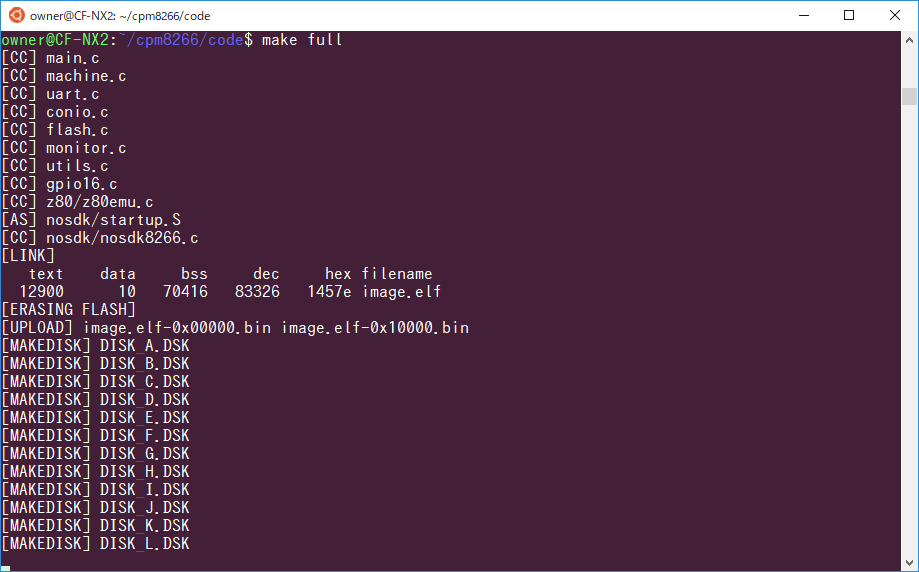
正常ならばこのような感じで進行します。転送が終わったら PuTTY や Tera Term でつないで (デフォルトで 9600 bps) 〔Enter〕キーを叩けば CP/M 8266 が起動します。
ドライブは A: ~ O: まであります。
| ドライブ | 説明 |
|---|---|
| A: | システム、アセンブラ |
| B: | アセンブラ、リンカ、Microsoft Basic |
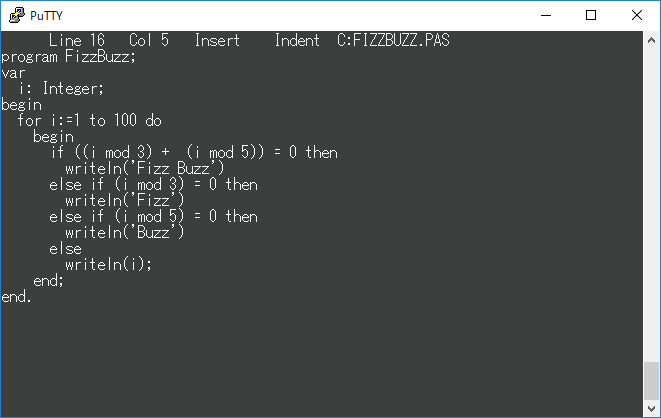
| C: | Turbo Pascal 3.01A |
| D: | Word Star 3.0 |
| E: | Word Star 3.3 |
| F: | (なし) |
| G: | ゲーム |
| H: | BASIC プログラム |
| I: | BASIC プログラム |
| J: | (なし) |
| K: | (なし) |
| L: | (なし) |
| M: | XMODEM |
| N: | Z80 アセンブラサンプル? |
| O: | (なし) |
Turbo Pascal を動かしてみました。
ビルドオプションを変更して ESP-WROOM-02 (EP8266) に対して Wi-Fi 経由で Telnet 接続できるようにする事も可能なのですが、メモリが 36K になってしまい Turbo Pascal 等がマトモに動作しなくなってしまいます。
7.CP/M 8266 イメージの退避
Windows の C ドライブは /mnt/c として透過的に見えるので CP/M 8266 のバイナリを退避させておきましょう。
$ mkdir /mnt/c/cpm8266
$ cp -v *.bin /mnt/c/cpm8266
$ cp -v disks/*.DSK /mnt/c/cpm8266
こうしておけば、
@echo off
SET COM_PORT=COM5
SET UP_SPD=921600
SET ESPTOOL=%LocalAppData%\Arduino15\packages\esp32\tools\esptool\2.3.1

%ESPTOOL%\esptool.exe --chip esp8266 --port %COM_PORT% --baud %UP_SPD% write_flash 0x00000 image.elf-0x00000.bin
%ESPTOOL%\esptool.exe --chip esp8266 --port %COM_PORT% --baud %UP_SPD% write_flash 0x10000 image.elf-0x10000.bin
%ESPTOOL%\esptool.exe --chip esp8266 --port %COM_PORT% --baud %UP_SPD% write_flash 0x3c0000 DISK_A.DSK
%ESPTOOL%\esptool.exe --chip esp8266 --port %COM_PORT% --baud %UP_SPD% write_flash 0x381000 DISK_B.DSK
%ESPTOOL%\esptool.exe --chip esp8266 --port %COM_PORT% --baud %UP_SPD% write_flash 0x342000 DISK_C.DSK
%ESPTOOL%\esptool.exe --chip esp8266 --port %COM_PORT% --baud %UP_SPD% write_flash 0x303000 DISK_D.DSK
%ESPTOOL%\esptool.exe --chip esp8266 --port %COM_PORT% --baud %UP_SPD% write_flash 0x2c4000 DISK_E.DSK
%ESPTOOL%\esptool.exe --chip esp8266 --port %COM_PORT% --baud %UP_SPD% write_flash 0x285000 DISK_F.DSK
%ESPTOOL%\esptool.exe --chip esp8266 --port %COM_PORT% --baud %UP_SPD% write_flash 0x246000 DISK_G.DSK
%ESPTOOL%\esptool.exe --chip esp8266 --port %COM_PORT% --baud %UP_SPD% write_flash 0x207000 DISK_H.DSK
%ESPTOOL%\esptool.exe --chip esp8266 --port %COM_PORT% --baud %UP_SPD% write_flash 0x1c8000 DISK_I.DSK
%ESPTOOL%\esptool.exe --chip esp8266 --port %COM_PORT% --baud %UP_SPD% write_flash 0x189000 DISK_J.DSK
%ESPTOOL%\esptool.exe --chip esp8266 --port %COM_PORT% --baud %UP_SPD% write_flash 0x14a000 DISK_K.DSK
%ESPTOOL%\esptool.exe --chip esp8266 --port %COM_PORT% --baud %UP_SPD% write_flash 0x10b000 DISK_L.DSK
%ESPTOOL%\esptool.exe --chip esp8266 --port %COM_PORT% --baud %UP_SPD% write_flash 0x0cc000 DISK_M.DSK
%ESPTOOL%\esptool.exe --chip esp8266 --port %COM_PORT% --baud %UP_SPD% write_flash 0x08d000 DISK_N.DSK
%ESPTOOL%\esptool.exe --chip esp8266 --port %COM_PORT% --baud %UP_SPD% write_flash 0x04e000 DISK_O.DSK
esptool を使ってアップロードできます。バッチファイルは arduino-esp32 付属の esptool を使う設定になっていますので、適宜読み替えてください。GUI な Flash Download Tools (Espressif) を使ってアップロードする事もできます。
8.CP/M 8266 ディスクイメージの退避 (バックアップ)
ESP-WROOM-02 (EP8266) のフラッシュメモリからディスクイメージを抜き出すには以下のバッチファイルを使います。
@echo off
SET COM_PORT=COM5
SET UP_SPD=921600
SET ESPTOOL=%LocalAppData%\Arduino15\packages\esp32\tools\esptool\2.3.1

%ESPTOOL%\esptool.exe --chip esp8266 --port %COM_PORT% --baud %UP_SPD% read_flash 0x3c0000 0x3E900 DISK_A.DSK.BAK
%ESPTOOL%\esptool.exe --chip esp8266 --port %COM_PORT% --baud %UP_SPD% read_flash 0x381000 0x3E900 DISK_B.DSK.BAK
%ESPTOOL%\esptool.exe --chip esp8266 --port %COM_PORT% --baud %UP_SPD% read_flash 0x342000 0x3E900 DISK_C.DSK.BAK
%ESPTOOL%\esptool.exe --chip esp8266 --port %COM_PORT% --baud %UP_SPD% read_flash 0x303000 0x3E900 DISK_D.DSK.BAK
%ESPTOOL%\esptool.exe --chip esp8266 --port %COM_PORT% --baud %UP_SPD% read_flash 0x2c4000 0x3E900 DISK_E.DSK.BAK
%ESPTOOL%\esptool.exe --chip esp8266 --port %COM_PORT% --baud %UP_SPD% read_flash 0x285000 0x3E900 DISK_F.DSK.BAK
%ESPTOOL%\esptool.exe --chip esp8266 --port %COM_PORT% --baud %UP_SPD% read_flash 0x246000 0x3E900 DISK_G.DSK.BAK
%ESPTOOL%\esptool.exe --chip esp8266 --port %COM_PORT% --baud %UP_SPD% read_flash 0x207000 0x3E900 DISK_H.DSK.BAK
%ESPTOOL%\esptool.exe --chip esp8266 --port %COM_PORT% --baud %UP_SPD% read_flash 0x1c8000 0x3E900 DISK_I.DSK.BAK
%ESPTOOL%\esptool.exe --chip esp8266 --port %COM_PORT% --baud %UP_SPD% read_flash 0x189000 0x3E900 DISK_J.DSK.BAK
%ESPTOOL%\esptool.exe --chip esp8266 --port %COM_PORT% --baud %UP_SPD% read_flash 0x14a000 0x3E900 DISK_K.DSK.BAK
%ESPTOOL%\esptool.exe --chip esp8266 --port %COM_PORT% --baud %UP_SPD% read_flash 0x10b000 0x3E900 DISK_L.DSK.BAK
%ESPTOOL%\esptool.exe --chip esp8266 --port %COM_PORT% --baud %UP_SPD% read_flash 0x0cc000 0x3E900 DISK_M.DSK.BAK
%ESPTOOL%\esptool.exe --chip esp8266 --port %COM_PORT% --baud %UP_SPD% read_flash 0x08d000 0x3E900 DISK_N.DSK.BAK
%ESPTOOL%\esptool.exe --chip esp8266 --port %COM_PORT% --baud %UP_SPD% read_flash 0x04e000 0x3E900 DISK_O.DSK.BAK

:EXIT
PAUSE
環境設定が済んだ CP/M 8266 のディスクイメージのバックアップを取っておく事ができます。
おわりに
CP/M 8266 とは別に RunCPM という CP/M 2.2 エミュレータもあります。こちらは Arduino ベースでインストールも簡単なのですが、ESP-WROOM-02 (EP8266) だと最大でも 34K のメモリしか確保できません。
62K のメモリが使え、ディスク IO も早いので、ESP-WROOM-02 (EP8266) で CP/M エミュレータを動かすなら CP/M 8266 の方がよさそうです。
See also: