#はじめに
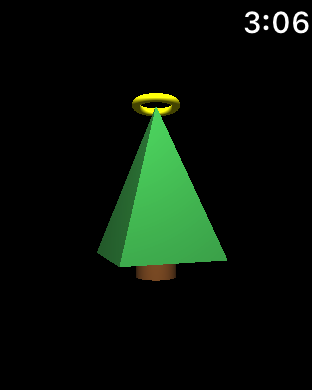
watchOS3より追加されたDigital Crownの値取得とSceneKit for watchOSを組み合わせて、Apple Watchに表示させたXmasツリーをクラウンを回すタイミングに応じて回転させるデモです。
xmasCrownのソースコードはGitHubで公開しています。
ご覧のように装飾がない状態なので、ぜひプルリクで追加していただけるとオープンソースらしくて嬉しいです。
#自己紹介
- iOSエンジニア 星野佑太(ge-nie inc.というiOSメインの開発会社代表 2009年〜)
- メモ電卓(ge-calc) 72万ダウンロードを達成。
- PickerをPopoverで表示するライブラリSwiftyPickerPopoverをOSSとして公開しています。188スター
- サンフランシスコのWWDC2016に参加→まとめ記事
- watchOS 3で解禁されたDigital CrownやTableViewフォームを高速開発するためのEureka、watchOSでのRealm使用に関心があります。
- アカウントの紹介: GitHub, Twitter, Facebook, Qiita, SlideShare
- 開発相談のお問い合わせ: ythshn@ge-nie.co.jp
#クラウンの値を取得する
Apple Watchのデジタルクラウンを回転させたときに値を取得するための実装です。コードを抜粋します。
class InterfaceController: WKInterfaceController, WKCrownDelegate {

    @IBOutlet var sceneView: WKInterfaceSCNScene!

//省略
    var greenNode = SCNNode(geometry: SCNPyramid(width: 5, height: 7.5, length: 5))
//省略

    override func awake(withContext context: Any?) {
        super.awake(withContext: context)
        crownSequencer.delegate = self
        addScene()

    }

    override func willActivate() {
        super.willActivate()
        crownSequencer.focus()

    }

    func crownDidRotate(_ crownSequencer: WKCrownSequencer?, rotationalDelta: Double) {

        let d:CGFloat = CGFloat(rotationalDelta)
        greenNode.runAction(SCNAction.rotateBy(x: 0, y: d, z: 0, duration: 0.5), completionHandler: {} )

    }
- まず、WKCrownDelegateを宣言しています。
- WKInterfaceControllerのプロパティとしてcrownSequencerがあり、そのdelegateとして自身をawake()のタイミングでセットしています。
- そして、willActivate()でcrownSequencerにフォーカスしています。
- これにより、クラウンと回転時にcrownDidRotate()が呼ばれます。
- rotationalDeltaが渡されるので、これを使って相対的に3Dモデルを回転させる処理をしています。
#3Dモデルの描画
watchOS3からSceneKitが利用できるようになりました。
今回は、Xmasツリーを表現するために3つのパーツを利用しています。幹(brownNode)、緑の葉(greenNode)、天頂のリング(ringNode)です。
class InterfaceController: WKInterfaceController, WKCrownDelegate {

    @IBOutlet var sceneView: WKInterfaceSCNScene!

    var brownNode = SCNNode(geometry: SCNCylinder(radius: 1, height: 1))
    var greenNode = SCNNode(geometry: SCNPyramid(width: 5, height: 7.5, length: 5))
    var ringNode = SCNNode(geometry: SCNTorus(ringRadius: 1, pipeRadius: 0.2))


    override func awake(withContext context: Any?) {
        super.awake(withContext: context)
//省略
        addScene()

    }

    func addScene() {
        let scene = SCNScene()

        let cameraNode = SCNNode()
        cameraNode.camera = SCNCamera()
        scene.rootNode.addChildNode(cameraNode)

        cameraNode.position = SCNVector3(x: 0, y: 0, z: 15)

        let lightNode = SCNNode()
        lightNode.light = SCNLight()
        lightNode.light!.type = SCNLight.LightType.omni
        lightNode.position = SCNVector3(x: 0, y: 10, z: 10)
        scene.rootNode.addChildNode(lightNode)

        let ambientLightNode = SCNNode()
        ambientLightNode.light = SCNLight()
        ambientLightNode.light!.type = SCNLight.LightType.ambient
        ambientLightNode.light!.color = UIColor.darkGray
        scene.rootNode.addChildNode(ambientLightNode)

        brownNode.position = SCNVector3(x: 0, y: -2.5, z: 0)
        greenNode.position = SCNVector3(x: 0, y: -2, z: 0)
        ringNode.position = SCNVector3(x: 0, y: 5.5, z: 0)

        //texture
        let material = SCNMaterial()
        material.diffuse.contents = UIColor(red:0.27, green:0.68, blue:0.35, alpha:1.0)
        greenNode.geometry?.firstMaterial = material

        let material2 = SCNMaterial()
        material2.diffuse.contents = UIColor.yellow
        ringNode.geometry?.firstMaterial = material2

        let material3 = SCNMaterial()
        material3.diffuse.contents = UIColor.brown
        brownNode.geometry?.firstMaterial = material3

        scene.rootNode.addChildNode(brownNode)
        scene.rootNode.addChildNode(greenNode)
        scene.rootNode.addChildNode(ringNode)

        sceneView.scene = scene

        //If you want to see fps, please uncomment it.
        //        sceneView.showsStatistics = true

    }
- Storyboardで定義したsceneViewを冒頭で接続しています。これで画面いっぱいのキャンバスを定義できました。
- brownNodeなどの3つの要素について形状やサイズを定義しています。
- addScene()の中で、描画をひとまとめに書いています。
- scene、cameraNode、lightNode、ambientLightNodeを定義し、セットしています。
- brownNodeなどの位置、テクスチャを指定します。
テクスチャの部分にしかるべき画像をセットすれば、塗装したような効果を与えることも可能ですね。
#クラウン回転のシミュレーション
メニューに記述がないので気付きにくいのですが、watchOSシミュレータでクラウンの回転をシミュレートできます。二本指ドラッグをすると、クラウンの回転をシミュレーションさせることができます。
#最後に
装飾のプルリクをお待ちしています。テクスチャーの追加だけでも歓迎です。背景も寂しいので、何かアイディアのある方がいらしたらぜひお願いします。iOS版は全く作っていないので、そちらもアイディアがあればよろしくお願いします。
少し早いですが、Merry Xmas!
xmasCrown
