はじめに
AWS CloudTrailのログ分析をElasticsearchで実施するためのログ取り込み方法をまとめてみました。
利用環境
| product | version |
|---|---|
| Elasticsearch | 6.6.2 |
| kibana | 6.6.2 |
| logstash | 6.6.2 |
| Java | 1.8.0 |
| OS(EC2) | Amazon Linux2 (t3.large) |
| AMI ID | ami-06b382aba6c5a4f2c |
| Region | us-east-1 |
【参考】
・AWS CloudTrailとは
前提として
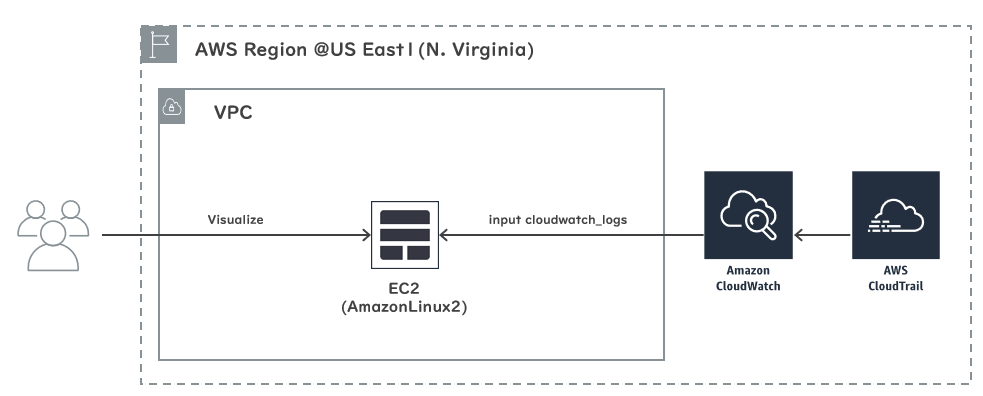
CloudTrailはS3 BucketとCloudWatchLogsの2か所に出力が可能です。
コスト(蓄積とリクエスト)的には当然S3の方がメリットがあるんですが
複雑な配列構造のJSONをパースすることを考えるとCloudWatchLogsにメリットがあるため
CloudWatchLogsに出力したものをLogstashでInputしています。
また本記事ではElasticStackのインストール手順は省力しています。
【参考】
・Amazon S3がCloudTrailに対応しました
・Amazon S3の料金
・Amazon CloudWatchの料金
構築手順
以下の手順で構築を実施します。
1. IAM Role作成
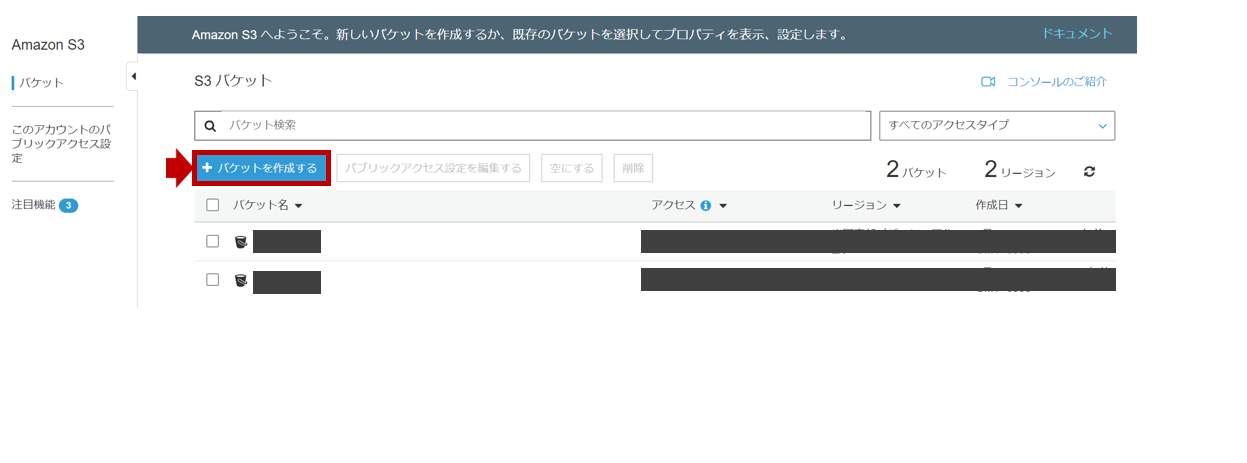
2. S3 Bucket作成
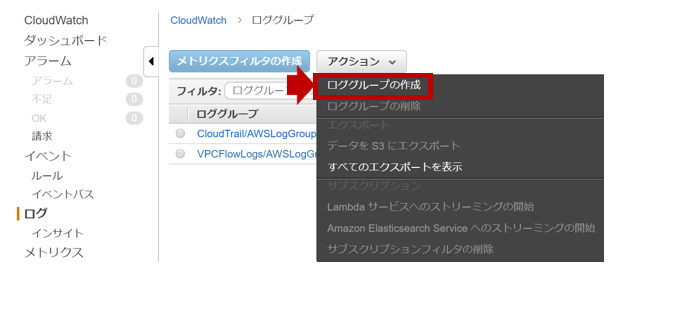
3. ロググループ作成
4. CloudTrail証跡作成
5. Logstashの設定
6. Index_Templeteの追加
7. ログ取り込み
1. IAM Role作成
- LogstashがCloudWatchLogsからログを取得するのに必要なIAM Roleを作成します。
{
    "Version": "2012-10-17",
    "Statement": [
        {
            "Action": [
                "logs:Describe*",
                "logs:Get*",
                "logs:List*",
                "logs:StartQuery",
                "logs:StopQuery",
                "logs:TestMetricFilter",
                "logs:FilterLogEvents"
            ],
            "Effect": "Allow",
            "Resource": "*"
        }
    ]
}
2. S3 Bucket作成
3. ロググループ作成
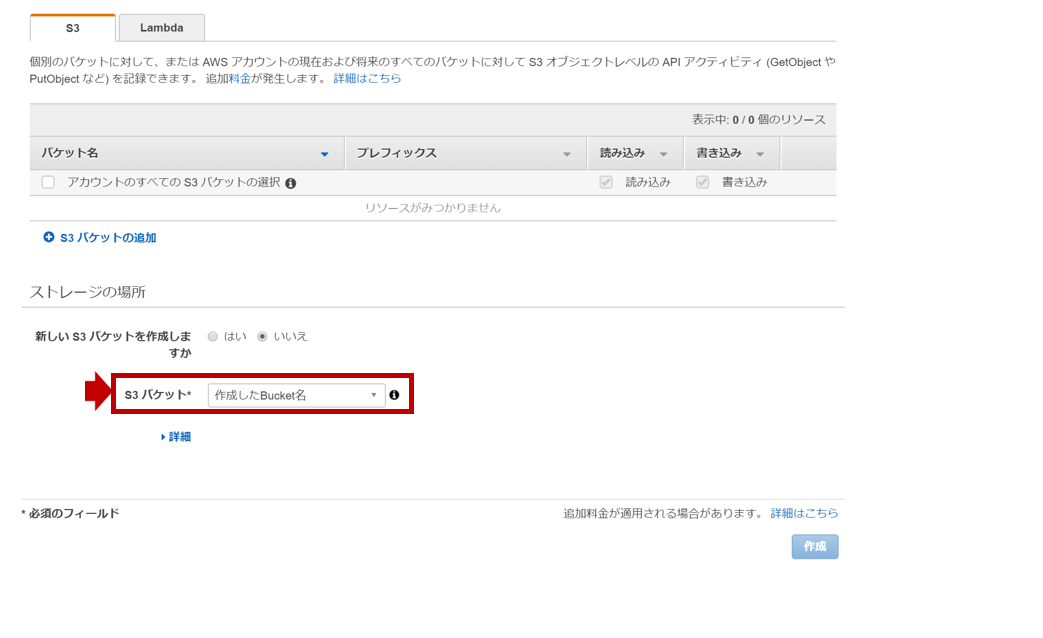
4. CloudTrail証跡作成
-
作成した証跡を編集し、[CloudWatch Logs]を設定します。(作成したロググループを指定し、[次へ]をクリックします)

-
IAMロールに[CloudTrail_CloudWatchLogs_Role]が指定されていることを確認し、[許可]をクリックします。

5. Logstashの設定
-
logstash-input-cloudwatch_logspluginを導入します。
[root@ip-172-31-34-49]# /usr/share/logstash/bin/logstash-plugin install logstash-input-cloudwatch_logs
Validating logstash-input-cloudwatch_logs
Installing logstash-input-cloudwatch_logs
Installation successful
- 以下の設定をlogstash.confにします。
input {
  cloudwatch_logs {
    region => "us-east-1"
    log_group => [ "CloudTrail/AWSLogGroup" ]
    sincedb_path => "/var/lib/logstash/sincedb_cloudtrail"
  }
}

filter {
  json {
    source => "message"
  }
  date {
    match => [ "eventTime", "ISO8601" ]
    target => "@timestamp"
  }
  ruby {
    code => "event.set('[@metadata][local_time]',event.get('[@timestamp]').time.localtime.strftime('%Y-%m-%d'))"
  }
  useragent {
    source => "userAgent"
    target => "useragent"
  }
  geoip {
    source => "sourceIPAddress"
  }
  mutate {
    remove_field => [ "message" ]
  }
}

output {
  elasticsearch {
    hosts => [ "localhost:9200" ]
    index => "cloudtrail-%{[@metadata][local_time]}"
  }
}
6. Index_Templeteの追加
- CloudTrailのログを取り込むとField数がデフォルト制限値の1,000を超えてIndex出来なくなる場合があります。
- 以下のIndex TempleteをKibanaのDevToolsなどでElasticsearchにPUTしておきます。
PUT _template/cloudtrail
{
"index_patterns": ["cloudtrail-*"],
  "settings": {
    "number_of_shards": 1,
    "number_of_replicas" : 1,
    "index.mapping.total_fields.limit": 2000
  },
  "mappings" : {
    "_default_" : {
      "dynamic_templates" : [
        {
          "message_field" : {
            "path_match" : "message",
            "match_mapping_type" : "string",
            "mapping" : {
              "type" : "text",
              "norms" : false
            }
          }
        },
        {
          "string_fields" : {
            "match" : "*",
            "match_mapping_type" : "string",
            "mapping" : {
              "type" : "text",
              "norms" : false,
              "fields" : {
                "keyword" : {
                  "type" : "keyword",
                  "ignore_above" : 256
                }
               }
            }
          }
        }
       ],
       "properties" : {
          "@timestamp" : {
            "type" : "date"
          },
          "@version" : {
            "type" : "keyword"
          },
          "geoip" : {
            "dynamic" : true,
            "properties" : {
              "ip" : {
                "type" : "ip"
              },
              "location" : {
                "type" : "geo_point"
              },
              "latitude" : {
                "type" : "half_float"
              },
              "longitude" : {
                "type" : "half_float"
              }
            }
          }
        }
      }
    },
  "aliases" : { }
}
【参考】
・ ElasticSearchでdocument追加時にfield上限値を超過したエラーが出る
7. ログ取り込み
- LogstashのEC2に作成したIAM Role(CloudWatchLogsReadOnlyAccess)を割り当てます。
- Logstashのサービスを起動します。
[root@ip-172-31-34-49]# systemctl start logstash
- 以下のような形でKibanaでログが参照出来るようになります。
{
  "_index": "cloudtrail-2019-04-25",
  "_type": "doc",
  "_id": "QShCUmoBhVwl9UKOhoFB",
  "_version": 1,
  "_score": null,
  "_source": {
    "sourceIPAddress": "xxx.xxx.xxx.xxx",
    "awsRegion": "us-east-1",
    "eventName": "ListServiceSpecificCredentials",
    "requestParameters": {
      "userName": "xxxxx",
      "serviceName": "codecommit.amazonaws.com"
    },
    "eventType": "AwsApiCall",
    "userAgent": "console.amazonaws.com",
    "eventTime": "2019-04-25T02:00:38Z",
    "geoip": {
      "ip": "xxx.xxx.xxx.xxx",
      "postal_code": "xxx-xxxxx",
      "timezone": "Asia/Tokyo",
      "region_name": "Tokyo",
      "region_code": "13",
      "country_name": "Japan",
      "latitude": xx.xxx,
      "country_code2": "JP",
      "longitude": xxx.xxxx,
      "city_name": "Tokyo",
      "location": {
        "lat": xx.xxx,
        "lon": xxx.xxxx
      },
      "continent_code": "AS",
      "country_code3": "JP"
    },
    "requestID": "ec37f520-xxxx-xxxx-xxxx-df78061586e9",
    "@timestamp": "2019-04-25T02:10:08.266Z",
    "eventVersion": "1.05",
    "userIdentity": {
      "arn": "arn:aws:sts::xxxxxxxxxxxx:assumed-role/xxxxxx/xxxxxxxxxxxxxxx",
      "sessionContext": {
        "attributes": {
          "creationDate": "2019-04-25T01:54:13Z",
          "mfaAuthenticated": "xxxxxx"
        },
        "sessionIssuer": {
          "principalId": "AROAJB3AZKZTZDX3EBCPE",
          "arn": "arn:aws:iam::xxxxxxxxxxxx:role/xxxxxx",
          "accountId": "xxxxxxxxxxxx",
          "userName": "xxxxxx",
          "type": "Role"
        }
      },
      "type": "AssumedRole",
      "accessKeyId": "xxxxxxxxxxxxxxxxxxx",
      "principalId": "xxxxxxxxxxxxxxxxxxx:xxxxxxxxxxxxxxxxxxx",
      "accountId": "xxxxxxxxxxxx"
    },
    "useragent": {
      "name": "Other",
      "device": "Other",
      "os_name": "Other",
      "build": "",
      "os": "Other"
    },
    "cloudwatch_logs": {
      "ingestion_time": "2019-04-25T02:10:08.303Z",
      "log_stream": "xxxxxxxxxxxx_CloudTrail_us-east-1",
      "event_id": "xxxxxxxxxxxx1142016965745979308228964826353176462615707659",
      "log_group": "CloudTrail/AWSLogGroup"
    },
    "recipientAccountId": "xxxxxxxxxxxx",
    "@version": "1",
    "userid": "xxxxxxxxxxxx",
    "eventSource": "iam.amazonaws.com",
    "prinsipalid": "xxxxxxxxxxxxxxxxxxx",
    "responseElements": null,
    "eventID": "xxxxxxxx-xxxx-xxxx-xxxx-6bd2000d98c3",
    "eventCategory": "Other"
  },
  "fields": {
    "eventTime": [
      "2019-04-25T02:00:38.000Z"
    ],
    "cloudwatch_logs.ingestion_time": [
      "2019-04-25T02:10:08.303Z"
    ],
    "@timestamp": [
      "2019-04-25T02:10:08.266Z"
    ],
    "userIdentity.sessionContext.attributes.creationDate": [
      "2019-04-25T01:54:13.000Z"
    ]
  },
  "sort": [
    1556158208266
  ]
}
まとめ
AWSマネージメントコンソール上ではとてもじゃないですが、ログ分析は出来ません。
CloudWatchLogs Insightでクエリーを投げる方法もあると思いますが
CloudTrailのログはeventNameによって、ログのFieldが異なるため
まずはKibanaでどんなログが入っているのか概要を抑えたいところですよね^^
CloudTrailではAWSマネージメントコンソールへのログイン監査に必要な情報が
記録されています。社内のセキュリティポリシーを守っているのかを抑えるのに
本投稿が役に立つことを願っています。


