はじめに
会社のネットワークからインターネット越しにKibanaへアクセスしようとするとファイアウォールで
ブロックされることが多いです。
KibanaのデフォルトポートであるTCP5601のまま、会社ネットワークからGCP上に構築したKibanaに
アクセスできるようにした際にCloud Load Balancingでハマったので、備忘録的に投稿します。
利用環境
・Kibana 7.1.1
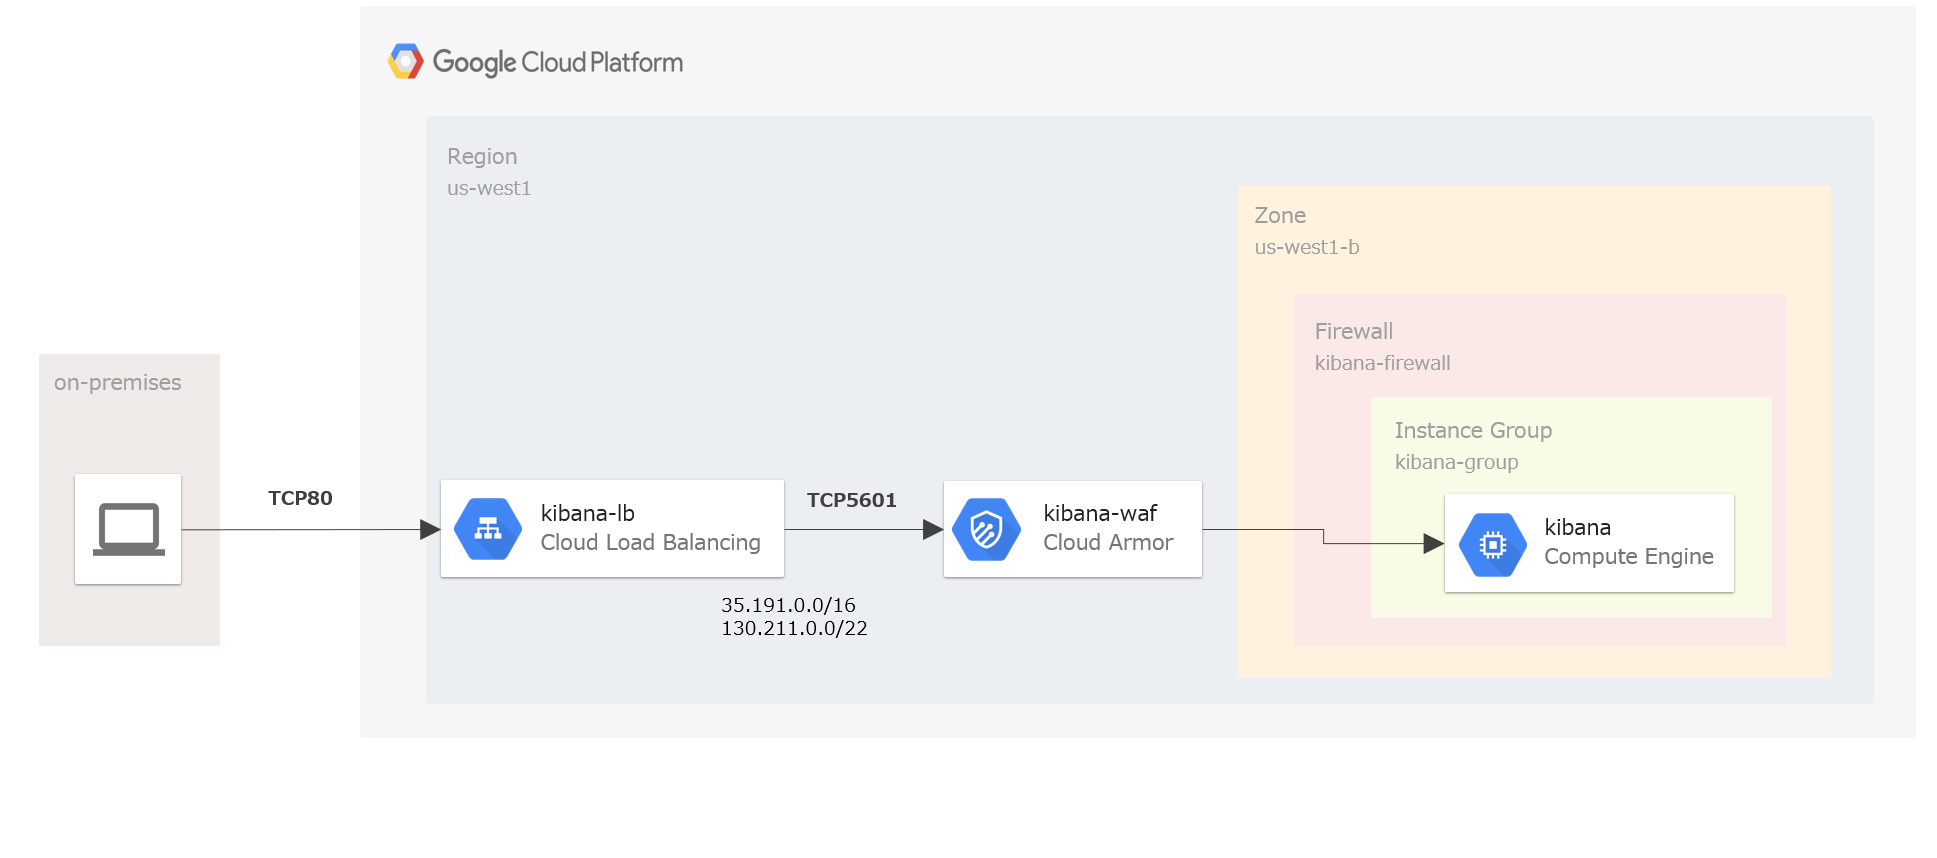
※ 構成は以下のようになりました。
前提
やり方は色々あると思っていますが、ちょっとワガママを言いました。
- AWSではなくGCPで構築したかった
- KibanaのポートはデフォルトのTCP5601から変えたくなかった
- KibanaのGCEにはNGINXを入れたくなかった
- TCP443でSSL証明書の発行はしたくなかった
- 送信元IPアドレスを会社ネットワークからに限定したかった
上記のワガママを実現しようとすると
-
Cloud Load BalancingでTCP80をTCP5601にポートフォワーディングする -
Cloud Load Balancingにファイアウォールルールの適用は出来ないため、Cloud ArmorでIP制御を行う
ということになります。
【参考】
・ Google Cloud Load Balancing documentation
・ Google Cloud Armor documentation
実施内容
以下のステップで設定を実施しました。
- VMインスタンスの作成
- インスタンスグループの作成
- ヘルスチェックの作成
- ファイアウォールルールの作成
- HTTP Load Balancingの作成
- セキュリティポリシーの作成
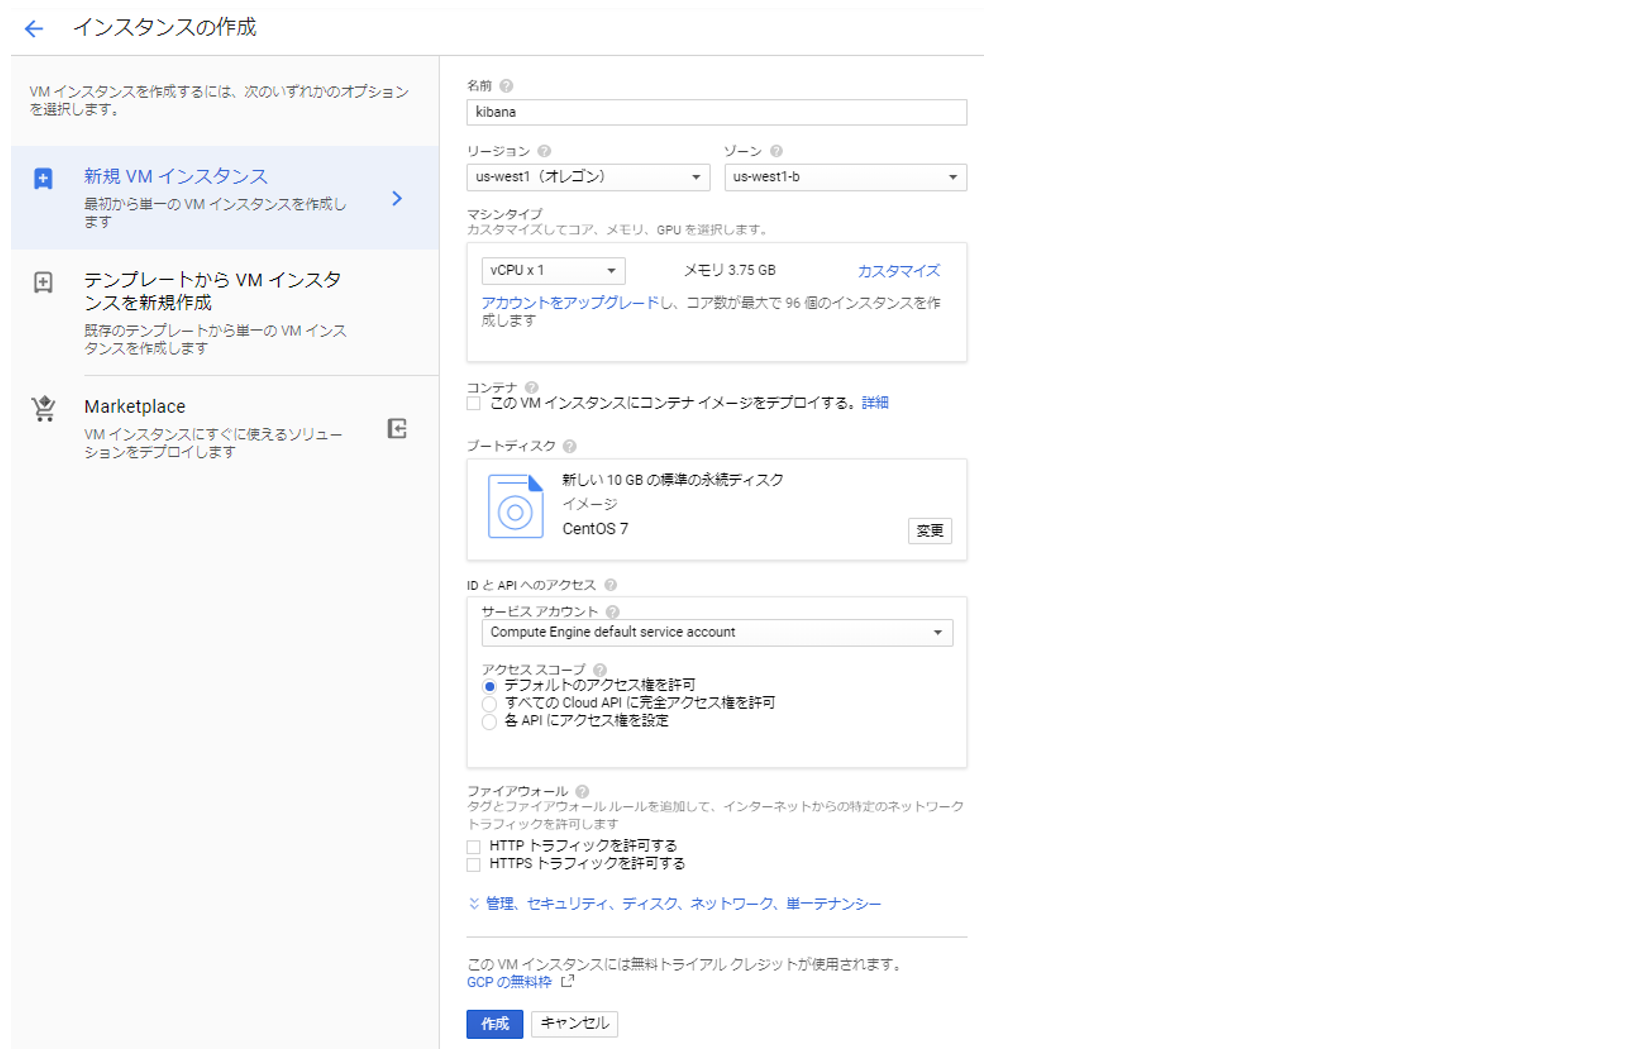
1. VMインスタンスの作成
[GCPメニュー] > [Compute Engine] > [VMインスタンス]
リージョン:us-west1 (オレゴン)、ゾーン:us-west1-bでインスタンスをCentOS7で構築しています。
【gcloudコマンド】
$ gcloud compute instances create kibana \
   --boot-disk-auto-delete \
   --image "centos-7" \
   --maintenance-policy TERMINATE \
   --preemptible \
   --zone "us-west1-b"
※Kibanaの構築手順は割愛しています。
【参考】
・ Install Kibana with RPM
2. インスタンスグループの作成
[GCPメニュー] > [Compute Engine] > [インスタンスグループ]
上記で作成したVMと同じロケーションとし、VMインスタンスにkibanaをしてします。
(非マネージドインスタンスグループとします)
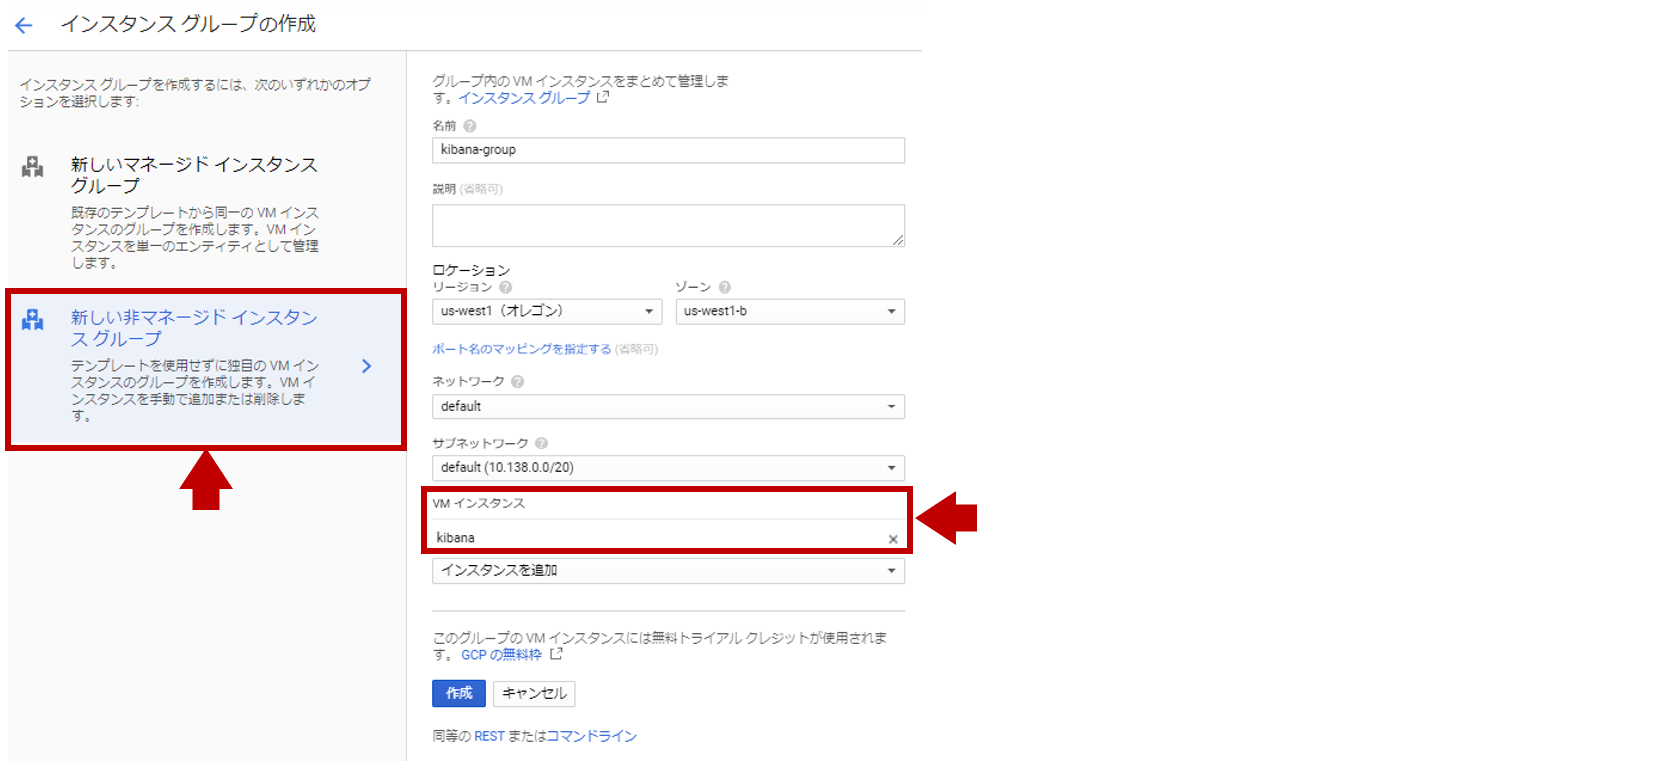
【gcloudコマンド】
$ gcloud compute instance-groups unmanaged create kibana-group \
   --zone "us-west1-b"
$ gcloud compute instance-groups unmanaged add-instances kibana-group \
   --instances "kibana"
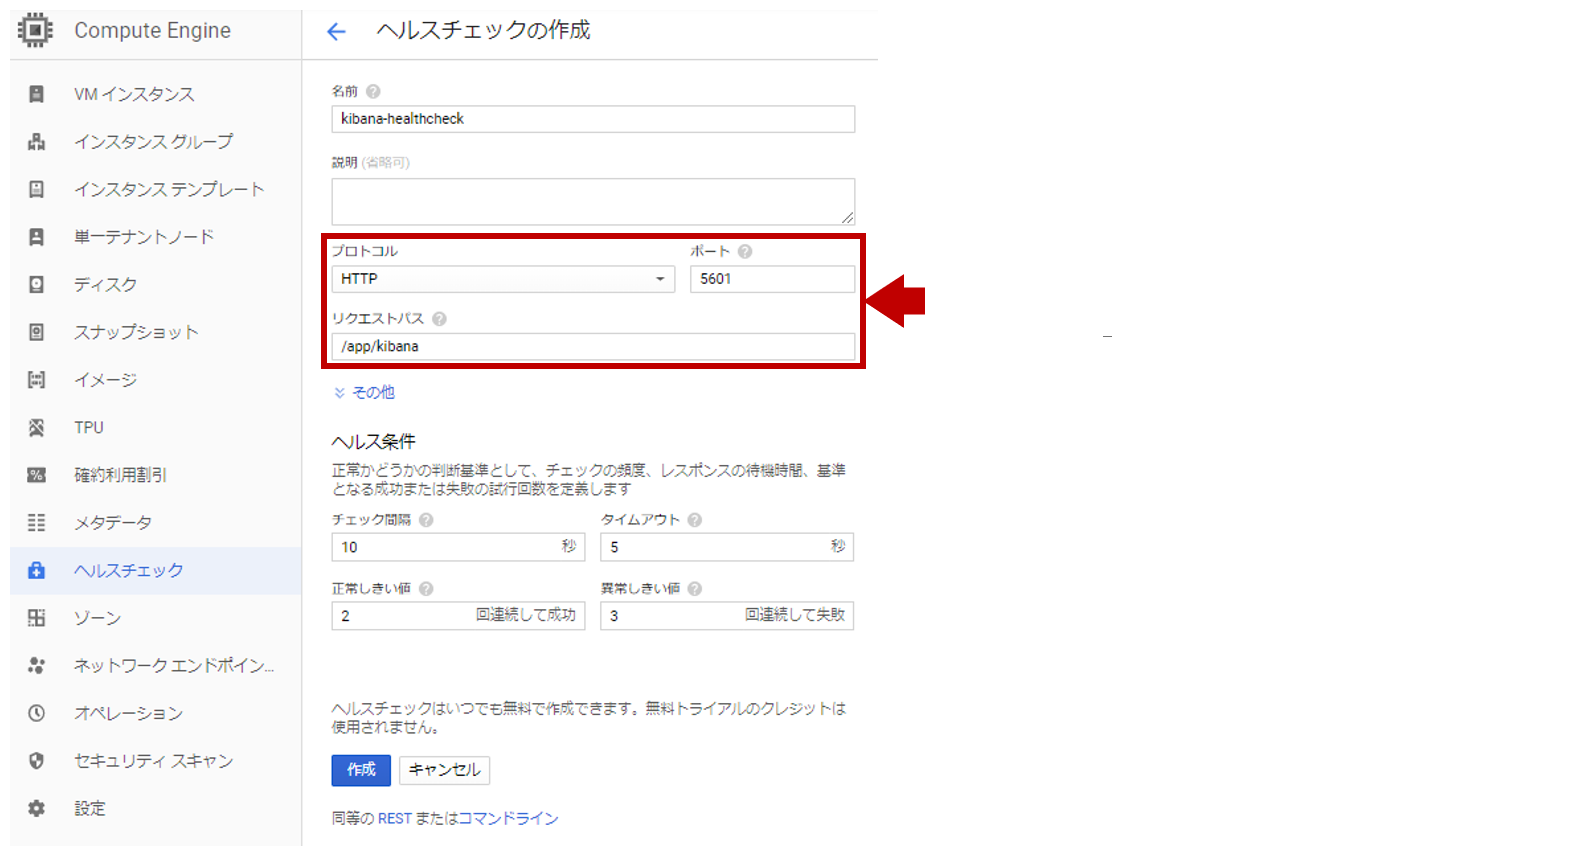
3. ヘルスチェックの作成
[GCPメニュー] > [Compute Engine] > [ヘルスチェック]
プロトコル:HTTP、ポート:5601、リクエストパス:/app/kibanaとします。
【gcloudコマンド】
$ gcloud compute http-health-checks create kibana-healthcheck \
   --port "5601" \
   --request-path "/app/kibana" \
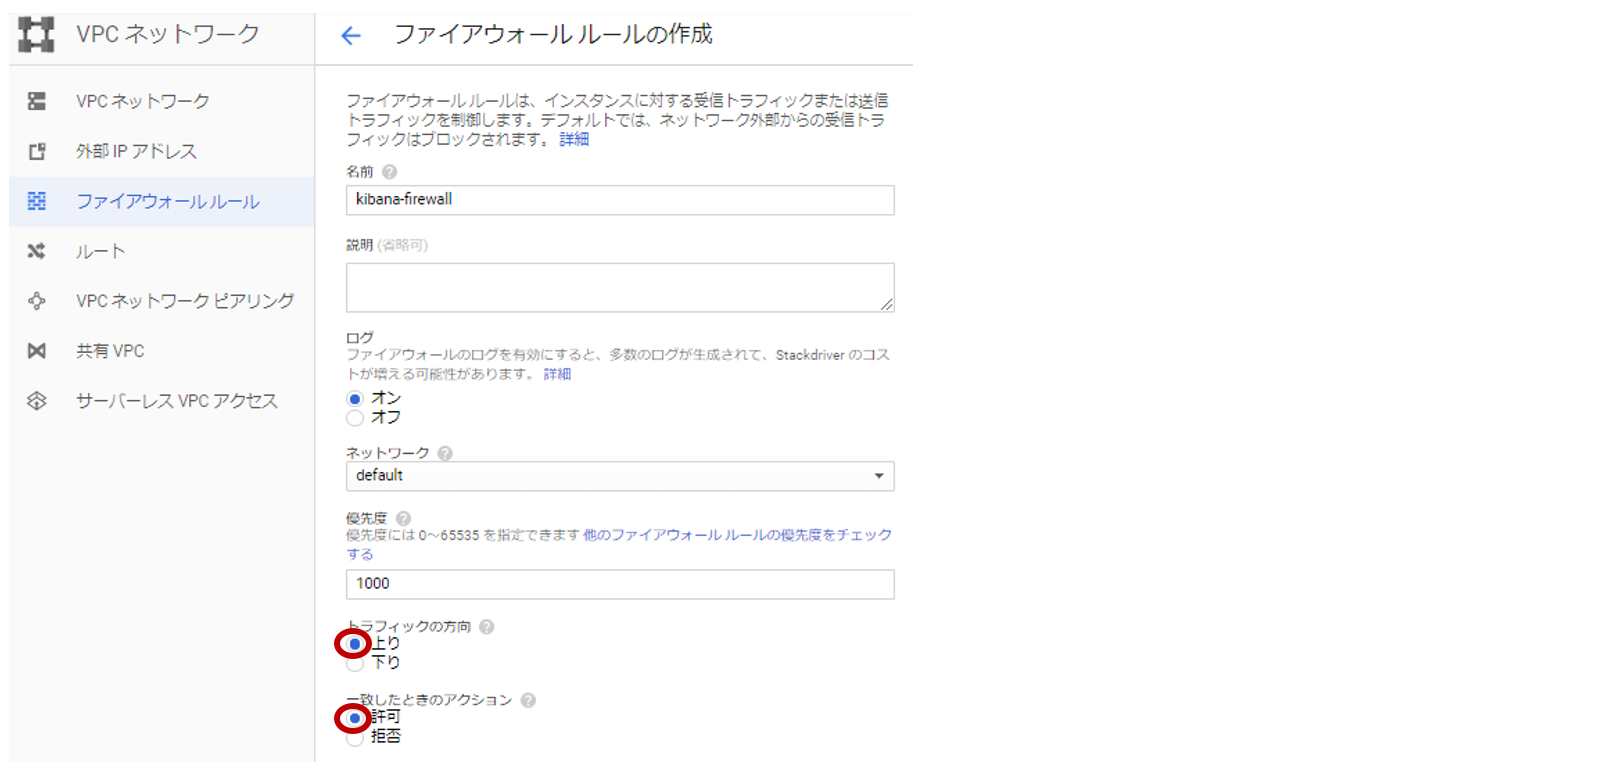
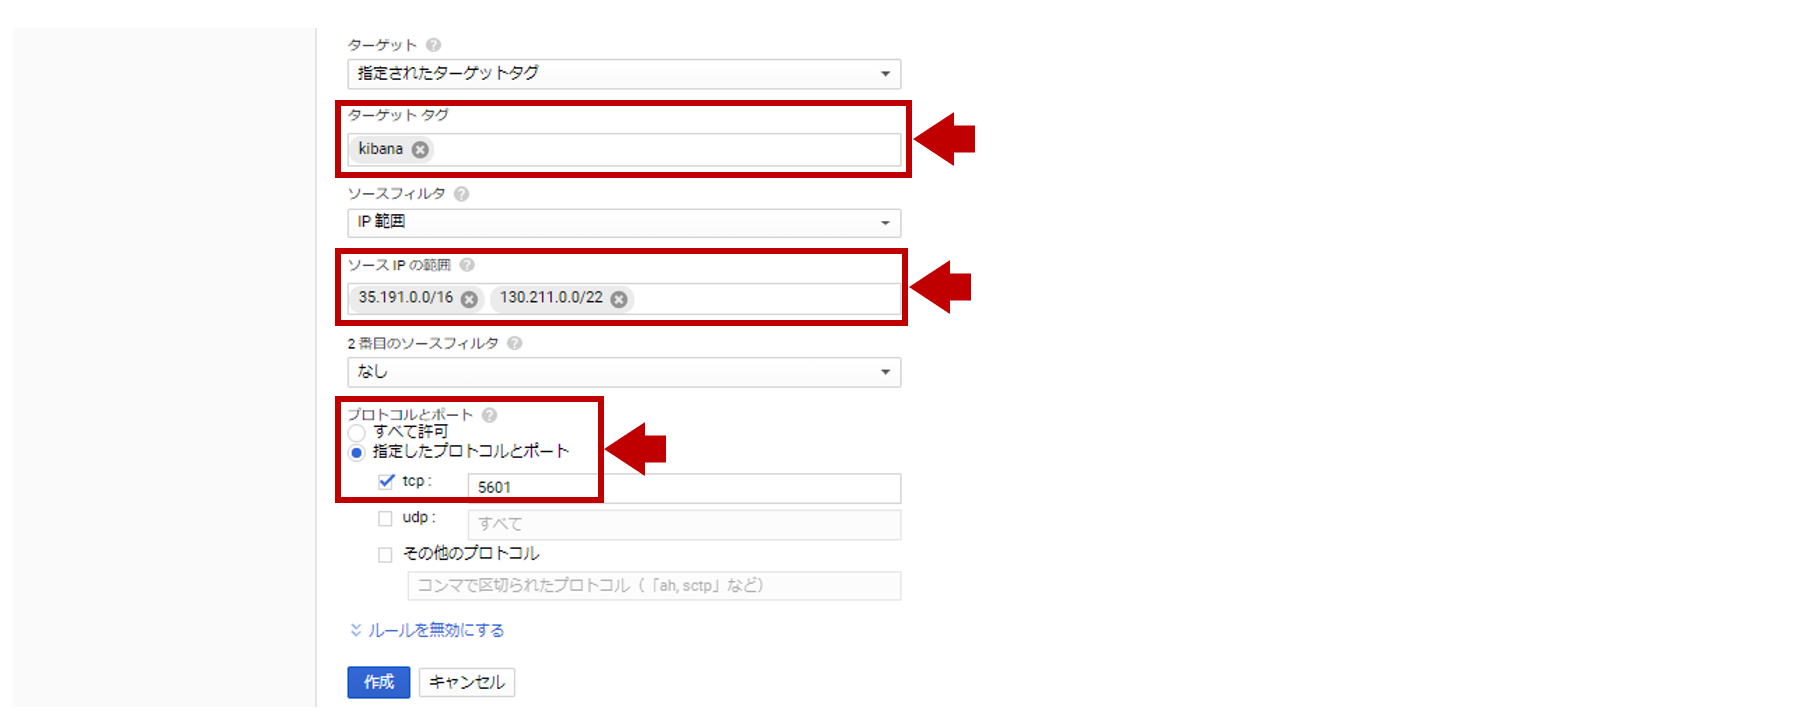
4. ファイアウォールルールの作成
[GCPメニュー] > [VPCネットワーク] > [ファイアウォールルール]
Cloud Load Balancingからの通信を許可する必要があります。
35.191.0.0/16と130.211.0.0/22からのTCP5601のみ許可します。
Traffic from the load balancer to your instances has an IP address in the ranges of 130.211.0.0/22 and 35.191.0.0/16.
When viewing logs on your load balanced instances, you will not see the source address of the original client. Instead, you will see source addresses from this range.
【gcloudコマンド】
$ gcloud compute firewall-rules create kibana-firewall \
   --source-ranges 130.211.0.0/22,35.191.0.0/16 \
   --target-tags kibana \
   --allow tcp:5601
VMインスタンスに作成したファイアウォールルールのネットワークタグ:kibanaを付与します。

5. HTTP Load Balancingの作成
設定画面では、HTTP(S)負荷分散、TCP負荷分散、UDP負荷分散という表現がされてますが
実際には以下の5つのパターンがあり、ユースケースに応じて非常に細かく複雑になっています。
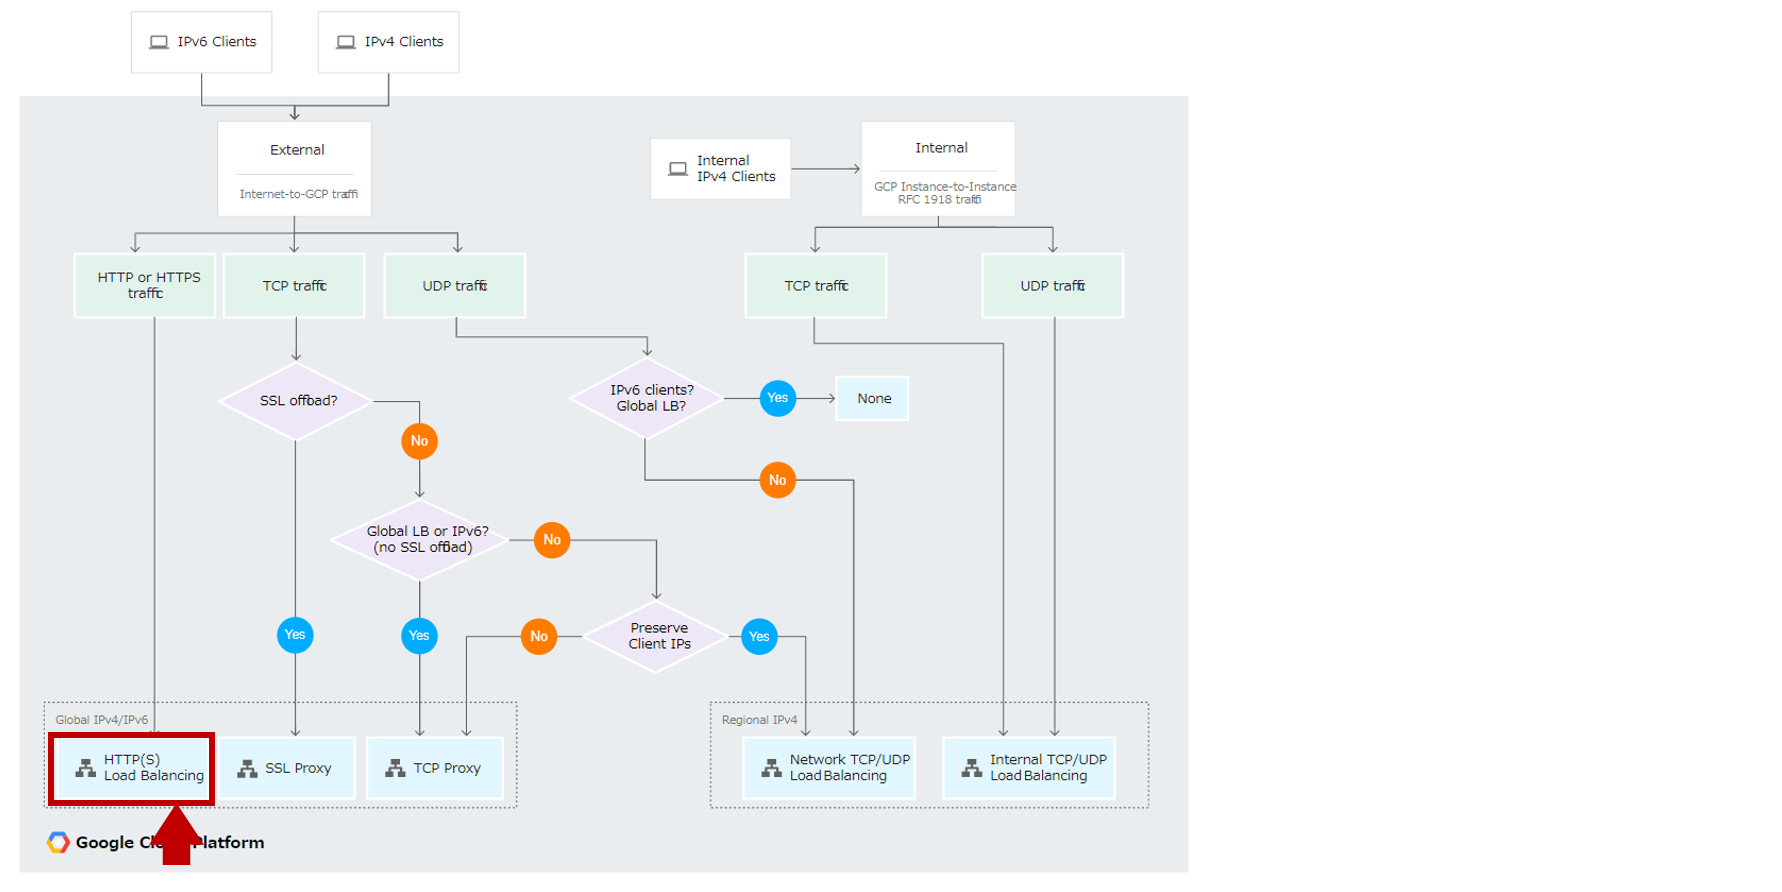
※今回は要件的にHTTP(S) Load Balancingを利用しています。
[GCPメニュー] > [ネットワーキング] > [負荷分散]
HTTP(S)負荷分散を選択します。

バックエンドの設定でバックエンドサービスの作成を行います。
(ロードバランサがどのVMインスタンスのグループに負荷分散をするのかを定義)
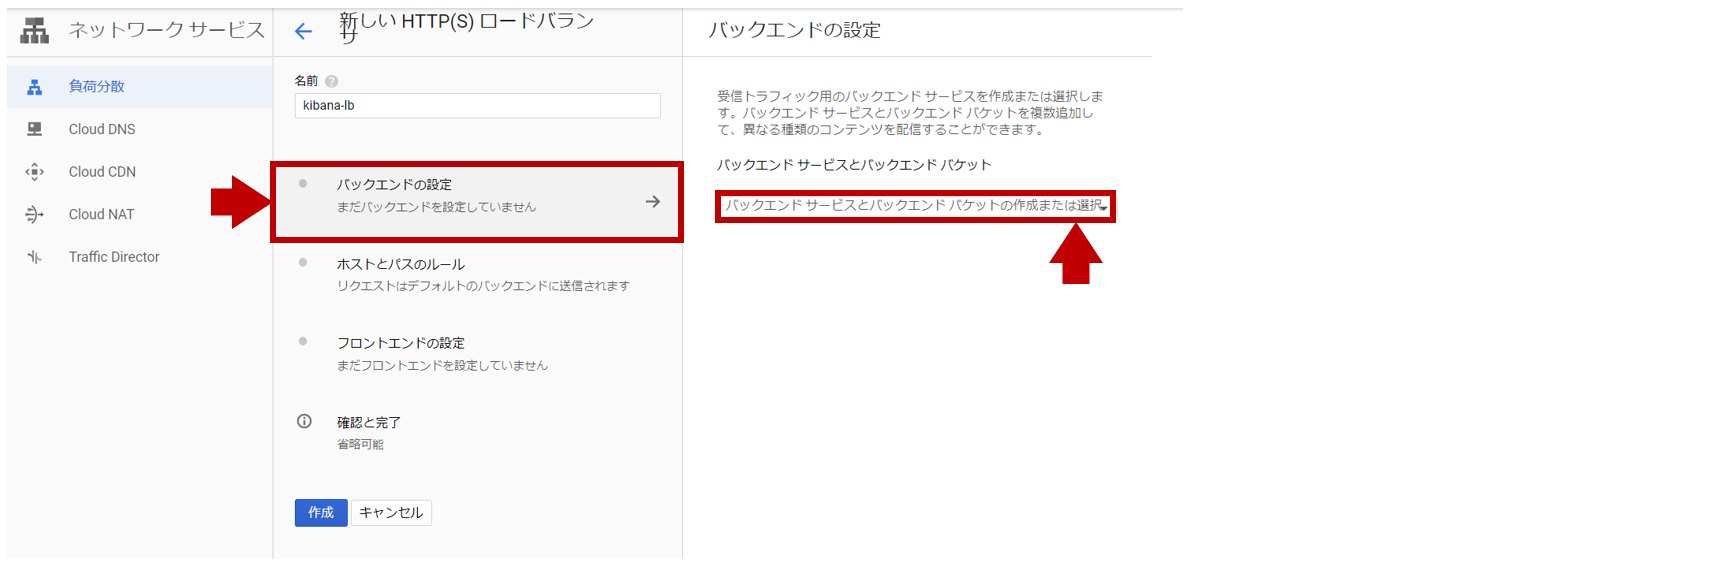
事前に作成したインスタンスグループ:kibana-groupに対して、ポート番号:5601で負荷分散します。
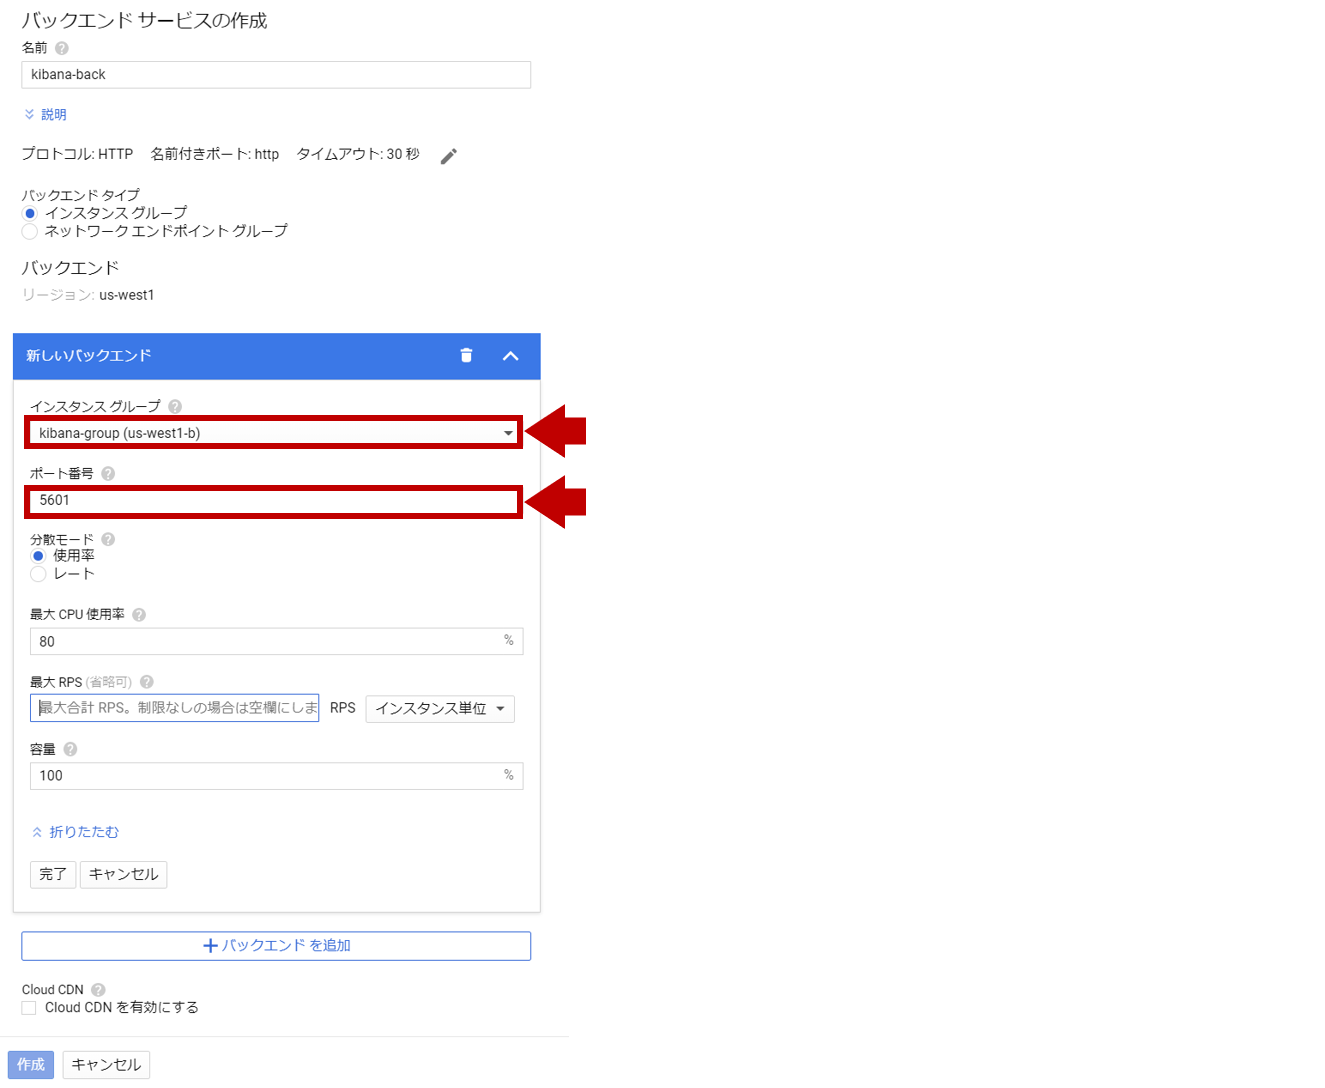
事前に作成したヘルスチェック:kibana-healthcheckを設定し、作成します。

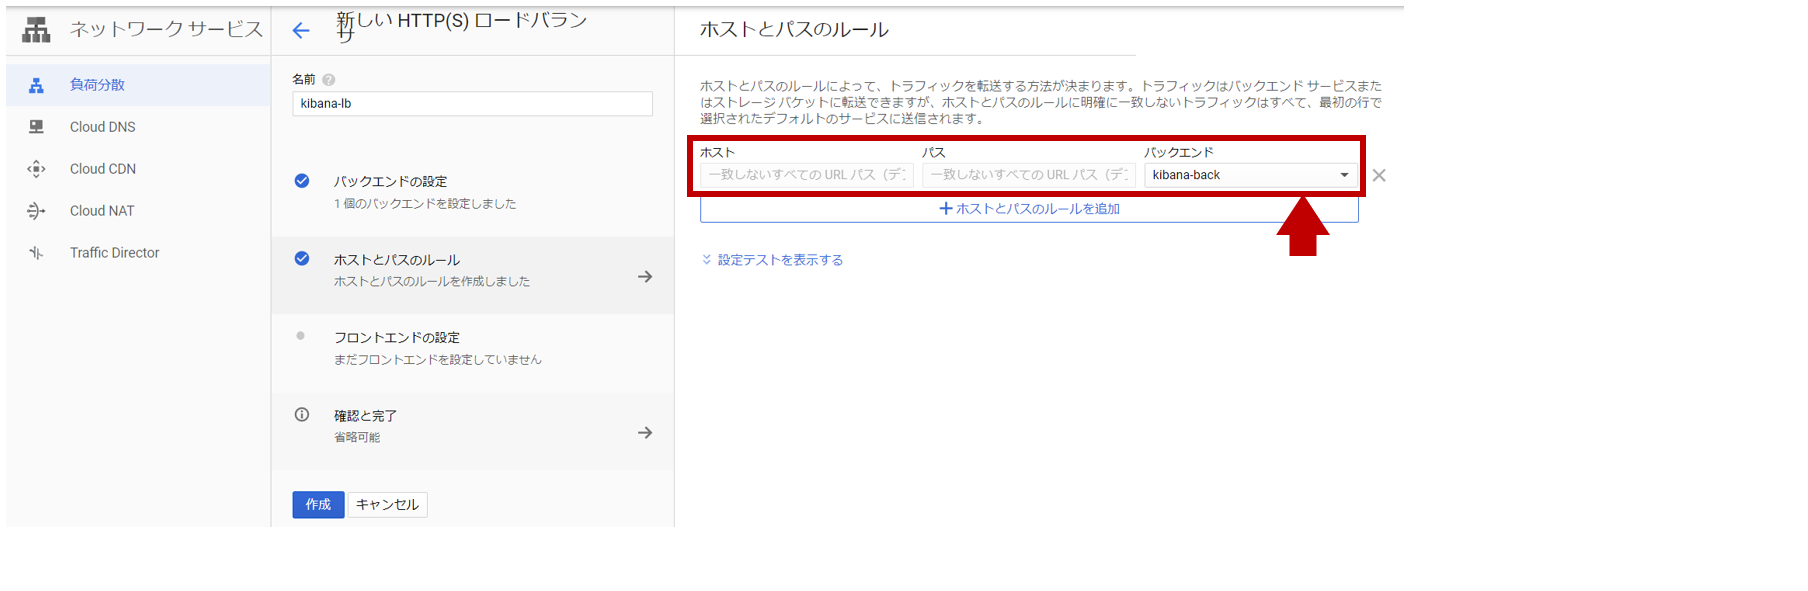
ホストとパスのルールとして、作成したバックエンドサービスが追加されます。
フロントエンドの設定でクライアントからの受信設定を行います。
HTTP(80)でシングルリージョンとなるので、以下のように設定します。
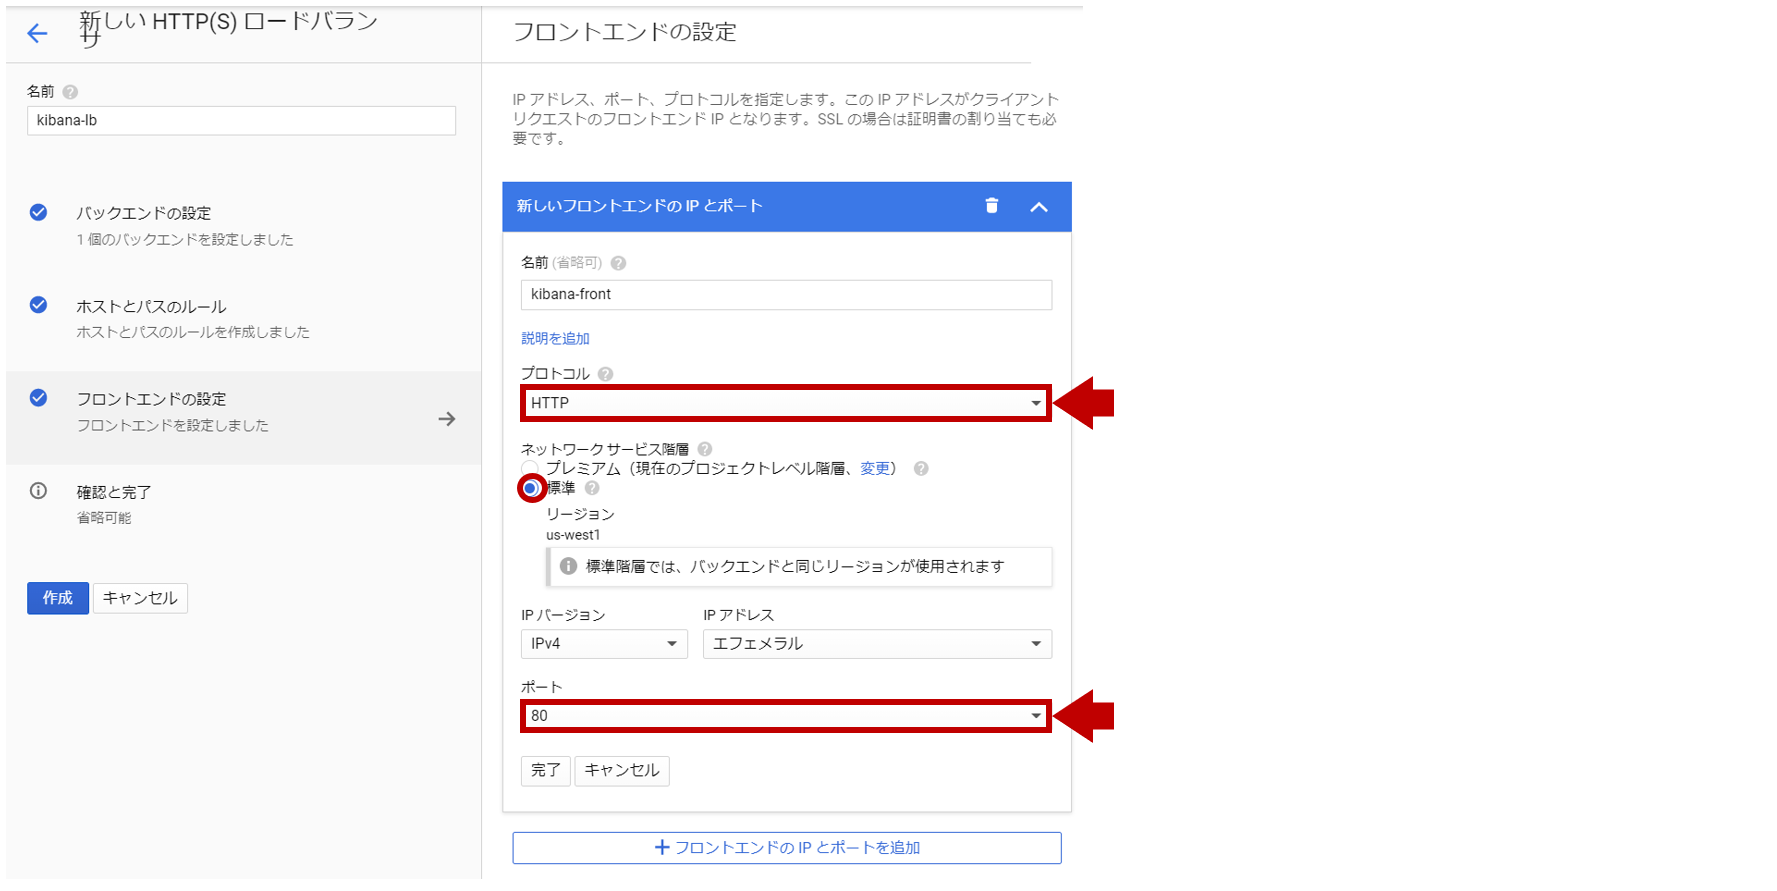
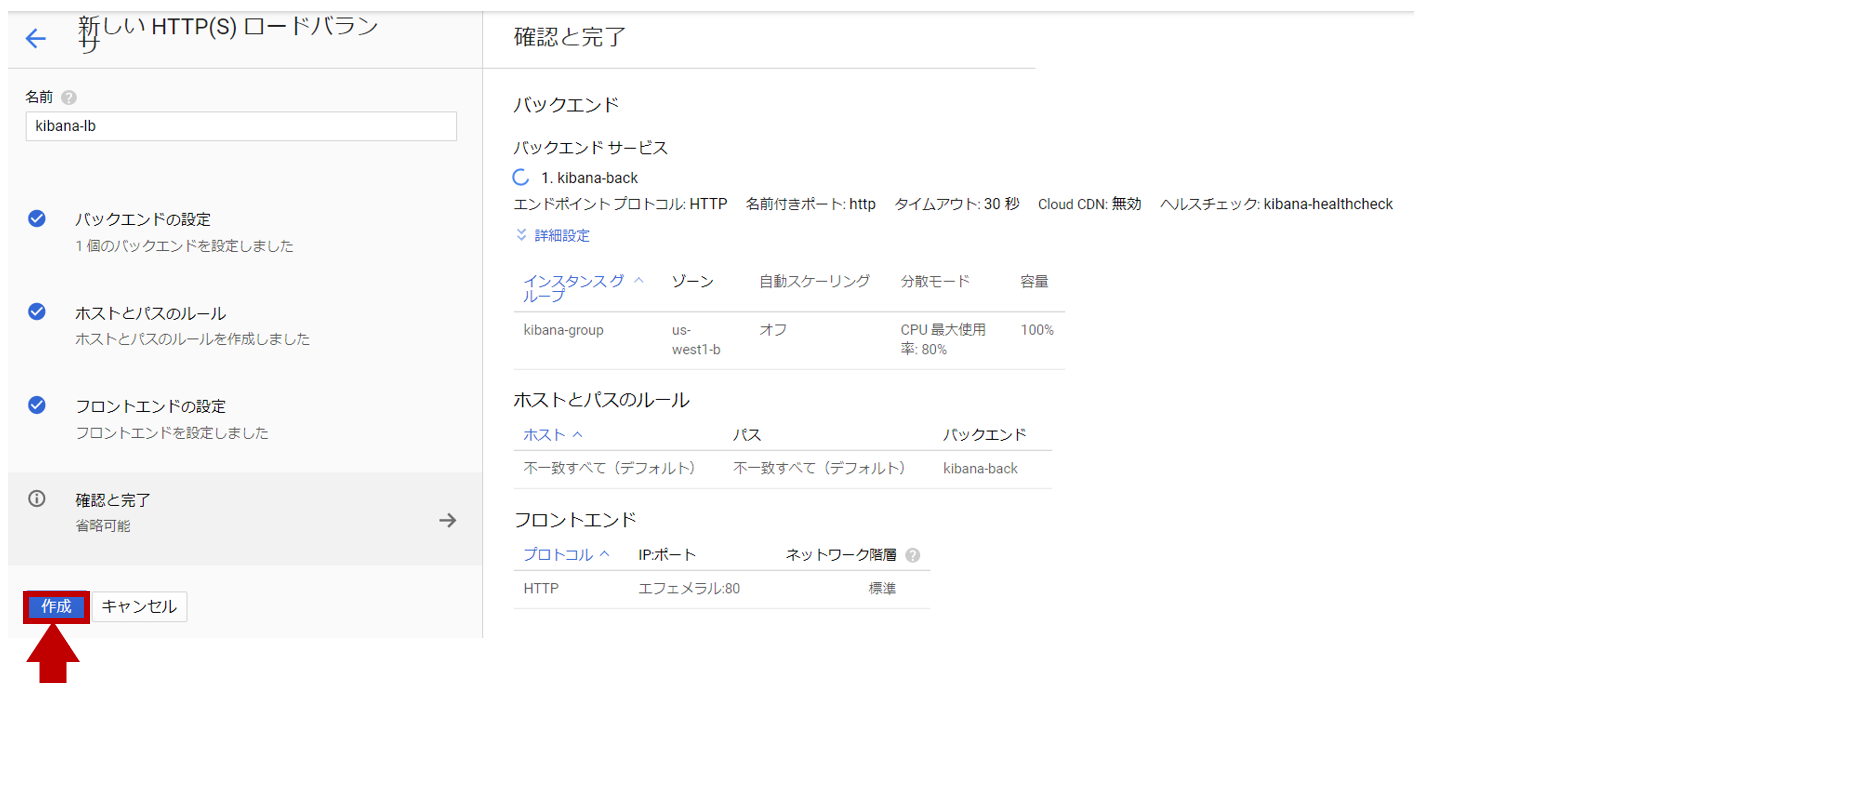
内容に間違いがなければ、[作成]をします。これでkibana-lbに完成です。
【gcloudコマンド】
$ gcloud compute backend-services create kibana-back \
   --protocol HTTP \
   --http-health-checks kibana-healthcheck \
   --global
$ gcloud compute backend-services add-backend kibana-back \
   --instance-group kibana-group \
   --global
$ gcloud compute url-maps create kibana-lb \
   --default-service kibana-back
$ gcloud compute forwarding-rules create kibana-front \
   --target-http-proxy kibana-lb-target-proxy \
   --ports 80
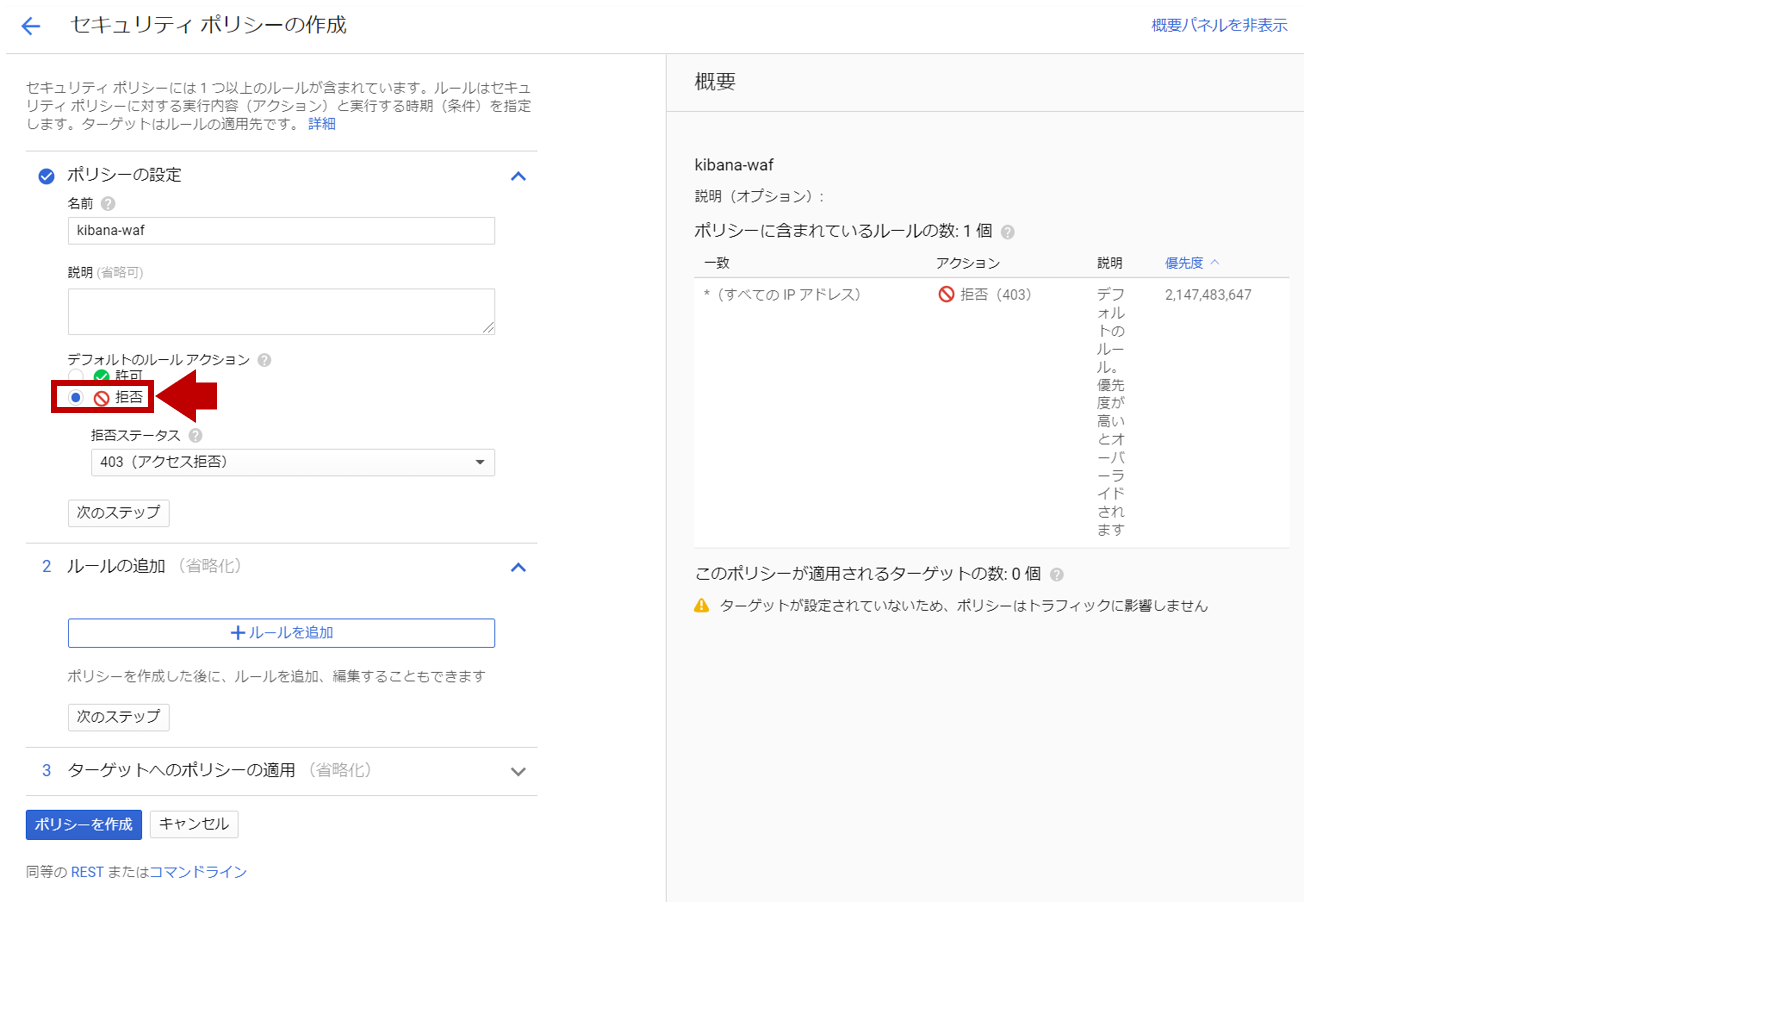
6. セキュリティポリシーの作成
[GCPメニュー] > [ネットワークセキュリティ] > [Cloud Armor]
ポリシーの作成を行います。(デフォルト動作は全て拒否です。)
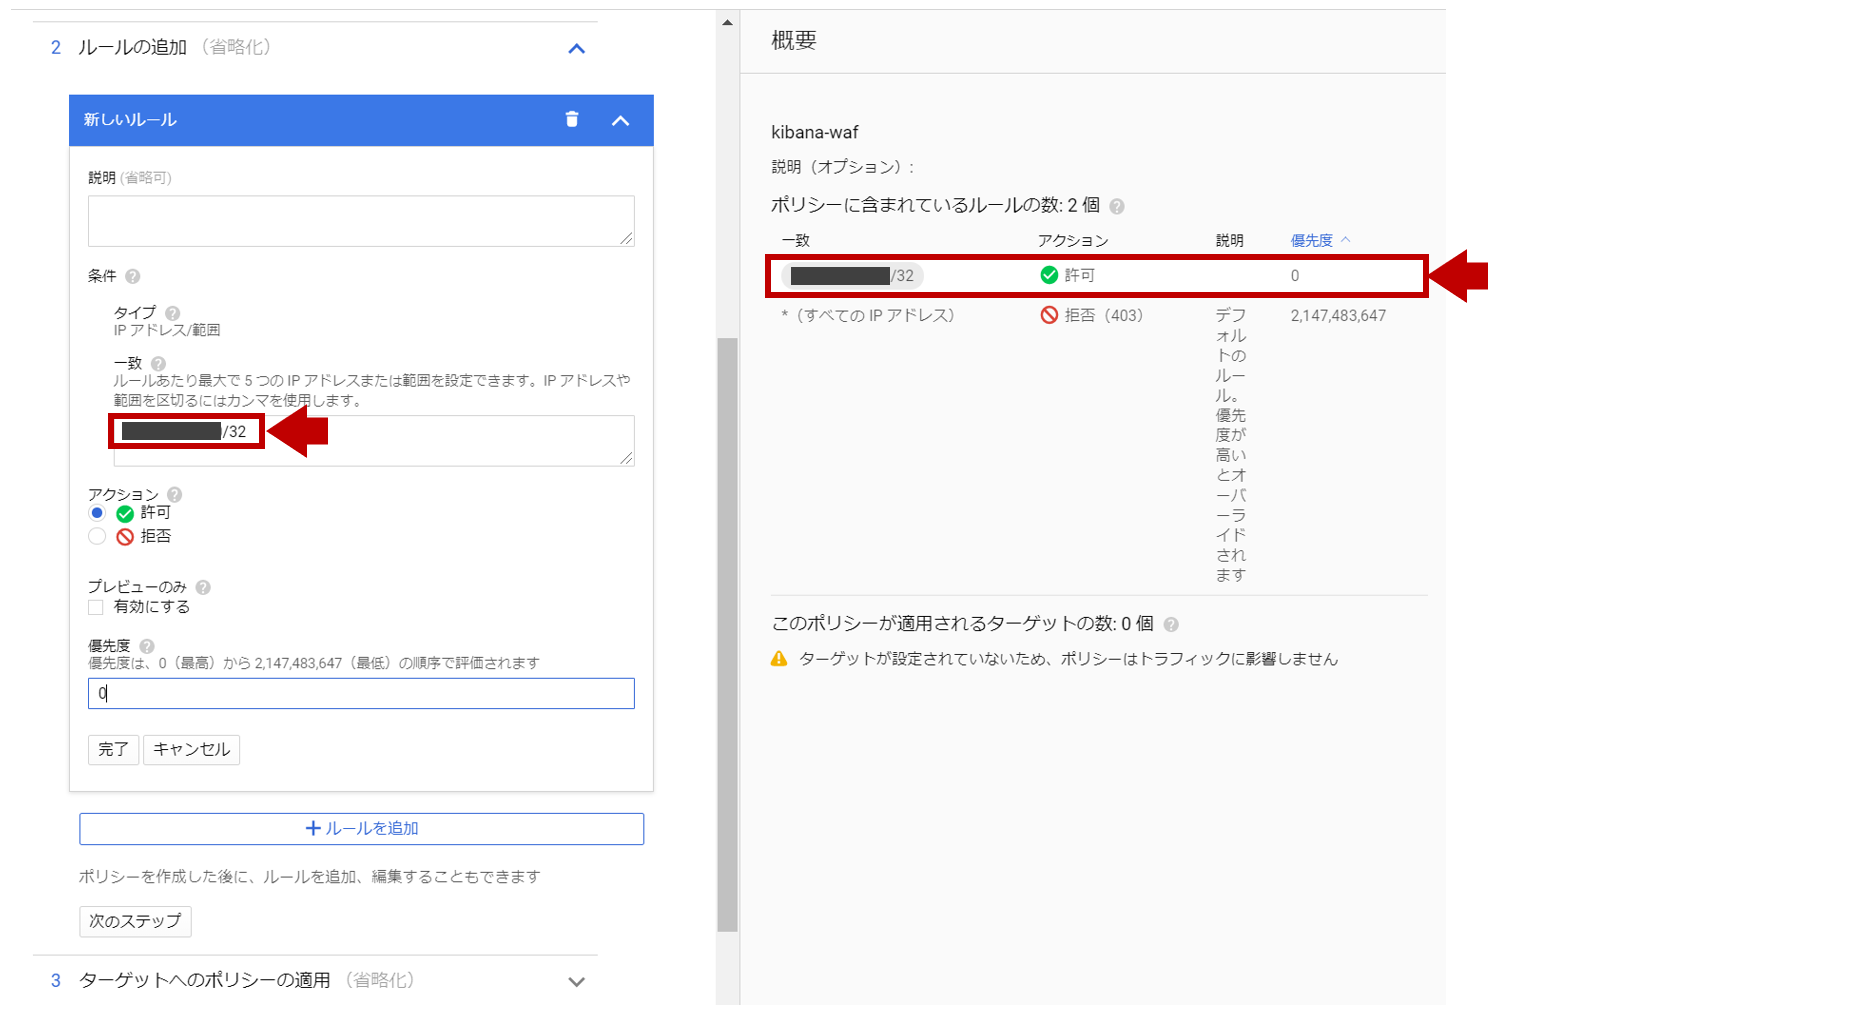
条件の一致に会社ネットワークのグローバルIPをセットし、アクション:許可、優先度:0とします。
ターゲットへのポリシーの適用にタイプ:ロードバランサバックエンドサービス、ターゲット:kibana-backを選択します。
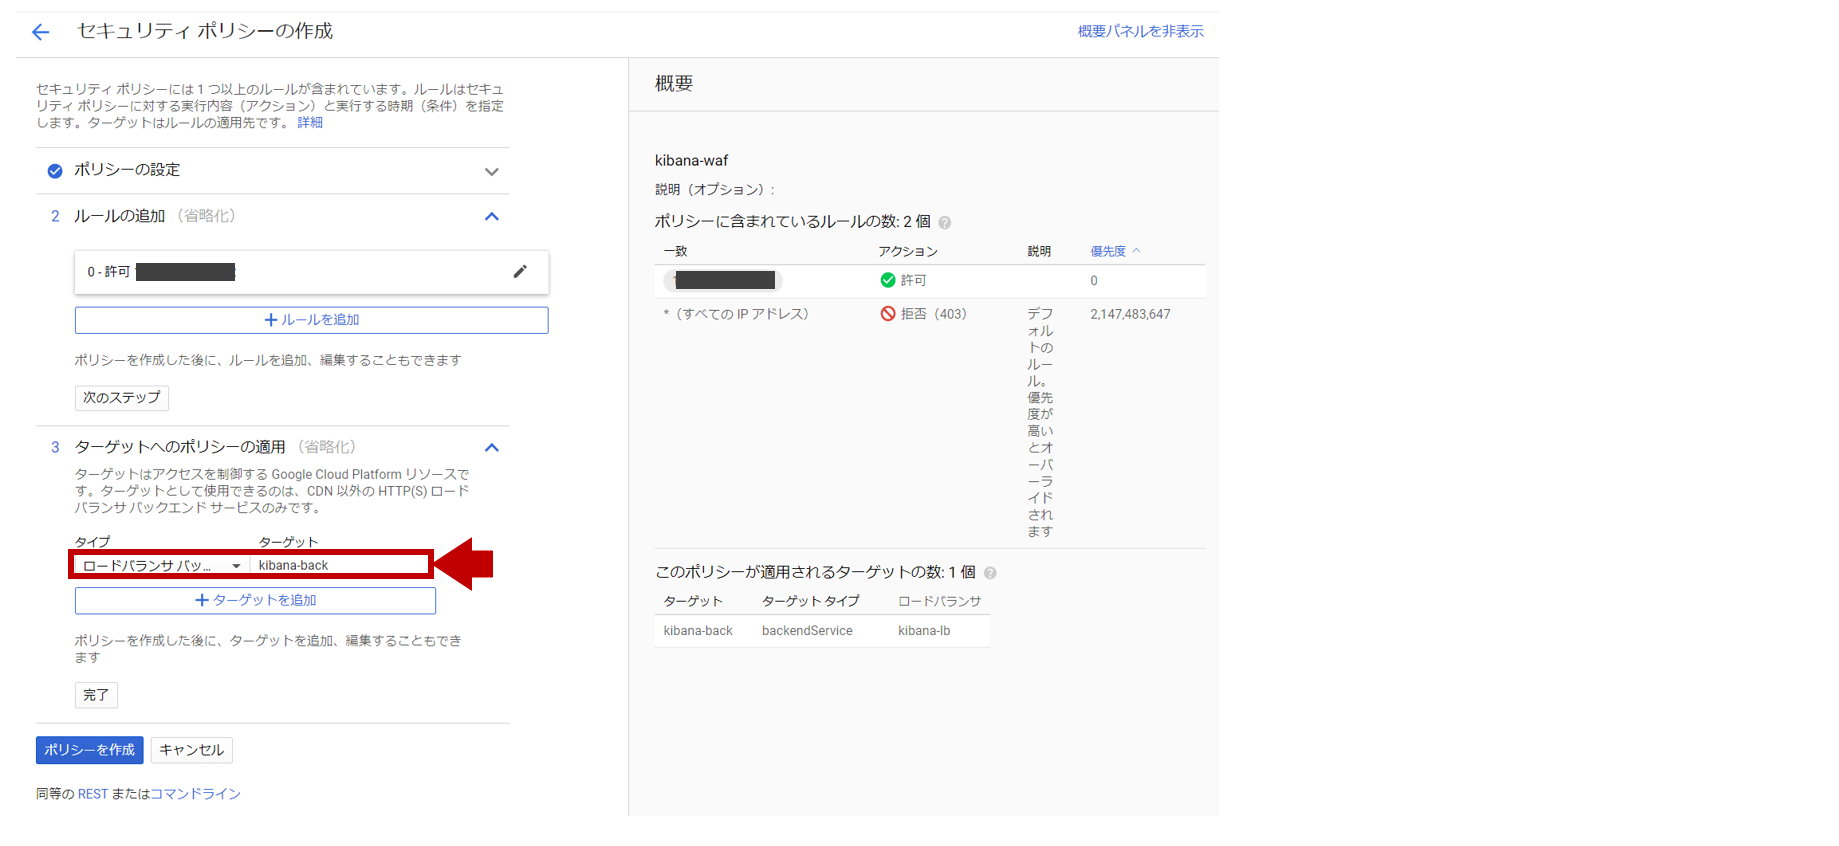
ポリシーを作成で作成されれば、完了です。
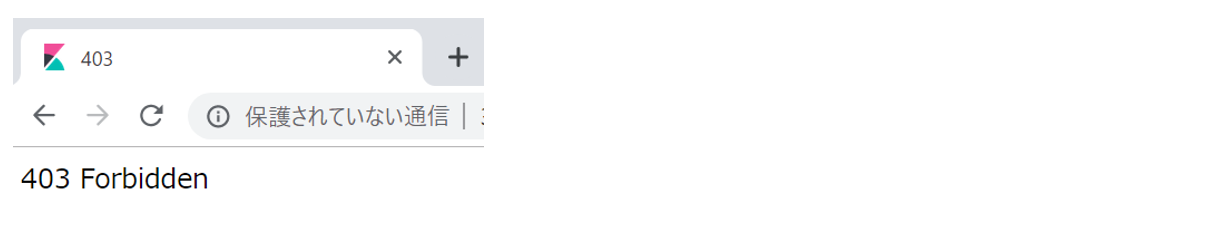
会社ネットワーク以外からKibanaにアクセスすると以下の画面となります。
【gcloudコマンド】
$ gcloud compute security-policies create kibana-waf
$ gcloud compute security-policies rules update 2147483647 \
   --security-policy kibana-waf \
   --action "deny-403"
$ gcloud compute security-policies rules create 0 \
   --security-policy kibana-waf \
   --src-ip-ranges "xxx.xxx.xxx.xxx/32" \
   --action "allow"
$ gcloud compute backend-services update kibana-back \
   --security-policy kibana-waf
【参考】
・ Setting Up HTTP(S) Load Balancing
まとめ
今回ハマったポイントは、要件を満たす最適なロードバランサのタイプの選び間違いでした。
最初は、HTTP(S)負荷分散ではなく、TCP負荷分散を選択してしまいました。
TCP80をTCP5601にポートフォワーディングするので、それでOKだと思ったんですが
TCP負荷分散ではポートフォワーディングが出来ませんでした。
公式サイトを読んでいると漠然と「HTTP/HTTPSの場合は、HTTP(S)負荷分散を推奨します」
と記載されていますが、ポートフォワーディングするだけならL7じゃなくてL4でいいじゃんと
考えたのが失敗でした。。。
あとはLoad Balancingの設定をするだけなのに、色々な箇所に設定を作らないと機能せず
どことどこがどう関連しているのか初学者には考え方が掴みにくく、AWS ELBのほうが敷居が低いなと
感じました。画面を行ったり来たりしないと設定できないので、Cloud Shell前提なんですかね、、