概要
このエントリでは、筆者が「今iOSデバイスが5G接続を使えているか」を確認するコードを書いてみた例を紹介します。
対象読者
- iOSアプリの開発に興味がある方
エントリの動機
- 筆者がiPhone 13 miniに買い替えて5Gがつかめるようになったので、使い方を調べてみたくなりました。
おことわり
このエントリの例は、機能の確認までが目的であり、開発者が手元で動作確認するまでがゴールです。実際にアプリで活用していく上では、オブジェクトの持ち方(ライフサイクル)、パーミッションの処理、複数SIMへの対応などへの対応が必要になるでしょう。
環境
本エントリでは、下記を使用しています。
- iPhone 13 mini / iOS 15.1.1
- 回線契約状況 5G接続可能な物理SIM 1枚、eSIM契約なし
- Xcode 13.1
- Mac Book Air (Apple Silicon) / macOS Monterey (12.0.1)
できたもの
イメージ
下図の画面下部に「CTRadioAccessTechnologyNRNSA」の表示がありますが、これがiPhoneがこのスクリーンショットを取った時点で、5G接続(の2つ使える方式のうちの、Non-Standalone(NRNSA)の方の接続)を使っていることを示しています。

参考までに、5Gが使える地域でビルの中に入った状態でこのアプリを動かすと、「CTRadioAccessTechnologyLTE」の表示(4Gを使っている)になります(下図)。

作り方
このエントリで紹介したコードは、GitHubに置いてあります。
接続の取得
CTTelephonyNetworkInfoを使います。(本エントリでは、iOS15以降を対象としています。iOS15未満での動作までは調べていません。)
iPhoneに搭載された回線に対応して、情報が取得できます。eSIM+物理SIMを搭載したiPhoneでは、2つ分のサービスが取得できるため、ループで回して処理しています。
ここで、筆者は自分のiPhoneの回線契約が物理SIM 1枚なのでこれでよいのですが、eSIMあわせて2枚使っている場合には、返り値の文字列が2つの連続になり、テスト用とはいえちょっとかっこわるいかも。。と思いつつ、自分が困らないのでこの程度にとどめました。
    // get current "Radio Access Technology Constants" string
    //
    // CTRadioAccessTechnologyLTE ... 4G
    // CTRadioAccessTechnologyNRNSA ... 5G, (The 5G New Radio Non-Standalone (NRNSA) radio access technology.)
    // CTRadioAccessTechnologyNR ... 5G, (The 5G New Radio (NR) radio access technology.)
    //
    // see)
    // https://developer.apple.com/documentation/coretelephony/cttelephonynetworkinfo/radio_access_technology_constants
    var connectionType: String {

        // to handle updates to user's cellar provider information,
        // use "serviceSubscriberCellularProvidersDidUpdateNotifier"
        // This App shows one-time info.
        //
        // https://developer.apple.com/documentation/coretelephony/cttelephonynetworkinfo/3024512-servicesubscribercellularprovide
        //
        let info = CTTelephonyNetworkInfo()
        // iOS device may have multiple SIMS.
        // This app simply bind their service's technologies.
        var technologies = ""
        for (service, _) in info.serviceSubscriberCellularProviders ?? [:] {
            let radio = info.serviceCurrentRadioAccessTechnology?[service] ?? ""
            if (radio != "") {
               technologies += radio
            }
        }

        let s = technologies
        return s
    }
画面
テスト用の1画面なので、View用のクラスの上にペタペタ部品を貼り付けていく方式で作りました。地図部分以外のコードは以下のような形になります。
「 // ここに、前述のconnectionType()のコード」とした部分は、一つ前の節で紹介したロジックです。
import SwiftUI
import CoreTelephony

struct ContentView: View {
    @StateObject var locationManager = LocationManager()

    var userLatitude: String {
            return "\(locationManager.lastLocation?.coordinate.latitude ?? 0)"
        }

        var userLongitude: String {
            return "\(locationManager.lastLocation?.coordinate.longitude ?? 0)"
        }


   // ここに、前述のconnectionType()のコード

    var body: some View {
        VStack {
            MapView().frame(height:300)
            HStack {
                VStack {
                    Text("Can I catch 5G?")
                        .font(.title)
                        .fontWeight(.bold)
                        .padding()
                }
                VStack {
                    Text("Connection Type")
                    Divider()
                    Text(connectionType).border(Color.gray, width: 1)
                }
            }
            VStack {
                HStack {
                    Text("latitude: \(userLatitude)")
                    Text("longitude: \(userLongitude)")
                }
            }

        }
        Divider()
    }
}
地図部分は、以下です。
(こんなに簡単でいいのか、、、と思いますが、実際のところこれで動きます。)
位置情報の取得は後述します。
import SwiftUI
import MapKit

struct MapView: View {
    @StateObject var locationManager = LocationManager()

    var body: some View {
        Map(coordinateRegion: $locationManager.region)
    }
}

struct MapView_Previews: PreviewProvider {
    static var previews: some View {
        MapView()
    }
}
位置情報取得
5G使えているかどうかだけでも良かったのですが、どこで調べたかもわかると楽しそうなので地図を表示しておくことにしました。
iOSのMapKitを使うと、地図のレンダリング全般はやってくれるので、今回の目的では位置情報を適宜渡して、地図も更新できれば足ります。
StackOverflowに参考になるコードがあったので、参考にしつつ、削ったり、自分が使いたい情報を「@Published」をつけて画面側(地図部品側)から参照できるように変更しています。
このコードもテスト用なので、実用的なアプリにするには、位置情報利用に関するパーミッションの取り方やら、パーミッションの状態によっていろいろ分岐するコードが必要になります。
ですが、これはテストアプリ、ざくっと簡単に行きます。
// based on Giuseppe Sapienza's answer in StackOverflow
// https://stackoverflow.com/questions/57681885/how-to-get-current-location-using-swiftui-without-viewcontrollers

import Foundation
import CoreLocation
import Combine
import MapKit

class LocationManager: NSObject, ObservableObject, CLLocationManagerDelegate {

    private let locationManager = CLLocationManager()
    @Published var lastLocation: CLLocation?
    @Published var region = MKCoordinateRegion()

    override init() {
        super.init()
        locationManager.delegate = self
        locationManager.desiredAccuracy = kCLLocationAccuracyBest
        // should handle Auth in prod.code
        locationManager.requestWhenInUseAuthorization()
        // It's better to call this after authorization passed.
        // This App is for testing purpose, simply call it here.
        locationManager.startUpdatingLocation()
    }

    func locationManager(_ manager: CLLocationManager, didChangeAuthorization status: CLAuthorizationStatus) {
    }

    func locationManager(_ manager: CLLocationManager, didUpdateLocations locations: [CLLocation]) {
        guard let location = locations.last else { return }
        lastLocation = location
        // print(#function, location)
        locations.last.map {
            let center = CLLocationCoordinate2D(latitude: $0.coordinate.latitude, longitude: $0.coordinate.longitude)
            let span = MKCoordinateSpan(latitudeDelta: 0.01, longitudeDelta: 0.01)
            region = MKCoordinateRegion(center: center, span: span)
        }
    }
}
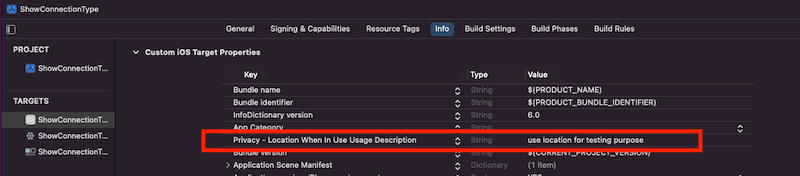
プロジェクトの設定で、"Info"の下の"Custom iOS Target Properties"を表示し、下図のように"Privacy - Location When in Use Usage Description"のキーに対して、何か文字列を与えます。自分だけが使うテストなので適当でOK。
動かす
ここまでできたら、実機を繋いで動かすだけです。
起動時に、位置情報を利用して良いかどうかをOS側が尋ねてくるので、「使用中だけ許可」を指定します。
おわりに
このエントリでは、iOS(15.0以上)で5Gが使えているかをコードで判断するための関連クラスを紹介し、実際に使ってみたアプリを添えてご紹介しました。
Swift UI、こういった、ちょっとだけ動かしたいアプリを作る上でも、簡単に書けて重宝しますね。
参考
-
iOSで5Gかどうか判断する(罠付き)
このエントリではiOS15以上に限った記載をしていますが、以下のエントリではiOS14.x系などで動作させた場合に関する注意が紹介されており、参考になると思います。 -
How to get Current Location using SwiftUI, without ViewControllers? StackOverflowのこの記事では、位置情報取得に関して幾つかの例が挙げられていました。このエントリでは、そのうちの一つを参考に、必要部分を作りました。