◆ 更新 - 2017/10/18
有効期限の切れたアクセストークンの更新が動作していなかったので、設定手順とコードと変更しました。
netatomo Connect はアクセストークンの有効期限切れを ステータスコード:403 で返してくれるのに対し、Salesforce のアクセストークン自動更新は ステータスコード:401 にしか反応しないためです。
-
- 認証の準備
- 対象:全て
- 『1. 認証の準備(改訂版)』を追記
-
- データを取得
- Netatmo.apxc を修正
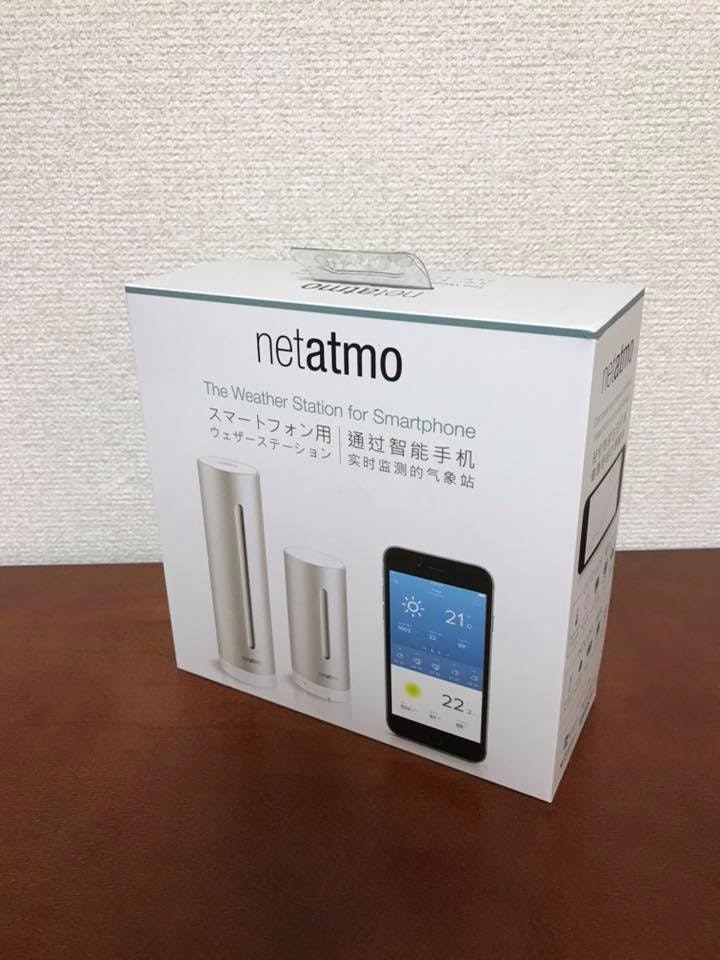
- netatmo Weather Station を買ったので、早速 Salesforce へのデータを取り込めるか試してみました!
- 定期的に Platform Event に取り込むところまでの手順の紹介です。その後のデータの活かし方はご自由に!
1. 認証の準備(トークン更新できないので今回は使えない)
データの取得元となる netatmo Connect では OAuth2 での認証機能を提供しているので、Salesforce 側はカスタム認証プロバイダーを設定しておきます。
また、カスタム認証プロバイダーによる認証情報を Apex の Callout で利用するため指定ログイン情報も設定しておきましょう。
カスタム認証プロバイダーと指定ログイン情報を設定しておくと、アクセストークンの取得や更新作業を実装する必要がなくなり、コードも綺麗に保てるので便利です。
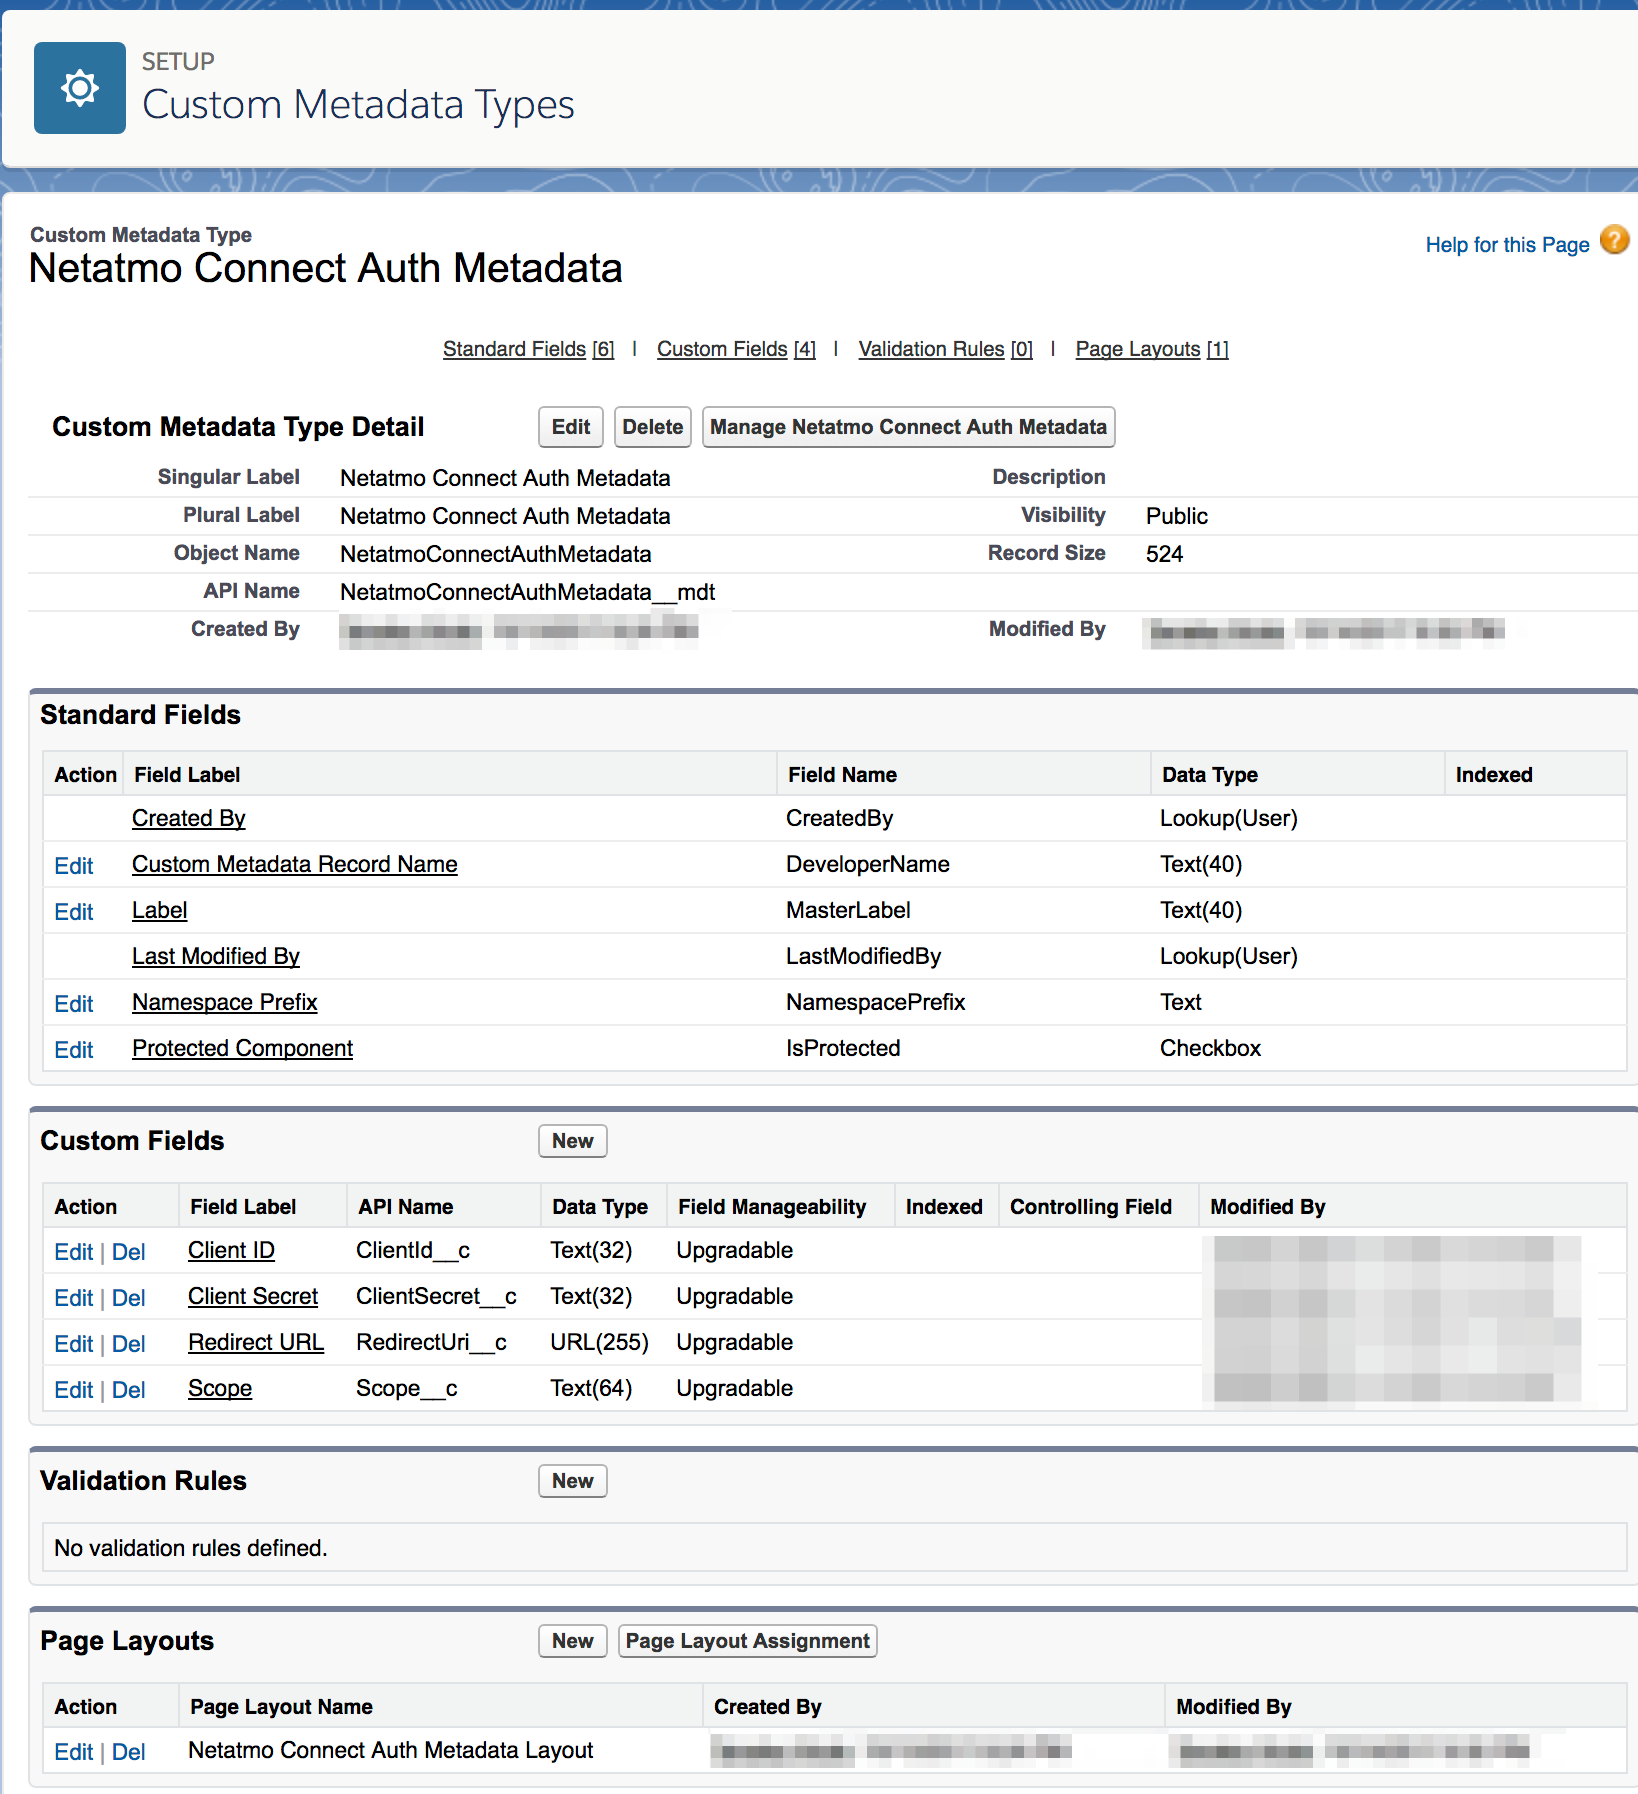
1-1. カスタムメタデータ型の作成
まずは、認証時に利用する値を保存しておくためのカスタムメタデータ型を作成します。
1-2. Auth.AuthProviderPluginClass を拡張した Apex クラスの作成
- 次に、カスタム認証プロバイダーの挙動を指定するための Apex クラスを準備します。
global class NetatmoConnectAuthProviderPlugin extends Auth.AuthProviderPluginClass {
    private class TokenResponse {
        public String access_token;
        public Long expires_in;
        public Long expire_in;
        public List<String> scope;
        public String refresh_token;
        public String error; //"invalid_request"
    }

    global String getCustomMetadataType() {
        return 'NetatmoConnectAuthMetadata__mdt';
    }

    global PageReference initiate(Map<string,string> authProviderConfiguration, String stateToPropagate) {
        String url = 'https://api.netatmo.com/oauth2/authorize'
            + '?client_id='     + authProviderConfiguration.get('ClientId__c')
            + '&redirect_uri='  + EncodingUtil.urlEncode(authProviderConfiguration.get('RedirectUri__c'), 'UTF-8')
            + '&scope='         + authProviderConfiguration.get('Scope__c')
            + '&state='         + stateToPropagate;
       return new PageReference(url);
    }

    global Auth.AuthProviderTokenResponse handleCallback(Map<string,string> authProviderConfiguration, Auth.AuthProviderCallbackState callbackState) {
        System.debug('handleCallback');
        Map<String,String> queryParams = callbackState.queryParameters;
        String code = queryParams.get('code');
        String state = queryParams.get('state');

        HttpRequest req = new HttpRequest();
        req.setEndpoint('https://api.netatmo.com/oauth2/token');
        req.setHeader('Content-Type','application/x-www-form-urlencoded;charset=UTF-8');
        req.setMethod('POST');
        req.setBody('grant_type=authorization_code'
                    + '&client_id='     + authProviderConfiguration.get('ClientId__c')
                    + '&client_secret=' + authProviderConfiguration.get('ClientSecret__c')
                    + '&code='          + code
                    + '&redirect_uri='  + EncodingUtil.urlEncode(authProviderConfiguration.get('RedirectUri__c'), 'UTF-8')
                    + '&scope='         + authProviderConfiguration.get('Scope__c'));
        Http http = new Http();
        HTTPResponse res = http.send(req);

        TokenResponse tokenResponse = (TokenResponse)JSON.deserialize(res.getBody(), TokenResponse.class);
        return new Auth.AuthProviderTokenResponse('NetatmoConnect', tokenResponse.access_token, tokenResponse.refresh_token, state);
    }

    global Auth.UserData getUserInfo(Map<string,string> authProviderConfiguration, Auth.AuthProviderTokenResponse response) {
        return new Auth.UserData(UserInfo.getUserId(), null, null, null, null, null, null, null, null, null, null);
    }

    override global Auth.OAuthRefreshResult refresh(Map<String,String> authProviderConfiguration, String refreshToken) {
        HttpRequest req = new HttpRequest();
        req.setEndpoint('https://api.netatmo.com/oauth2/token');
        req.setHeader('Content-Type','application/x-www-form-urlencoded;charset=UTF-8');
        req.setMethod('POST');
        req.setBody('grant_type=refresh_token'
                    + '&client_id='     + authProviderConfiguration.get('ChannelId__c')
                    + '&client_secret=' + authProviderConfiguration.get('ClientSecret__c')
                    + '&refresh_token=' + refreshToken);
        Http http = new Http();
        HTTPResponse res = http.send(req);
        TokenResponse tokenResponse = (TokenResponse)JSON.deserialize(res.getBody(), TokenResponse.class);
        return new Auth.OAuthRefreshResult(tokenResponse.access_token, tokenResponse.refresh_token, tokenResponse.error);
    }
}
1-3. リモートサイトの登録
- 外部サーバーへのアクセスになるので、こちらも忘れずに設定しておきましょう。

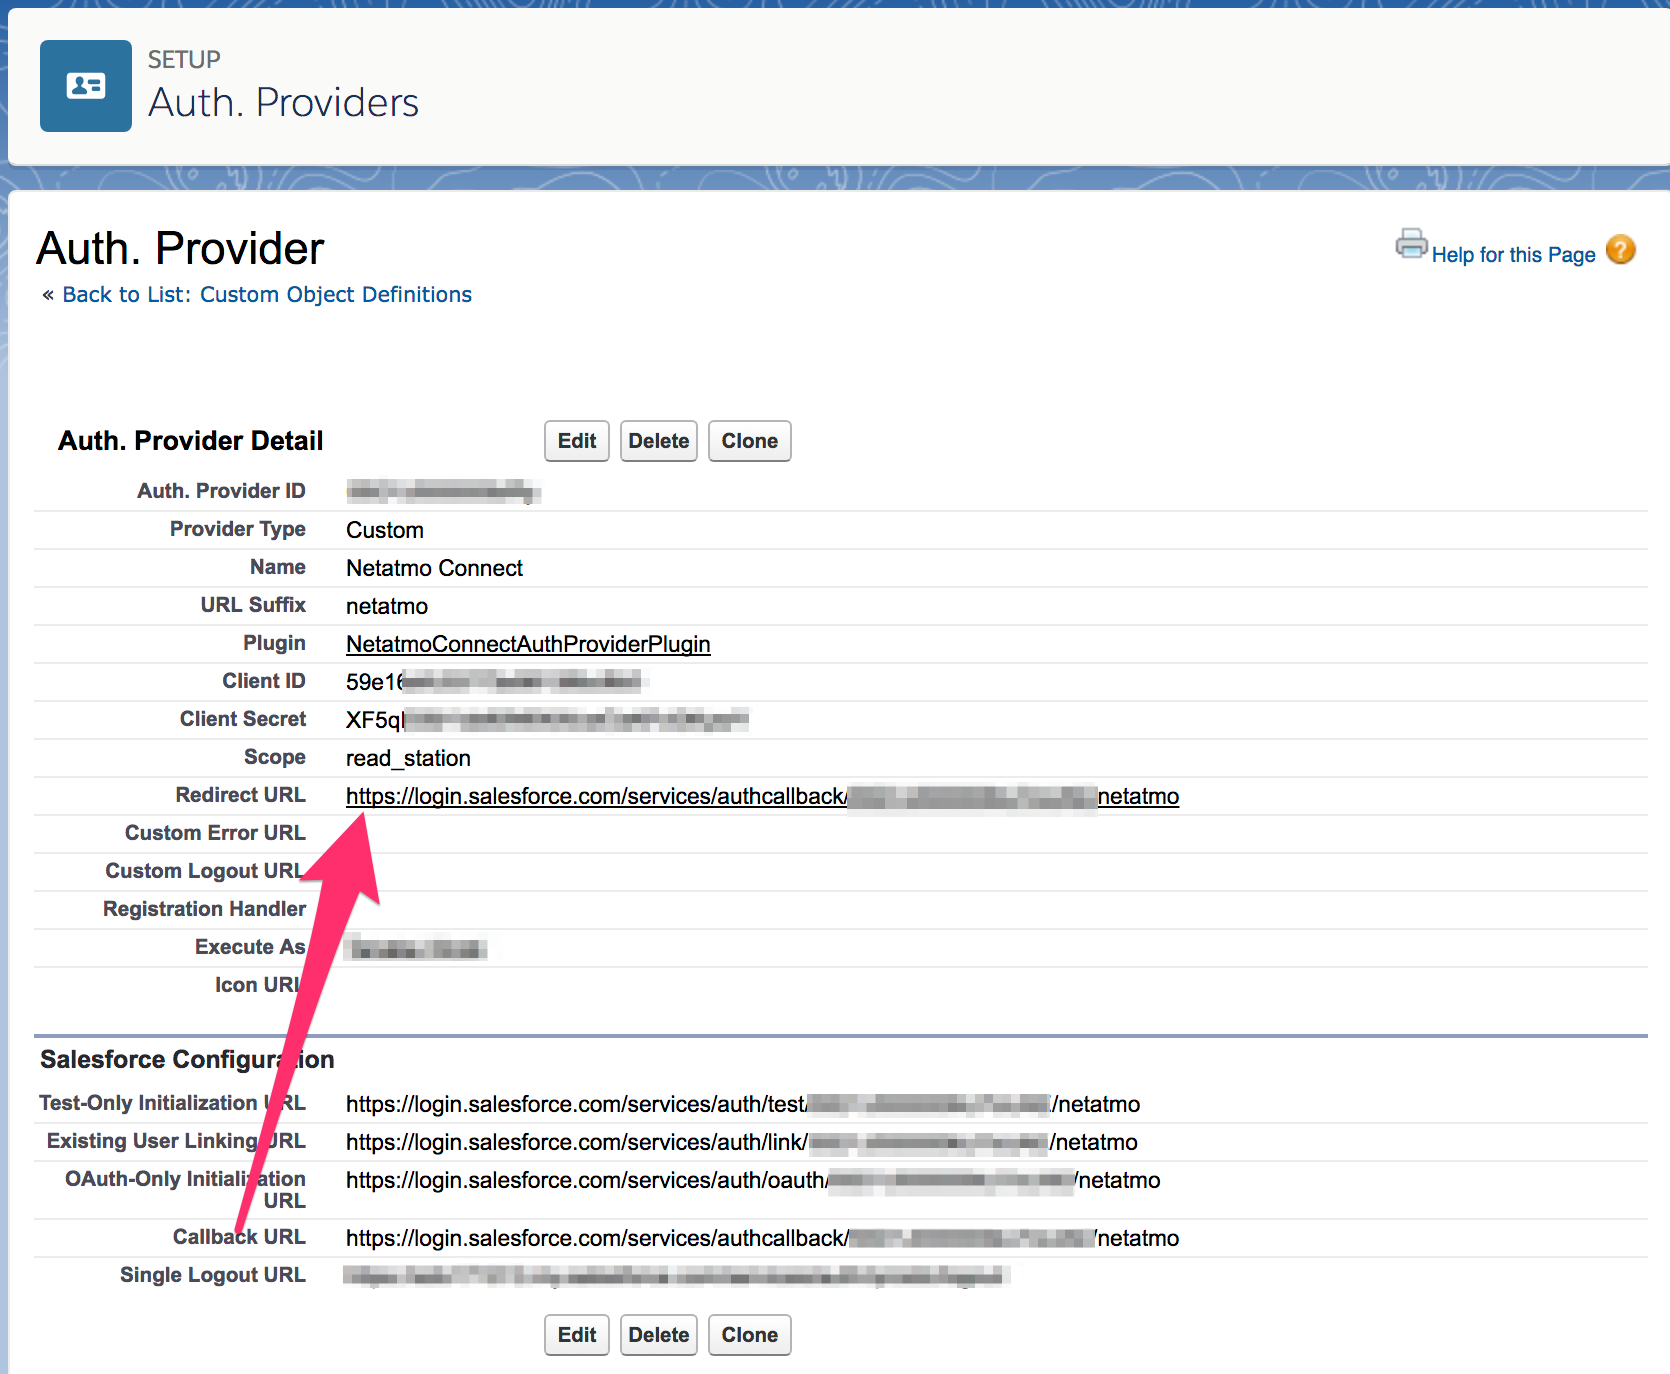
1-4. カスタム認証プロバイダーの作成
- ここまで来たら、やっとカスタム認証プロバイダーに作成に入ります。
- この作業は、ユーザーの表示言語を「英語」に変更してから行ってください。カスタム認証プロバイダーの作成を完了した後の作業は、「日本語」に戻しても問題ありません。
- Clinent ID や Client Secret は netatmo Connect のアカウントで作成したアプリの情報を参照してください。
- Redirect URL は、カスタム認証プロバイダーを保存すると自動生成されます。新規作成時は一旦空欄で保存し、生成された Callback URL を追加で貼り付けてください。
1-5.netatmo Connect アプリの設定
- カスタム認証プロバイダーで生成された Callback URL は、 Natatmo Connect で作成したアプリの Redirect URL にも設定しておきましょう。

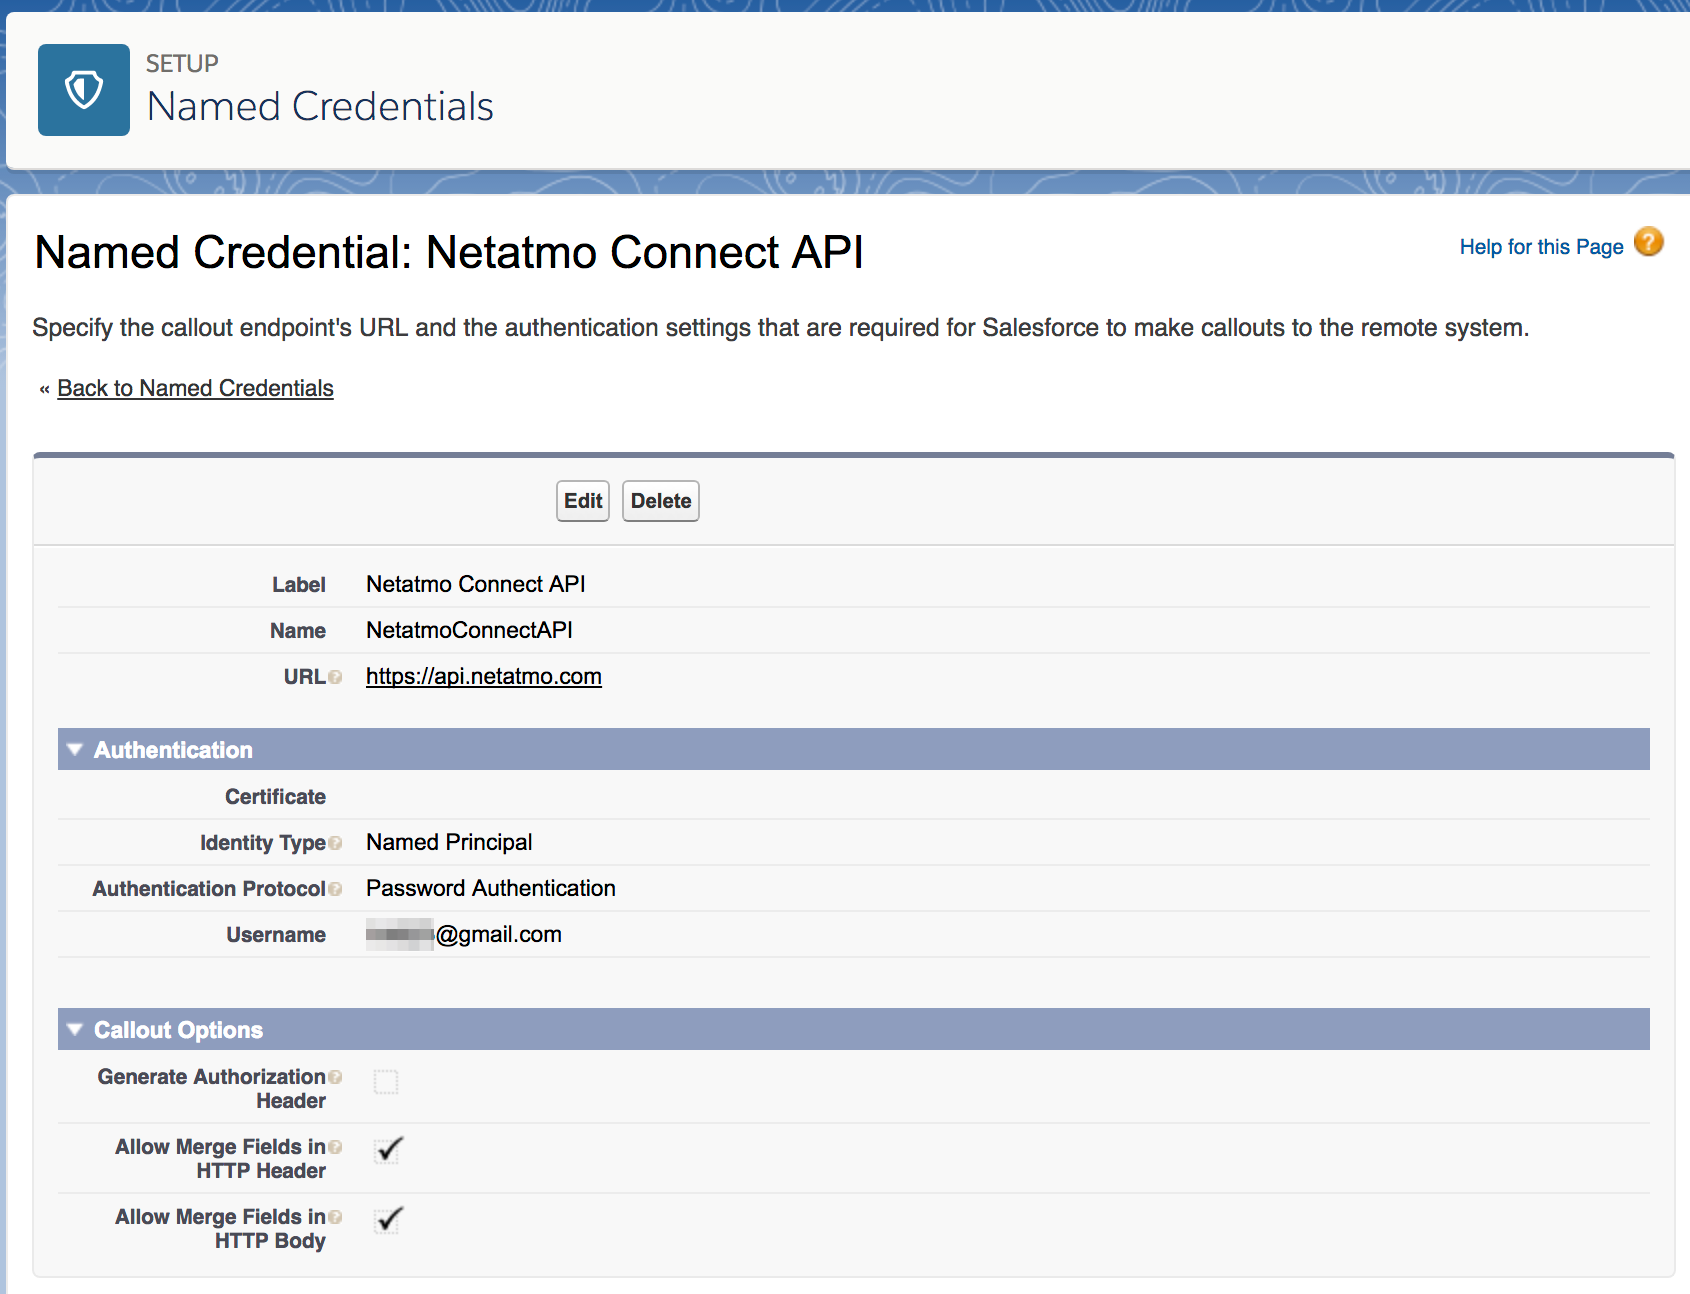
1-6. 指定ログイン情報の作成
上で作成したカスタム認証プロバイダーを利用して、指定ログイン情報を作成します。
保存と同時に認証も行っておきましょう。

1. 認証の準備(改訂版)
1-1. 指定ログイン情報を作成
netatomo Connect へのアクセスには、Client Credential による認証を利用します
これは、パスワード認証になるのでユーザー名とパスワードが必要になります。
それらを安全に管理するため、以下の利点がある指定ログイン情報を利用する事にしました。
- 入力したパスワードはマスクされる
- ある程度のアクセス制限が出来る
- Apex から SOQLクエリせずにアクセスできる
1-2. カスタム設定を作成
カスタム設定には、トークンの取得に必要な情報(Client ID, Client Secret等)と、取得したトークンを保存しておく場所とします。
トークンが丸見えになってしまいますが、スコープによってアクセスが制限されているので許容します。

続いて、上の Manage ボタンから新規の設定レコードを組織のデフォルトとして作成しておきます。

1-3. リモートサイトの登録
- 外部サーバーへのアクセスになるので、(まだ設定していない場合は)こちらも忘れずに設定しておきましょう。
2. Platform Event を作成
- 取得したデータを取り込むためのオブジェクトを用意します。
- 今回は、使ってみたかったので Platform Event を用意しました。
- 項目の桁数なんかは適当なので適宜変更してください。
- ユニークキーは Module ID (MACアドレス) です。

3 .データを取得
- いよいよデータを取得します。
- Weather Station のデータを取得したいので、
/api/getstationsdataのメソッドを使います。先程設定した指定ログイン情報もここで利用します。 - JSON で受け取ったレスポンスをパースするための Apex クラス(StationsDataResponse)も用意しました。
public class NetatmoAPI {
    private class TokenResponse {
        public String access_token;
        public Long expires_in;
        public Long expire_in;
        public List<String> scope;
        public String refresh_token;
        public String error;
    }

    /*
     * 認証方法を変更する前のデータ取得メソッド
      *
    public static StationsDataResponse getStationsData() {
        HttpRequest req = new HttpRequest();
        req.setEndpoint('callout:NetatmoConnect/api/getstationsdata');
        req.setMethod('GET');
        req.setBody('access_token={!$Credential.OAuthToken}');
        Http http = new Http();
        HTTPResponse res = http.send(req);

        String formattedBody = res.getBody().replace('"_id"', '"id"');
        return (StationsDataResponse)JSON.deserialize(formattedBody, StationsDataResponse.class);
    }
   */

    public static StationsDataResponse getStationsData() {
        NetatmoConnectAuthSetting__c setting = NetatmoConnectAuthSetting__c.getOrgDefaults();
        StationsDataResponse data = requestStationsData(setting.AccessToken__c);

        // アクセストークンの期限切れの場合、更新後再度データを取得する。
        // それ以外のエラーの場合、とりあえずアクセストークンを再取得してデータを取得しなおす。
        if (data.error != null) {
            TokenResponse tokenResponse;
            if (data.error.code == '3') { // アクセストークンが期限切れ
                tokenResponse = refreshAccessToken(setting);
            } else {  // アクセストークンが無効など
                tokenResponse = requestAccessToken(setting);
            }
            setting.AccessToken__c = tokenResponse.access_token;
            setting.RefreshToken__c = tokenResponse.refresh_token;
            data = requestStationsData(setting.AccessToken__c);
            upsert setting;
        }
        return data;
    }

    private static StationsDataResponse requestStationsData(String accessToken) {
        HttpRequest req = new HttpRequest();
        req.setEndpoint('callout:NetatmoConnectAPI/api/getstationsdata');
        req.setMethod('GET');
        req.setBody('access_token=' + accessToken);
        Http http = new Http();
        HTTPResponse response = http.send(req);
        return (StationsDataResponse)JSON.deserialize(response.getBody().replace('"_id"', '"id"'), StationsDataResponse.class);
    }
    private static TokenResponse requestAccessToken(NetatmoConnectAuthSetting__c setting) {
        HttpRequest req = new HttpRequest();
        req.setEndpoint('callout:NetatmoConnectAPI/oauth2/token');
        req.setHeader('Content-Type','application/x-www-form-urlencoded;charset=UTF-8');
        req.setMethod('POST');
        req.setBody('grant_type=password'
                    + '&client_id='     + setting.ClientId__c
                    + '&client_secret=' + setting.ClientSecret__c
                    + '&username='      + '{!$Credential.Username}'
                    + '&password='      + '{!$Credential.Password}'
                    + '&scope='         + setting.Scope__c);
        Http http = new Http();
        HTTPResponse res = http.send(req);
        return (TokenResponse)JSON.deserialize(res.getBody(), TokenResponse.class);
    }
    private static TokenResponse refreshAccessToken(NetatmoConnectAuthSetting__c setting) {
        HttpRequest req = new HttpRequest();
        req.setEndpoint('callout:NetatmoConnectAPI/oauth2/token');
        req.setHeader('Content-Type','application/x-www-form-urlencoded;charset=UTF-8');
        req.setMethod('POST');
        req.setBody('grant_type=refresh_token'
                    + '&client_id='     + setting.ClientId__c
                    + '&client_secret=' + setting.ClientSecret__c
                    + '&refresh_token=' + setting.RefreshToken__c);
        Http http = new Http();
        HTTPResponse res = http.send(req);
        return (TokenResponse)JSON.deserialize(res.getBody(), TokenResponse.class);
    }
}
public class StationsDataResponse {
    public Body body;
    public String status; // "ok",
    public double time_exec; // 0.016090154647827,
    public double time_server; // 1507961308
    public Error error;
    public class Error {
        public String code; // 2
        public String message; // "Invalid access token"
    }
    public class Body {
        public List<Device> devices;
        public User user;
    }
    public class Device {
        public String id;
        public String cipher_id; //"enc:16:OTJmOFH5EpI4XrgxUo4VnXlrtbOyN277tcQXXXXXXXXXXXXXXX"
        public Long last_status_store; //1507961214
        public List<Module> modules;
        public Place place;
        public String station_name; //"name"
        public String type; //"NAMain"
        public DashboardData dashboard_data;
        public List<String> data_type;
        public Boolean co2_calibrating; //true
        public Long  date_setup; //1507943394
        public Long last_setup; //1507943394
        public String module_name; //"name"
        public Integer firmware; //132
        public Long last_upgrade; //1507943398
        public Integer wifi_status; //34
    }
    public class Module {
        public String id; //"02:00:XX:XX:XX:XX"
        public String type; //"NAModule1"
        public Long   last_message; //1507961207
        public Long   last_seen; //1507961194
        public DashboardData dashboard_data;
        public List<String> data_type;
        public String  module_name; //"name"
        public Long    last_setup; //1507943396
        public Integer battery_vp; //6182
        public Integer battery_percent; // 100
        public Integer rf_status; //65
        public Integer firmware; //45
    }
    public class DashboardData {
        public Double AbsolutePressure; //1024.7
        public Long time_utc; //1507961143
        public Double Temperature; //16.7
        public String temp_trend; //"stable"
        public Integer Humidity; //81
        public Double Pressure; //1025.9
        public Integer Noise; // 37
        public Integer CO2; //463
        public Long date_max_temp; //1507943782
        public Long date_min_temp; //1507953575
        public Double min_temp; //16.5
        public Double max_temp; //27.6
    }
    public class Place {
        public Double altitude; // 10
        public String city; // "XXX"
        public String country; // "JP"
        public String timezone; //"Asia/Tokyo"
        public List<Double> location; //[139.12341234, 35.12341234]
    }
    public class User {
        public String mail;
        public Administrative Administrative;
    }
    public class Administrative {
        public String lang; // "ja-JP"
        public String reg_locale; // "ja-JP"
        public Integer unit; // 0
        public Integer windunit; //  0
        public Integer pressureunit; //  0
        public Integer feel_like_algo; // 0
    }
}
4. 定期的なデータの取得
4-1. バッチの作成
- 定期的にデータの取得を行いたいのスケジュールジョブを作成し、データを Platform Event にパブリッシュします。
- 屋内モジュールと屋外モジュールの情報が階層構造で取得出来ますが、今回はモジュール毎に平坦なデータが欲しかったのでネストループで分解しています。
global class WeatherStationModuleMonitorJob implements Schedulable {

    @future(callout=true)
    private static void retrieveWeatherStationModuleData() {
        StationsDataResponse res = NetatmoAPI.getStationsData();
        if (res.error != null ) return;

        List<WeatherStationModuleEvent__e > statusList = new List<WeatherStationModuleEvent__e > ();
        String email = res.body.user.mail;
        for (StationsDataResponse.Device device : res.body.devices) {
            statusList.add(new WeatherStationModuleEvent__e  (
                CO2__c             = device.dashboard_data.CO2,
                DeviceId__c        = device.id,
                Email__c           = email,
                FirmwareVersion__c = device.firmware,
                Humidity__c        = device.dashboard_data.Humidity,
                Latitude__c        = device.place.location[0],
                Longitude__c       = device.place.location[1],
                ModuleId__c        = device.id,
                ModuleName__c      = device.module_name,
                Noise__c           = device.dashboard_data.Noise,
                Pressure__c        = device.dashboard_data.Pressure,
                StationName__c     = device.station_name,
                Temperature__c     = device.dashboard_data.Temperature,
                Type__c            = device.type,
                WifiStatus__c      = device.wifi_status
            ));
            for (StationsDataResponse.Module module : device.modules) {
                statusList.add(new WeatherStationModuleEvent__e  (
                    DeviceId__c        = device.id,
                    Email__c           = email,
                    FirmwareVersion__c = module.firmware,
                    Humidity__c        = module.dashboard_data.Humidity,
                    Latitude__c        = device.place.location[0],
                    Longitude__c       = device.place.location[1],
                    ModuleId__c        = module.id,
                    ModuleName__c      = module.module_name,
                    StationName__c     = device.station_name,
                    Temperature__c     = module.dashboard_data.Temperature,
                    Type__c            = module.type,
                    WifiStatus__c      = device.wifi_status,
                    Battery__c         = module.battery_percent,
                    RFStatus__c        = module.rf_status
                ));
            }
        }
        List<Database.SaveResult> srList = EventBus.publish(statusList);
    }

    global void execute(SchedulableContext SC) {
        retrieveWeatherStationModuleData();
    }
}
4-2. バッチをスケジュール化
- 作成したバッチをスケジュール化しておきましょう。
- 開発者コンソールから、 Anonymous Window を開いて以下のコードを実行すると15分間隔でスケジュールされます。
System.schedule('WeatherStationModuleMonitorJob-00', '0  0 * * * ?', new WeatherStationModuleMonitorJob());
System.schedule('WeatherStationModuleMonitorJob-15', '0 15 * * * ?', new WeatherStationModuleMonitorJob());
System.schedule('WeatherStationModuleMonitorJob-30', '0 30 * * * ?', new WeatherStationModuleMonitorJob());
System.schedule('WeatherStationModuleMonitorJob-45', '0 45 * * * ?', new WeatherStationModuleMonitorJob());
おしまい!