先日、「データ分析に使ったNotebookをそのままPipelineに組み込みたい」という要望をいただいたのですが、あんまりそういうことができるパッケージが見つからないので、自分で作ることにしました。
自分で作るといっても既存のPipelineにちょっと機能を追加しただけです。
今回はPipelineにKedro、Notebookをそのまま組み込むためにPapermillを採用しました。
Kedroを選んだ理由は、Pipelineの構成がシンプル(関数と入出力書くだけ)なのと、ドキュメントが充実していて学習コストが低そうだったからです。誰かに使ってもらう提案をする上で、学習コストは結構重要ですね。あと、きぬいと氏が仰るように1ロゴがかっこいいです。
作ったもの
特徴は主に次の3つです。
- KedroからPapermillを使ってNotebookを実行する
- YAMLでPipelineを定義する
- Papermillが出力したNotebookをバージョン管理する
KedroからPapermillを使ってNotebookを実行する
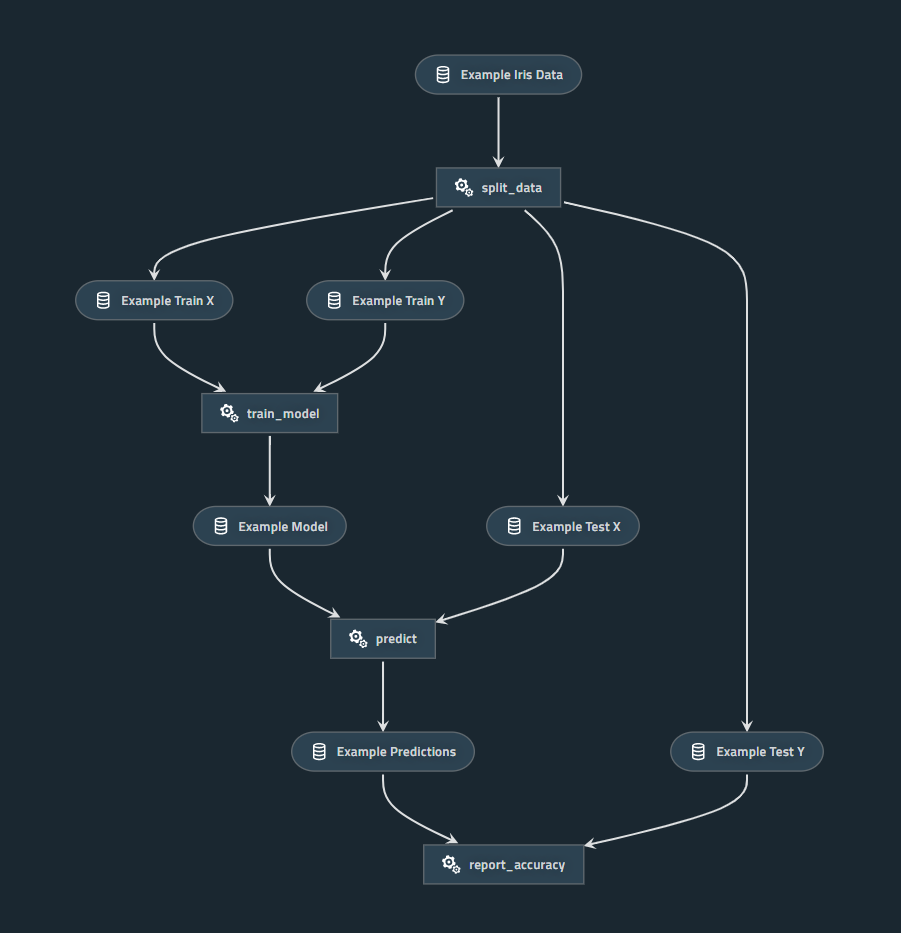
下図はKedroのHello WorldプロジェクトをKedro-Vizで可視化したもので、長方形が関数、角丸四角形がデータを表しています。
この長方形1つ1つがNotebookになるイメージです。

YAMLでPipelineを定義する
PipelineのYAMLは次のように書きます。例えばsplit_dataの出力example_train_xはtrain_modelの入力になっていて、これがPipelineのフロー(矢印)を表現しています。
# data_engineering pipeline
data_engineering:
  # split_data node
  split_data:
    nb:
      input_path: notebooks/data_engineering/split_data.ipynb
      parameters:
        test_data_ratio: 0.2
    inputs:
      - example_iris_data
    outputs:
      - example_train_x
      - example_train_y
      - example_test_x
      - example_test_y

# data_science pipeline
data_science:
  # train_model node
  train_model:
    nb:
      input_path: notebooks/data_science/train_model.ipynb
      parameters:
        num_iter: 10000
        lr: 0.01
      versioned: True
    inputs:
      - example_train_x
      - example_train_y
    outputs:
      - example_model
  # predict node
  predict:
    nb:
      input_path: notebooks/data_science/predict.ipynb
      versioned: True
    inputs:
      - example_model
      - example_test_x
    outputs:
      - example_predictions
  # report_accuracy node
  report_accuracy:
    nb:
      input_path: notebooks/data_science/report_accuracy.ipynb
      versioned: True
    inputs:
      - example_predictions
      - example_test_y
Papermillが出力したNotebookをバージョン管理する
例えばpipelines.ymlを次のように書くと、Notebookの出力先がdata/08_reporting/train_model#num_iter=10000&lr=0.01.ipynb/<version>/train_model#num_iter=10000&lr=0.01.ipynbのようになります。ここで<version>はYYYY-MM-DDThh.mm.ss.sssZでフォーマットされた日時文字列です。
# data_science pipeline
data_science:
  # train_model node
  train_model:
    nb:
      input_path: notebooks/data_science/train_model.ipynb
      parameters:
        num_iter: 10000
        lr: 0.01
      versioned: True
    inputs:
      - example_train_x
      - example_train_y
    outputs:
      - example_model
使い方
まだちゃんと整備できてないですが…。
概ね次の流れになります。
- 環境を作る
- Data Catalogを作る
- Notebookを作る
- Pipelineを作る
- 実行する
環境を作る
次のコマンドで、テンプレートプロジェクトから環境を作ります。
$ git clone https://github.com/hrappuccino/kedro-notebook-project.git
$ cd kedro-notebook-project
$ pipenv install
$ pipenv shell
Data Catalogを作る
Pipelineに登場するデータを(中間生成物も含めて)すべてData Catalogに登録します。
example_iris_data:
  type: pandas.CSVDataSet
  filepath: data/01_raw/iris.csv

example_train_x:
  type: pickle.PickleDataSet
  filepath: data/05_model_input/example_train_x.pkl

example_train_y:
  type: pickle.PickleDataSet
  filepath: data/05_model_input/example_train_y.pkl

example_test_x:
  type: pickle.PickleDataSet
  filepath: data/05_model_input/example_test_x.pkl

example_test_y:
  type: pickle.PickleDataSet
  filepath: data/05_model_input/example_test_y.pkl

example_model:
  type: pickle.PickleDataSet
  filepath: data/06_models/example_model.pkl

example_predictions:
  type: pickle.PickleDataSet
  filepath: data/07_model_output/example_predictions.pkl
Data Catalogの書き方はKedroのドキュメントを参考にしてください。
Notebookを作る
基本的にはいつも通りNotebookを作ればいいのですが、次の2つだけいつもと違います。
- データの入出力にKedroのData Catalogを使う
- Papermill用にパラメタライズする
データの入出力にKedroのData Catalogを使う
Jupyter Notebook/LabをKedroから起動します。
$ kedro jupyter notebook
$ kedro jupyter lab
Notebook内で次のマジックコマンドを実行します。これでcatalogというグローバル変数が使えるようになります。
%reload_kedro
データの読み込み/保存は、それぞれ次のように書きます。
data = catalog.load('example_iris_data')
catalog.save('example_train_x', train_x)
その他、JupyterでKedroを操作する方法はKedroのドキュメントを参考にしてください。
Papermill用にパラメタライズする
Notebookをパラメタライズするには、セルにparametersタグを付けます。

やり方はPapermillのドキュメントを参考にしてください。
Pipelineを作る
次のようなYAML(前述の再掲)でPipelineを記述します。
# data_engineering pipeline
data_engineering:
  # split_data node
  split_data:
    nb:
      input_path: notebooks/data_engineering/split_data.ipynb
      parameters:
        test_data_ratio: 0.2
    inputs:
      - example_iris_data
    outputs:
      - example_train_x
      - example_train_y
      - example_test_x
      - example_test_y

# data_science pipeline
data_science:
  # train_model node
  train_model:
    nb:
      input_path: notebooks/data_science/train_model.ipynb
      parameters:
        num_iter: 10000
        lr: 0.01
      versioned: True
    inputs:
      - example_train_x
      - example_train_y
    outputs:
      - example_model
  # predict node
  predict:
    nb:
      input_path: notebooks/data_science/predict.ipynb
      versioned: True
    inputs:
      - example_model
      - example_test_x
    outputs:
      - example_predictions
  # report_accuracy node
  report_accuracy:
    nb:
      input_path: notebooks/data_science/report_accuracy.ipynb
      versioned: True
    inputs:
      - example_predictions
      - example_test_y
実行する
Pipelineの全体/一部を実行します。
$ kedro run
$ kedro run --pipeline=data_engineering
--parallelオプションを指定すると、並列化可能なところを並列処理してくれます。
$ kedro run --parallel
その他、Pipelineの実行のやり方についてはKedroのドキュメントを参考にしてください。
(おまけ)Kedro-VizでPipelineを可視化する
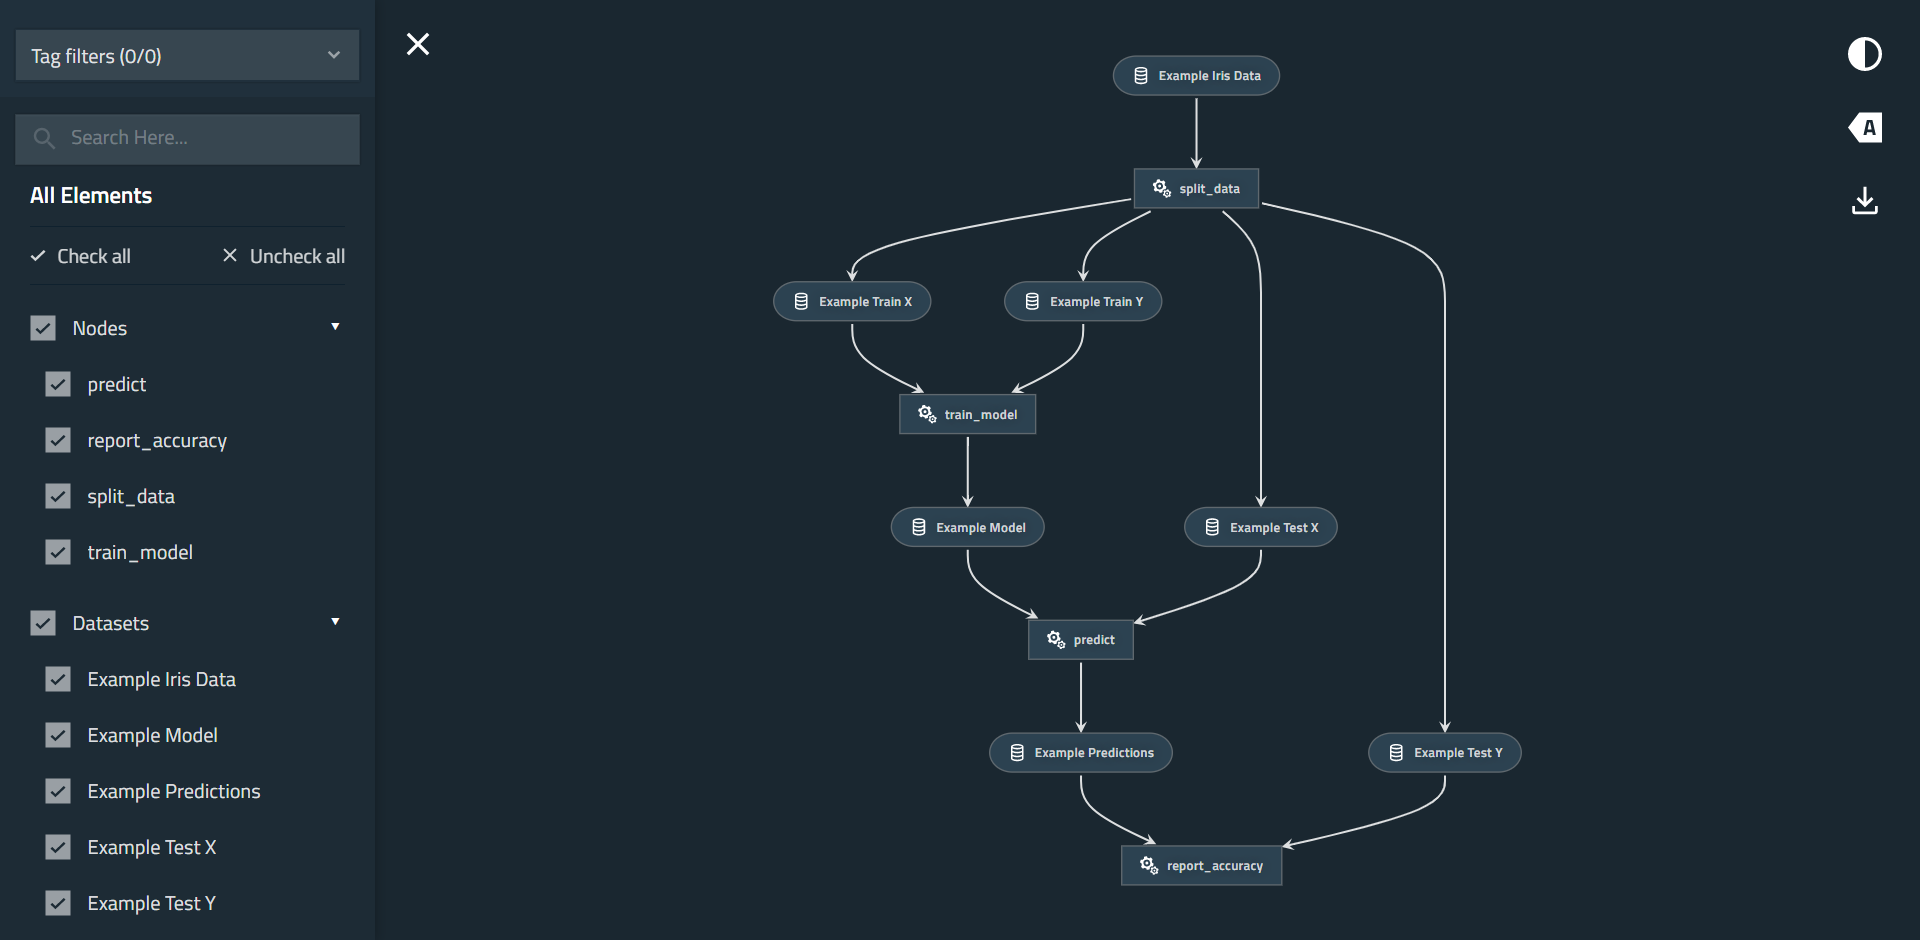
次のコマンドを実行し、http://127.0.0.1:4141/にアクセスすると下図のページが表示されます。
$ kedro viz
(おまけ)MLflowでメトリクスを追跡する
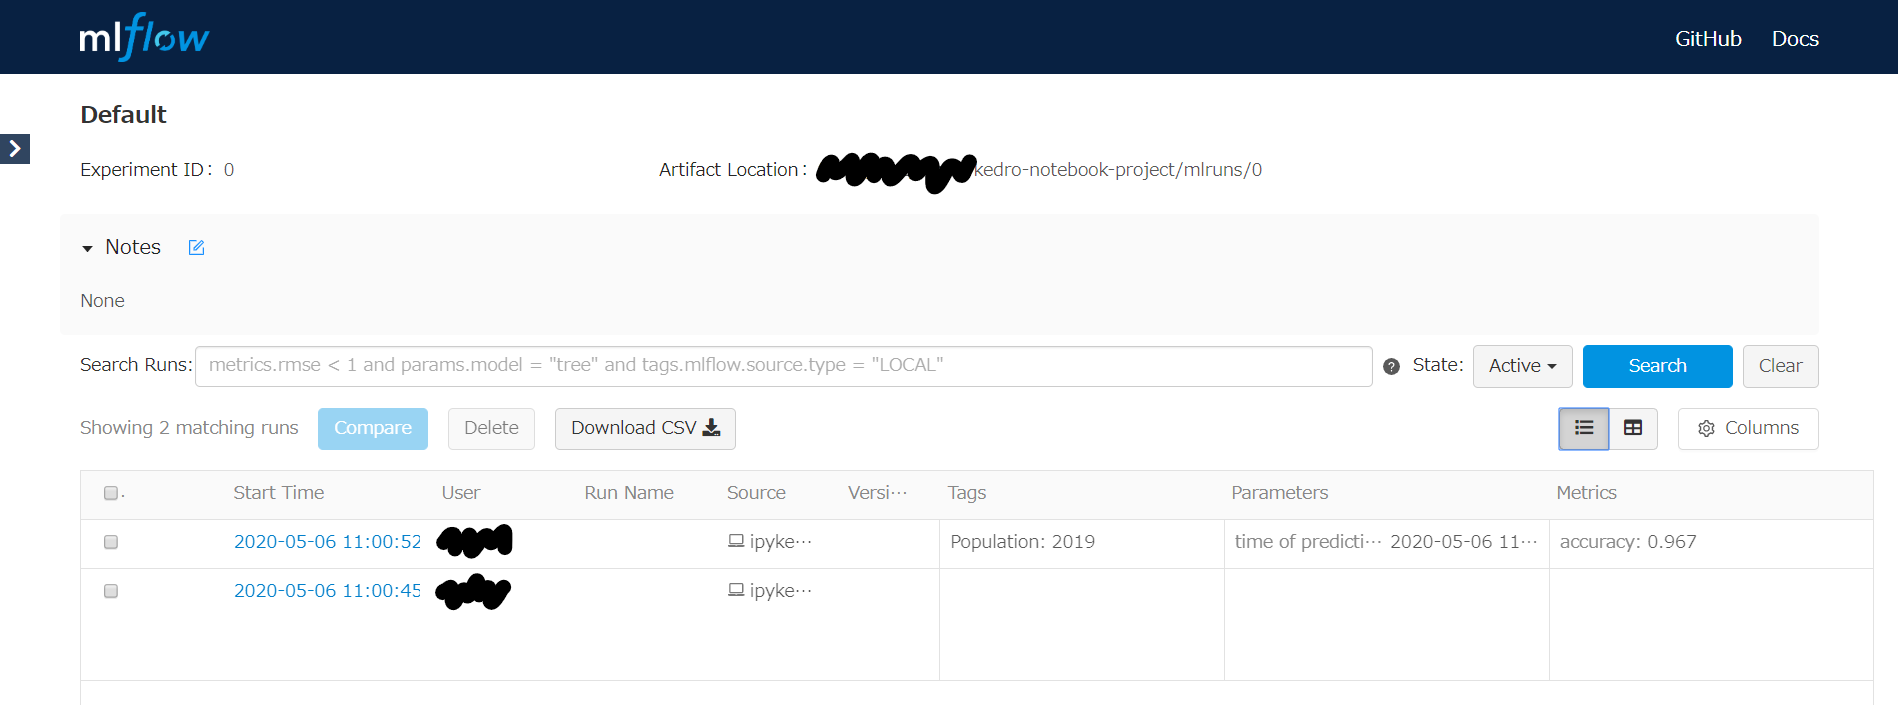
次のコマンドを実行し、http://127.0.0.1:5000/にアクセスすると下図のページが表示されます。
$ mlflow ui
Note: Notebookで実行したため、単一のExperimentが2行で記録されています。
Kedro+MLflowに関してはKedroのブログでも紹介されています。
仕組み
仕組みを簡単に説明します。
KedroからPapermillを使ってNotebookを実行する
正確には関数の中でPapermillを使ってNotebookを実行しています。
極端な話、pm.execute_notebookを実行すればいいだけなのですが、Notebookの引数とPipelineの引数を分離するために、クラスにして__init__と__call__で受け取るようにしています。最初はクロージャで実装していたのですが、並列処理するときにシリアライズできないと怒られたのでクラスにしました。
__get_default_output_pathはPapermillが出力したNotebookをバージョン管理するための処理で、詳しくは後述します。
import papermill as pm
from pathlib import Path
import os, re, urllib, datetime

DEFAULT_VERSION = datetime.datetime.now().isoformat(timespec='milliseconds').replace(':', '.') + 'Z'

def _extract_dataset_name_from_log(output_text):
    m = re.search('kedro.io.data_catalog - INFO - Saving data to `(\\w+)`', output_text)
    return m.group(1) if m else None

class NotebookExecuter:
    def __init__(self, catalog, input_path, output_path=None, parameters=None, versioned=False, version=DEFAULT_VERSION):
        self.__catalog = catalog
        self.__input_path = input_path
        self.__parameters = parameters
        self.__versioned = versioned
        self.__version = version
        self.__output_path = output_path or self.__get_default_output_path()

    def __call__(self, *args):
        nb = pm.execute_notebook(self.__input_path, self.__output_path, self.__parameters)
        dataset_names = [
            _extract_dataset_name_from_log(output['text'])
            for cell in nb['cells'] if 'outputs' in cell
            for output in cell['outputs'] if 'text' in output
        ]
        return {dataset_name: self.__catalog.load(dataset_name) for dataset_name in dataset_names if dataset_name}

    def __get_default_output_path(self):
        # 後述
YAMLでPipelineを定義する
前述のYAMLを読み込んでPipelineを作ります。
基本的に、辞書内包表記でYAMLをオブジェクトに変換しているだけです。
最後に作っている__default__のPipelineはkedro runで--pipelineオプションを省略したときに実行されるものです。
from kedro.pipeline import Pipeline, node
from kedro_local.nodes import *
import yaml

def create_pipelines(catalog, **kwargs):
    with open('conf/base/pipelines.yml') as f:
        pipelines_ = yaml.safe_load(f)

    pipelines = {
        pipeline_name: Pipeline([
            node(
                NotebookExecuter(catalog, **node_['nb']),
                node_['inputs'] if 'inputs' in node_ else None,
                {output: output for output in node_['outputs']} if 'outputs' in node_ else None,
                name=node_name,
            ) for node_name, node_ in nodes_.items()
        ]) for pipeline_name, nodes_ in pipelines_.items()
    }

    for pipeline_ in list(pipelines.values()):
        if '__default__' not in pipelines:
            pipelines['__default__'] = pipeline_
        else:
            pipelines['__default__'] += pipeline_

    return pipelines
Papermillが出力したNotebookをバージョン管理する
pipelines.ymlの定義に従って出力先を書き換えているだけです。self.__parametersが大きいとファイル名が長くなりすぎてしまうので注意が必要です。以前はハッシュ化していましたが、人に優しくないので暫定的にクエリ文字列化しています。
class NotebookExecuter:
    # 省略

    def __get_default_output_path(self):
        name, ext = os.path.splitext(os.path.basename(self.__input_path))
        if self.__parameters:
            name += '#' + urllib.parse.urlencode(self.__parameters)
        name += ext
        output_dir = Path(os.getenv('PAPERMILL_OUTPUT_DIR', ''))
        if self.__versioned:
            output_dir = output_dir / name / self.__version
            output_dir.mkdir(parents=True, exist_ok=True)
        return str(output_dir / name)
終わり
ここまで読んでくださって、ありがとうございました。
この記事で紹介したソースコードは、すべて私のGitHubに置いてあります。
もし興味があればお使いいただき、フィードバックいただけますと幸いです。

