Google Apps Script(GAS)で Nuxt 動かしてみたら面白いのでは?
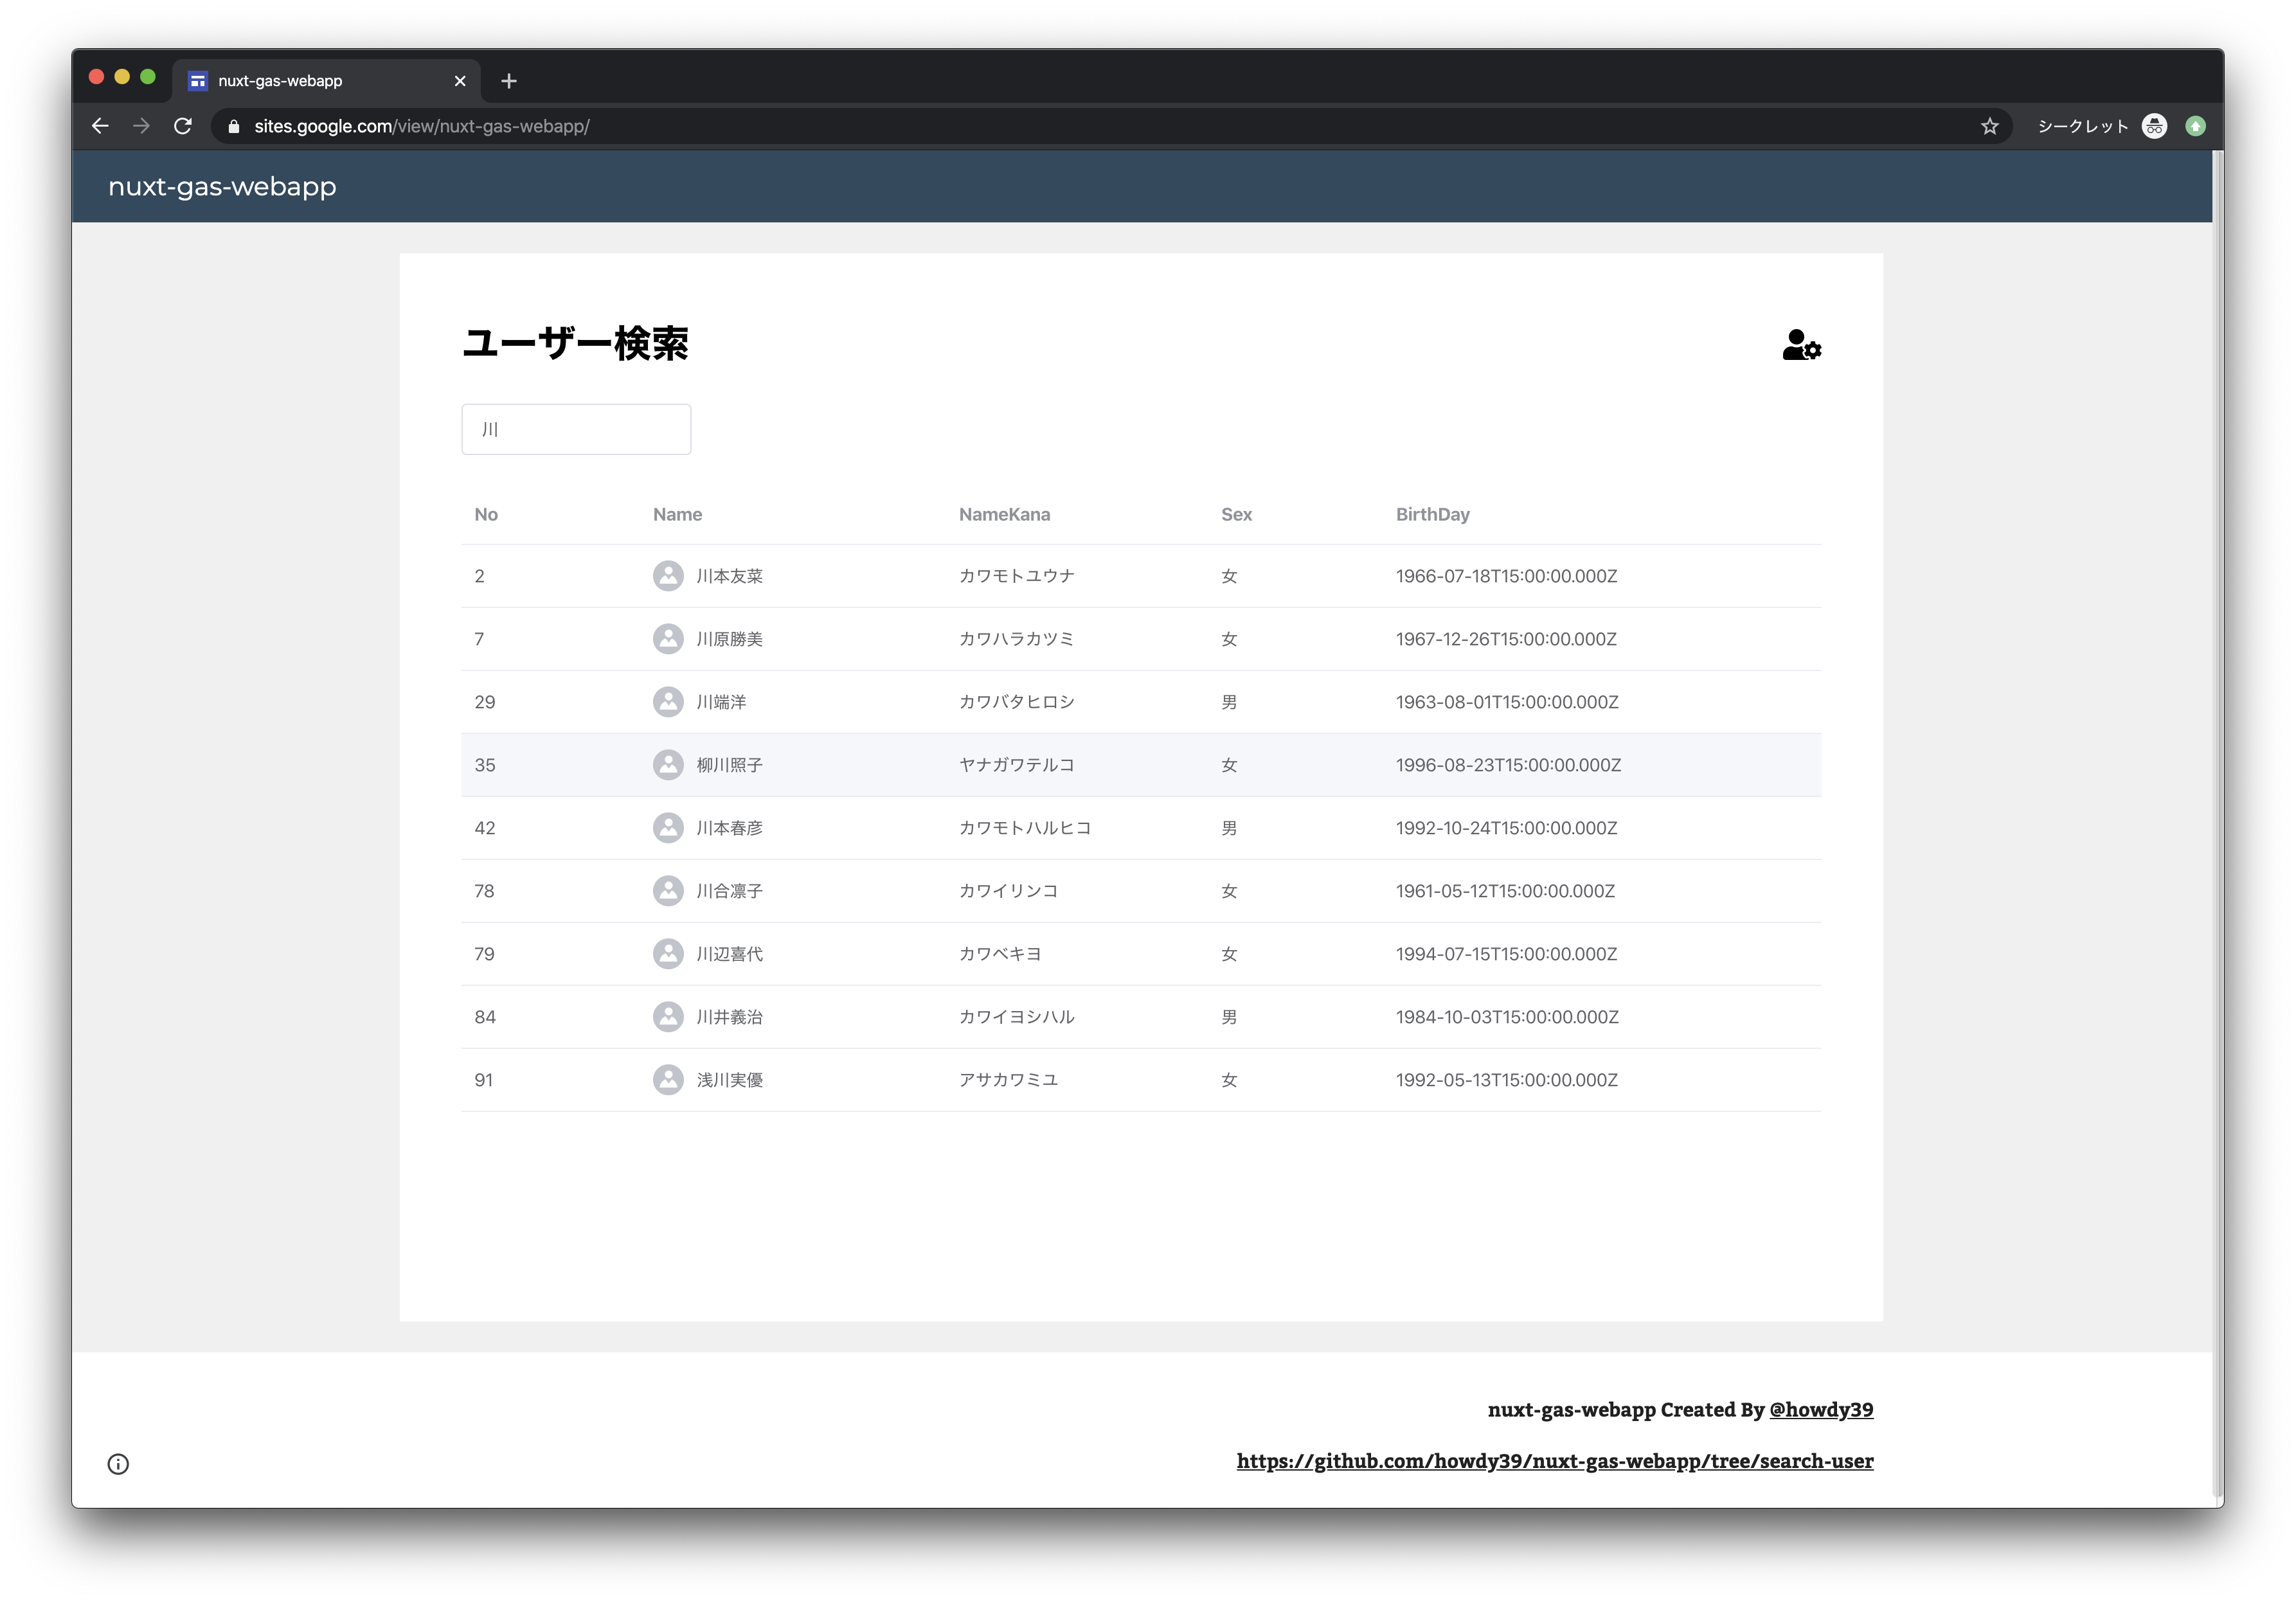
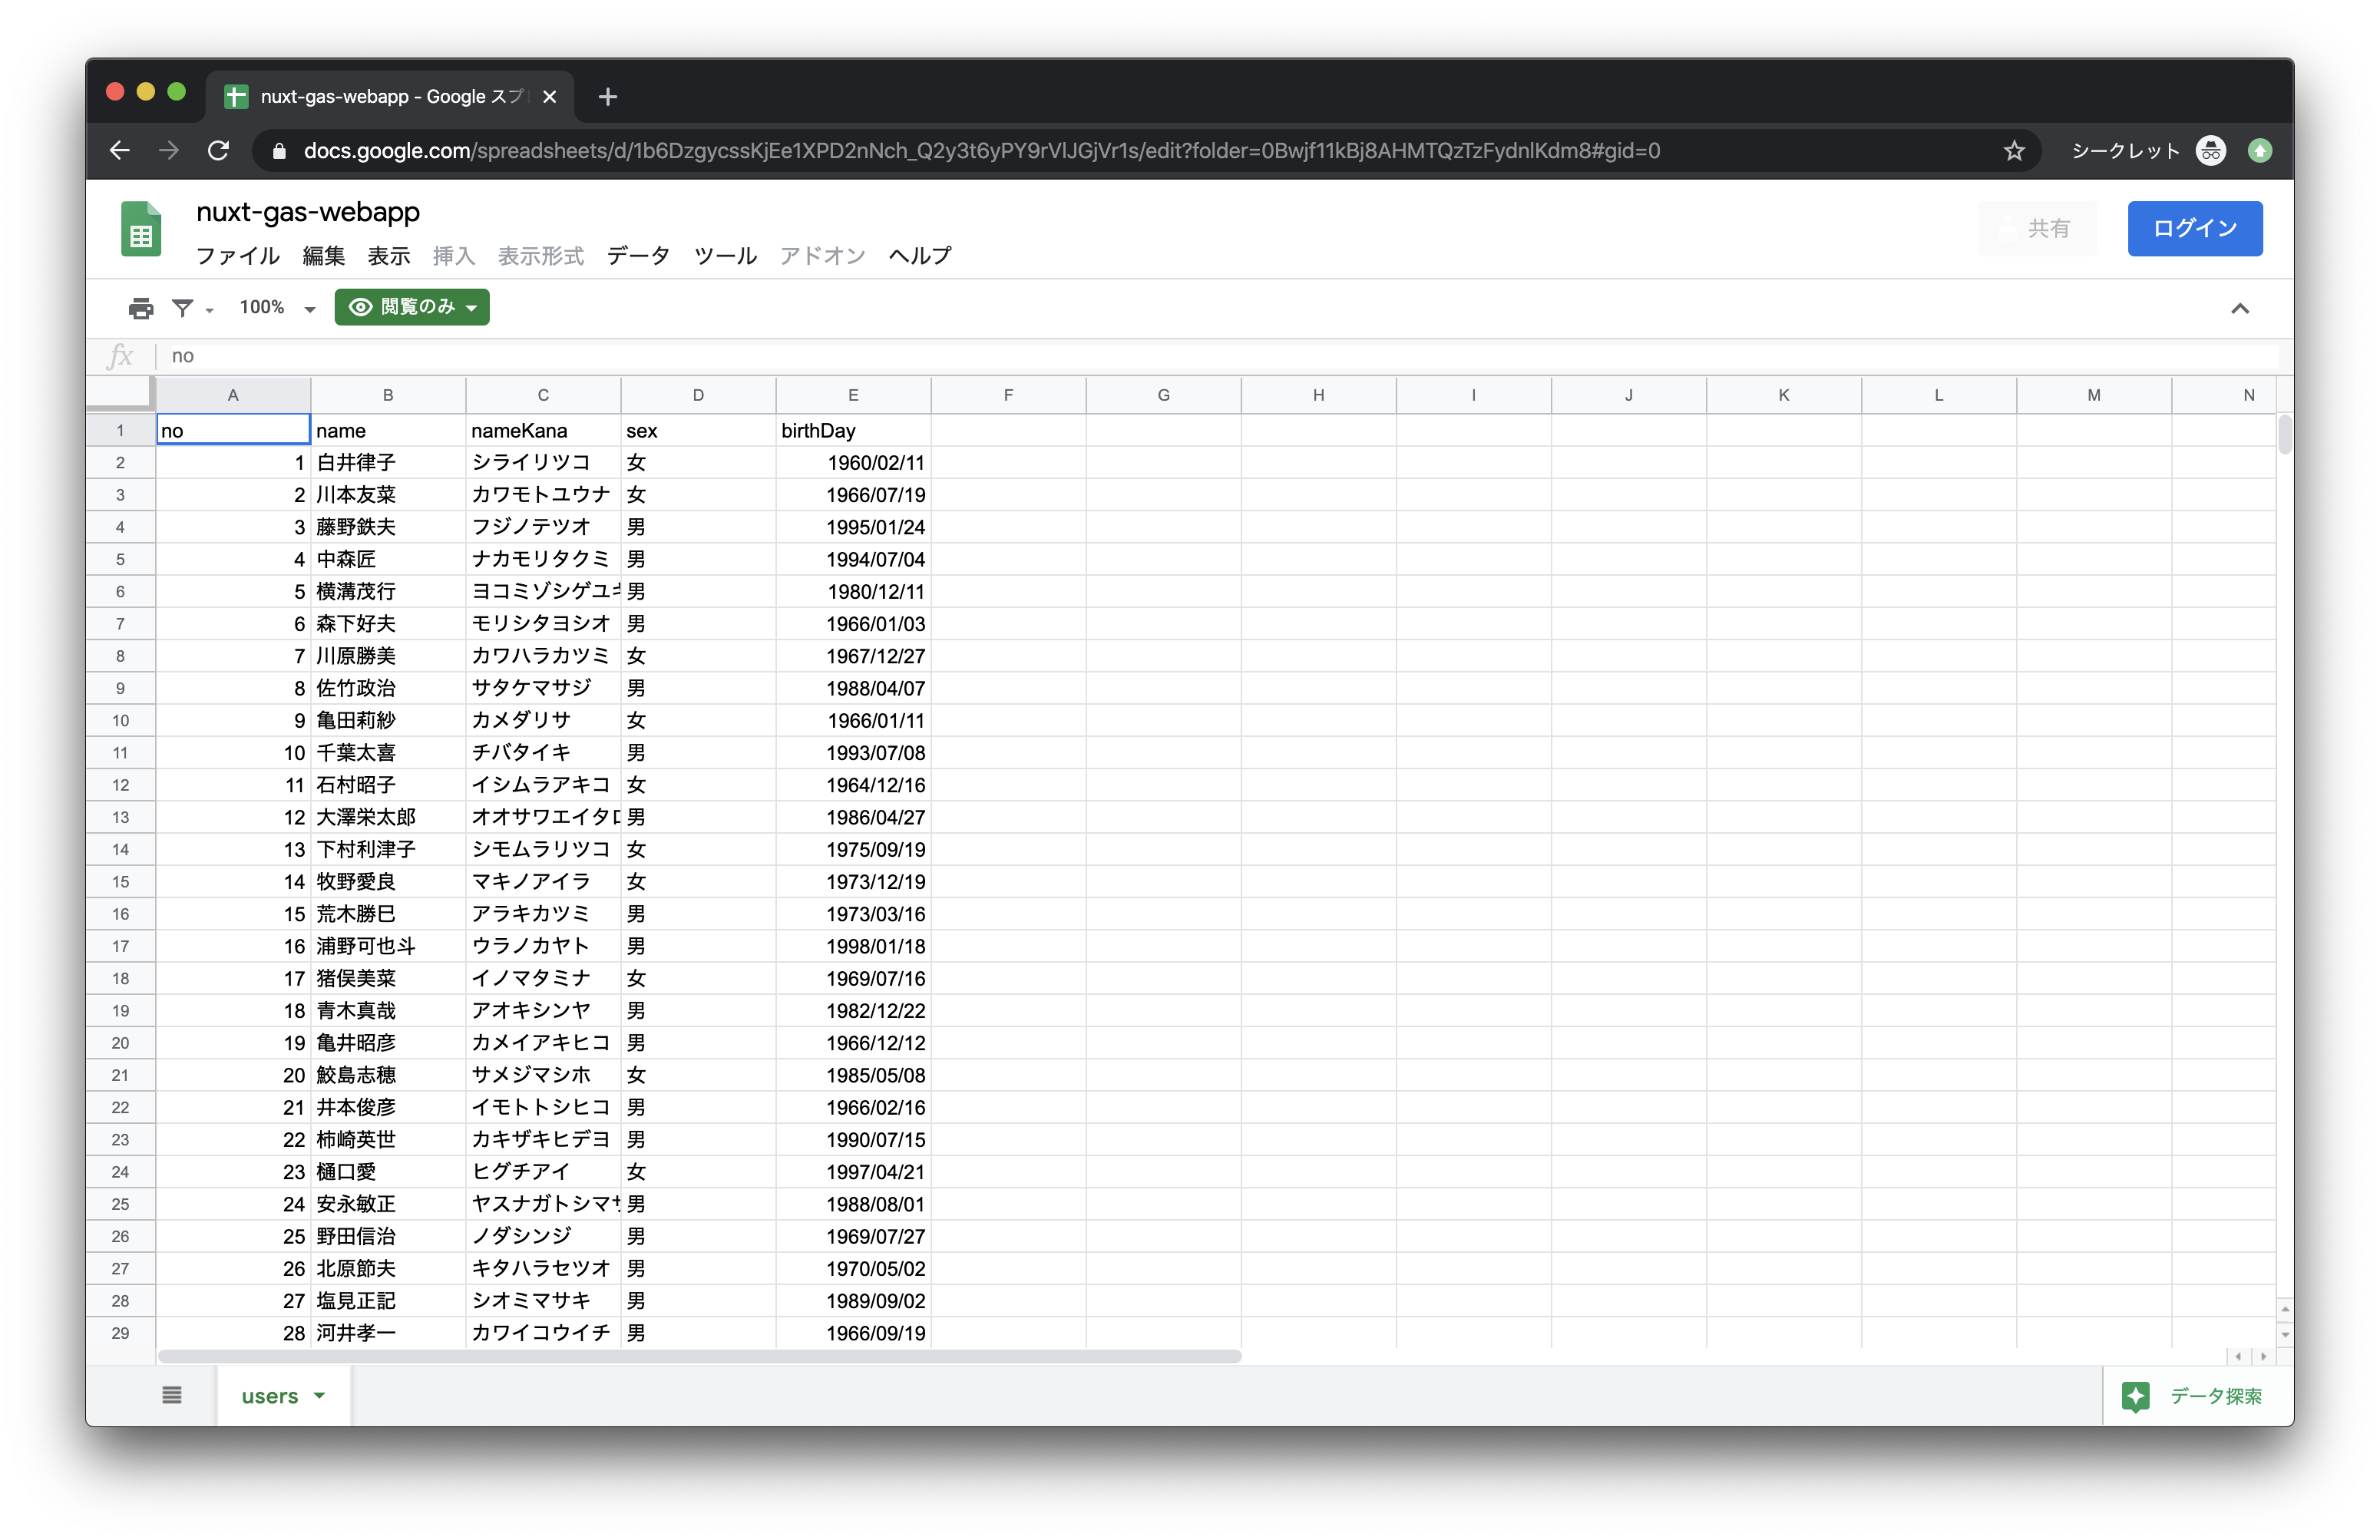
と思い試していたら動いたので、スプレッドシートをDBにして検索アプリケーションを作ってみました!
Nuxt.js の SPAモードを GAS を使って実際に GAS で Nuxt を動かしているURL
https://script.google.com/macros/s/AKfycbw9rOqkFPqP4Ym3n7goiL0tI4V3cx0UTOjVM8DTHT8FRG3ogjJs/exec
そして Google サイトで上記 URL を埋め込んで完成です。(GAS の 分かりづらい URL を隠すため)
https://sites.google.com/view/nuxt-gas-webapp/
本記事では Nuxt を GAS 上で実行するためのやりかたを主に解説してきます。
まず nuxt build を実行した結果がどうなっているのかを見ていきましょう。
そもそも Nuxt はどういうファイルを出力するのか
pages/index.vue と pages/dev.vue を作っただけのシンプルな Nuxt を build してみます。
ソース: https://github.com/howdy39/nuxt-gas-webapp/tree/master/nuxt/pages
                         Asset       Size  Chunks                         Chunk Names
../server/client.manifest.json   7.64 KiB          [emitted]
       4dc3b569e856e43cdf74.js   2.33 KiB       4  [emitted] [immutable]  runtime
       59dd7e691e85c4d93bde.js    162 KiB       1  [emitted] [immutable]  commons.app
       6f78c935aa007f5c95d3.js   44.6 KiB       0  [emitted] [immutable]  app
                      LICENSES  510 bytes          [emitted]
       c963b7fb6c8e63b5a272.js   1.19 KiB       2  [emitted] [immutable]  pages/dev
       ea45f7c48fea148ed3c9.js   2.81 KiB       3  [emitted] [immutable]  pages/index
 + 1 hidden asset
Entrypoint app = 4dc3b569e856e43cdf74.js 59dd7e691e85c4d93bde.js 6f78c935aa007f5c95d3.js
howdy39$ tree dist                                                                                        [~/projects/nuxt-gas-webapp]
dist
├── 200.html
├── README.md
├── _nuxt
│   ├── 4dc3b569e856e43cdf74.js
│   ├── 59dd7e691e85c4d93bde.js
│   ├── 6f78c935aa007f5c95d3.js
│   ├── LICENSES
│   ├── c963b7fb6c8e63b5a272.js
│   └── ea45f7c48fea148ed3c9.js
├── dev
│   └── index.html
├── favicon.ico
└── index.html

2 directories, 11 files
この中で実行に最低限必要なのは次の3つのファイル群です。
- ルーティングに必要な html
- Entrypoint である
runtimecommons.appappの js - ページごとの js である
pages/indexpages/devの js

つまり1〜3のファイル群を GAS 上で適切に読み込ませることができれば、 GAS で Nuxt を動かせます。
次は一旦 Nuxt から離れて GAS で Web 画面を作る手順を見ていきましょう。
GAS は HTML や JavaScript をホスティングすることはできない
GAS は HTML, JavaScript, CSS, 画像 などのファイルをホスティングすることはできません。
じゃあ Web サーバーとしては使えないのか、というとそうではありません。
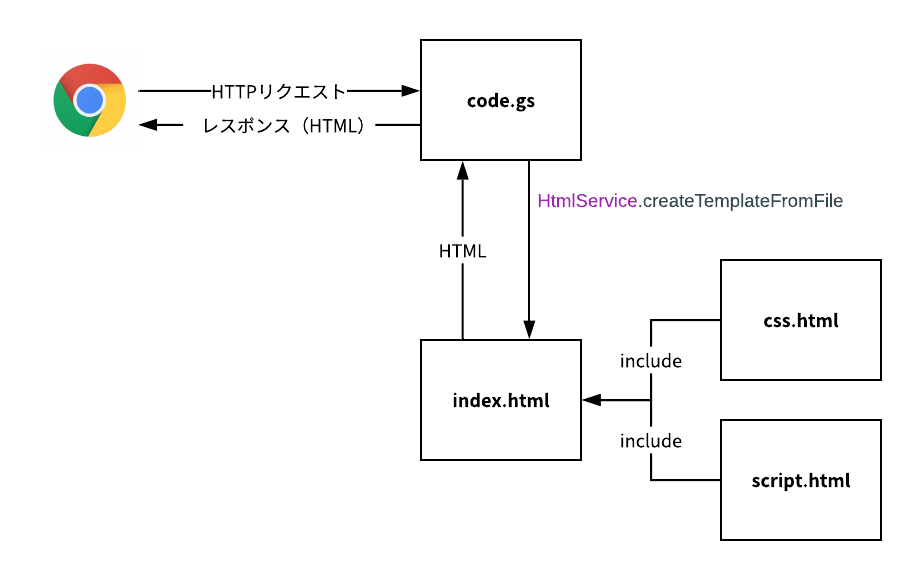
次の図のようにベースとなる html を GAS の HtmlService.createTemplateFromFile を使ってレスポンスに設定すると HTML を返す Web サーバーになります。
この html に CSS や JavaScript のファイルを include して一つのの html にまとめてしまえば、CSS や JavaScript を含めることができます。
※ または CDN を使う手法もあります。(CDNを使うのが一般的です)
※詳細は公式ドキュメントを参照ください。
HTML Service: Best Practices | Apps Script | Google Developers
Nuxt の構成と GAS で Web 画面を配信する仕組みはわかりましたね。
次は Nuxt との差分をどう埋めていくかです。
GAS で Nuxt が出力する HTML や JavaScript を読み込ませるために何を変えなければならないのか
次の2点が必要です。
- js ファイルを
<script>...</script>の形式に変換、include できるように拡張子を html に変える -
index.htmlを作成し、1で変換したファイルを include する
ポイントとして、Nuxt が生成した html は流用しません。
ほとんど JavaScript を読み込んでいるだけなので、自作して、include を使った形にするだけで十分だからです。

これらの作業を手動でやるのはしんどいので、自動で行うスクリプトを Node で作ります。
nuxt build の結果の js ファイルの一覧を読み込んでゴニョゴニョする感じです。
const fs = require('fs')
const path = require('path')
const chalk = require('chalk')
const ejs = require('ejs')
const rimraf = require('rimraf')
const mkdirp = require('mkdirp')

const sourceDirectory = 'dist/_nuxt'
const destDirectory = 'build'

try {
  console.log(chalk.blue('Start') + ' clasp-build')

  rimraf.sync(destDirectory)
  mkdirp(destDirectory)

  const filenames = fs.readdirSync(sourceDirectory).filter(name => name.endsWith('.js'))

  // GASで読み込むためにjsをhtmlに変換
  filenames.forEach((fileName) => {
    const data = fs.readFileSync(path.join(sourceDirectory, fileName), 'utf8')
    const writeData = `<script> ${data} </script>`
    fs.writeFileSync(path.join(destDirectory, fileName.replace('.js', '.html')), writeData)
    console.log(`Wrote ${fileName}`)
  })

  // index.htmlを生成して上書き
  const templateHtml = `
    <!doctype html>
    <html>
    <body>
        <div id="__nuxt"><style>#nuxt-loading{visibility:hidden;opacity:0;position:absolute;left:0;right:0;top:0;bottom:0;display:flex;justify-content:center;align-items:center;flex-direction:column;animation:nuxtLoadingIn 10s ease;-webkit-animation:nuxtLoadingIn 10s ease;animation-fill-mode:forwards;overflow:hidden}@keyframes nuxtLoadingIn{0%{visibility:hidden;opacity:0}20%{visibility:visible;opacity:0}100%{visibility:visible;opacity:1}}@-webkit-keyframes nuxtLoadingIn{0%{visibility:hidden;opacity:0}20%{visibility:visible;opacity:0}100%{visibility:visible;opacity:1}}#nuxt-loading>div,#nuxt-loading>div:after{border-radius:50%;width:5rem;height:5rem}#nuxt-loading>div{font-size:10px;position:relative;text-indent:-9999em;border:.5rem solid #f5f5f5;border-left:.5rem solid #fff;-webkit-transform:translateZ(0);-ms-transform:translateZ(0);transform:translateZ(0);-webkit-animation:nuxtLoading 1.1s infinite linear;animation:nuxtLoading 1.1s infinite linear}#nuxt-loading.error>div{border-left:.5rem solid #ff4500;animation-duration:5s}@-webkit-keyframes nuxtLoading{0%{-webkit-transform:rotate(0);transform:rotate(0)}100%{-webkit-transform:rotate(360deg);transform:rotate(360deg)}}@keyframes nuxtLoading{0%{-webkit-transform:rotate(0);transform:rotate(0)}100%{-webkit-transform:rotate(360deg);transform:rotate(360deg)}}</style><script>window.addEventListener("error",function(){var e=document.getElementById("nuxt-loading");e&&(e.className+=" error")})</script><div id="nuxt-loading" aria-live="polite" role="status"><div>Loading...</div></div></div>
        <% filenames.forEach(function (value, key) { %>
          <?!= include('<%= value %>'); ?>
        <% }); %>
    </body>
    </html>
    `
  const html = ejs.render(templateHtml, { filenames: filenames.map(f => f.replace('.js', '')) })
  fs.writeFileSync(path.join(destDirectory, 'index.html'), html)
  console.log(`Wrote index.html`)
} catch (e) {
  console.log(chalk.red(e))
}

console.log(chalk.green(`Success`) + ' clasp-build')
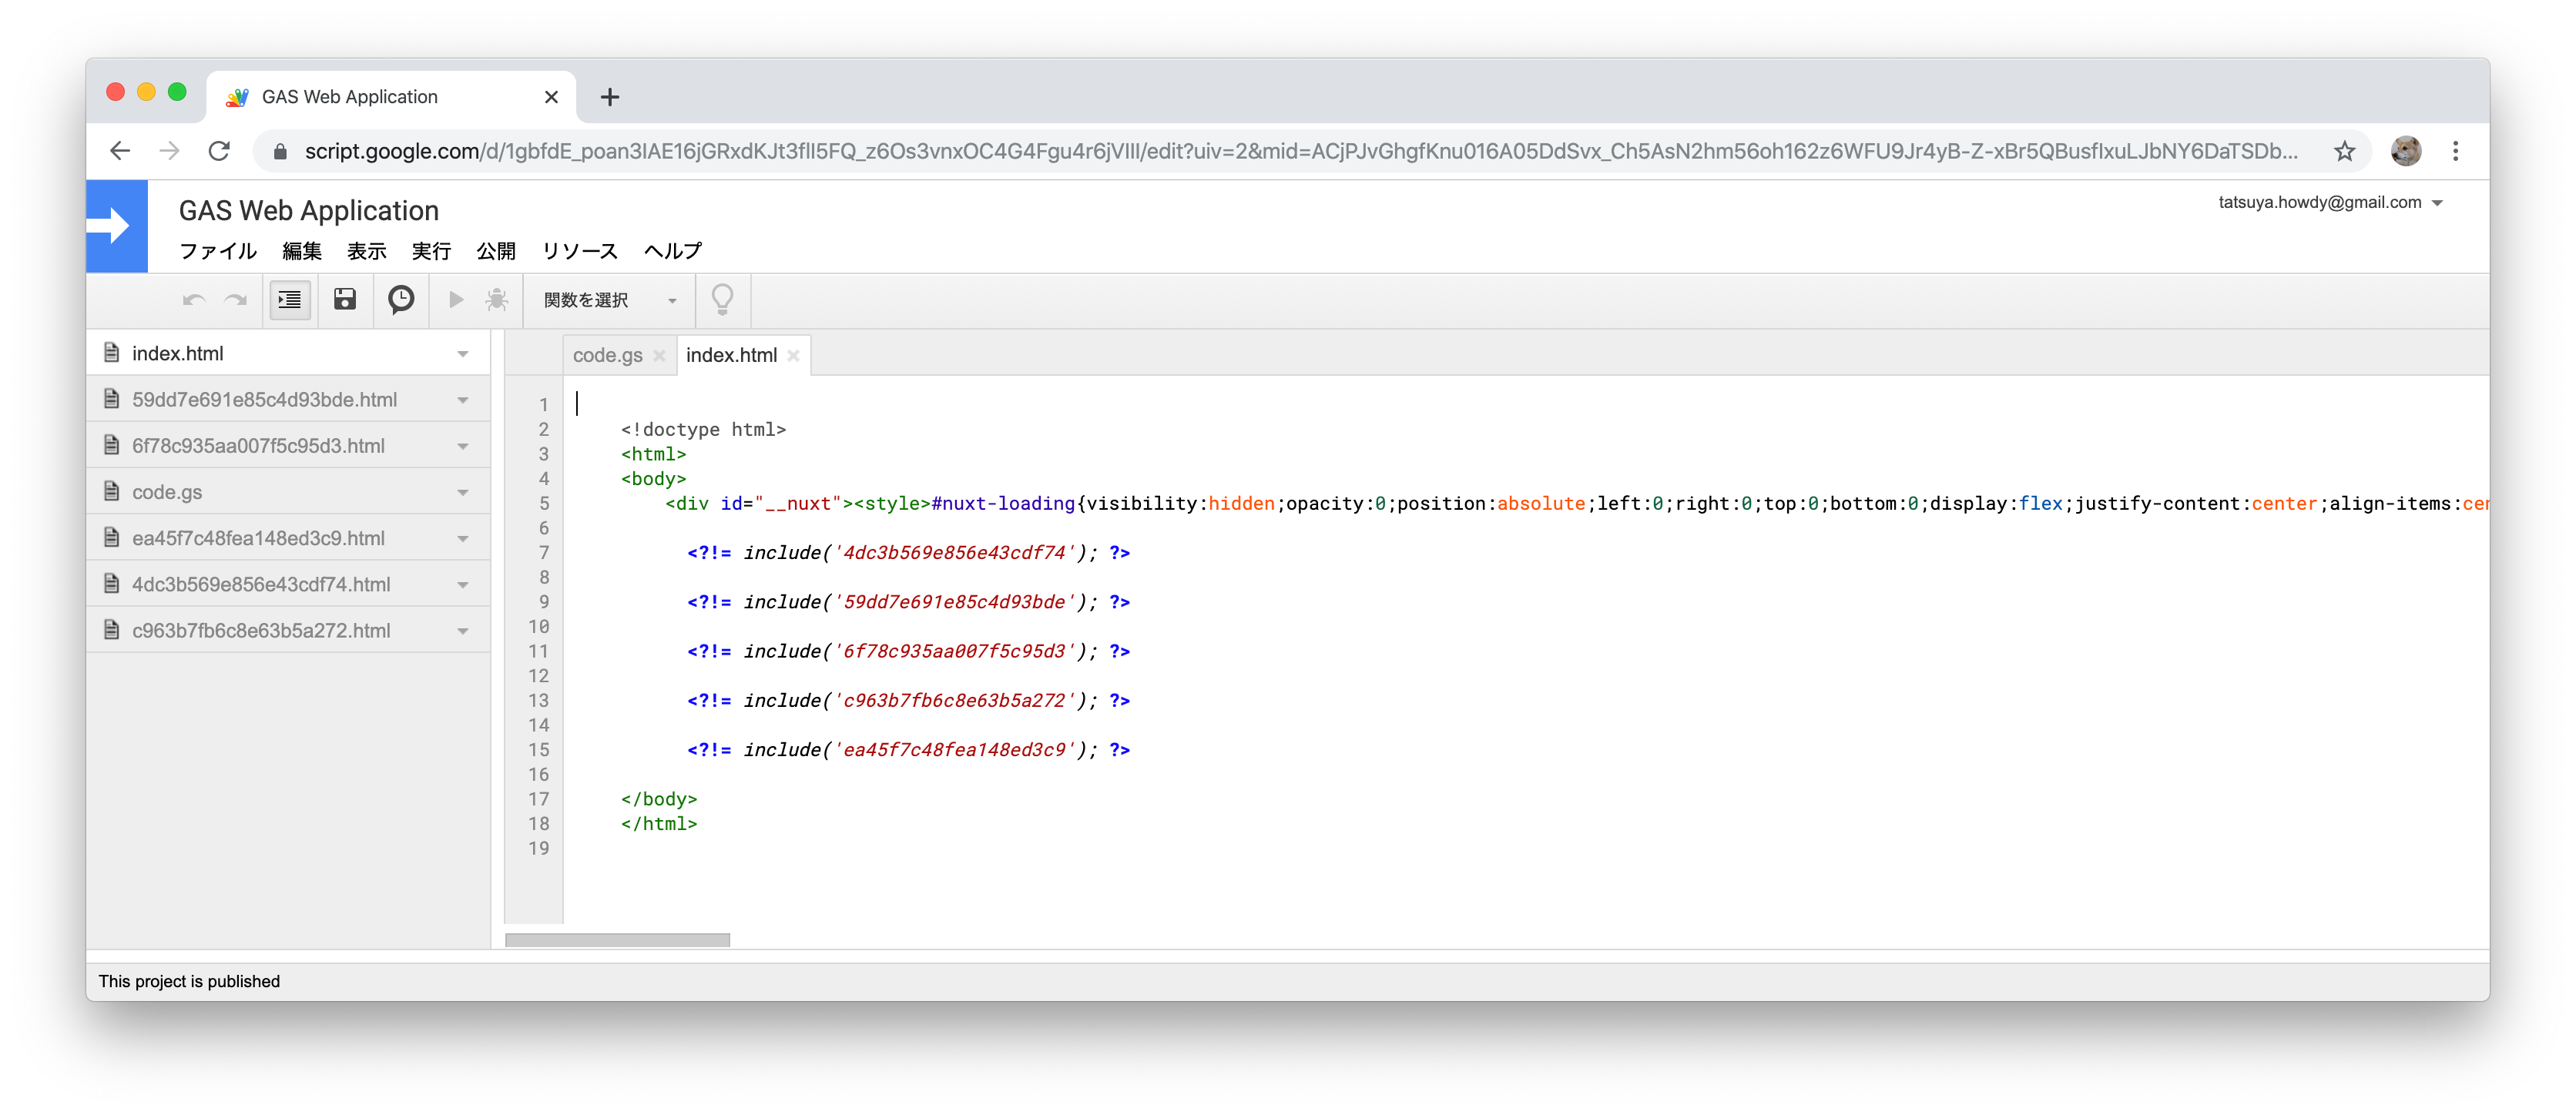
これを実行した結果を clasp push で GAS にデプロイします。
※ GAS のGoogle謹製CLIツール clasp - Qiita
すると次のようなファイルになります。
もうひとつのポイント
GAS の Web アプリケーション は https://script.google.com/macros/s/AKfycbwZEWZGSK7fFJD74gmvna8efkJQkjTNYUzt4gfHtCEXhfEiC4GZ/exec のような URL でアクセスしますがこの URL が HTML をそのまま返すわけではありません。
次のような多重のサンドボックス構造になっているのです。

つまり exec ページが読み込まれるわけでもありませんし、 「URLを 〜exec/dev にして pages/dev.vue を表示しよう!」 なんてこともできません。
そのため次のように nuxt.config.js のルーティングを変えてかならず index.vue が読み込まれるようにします。
  router: {
    extendRoutes (routes, resolve) {
      routes.push({
        name: 'custom',
        path: '*',
        component: resolve(__dirname, 'nuxt/pages/index.vue')
      })
    }
  },
ウェブアプリケーションとして導入
デプロイまで終わったら 「公開」 ー 「ウェブアプリケーションとして導入」 を実行するだけです。

では、実際にウェブアプリケーションを見てみましょう。
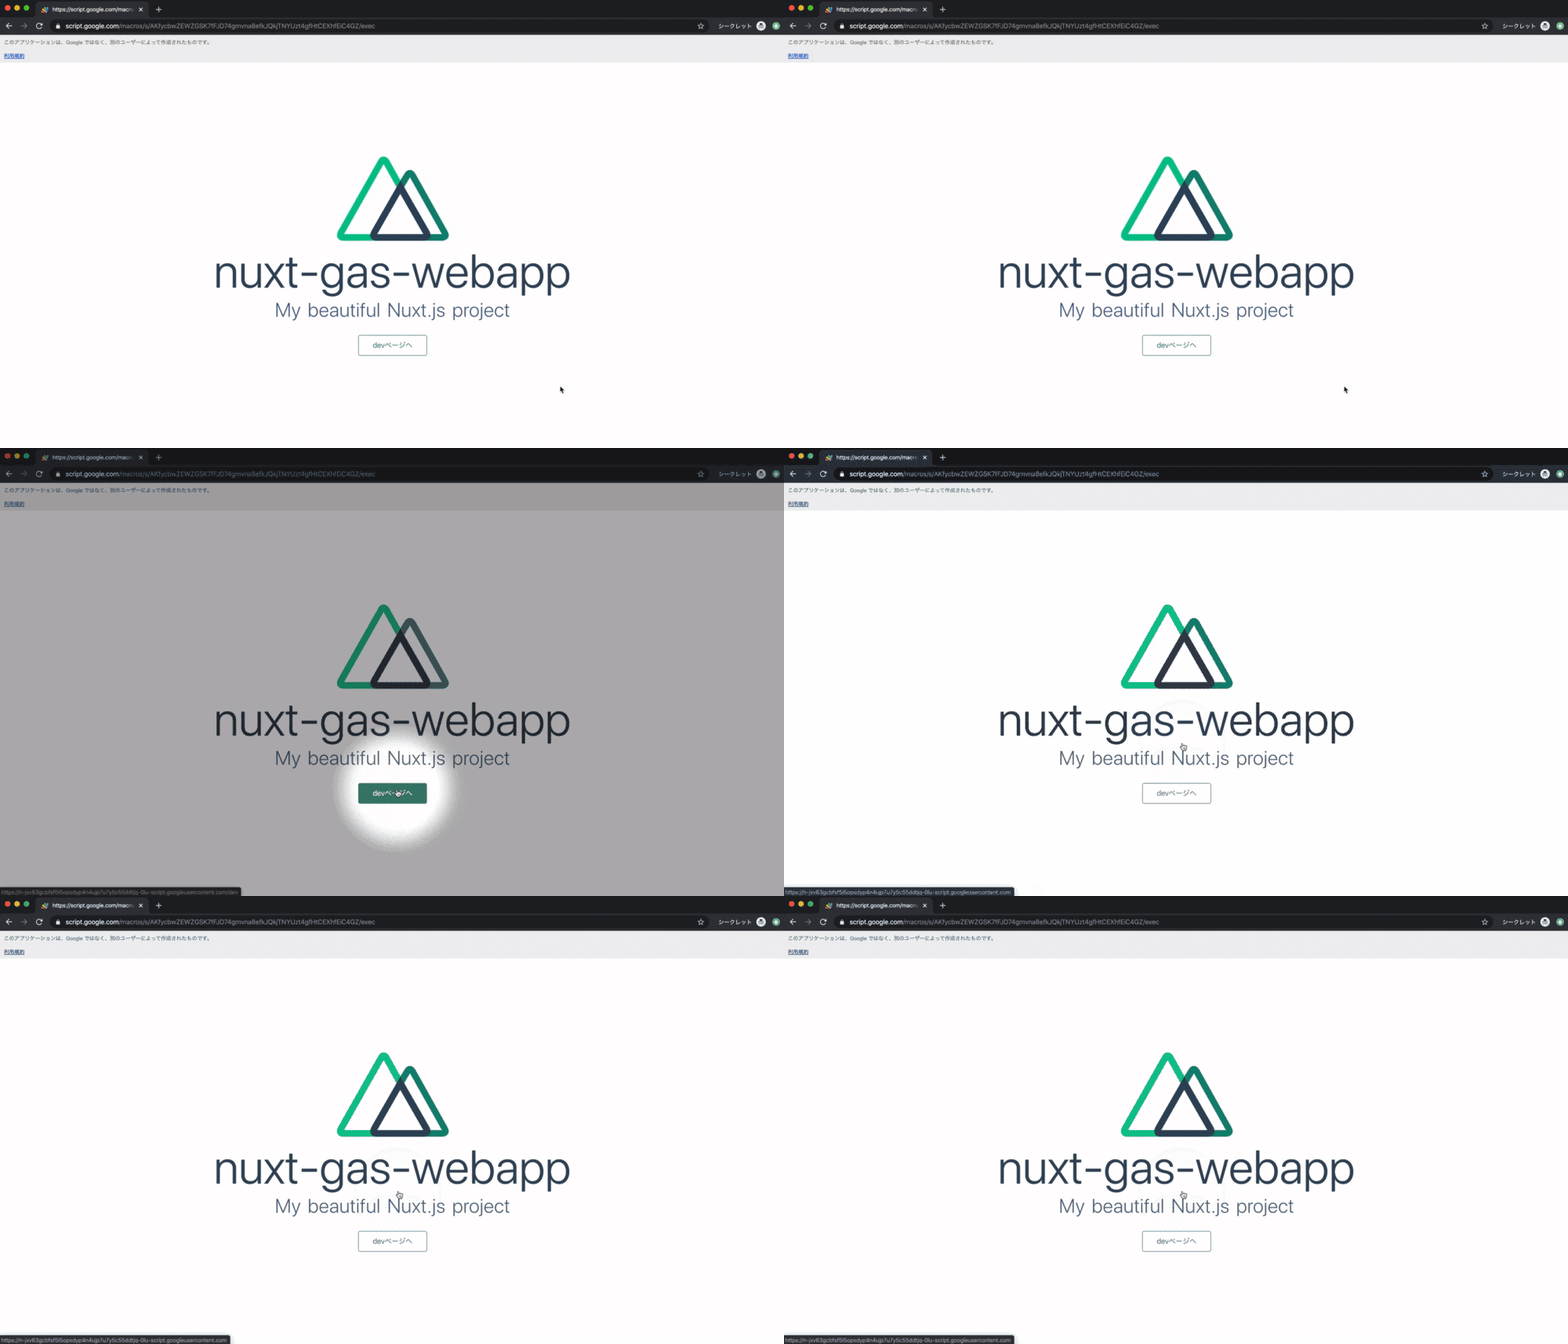
Nuxt のページが動いていますし、index ページと devページの行き来ができることも確認できます。
この技術を応用して検索アプリケーション作りました!
それが記事冒頭のアプリケーションです。
https://sites.google.com/view/nuxt-gas-webapp/
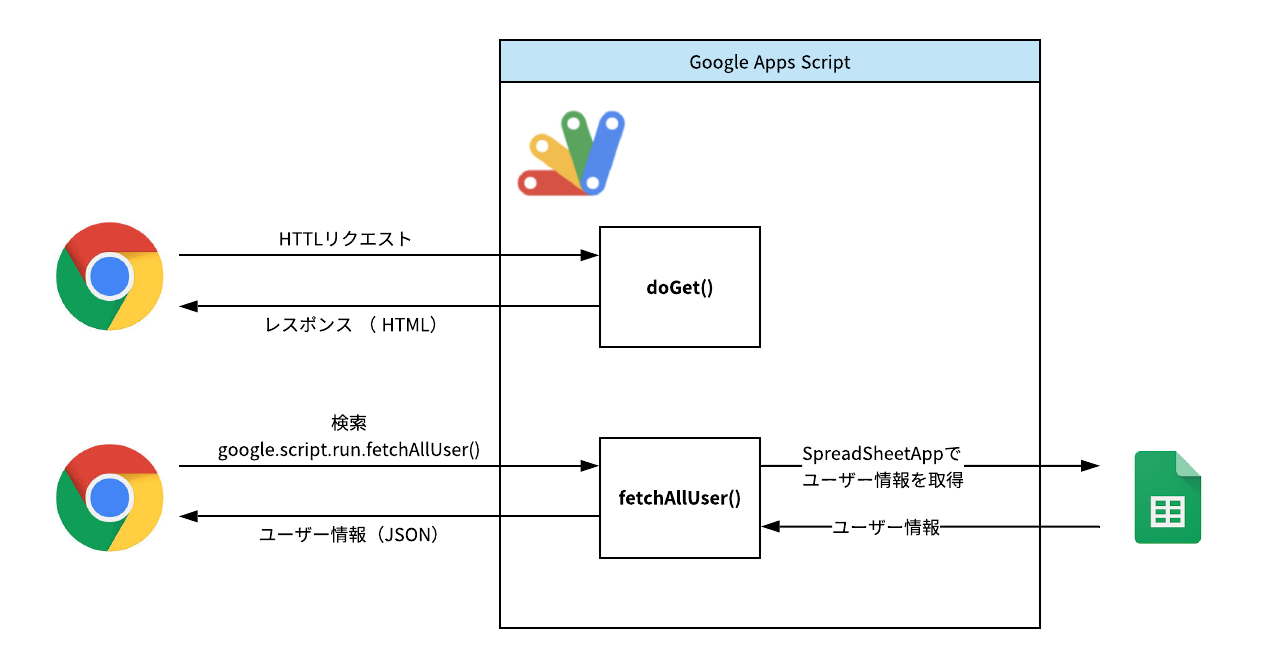
ポイントは GAS の HTML Service で作ったブラウザのグローバルオブジェクトに google が自動で作られるところです。
google.script.run().GASの関数名 の形で実行することで、JavaScript から任意の GAS の function を実行できます。
※ GAS は全ユーザーの情報を JSON で返すだけで、絞り込み自体はブラウザ側の JavaScript でやっています。
(2回目以降の検索は GAS にアクセスせずにブラウザだけで完結するようにするため)
さいごに
この構成はアリ・ナシでいうと、会社などで G Suite(有料版 Gmail) を使っていて社内向けの簡易的なシステムを作るなら、かなりアリかなと思います。
GAS の Web アプリケーションの公開時に Who has access to the app という公開した URL に誰がアクセスできるのかという設定項目があります。
次の画像は筆者が持っている tecthetoarster.org という G Suite の Who has access to the app の選択項目です。
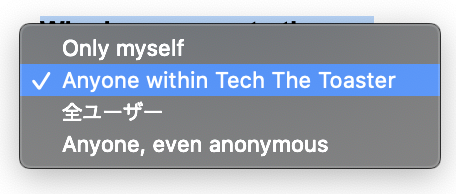
Anyone within Tech The Toaster を選べば、@tecthetoarster.org のアカウントにログインしていないと実行できない URL になります。
特定のドメイン内限定で使える Web アプリケーションを作るのは面倒ですよね。お手軽にセキュアな Web アプリケーションを作れるのはメリットかなと思います。
全コードは GitHub にあげてあるので良かったら参考にしてみてください。
howdy39/nuxt-gas-webapp - シンプルなやつ
howdy39/nuxt-gas-webapp - ユーザー検索アプリケーション
