この記事で制作したもののテスト動画はこちらでご確認いただけます。
Google Cloud Text-to-Speechとは?
まずはGoogleの公式HPの文章を引用します。
Google の AI テクノロジーを搭載した API を利用すると、テキストを自然な音声に変換できます。
これ以上ない簡潔な文章で感服いたします。そっけない言葉の裏にとてつもないテクノロジーが控えています。
というわけで、Google Cloud Text-to-Speechを使えば文字を音声データに変換することができます。音声の品質もかなりよくとても実用的です。
どうやって使う?
使い方はとても簡単です。Google Cloud Speechはけっこういろいろ面倒な感じでしたが、Google Cloud Text-to-Speechはとても単純に使えます。
というわけでもっと単純に使えるようにモジュールを書いてみました。
APIでテキストをmp3に変換する
まずはAPIを叩く部分
from google.cloud import texttospeech_v1beta1 as texttospeech
DEFAULT_LANGUAGE_CODE = "ja-JP"

class GoogleCloudSpeak:
    """GoogleText-to-Speechを使用するためのクラス。

    使用法:
        cloudttsからGoogleCloudSpeakをインポートします
        GoogleCloudSpeak.speak(text、language_code = "ja-JP")
    """

    @classmethod
    def __synthesize(cls, input_text, language_code, name):
        client = texttospeech.TextToSpeechClient()
        # 音声の名前はclient.list_voices()で取得できます。
        voice = texttospeech.VoiceSelectionParams(
            language_code=language_code,
            ssml_gender=texttospeech.SsmlVoiceGender.NEUTRAL,
            name=name,
        )

        audio_config = texttospeech.AudioConfig(
            audio_encoding=texttospeech.AudioEncoding.MP3
        )

        return client.synthesize_speech(
            input=input_text, voice=voice, audio_config=audio_config
        )

    @classmethod
    def synthesize_text(cls, text, language_code=DEFAULT_LANGUAGE_CODE, name=None):
        """テキストの入力文字列から音声を合成します。"""
        input_text = texttospeech.SynthesisInput(text=text)
        response = cls.__synthesize(input_text, language_code, name)

        return response.audio_content

    @classmethod
    def synthesize_ssml(cls, ssml, language_code=DEFAULT_LANGUAGE_CODE, name=None):
        """Synthesizes speech from the input string of ssml.

        Note: ssml must be well-formed according to:
            https://www.w3.org/TR/speech-synthesis/
        """
        input_text = texttospeech.SynthesisInput(ssml=ssml)
        response = cls.__synthesize(input_text, language_code, name)

        return response.audio_content

    @classmethod
    def speak(cls, text, language_code=DEFAULT_LANGUAGE_CODE, name=None):
        """テキストメッセージを話します。"""
        audio_content = cls.synthesize_text(text, language_code, name)
        SoundPlayer.play_from_buffer(audio_content, stop=True)

    @classmethod
    def speak_ssml(cls, ssml, language_code=DEFAULT_LANGUAGE_CODE, name=None):
        """SSMLメッセージを話します。 """
        audio_content = cls.synthesize_ssml(ssml, language_code, name)
        SoundPlayer.play_from_buffer(audio_content, stop=True)
この部分はGoogleのサンプルそのまま的な感じですが、ssml用の関数も用意してみました。SSMLを使えば音声のピッチやトーンなどを変更できます。
DEFAULT_LANGUAGE_CODEはlanguage_codeを何も指定せずに呼び出した場合に選択されるlanguage_codeを指定しています。この場合では"ja-JP"となっています。
今回はmp3を取得した後、すぐにパソコン上で再生することを考えていますので、SoundPlayerという別のモジュールを呼び出して直接再生するようにしています。
APIで取得したmp3の再生
このモジュールの中で呼ばれているSoundPlayerというのは取得したmp3を再生するモジュールで以下のようなものです。
from tempfile import NamedTemporaryFile
from pydub import AudioSegment
import simpleaudio

class SoundPlayer:
    """SoundPlayerモジュール。

    オーディオ形式は、mp3、wav、ogg、flac、3gpなどをサポートしています。
    詳細については、pudubのドキュメントを参照してください。
    """

    @classmethod
    def play(cls, filename, audio_format="mp3", wait=False, stop=False):
        """mp3オーディオファイルを再生します。

        オーディオファイルを再生します。

        :param filename:ソースオーディオファイルパス
        :param audio_format:mp3、wav、ogg、flac、3gpなど。
        :param wait:再生が終了するまで待ちます。
        :param stop:再生中のサウンドを停止し、新しいサウンドを再生します。
        """

        if stop:
            simpleaudio.stop_all()

        seg = AudioSegment.from_file(filename, audio_format)
        playback = simpleaudio.play_buffer(
            seg.raw_data,
            num_channels=seg.channels,
            bytes_per_sample=seg.sample_width,
            sample_rate=seg.frame_rate,
        )

        if wait:
            playback.wait_done()

    @classmethod
    def play_from_buffer(cls, audio_buff, audio_format="mp3", wait=False, stop=False):
        """オーディオファイルのバイナリーデーターから再生します。

        オーディオファイルのバイナリデータを一時ファイルに書き込んでから再生します。

        :param audio_buff: オーディオのバイナリーデーター
        :param audio_format:mp3、wav、ogg、flac、3gpなど。
        :param wait:再生が終了するまで待ちます。
        :param stop:再生中のサウンドを停止し、新しいサウンドを再生します。
        """
        with NamedTemporaryFile() as fd:
            fd.write(audio_buff)
            # revert head of file. it is neccesary to play audio.
            fd.seek(0)
            cls.play(fd.name, audio_format=audio_format, wait=wait, stop=stop)
TemporaryFileに書き出してそのファイルを読み込んで再生することにしています。ポイントとしては一度書き出した後、seek(0)で位置を戻してからファイルを読み出しています。
waitとstopは拡張性のためにつけたオプションです。それぞれ、
- wait 再生が終わるまで待つ
- stop 再生中の音を止めて、新たに再生する
この2つのオプションを駆使してwait=False及びstop=Falseとすれば同時多重再生等も可能になっています。
言語や発話者の設定
発話者などの音声の設定は最初のソースの中の
        voice = texttospeech.VoiceSelectionParams(
            language_code=language_code,
            ssml_gender=texttospeech.SsmlVoiceGender.NEUTRAL,
            name=name,
        )
の部分で設定されています。発音者(name)に指定できる日本語の声は
- "ja-JP-Standard-A"
- "ja-JP-Standard-B"
- "ja-JP-Standard-C"
- "ja-JP-Standard-D"
- "ja-JP-Wavenet-A"
- "ja-JP-Wavenet-B"
- "ja-JP-Wavenet-C"
- "ja-JP-Wavenet-D"
の8種類があるようです。最新の一覧については
で確認できますので使う前に調べてみたら面白いかもしれません。ちなみに指定しなくてもlanguage_codeだけ指定すれば使えます。
AとBは女性、CとDは男性の声となっており。それぞれ、AとCは高い声、BとDは低めの声のようです。B、Dの方が落ち着いた感じに聞こえます。使いどころに合わせて選択できるようです。
せっかくだから費用を節約しよう
上記のモジュールでとりあえずはGoogleCloudSpeak.speak("おはよう"、language_code = "ja-JP")などとすれば音声を発音できますが、この方法では同じテキストでも発音するたびにCloudに発音データを取りに行ってきます。
例えば対話システムだと「うん」だとか意外と同じような返答が帰る場合が多く、それ以外でも機器の説明などに使う場合は同じ音声を再生する場合も多いでしょう。
そこで一度テキストを音声に変換したら、それをキャッシュして再利用するモジュールも書いてみました。下の例ではついでにSSMLと普通のテキストの判別関数も追加してみました。これでCachedSpeck.speak()と呼び出せばやりたいことが大体は出来るようになりました。
import os
import hashlib

class CachedSpeak:
    """音声キャッシュモジュール。

    GoogleText-to-Speechから取得した音声データを保存および再生するクラス。
    音声データを./audio_cache/にキャッシュして再利用してます。
    """

    @classmethod
    def synthesize(cls, text, language_code=DEFAULT_LANGUAGE_CODE, name=None):
        """SSML check and Synctesize."""
        if text.startswith("<speak>") and text.endswith("</speak>"):
            return GoogleCloudSpeak.synthesize_ssml(
                text, language_code=language_code, name=name
            )
        return GoogleCloudSpeak.synthesize_text(
            text, language_code=language_code, name=name
        )

    @classmethod
    def speak(cls,
        text,
        wait=True,
        stop=True,
        language_code=DEFAULT_LANGUAGE_CODE,
        name=None,
        replace=False,
    ):
        """Cache speak."""
        dir_path = "./audio_cache/"
        text_hash = hashlib.sha224(text.encode("utf-8")).hexdigest()
        file_name = dir_path + text_hash + ".mp3"
        list_name = dir_path + "cached.txt"

        if not os.path.exists(dir_path):
            os.makedirs(dir_path)

        if not os.path.exists(file_name) or replace:
            with open(file_name, mode="wb") as f_p:
                audio = cls.synthesize(text, language_code=language_code, name=name)
                f_p.write(audio)
                with open(list_name, mode="a") as log_f_p:
                    log_f_p.write("\n{}, {}".format(text, text_hash + ".mp3"))

        SoundPlayer.play(file_name, wait=wait, stop=stop)
カレントディレクトリの下にaudio_cacheというディレクトリを作ってそこにテキストをhash化したファイル名で保存します。次回speakが呼び出されたときには、同じhash値のファイルがあるか確認して合った場合は、再度取得せずにそのデーターを返します。
これでだいぶ節約できそうです。
Google Cloud Text-to-Speechの利用料
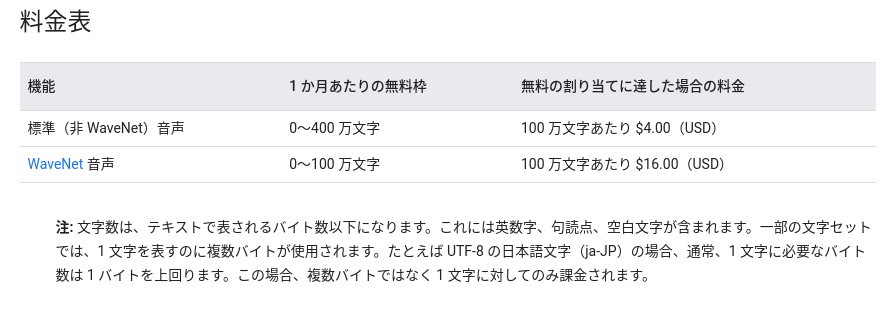
ちなみに、現在(2021年3月19日)のGoogle Cloud Text-to-Speechの利用料は以下のようになっています。
最新の料金表はHPでご確認ください。音声から文字のGoogle Cloud Speechはまあまあの価格でしたが、Text-to-Speechは400万文字まで無料なのでかなり安い感じがします。
いろんなアプリに応用できそうです。
完成したモジュール
以下が、全文です。動作チェック用のmain関数も含んでいますので、試しに実行してみてください。
トークンの設定
遅れましたが、APIを叩くにはアクセスするためのトークンの設定が必要です。それについてはGoogleCloudのHPをご参考にください。
前の記事でも「秘密鍵の設定」という項目で少しだけ触れています。
jsonファイルをダウンロードして、環境変数を書き換えれば設定完了です。
ソースコード全体
# !/usr/bin/python

# coding: UTF-8
# Copyright 2019 Hideto Manjo.
#
# Licensed under the MIT License

"""Google CloudText-to-Speechを簡単に使うためのモジュール"""

from __future__ import division

import os
import hashlib
from tempfile import NamedTemporaryFile
from pydub import AudioSegment
import simpleaudio

from google.cloud import texttospeech_v1beta1 as texttospeech

DEFAULT_LANGUAGE_CODE = "ja-JP"

class SoundPlayer:
    """SoundPlayerモジュール。

    オーディオ形式は、mp3、wav、ogg、flac、3gpなどをサポートしています。
    詳細については、pudubのドキュメントを参照してください。
    """

    @classmethod
    def play(cls, filename, audio_format="mp3", wait=False, stop=False):
        """mp3オーディオファイルを再生します。

        オーディオファイルを再生します。

        :param filename:ソースオーディオファイルパス
        :param audio_format:mp3、wav、ogg、flac、3gpなど。
        :param wait:再生が終了するまで待ちます。
        :param stop:再生中のサウンドを停止し、新しいサウンドを再生します。
        """

        if stop:
            simpleaudio.stop_all()

        seg = AudioSegment.from_file(filename, audio_format)
        playback = simpleaudio.play_buffer(
            seg.raw_data,
            num_channels=seg.channels,
            bytes_per_sample=seg.sample_width,
            sample_rate=seg.frame_rate,
        )

        if wait:
            playback.wait_done()

    @classmethod
    def play_from_buffer(cls, audio_buff, audio_format="mp3", wait=False, stop=False):
        """オーディオファイルのバイナリーデーターから再生します。

        オーディオファイルのバイナリデータを一時ファイルに書き込んでから再生します。

        :param audio_cbuff: オーディオのバイナリーデーター
        :param audio_format:mp3、wav、ogg、flac、3gpなど。
        :param wait:再生が終了するまで待ちます。
        :param stop:再生中のサウンドを停止し、新しいサウンドを再生します。
        """
        with NamedTemporaryFile() as fd:
            fd.write(audio_buff)
            # revert head of file. it is neccesary to play audio.
            fd.seek(0)
            cls.play(fd.name, audio_format=audio_format, wait=wait, stop=stop)


class GoogleCloudSpeak:
    """GoogleText-to-Speechを使用するためのクラス。

    使用法:
        cloudttsからGoogleCloudSpeakをインポートします
        GoogleCloudSpeak.speak(text、language_code = "ja-JP")
    """

    @classmethod
    def __synthesize(cls, input_text, language_code, name):
        client = texttospeech.TextToSpeechClient()
        # 音声の名前はclient.list_voices()で取得できます。
        voice = texttospeech.VoiceSelectionParams(
            language_code=language_code,
            ssml_gender=texttospeech.SsmlVoiceGender.NEUTRAL,
            name=name,
        )

        audio_config = texttospeech.AudioConfig(
            audio_encoding=texttospeech.AudioEncoding.MP3
        )

        return client.synthesize_speech(
            input=input_text, voice=voice, audio_config=audio_config
        )

    @classmethod
    def synthesize_text(cls, text, language_code=DEFAULT_LANGUAGE_CODE, name=None):
        """テキストの入力文字列から音声を合成します。"""
        input_text = texttospeech.SynthesisInput(text=text)
        response = cls.__synthesize(input_text, language_code, name)

        return response.audio_content

    @classmethod
    def synthesize_ssml(cls, ssml, language_code=DEFAULT_LANGUAGE_CODE, name=None):
        """Synthesizes speech from the input string of ssml.

        Note: ssml must be well-formed according to:
            https://www.w3.org/TR/speech-synthesis/
        """
        input_text = texttospeech.SynthesisInput(ssml=ssml)
        response = cls.__synthesize(input_text, language_code, name)

        return response.audio_content

    @classmethod
    def speak(cls, text, language_code=DEFAULT_LANGUAGE_CODE, name=None):
        """テキストメッセージを話します。"""
        audio_content = cls.synthesize_text(text, language_code, name)
        SoundPlayer.play_from_buffer(audio_content, stop=True)

    @classmethod
    def speak_ssml(cls, ssml, language_code=DEFAULT_LANGUAGE_CODE, name=None):
        """SSMLメッセージを話します。 """
        audio_content = cls.synthesize_ssml(ssml, language_code, name)
        SoundPlayer.play_from_buffer(audio_content, stop=True)


class CachedSpeak:
    """音声キャッシュモジュール。

    GoogleText-to-Speechから取得した音声データを保存および再生するクラス。
    音声データを./audio_cache/にキャッシュして再利用してます。
    """

    @classmethod
    def synthesize(cls, text, language_code=DEFAULT_LANGUAGE_CODE, name=None):
        """SSML check and Synctesize."""
        if text.startswith("<speak>") and text.endswith("</speak>"):
            return GoogleCloudSpeak.synthesize_ssml(
                text, language_code=language_code, name=name
            )
        return GoogleCloudSpeak.synthesize_text(
            text, language_code=language_code, name=name
        )

    @classmethod
    def speak(
        cls,
        text,
        wait=True,
        stop=True,
        language_code=DEFAULT_LANGUAGE_CODE,
        name=None,
        replace=False,
    ):
        """Cache speak."""
        dir_path = "./audio_cache/"
        text_hash = hashlib.sha224(text.encode("utf-8")).hexdigest()
        file_name = dir_path + text_hash + ".mp3"
        list_name = dir_path + "cached.txt"

        if not os.path.exists(dir_path):
            os.makedirs(dir_path)

        if not os.path.exists(file_name) or replace:
            with open(file_name, mode="wb") as f_p:
                audio = cls.synthesize(text, language_code=language_code, name=name)
                f_p.write(audio)
                with open(list_name, mode="a") as log_f_p:
                    log_f_p.write("\n{}, {}".format(text, text_hash + ".mp3"))

        SoundPlayer.play(file_name, wait=wait, stop=stop)


if __name__ == "__main__":
    TEST_TEXTS = [
        "こんにちは、これはGoogle Cloud Text-to-Speechを使用するためのモジュールです。",
        "クラスCachedSpeakを使用すると、以前に取得したオーディオが再利用されます。",
        '<speak><say-as interpret-as="cardinal">12345</say-as>などのssml入力もサポートします。</speak>',
    ]
    for text in TEST_TEXTS:
        print(text)
        CachedSpeak.speak(text, replace=True, language_code="ja-JP", name="ja-JP-Standard-A")

    input("何かのキーを押すと終了します。")
テスト実行
ターミナルから実行する場合は
python3 cloudtts.py
とするとメイン関数に書かれたテスト音声が流れます。また、同じディレクトリに置けば
from cloudtts import CachedSpeak
CachedSpeak.speak("おはよう")
と行った感じで使うことが出来ます。
使ってみてわかったこと
Google Cloud Text-to-Speechはとても簡単に利用できます。
英語でも日本語でもいろいろ発話出来ますので、Google Cloud SpeechやGoogle Cloud Translateなどと連携すれば、日本語音声を聞き取って英語に翻訳して発話するプログラムなども簡単に製作可能だと思います。
今回は説明を省きましたが、SSMLというXMLのような記述でテキストを入力すれば、声の高さの変更や読み上げの音声の中に音楽を埋め込むことも可能のようです。
音声はかなり自然なのでこれより高品質の音声を求める場合は、自力で機械学習するしかなさそうな気がします。音質についてはWavenetのほうが良いですが、その分料金も少々高くなるようです。
まとめ
今回はGoogle Cloud Text-to-Speechを使った発話を更にさらに短く書けるようなモジュールを作成してみました。利用料金は音声を文字に置き換えるGoogle Cloud Speechよりはるかに安いため、それほど気をつけなくても良いですが、万が一に誤って大量の文字を送ってしまった場合、とてつもない請求額になるかもしれないので、その点は十分ご注意ください。(実験してないですが、当然文字数のリミッターとかありますよねこれ?もし無かったらけっこう危険かも)
この記事が誰かのお役に立ちますように。
