TCP BBR な ShadowsocksR サーバを構築・設定方法。なお他のメジャーディストリビューションについてはたくさん情報があるので、Raspiberry Pi を使っての構築・設定方法を記載しているが、普通のディストリも同様の方法で設定できると思う。Linux 触った経験がある人なら、さくっと設定可能。
最近の Raspbian OS
最近の Raspbian OS の Linux カーネルは 4.9 以降なので、簡単に 輻輳制御の新アルゴリズム TCP BBR の導入が出来るようになった。
teddysun さんのスクリプト経由で BBR を入れる
を使うことで、環境を判別して自動でインストール & 設定してくれる。Linux 4.9 以前でカーネルが古いが、新しいカーネルパッケージが提供されている場合、最新のカーネルのインストールまで行ってくれる。
$ uname -a
Linux raspberrypi 4.14.98-v7+ #1200 SMP Tue Feb 12 20:27:48 GMT 2019 armv7l GNU/Linux
$ wget https://github.com/teddysun/across/raw/master/bbr.sh
$ sudo bash bbr.sh
---------- System Information ----------
 OS      : Raspbian GNU/Linux 9
 Arch    : armv7l (32 Bit)
 Kernel  : 4.14.98-v7+
----------------------------------------
 Auto install latest kernel for TCP BBR

 URL: https://teddysun.com/489.html
----------------------------------------

Press any key to start...or Press Ctrl+C to cancel

Info: Your kernel version is greater than 4.9, directly setting TCP BBR...
Info: Setting TCP BBR completed...
確認
$ sysctl net.ipv4.tcp_congestion_control
net.ipv4.tcp_congestion_control = bbr
$ sysctl net.core.default_qdisc
net.core.default_qdisc = fq
teddysun さんのスクリプト経由で shadowsocksR を入れる
$ wget https://raw.githubusercontent.com/teddysun/shadowsocks_install/master/shadowsocksR.sh
$ sudo bash shadowsocksR.sh
// 対話型UIにそって設定
Congratulations, ShadowsocksR server install completed!
Your Server IP        :  *.*.*.*
Your Server Port      :  10024
Your Password         :  XXXX
Your Protocol         :  auth_aes128_md5
Your obfs             :  tls1.2_ticket_auth
Your Encryption Method:  chacha20-ietf

Welcome to visit:https://shadowsocks.be/9.html
Enjoy it!
これで init.d に shadowsocks 追加され、自動起動もするように。ShadowsocksR の設定を弄るには /etc/shadowsocks.json を編集すればおk。
ShadowsocksR (SSR) の速度を上げる
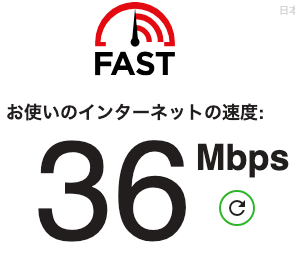
初期の速度は fast.com 計測で 36Mbps。ラズパイは Raspberry Pi 2 Model B。
ネットワーク環境的には直接 fast.com に繋ぐと 90Mbps 強ほどなので、ラズパイのSSR経由でももっと早くなってもおかしくないハズなので調査すると、SSR サーバの Python プロセスのCPU負荷が SSR 接続してネットワーク転送中は100%になっており、CPUがボトルネックになっている。
なお SSR サーバの設定は以下である。
- method (暗号化方式)
- chacha20-ietf
- obfs (他のパケットへの偽装設定)
- tls1.2_ticket_auth
- protocol (難読化方式)
- auth_aes128_md5
worker 数を増やす
まずは SSR の worker を増やす。使ってるラズパイは Raspberry Pi 2 Model B で CPUコア数は4なので4へ。
$ ps aux|grep shadow
// 1プロセスで動いている
root     17769  3.8  1.3  18872 13320 ?        Ss   12:19   0:00 python /usr/local/shadowsocks/server.py -c /etc/shadowsocks.json -d start
$ sudo vim /etc/shadowsocks.json
// workers の項目を1から4へ
  "workers": 4,
$ sudo /etc/init.d/shadowsocks restart
$ ps aux|grep shadow
// 親プロセス1と4プロセス動いてる。
root     17828  0.2  1.2  18872 12624 ?        Ss   12:20   0:00 python /usr/local/shadowsocks/server.py -c /etc/shadowsocks.json -d start
root     17829  0.0  1.1  18872 11500 ?        S    12:20   0:00 python /usr/local/shadowsocks/server.py -c /etc/shadowsocks.json -d start
root     17830  0.0  1.1  18872 11500 ?        S    12:20   0:00 python /usr/local/shadowsocks/server.py -c /etc/shadowsocks.json -d start
root     17831  0.9  1.3  18872 13216 ?        S    12:20   0:00 python /usr/local/shadowsocks/server.py -c /etc/shadowsocks.json -d start
root     17832  0.0  1.1  18872 11500 ?        S    12:20   0:00 python /usr/local/shadowsocks/server.py -c /etc/shadowsocks.json -d start
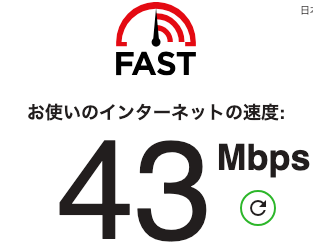
この状態で fast.com 測定で、43Mbpsへ。
なお worker 数は3でも測定速度は変わらなかったので、3でもいいかも。
CPU のクロックを上げる
CPUクロック、俺のラズパイ2がこんなに遅いわけがないによると、CPUの省電力設定がきいていて、定格900Mhzのところ600Mhzで動いている、との話しなので見てみる。
$ sudo cat /sys/devices/system/cpu/cpu0/cpufreq/cpuinfo_cur_freq
600000
600Mhzじゃん!と思ったのだけど
$ sudo cat /sys/devices/system/cpu/cpu0/cpufreq/scaling_governor
ondemand
を見ると、今2019年4月現在の Raspbian OS 標準はオンデマンド設定になってる。なので
# watch -n 0.5 cat /sys/devices/system/cpu/cpu0/cpufreq/cpuinfo_cur_freq
して、SSR経由でネットワーク負荷がかかったときのCPUクロック見てみたけど、その場合は定常的に900Mhzな速度だったので、ondemandからperformanceへ変更しても影響が出なさそう。いちおう変更して測定してみたけど、特に速度は変わらず。
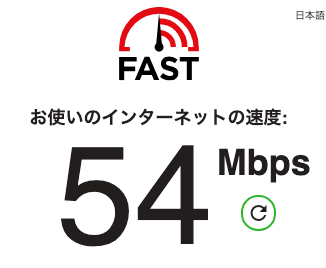
オーバークロックする
sudo raspi-config の、オーバークロック設定で 900Mhz -> 1000Mhz は簡単にセットできるので変更して速度測定してみる。定格外なので寿命縮んだり、コアの温度や電力消費向上による問題が出たり、SDカードのファイルシステムが破損しやすくなったりするので選択する人は注意。
結果54Mbpsへ。クロック的には1割程度なんだけど、SDRAMのクロックも上がったからなのか、25%ぐらい速度向上している。
たぶんCPUコア速度が1.5倍の、Raspberry Pi 3 Model B+なら、70-80Mbpsな速度が出そう。
SSR の通信方式の変更
の通りの各種設定。SSRの主目的に中国のグレートファイヤーウォールを超え通信できる、というのがあるのだけど、それらを考慮しない場合は速度重視な設定が出来る。
- method (暗号化方式)
- none
- obfs (他のパケットへの偽装設定)
- plain
- protocol (難読化方式)
- origin
上記設定で繋いだ場合、TCP BBR を使って接続している、ほぼ何もしない Socks Proxy としての振る舞いに近くなるので、スループットが落ちること無く速度が出た。
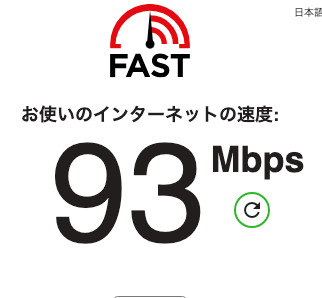
なお protocol, obfs は GFW対策な設定だが、method は通信の暗号化なので、暗号化したい場合は速度が落ちるが設定した方が良い。
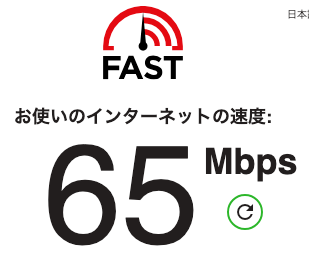
- method (暗号化方式)
- chacha20-ietf
- obfs (他のパケットへの偽装設定)
- plain
- protocol (難読化方式)
- origin
な設定の場合、65Mbpsな速度がでつつ、暗号化し通信できる。
その他
sysctl さらに最適化する
SSR サーバのポートごとに異なるパスワードを使う
/shadowsocks.json の server_port / password の項目を削除し、代わりに port_password以下の設定を入れる。
$ sudo vim /etc/shadowsocks.json
...
    // "server_port":10024,
    // "password":"XXX",
    "port_password":{
         "10024":"XXX",
         "10025":"YYY"
    },
$ sudo /etc/init.d/shadowsocks restart
BBR の無効化方法
BBR 有効化する話しはたくさんで出てくるが、無効化についてあまりなかったので。sysctl.conf を編集して反映する。
$ sudo vim /etc/sysctl.d/99-sysctl.conf
# .....
# bbr と fq から元の pfifo_fast と cubic に変更
# net.core.default_qdisc = fq
# net.ipv4.tcp_congestion_control = bbr
net.core.default_qdisc = pfifo_fast
net.ipv4.tcp_congestion_control = cubic

# 反映する
$ sudo sysctl -p