書籍、「12ステップで作る 組込みOS自作入門」を写経するに当たって、H8 をクロスコンパイルして開発ボードで動かすまでのメモ。
まんま サポートページ の通りで動く。書籍と同じバージョンの gcc, binutils を使う。
$ wget http://kozos.jp/books/makeos/gcc-3.4.6.tar.gz
$ wget http://kozos.jp/books/makeos/binutils-2.19.1.tar.gz
まずは binutils から入れる。一部 warning で落ちるため --disable-werror で。
./configure --target=h8300-elf --disable-nls --disable-werror
maka
sudo make install
これで /usr/local/bin/h8300-elf-* が出来上がる。
続いて gcc 3.4.6。書籍にもある通り、引数の問題を修正。
--- gcc/collect2.c.orig 2016-05-10 10:20:52.257832056 +0900
+++ gcc/collect2.c      2016-05-10 10:21:07.529732043 +0900
@@ -1534,7 +1534,7 @@
   if (redir)
     {
       /* Open response file.  */
-      redir_handle = open (redir, O_WRONLY | O_TRUNC | O_CREAT);
+      redir_handle = open (redir, O_WRONLY | O_TRUNC | O_CREAT, 755);

       /* Duplicate the stdout and stderr file handles
         so they can be restored later.  */
続いて 64bit 環境だと発生する問題の修正パッチ。
--- h8300.c     (revision 117513)
+++ h8300.c     (working copy)
@@ -83,8 +83,8 @@
 static int h8300_saveall_function_p (tree);
 static int h8300_monitor_function_p (tree);
 static int h8300_os_task_function_p (tree);
-static void h8300_emit_stack_adjustment (int, unsigned int);
-static int round_frame_size (int);
+static void h8300_emit_stack_adjustment (int, HOST_WIDE_INT);
+static HOST_WIDE_INT round_frame_size (HOST_WIDE_INT);
 static unsigned int compute_saved_regs (void);
 static void push (int);
 static void pop (int);
@@ -510,7 +510,7 @@
    SIZE to adjust the stack pointer.  */

 static void
-h8300_emit_stack_adjustment (int sign, unsigned int size)
+h8300_emit_stack_adjustment (int sign, HOST_WIDE_INT size)
 {
   /* If the frame size is 0, we don't have anything to do.  */
   if (size == 0)
@@ -546,8 +546,8 @@

 /* Round up frame size SIZE.  */

-static int
-round_frame_size (int size)
+static HOST_WIDE_INT
+round_frame_size (HOST_WIDE_INT size)
 {
   return ((size + STACK_BOUNDARY / BITS_PER_UNIT - 1)
          & -STACK_BOUNDARY / BITS_PER_UNIT);
./configure --target=h8300-elf --disable-nls --disable-threads --disable-shared --enable-languages=c
make
sudo make install
これで /usr/local/h8300-elf/bin に h8300 でつかう gcc ができる。
$ /usr/local/h8300-elf/bin/gcc -v
Reading specs from /usr/local/lib/gcc/h8300-elf/3.4.6/specs
Configured with: ./configure --target=h8300-elf --disable-nls --disable-threads --disable-shared --enable-languages=c
Thread model: single
gcc version 3.4.6
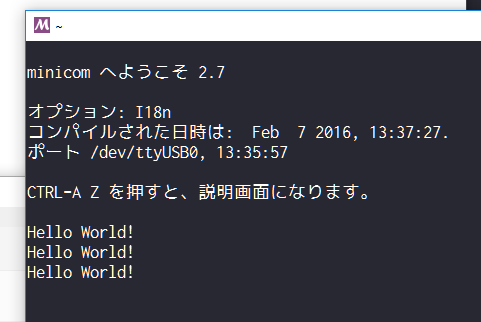
あとは h8write をコンパイルして、h8write 経由でイメージを転送し、minicom から接続する。
第一章のブートローダー転送後。
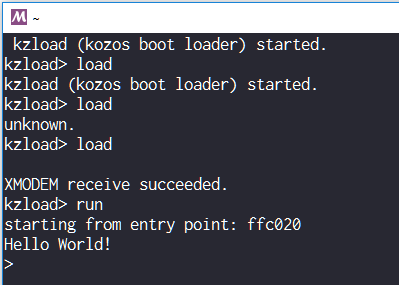
第六章での xmodem を使ったロムの読み込みも問題なく行えた。
ちなみに環境は 64bit Windows 10 上の VirtualBox に Ubuntu LTS 16.04 を入れ、FDTI シリアルUBS変換を VirtualBox の USB にマウントしてそこ経由で。
シリアル変換器には、秋月の FT232RL USB・RS232C変換モジュール を使った。
最初は Win10 上の msys2 (+Mingw64) でクロスコンパイル環境作ろうとしたんだけど gcc-3.4 動かすことができず、Ubuntu でやったら非常に簡単にできた・・・。