概要
「pyqt5の使い方」〜「ROS環境への実装」が主な内容になります。
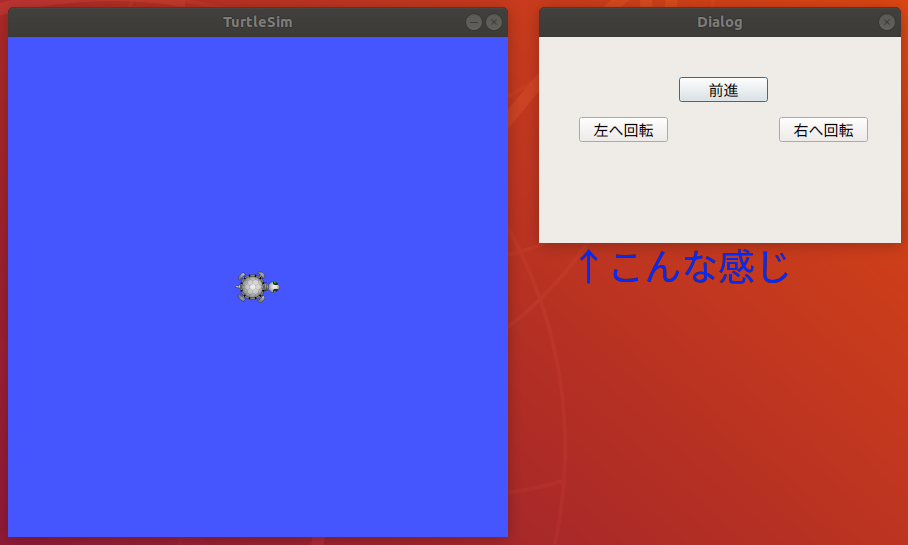
ですので、本記事は以下のものを作成して実装したらゴールとします。
機能:
- [前進]ボタンを押すと、TurtleSimの亀が前進する。
- [左へ回転]ボタンを押すと、TurtleSimの亀が左へ回転する。
- [右へ回転]ボタンを押すと、TurtleSimの亀が右へ回転する。
(ROSの機能の一つである「rqt」でいいじゃんって話なんですが、
今回はデモってことで、適当に応用していただけたらって感じで...)
作業時間は「pyqt環境構築」~「実装」までで、1時間くらいです。
記事の対象者
- ROSを触ったことがある
- GUIを作成したことがない
ROS環境の構築
以下を参考にさせていただきました。
ROSに触れたことがない方でも、以下の8.2節(P68)まで読んでいただけると、以下の理解が容易になると思います。
pyqt5環境の構築
以下を参考にさせていただきました。
Qt DesignerによるPyQt5のGUIプログラム作成
GUI作成の流れ
- QtデザイナでGUIの画面を作成(「.ui」ファイルとなる)。
- 「.ui」→「.py」へ変換。
- GUIのメインプログラムを書く。
Qt 5デザイナでGUIの画面を作成
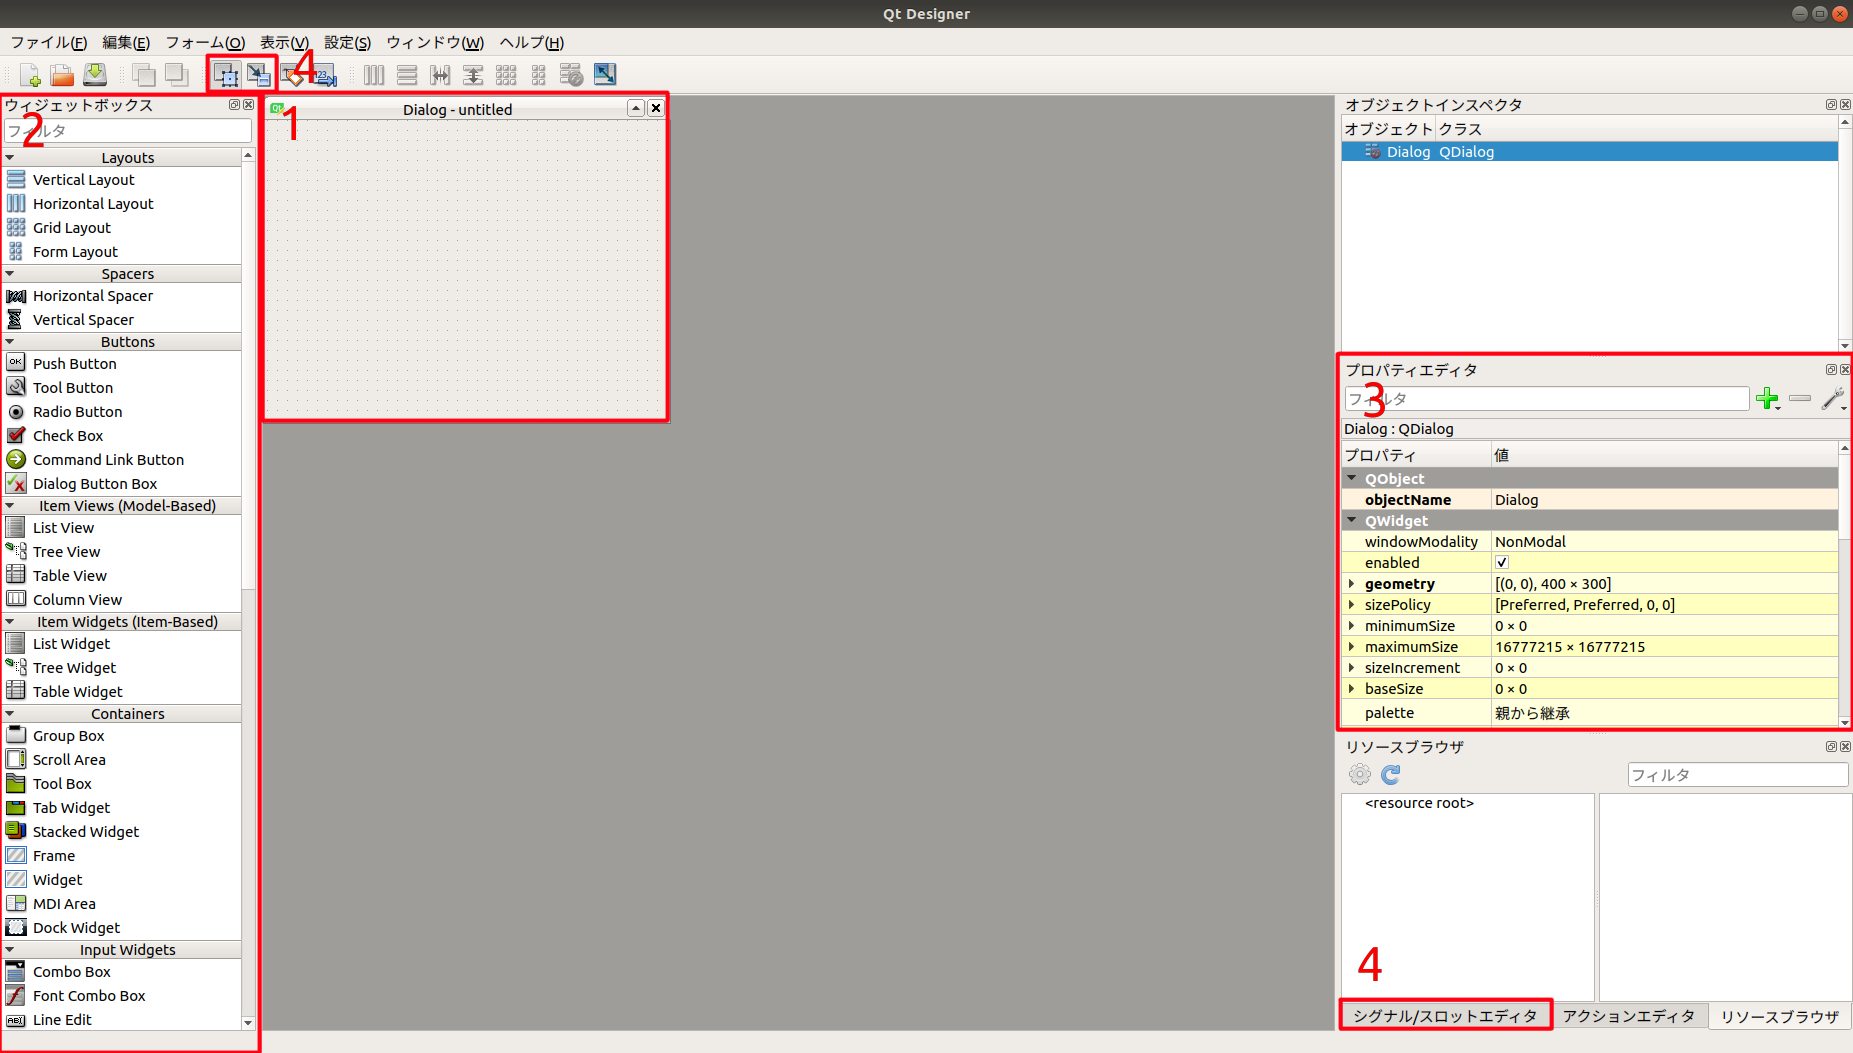
今回、用いるのは上の赤枠の4箇所です。
- Main Window。GUIの土台です。ここに描画したものが完成するGUI画面になります。
- 使用するウィジェット(ツール)です。ボタンとかチェックボックスとか。
- ウィジェットのプロパティです。ウィジェットの名前や大きさ、色などを設定します。
- シグナル/スロットのプロパティです。GUIの機能を設定します。
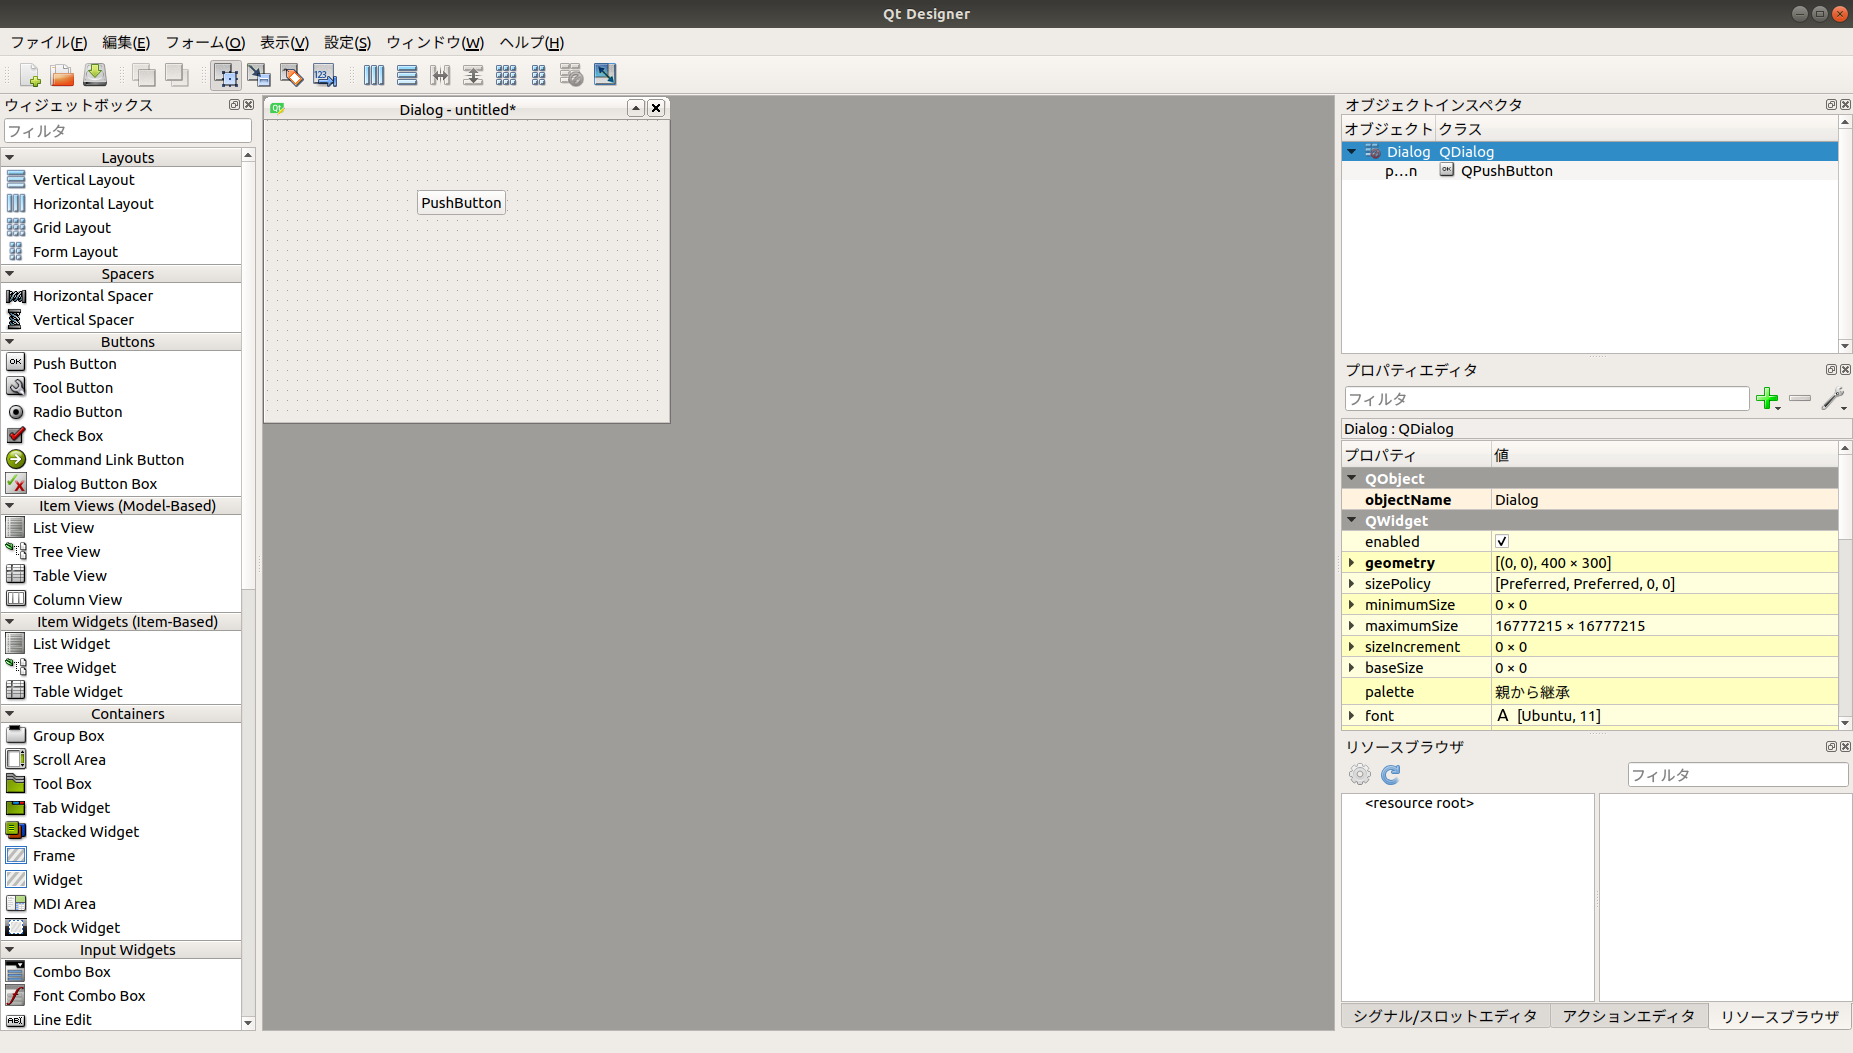
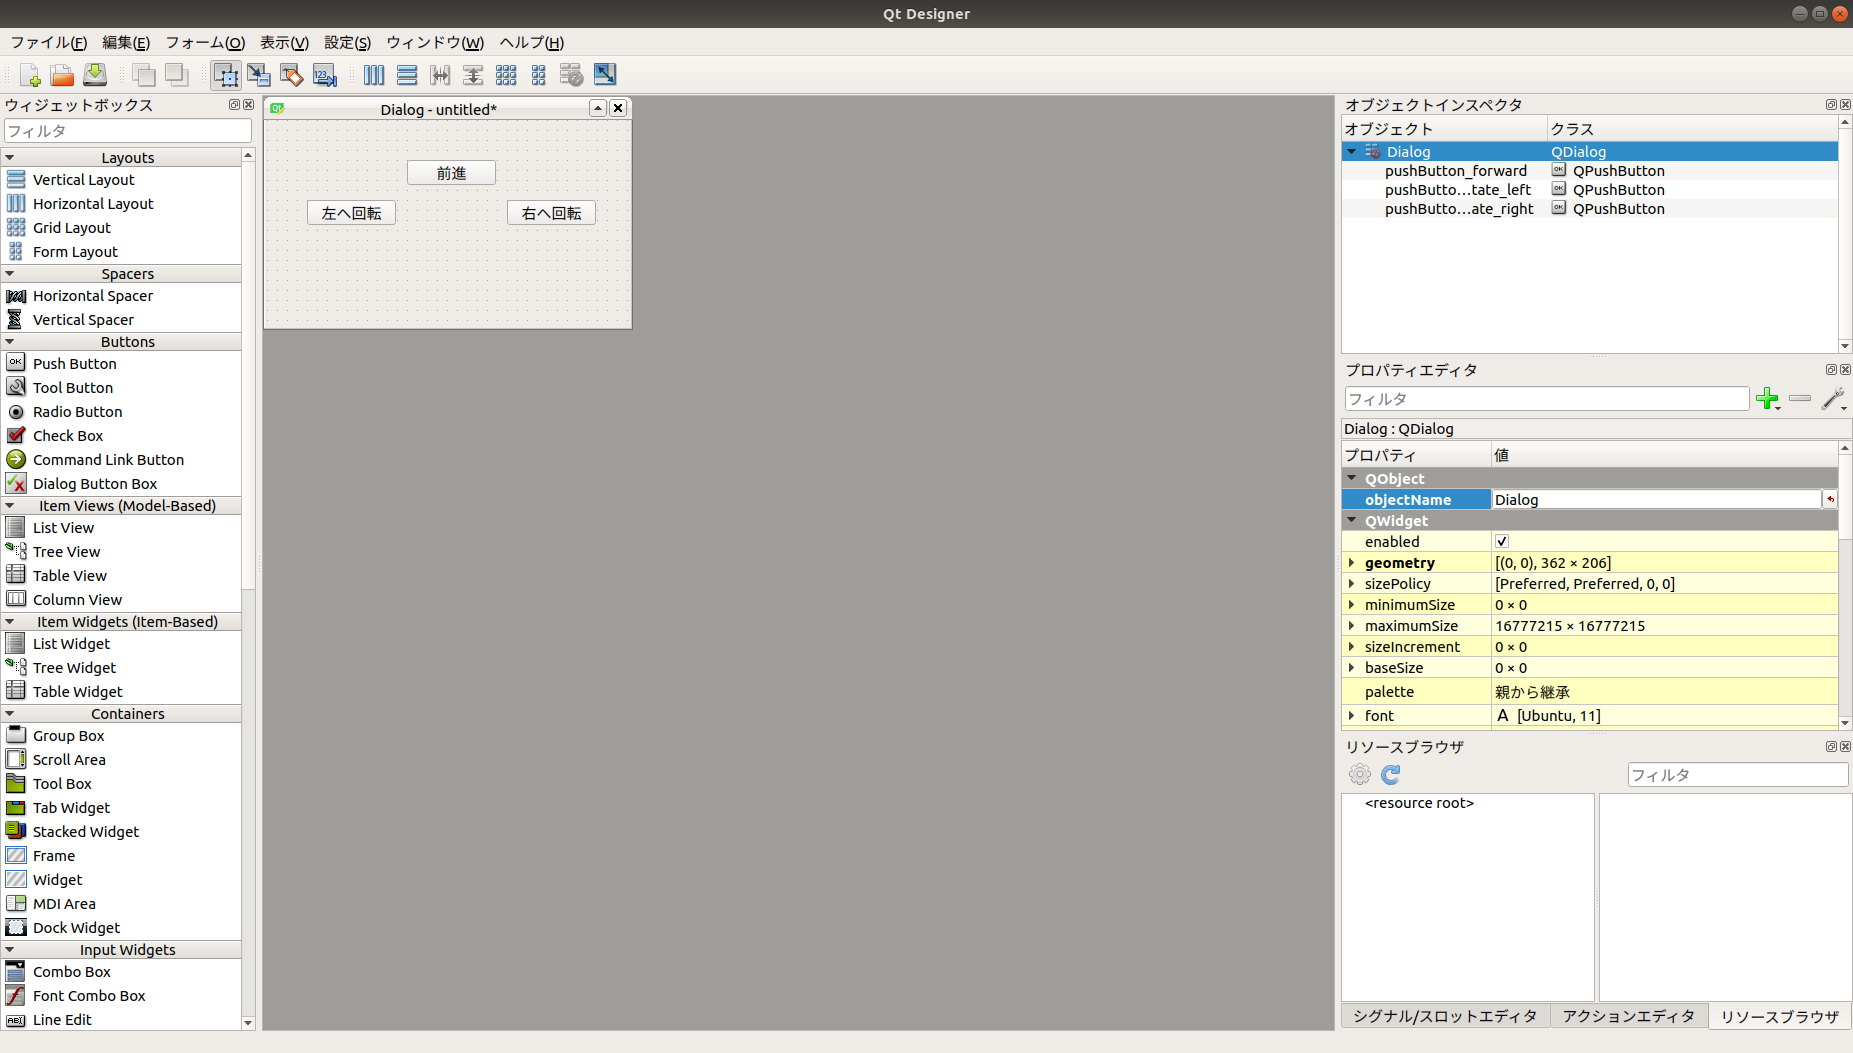
はじめにウィジェット(ボタンやチェックボックスなど)を配置していきます。
試しに、赤枠2のウィジェットボックスから[push botton]を選択して、赤枠1のMain Windowに貼り付けてみます。
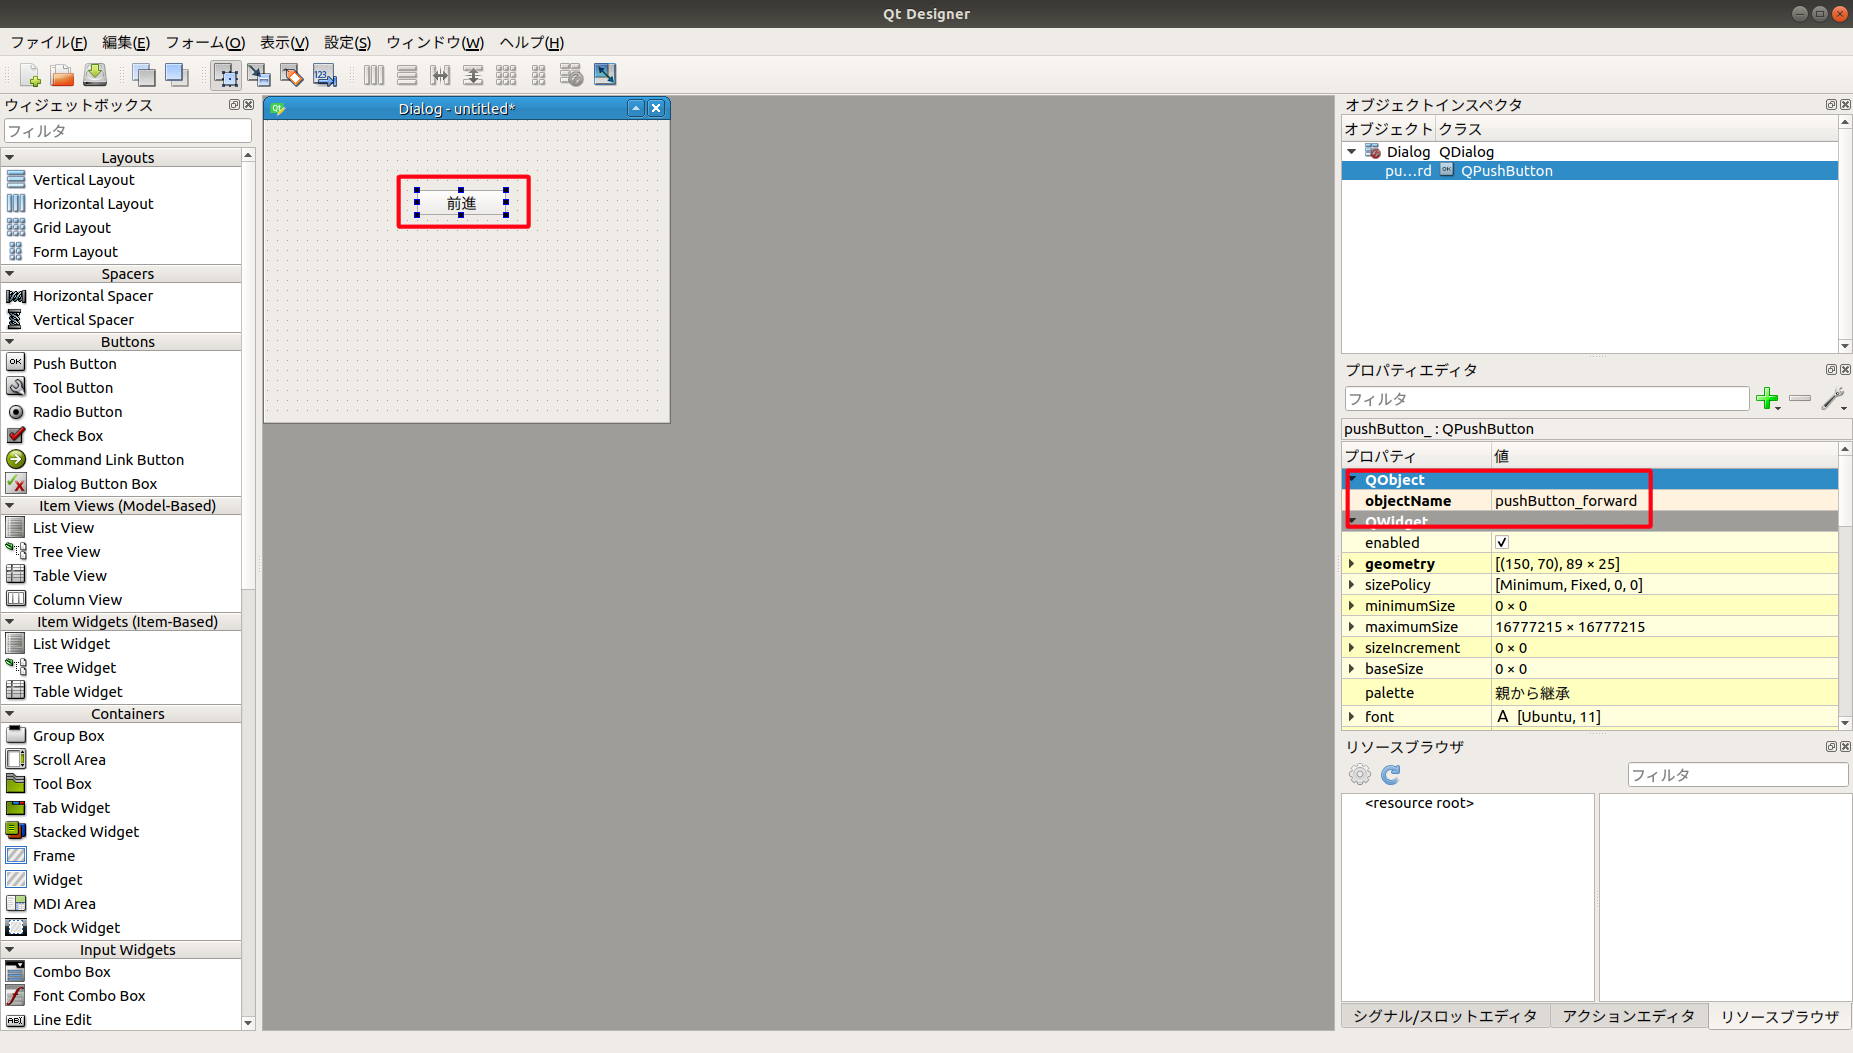
次に赤枠3のウィジェットのプロパティで[push botton]の名前を変更します。
[push botton]を選択して、ObjectNameとボタンの表示名を編集しましょう。
ボタンの表示名はボタンをダブルクリックすることで編集できます。
(ここではObjectNameを「pushButton_forward」、ボタンの表示名を「前進」としました。)
同様に「左へ回転」と「右へ回転」ボタンも作成します。
- 「左へ回転」ボタンのプロパティのObjectNameを「pushButton_rotate_left」に設定しました。
- 「右へ回転」ボタンのプロパティのObjectNameを「pushButton_rotate_right」に設定しました。
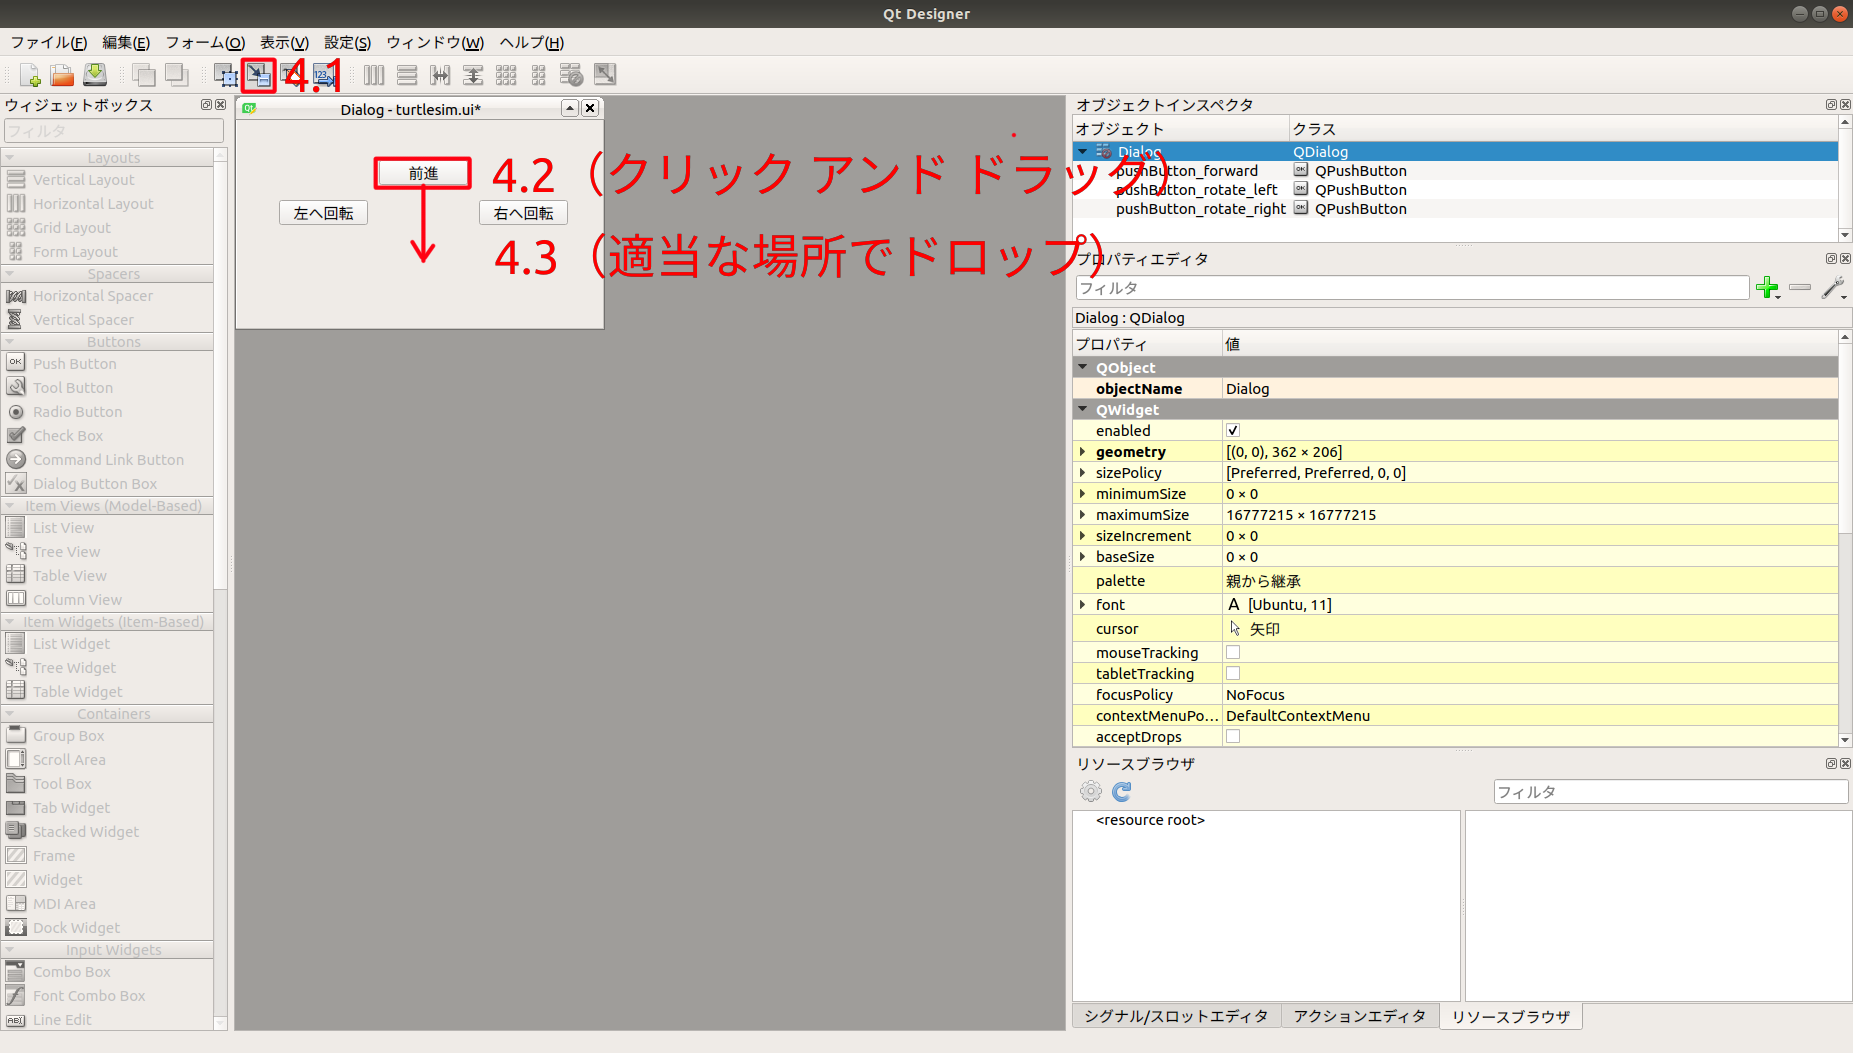
次にウィジェットにシグナル/スロットを設定します。
以下の4.1をクリックして、
4.2のウィジェットをクリックアンドドラッグ、
4.3の適当な場所にドロップしてください。
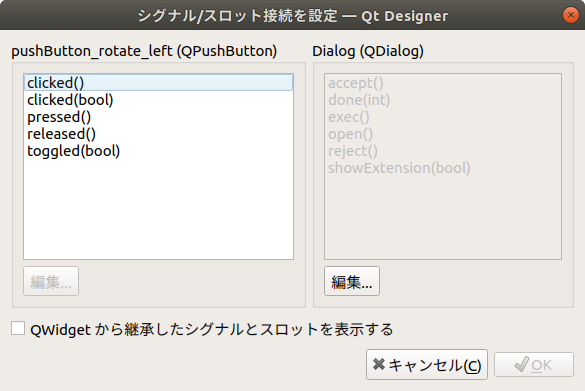
以下の画面が開いたと思います。
チェックボックス[QWidgetから継承したシグナルとスロットを表示する]にチェック入れてください。
デフォルトでもたくさんの機能が準備されています。
今回は[前進ボタンをクリックした時に亀を前進させたい]ので、
左枠のQPushButtonをclicked()に設定します。
このように何かが発生したことを他のオブジェクトに通知するための関数(今回は前進ボタンをクリックした時:clicked())をシグナルと呼びます。
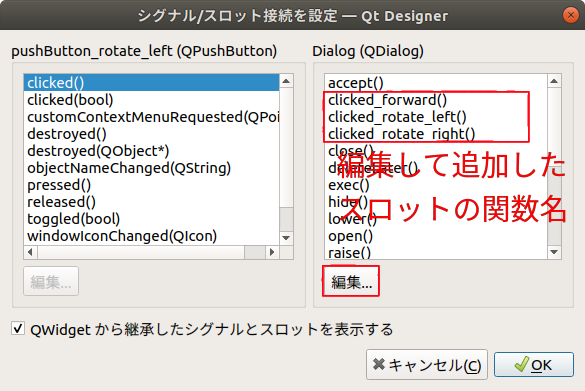
次にスロットを設定します。
スロットとはシグナル(ボタンをクリックした時)に反応して実行される関数(今回は、亀を移動・回転させたい機能)のことです。
シグナルで設定した「clicked()」などの汎用的な関数はデフォルトで用意されていましたが、
今回はTurtleSimの亀を移動・回転させることがスロットに当たるので、
自分でスロットを作成する必要があります。
スロットの設定であるDialog(QDialog)の下にある[編集]ボタンを押して、
スロットを作成してください。
- clicked_forward()
- clicked_rotate_left()
- clicked_rotate_right()
スロットを作成すると、以下のように関数名が増えると思います。
今、[前進]ボタンのシグナルとスロットを設定しているので、
スロットをclicked_forward()に設定して[OK]ボタンを押してください。
これで[前進]ボタンのシグナルとスロットの設定が終わりました。
同様に、[左へ回転]ボタンと[右へ回転]ボタンのシグナルとスロットも設定してください。
(赤枠4.1のボタンを押して、[左へ回転]ボタンでクリックアンドドラッグアンドドロップ....略)
- [左へ回転]ボタンのシグナルは「clicked()」、スロットは「clicked_rotate_left()」に設定します。
- [右へ回転]ボタンのシグナルは「clicked()」、スロットは「clicked_rotate_right()」に設定します。
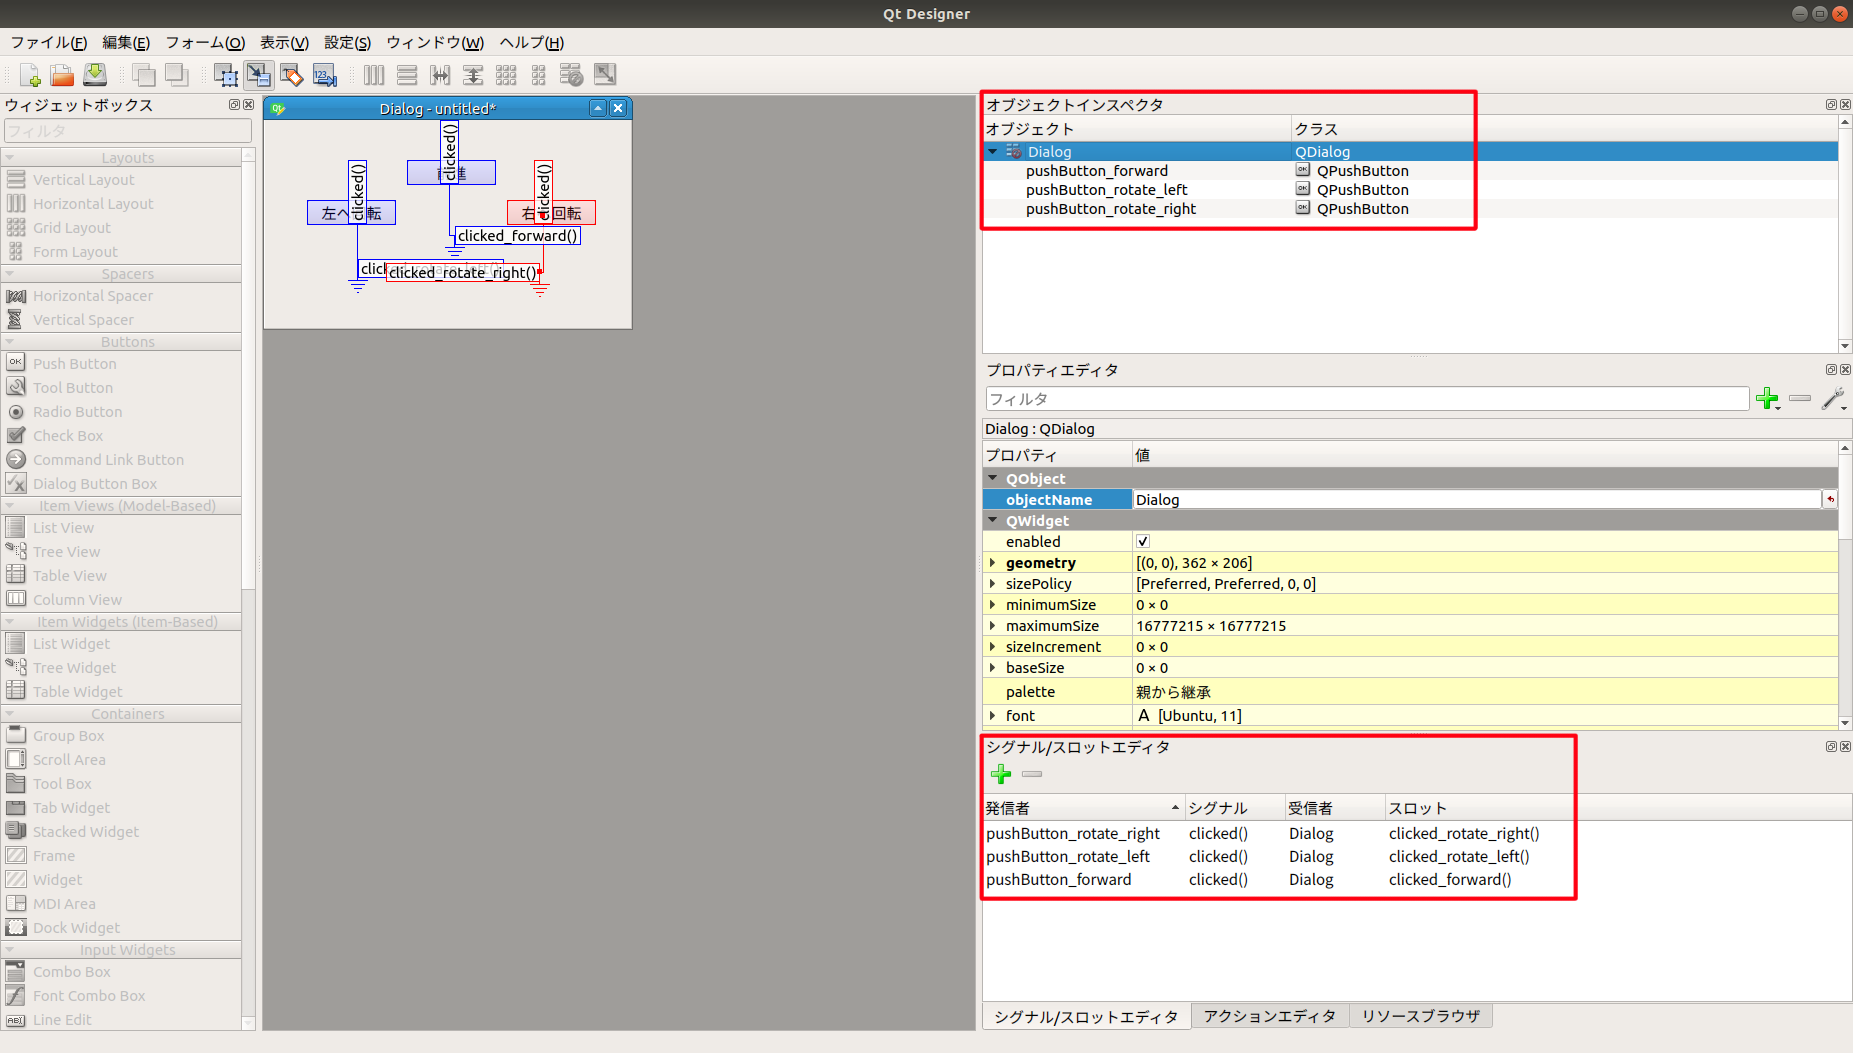
上赤枠の「オブジェクトインスペクタ」と下赤枠の「シグナル/スロットエディタ」の設定が合っていればOKです。
「オブジェクトインスペクタ」の設定が違う場合は手順3に戻って、ObjectNameの再設定を行ってください。
「シグナル/スロットエディタ」の設定が違う場合は手順4に戻って、シグナル/スロットの再設定を行ってください。
画面を作成したら、「turtlesim.ui」で保存してください。
以下のようなプログラムになっていると思います。
<?xml version="1.0" encoding="UTF-8"?>
<ui version="4.0">
 <class>Dialog</class>
 <widget class="QDialog" name="Dialog">
  <property name="geometry">
   <rect>
    <x>0</x>
    <y>0</y>
    <width>362</width>
    <height>206</height>
   </rect>
  </property>
  <property name="windowTitle">
   <string>Dialog</string>
  </property>
  <widget class="QPushButton" name="pushButton_forward">
   <property name="geometry">
    <rect>
     <x>140</x>
     <y>40</y>
     <width>89</width>
     <height>25</height>
    </rect>
   </property>
   <property name="text">
    <string>前進</string>
   </property>
  </widget>
  <widget class="QPushButton" name="pushButton_rotate_left">
   <property name="geometry">
    <rect>
     <x>40</x>
     <y>80</y>
     <width>89</width>
     <height>25</height>
    </rect>
   </property>
   <property name="text">
    <string>左へ回転</string>
   </property>
  </widget>
  <widget class="QPushButton" name="pushButton_rotate_right">
   <property name="geometry">
    <rect>
     <x>240</x>
     <y>80</y>
     <width>89</width>
     <height>25</height>
    </rect>
   </property>
   <property name="text">
    <string>右へ回転</string>
   </property>
  </widget>
 </widget>
 <resources/>
 <connections>
  <connection>
   <sender>pushButton_rotate_left</sender>
   <signal>clicked()</signal>
   <receiver>Dialog</receiver>
   <slot>clicked_rotate_left()</slot>
   <hints>
    <hint type="sourcelabel">
     <x>90</x>
     <y>93</y>
    </hint>
    <hint type="destinationlabel">
     <x>91</x>
     <y>148</y>
    </hint>
   </hints>
  </connection>
  <connection>
   <sender>pushButton_forward</sender>
   <signal>clicked()</signal>
   <receiver>Dialog</receiver>
   <slot>clicked_forward()</slot>
   <hints>
    <hint type="sourcelabel">
     <x>182</x>
     <y>59</y>
    </hint>
    <hint type="destinationlabel">
     <x>188</x>
     <y>115</y>
    </hint>
   </hints>
  </connection>
  <connection>
   <sender>pushButton_rotate_right</sender>
   <signal>clicked()</signal>
   <receiver>Dialog</receiver>
   <slot>clicked_rotate_right()</slot>
   <hints>
    <hint type="sourcelabel">
     <x>276</x>
     <y>96</y>
    </hint>
    <hint type="destinationlabel">
     <x>273</x>
     <y>152</y>
    </hint>
   </hints>
  </connection>
 </connections>
 <slots>
  <slot>clicked_rotate_left()</slot>
  <slot>clicked_rotate_right()</slot>
  <slot>clicked_forward()</slot>
 </slots>
</ui>
「.ui」→「.py」へ変換
$ pyuic5 -o turtlesim.py turtlesim.ui
Qt 5デザイナで作成した「turtlesim.ui」から「turtlesim.py」が自動生成されます。
# -*- coding: utf-8 -*-

# Form implementation generated from reading ui file 'turtlesim.ui'
#
# Created by: PyQt5 UI code generator 5.10.1
#
# WARNING! All changes made in this file will be lost!

from PyQt5 import QtCore, QtGui, QtWidgets

class Ui_Dialog(object):
    def setupUi(self, Dialog):
        Dialog.setObjectName("Dialog")
        Dialog.resize(362, 206)
        self.pushButton_forward = QtWidgets.QPushButton(Dialog)
        self.pushButton_forward.setGeometry(QtCore.QRect(140, 40, 89, 25))
        self.pushButton_forward.setObjectName("pushButton_forward")
        self.pushButton_rotate_left = QtWidgets.QPushButton(Dialog)
        self.pushButton_rotate_left.setGeometry(QtCore.QRect(40, 80, 89, 25))
        self.pushButton_rotate_left.setObjectName("pushButton_rotate_left")
        self.pushButton_rotate_right = QtWidgets.QPushButton(Dialog)
        self.pushButton_rotate_right.setGeometry(QtCore.QRect(240, 80, 89, 25))
        self.pushButton_rotate_right.setObjectName("pushButton_rotate_right")

        self.retranslateUi(Dialog)
        self.pushButton_rotate_left.clicked.connect(Dialog.clicked_rotate_left)
        self.pushButton_forward.clicked.connect(Dialog.clicked_forward)
        self.pushButton_rotate_right.clicked.connect(Dialog.clicked_rotate_right)
        QtCore.QMetaObject.connectSlotsByName(Dialog)

    def retranslateUi(self, Dialog):
        _translate = QtCore.QCoreApplication.translate
        Dialog.setWindowTitle(_translate("Dialog", "Dialog"))
        self.pushButton_forward.setText(_translate("Dialog", "前進"))
        self.pushButton_rotate_left.setText(_translate("Dialog", "左へ回転"))
        self.pushButton_rotate_right.setText(_translate("Dialog", "右へ回転"))
GUIのメインプログラムを書く。
Qtデザイナで指定したスロット名。
- clicked_rotate_left
- clicked_forward
- clicked_rotate_right
に役割を与えて終わり!!!
# ! /usr/bin/python3
# -*- coding: utf-8 -*-


# GUI。
import sys
from PyQt5.QtCore import *
from PyQt5.QtWidgets import *
from turtlesim import Ui_Dialog # 自動生成したファイルをインポート
# ROS。
import rospy
from geometry_msgs.msg import Twist


class Test(QDialog):
    def __init__(self,parent=None):
        # GUI。
        super(Test, self).__init__(parent)
        self.ui = Ui_Dialog()
        self.ui.setupUi(self)

        # ROS。pubの設定。
        self.cmd_vel_Twist = Twist()
        self.pub_cmd_vel = rospy.Publisher('/turtle1/cmd_vel',Twist,queue_size=10)

    def clicked_rotate_left(self):
        """
        Qtデザイナで指定したスロット名。
        「左に回転」ボタンで実行したい処理を書く。
        """
        self.cmd_vel_Twist.angular.z = 1 # 1[rad/s]で左に回転
        self.pub_cmd_vel.publish(self.cmd_vel_Twist)
        self.cmd_vel_Twist.angular.z = 0

    def clicked_forward(self):
        """
        Qtデザイナで指定したスロット名。
        「前進」ボタンで実行したい処理を書く。
        """
        self.cmd_vel_Twist.linear.x = 1 # 1[m/s]で直進
        self.pub_cmd_vel.publish(self.cmd_vel_Twist)
        self.cmd_vel_Twist.linear.x = 0

    def clicked_rotate_right(self):
        """
        Qtデザイナで指定したスロット名。
        「右に回転」ボタンで実行したい処理を書く。
        """
        self.cmd_vel_Twist.angular.z = -1 # 1[rad/s]で右に回転
        self.pub_cmd_vel.publish(self.cmd_vel_Twist)
        self.cmd_vel_Twist.angular.z = 0


if __name__ == '__main__':
    rospy.init_node('turtlesim_talker')
    app = QApplication(sys.argv)
    window = Test()
    window.show()
    sys.exit(app.exec_())
実行
-
roscoreの起動
$ roscore -
turtlesimの実行
$ rosrun turtlesim turtlesim_node -
GUIのメインプログラムの実行
$ python main_turtlesim.py
終わりに
いい感じに動きましたかね(?)
今回は僕がGUIを作成する際に躓いたポイントを重点的に書き出しました。
特にシグナルとスロットの設定と実行プログラムの関係については画像を入れて詳しく説明したつもりです。
今回はシンプルなGUIを作成しましたが、作り込めば製品化も可能らしいですね。
(僕もモチベがあればドローンのGUIを作成したいと思います)
