For English speakers
I wrote the main part in English so you can refer if you guys are interested:) I wonder if there is anyone who does not understand Japanese but use qiita.
はじめに
仮想通貨支払い用のapiを調べているとCoinGateが頻繁に出てくるので使用してみることにしました。が、公式サイトのpythonコードがpython3に対応しておらず、djangoでCoinGateを利用する方法について説明しているwebサイトが一つも見つからなかったので、備忘録がてら投稿してみます。Djangoのpayment system比較表にも載ってないですね。
Comparison of packages for accepting payments.
coingate-apiを使用する
使い方を調べまわってると、このapiに辿り着きました。
coingate-api 0.1.5
"This is open source library provided by SociumNET team and it is used in some internal projects."
このapiはSociumNETに提供されているオープンソースライブラリで、内部プロジェクトで使用されています。
と冒頭に書いているので調べてみたとところ、作成者はBlockChainを使ったソリューションを提供するヨーロッパの会社みたいです。
SociumNET
CoinGateについて
CoinGateでは本番用とテスト用にレイアウトが全く同じサイトが用意されており、テスト用がCoinGate sandboxと呼ばれています。
CoinGate
CoinGate_sandbox
ログインして進めるとこんな画面がでるので、アプリを作成して、sand_auth_tokenを入手します。

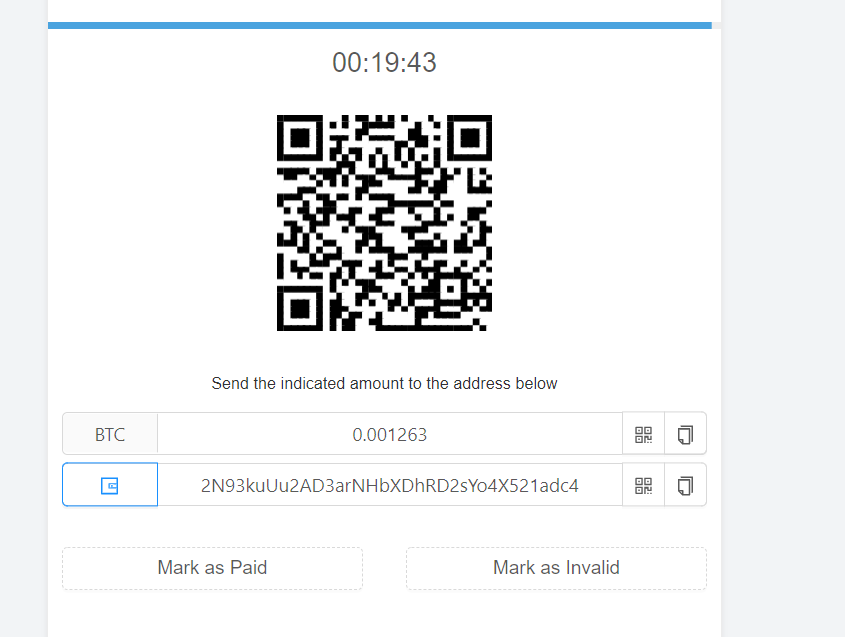
支払い画面はこんな風になっています。

 [テストサイト](https://example.coingate.com/)を参考にすればより全体が分かるかもしれません。(昨日までは使えたのですが、今日はサイトにアクセスできませんでした 2/11現在)
Djangoに実装
仮想通貨でサイト内のポイントを購入できるという設定ですすめていきます。
Just think that this website is a website where you can buy things with points that are purchased via cryoto.
フローについて About the flow
1. 支払いページでポイント数を指定 (Specify the number of points on payment page)
2. ユーザがsubmitを押した後、注文内容をProceedViewへ送信 (It transfers the order data to ProceedView after a user submits)
3. 注文内容をapiで送った後、returnにあるpayment_urlへユーザをリダイレクト (Redirect the user to payment_url derived from return of order api)
4. ユーザがCoinGateで支払処理 (the user make the payment on Coin Gate)
5. 支払い終了後自分のサイトへユーザがリダイレクトされるので、支払いが本当に済んでいるか確認 (Confirm if the payment is valid after the payment is done and the user is directed to your website)
6. 確認ができればポイントをユーザに付与 (Give the points to the user after the confirmation)
※5に関しては、ユーザが自分のサイトにリダイレクトされない可能性があるので、それを別途考慮しないといけない。(As for 5, your user may not be redirected to your website. Design your website to allow the user activity.
1. urls
from django.conf.urls import url
from .views import (
    CancelView,
    CallbackView,
    FailView,
    PurchaseView,
    SuccessView,
    )

urlpatterns = [
    url(r'^purchase/$', PurchaseView.as_view(), name='purchase'),
    url(r'^proceed/$', ProceedView, name='proceed'),
    url(r'^success/$', SuccessView.as_view(), name='success'),
  url(r'^fail/$', FailView.as_view(), name='fail'),
    url(r'^cancel/$', CancelView.as_view(), name='cancel'),
    url(r'^callback/$', CallbackView.as_view(), name='callback'),
]
2. html
{% extends "base.html" %}
{% block content %}
<h1> 1point = {{ BTC_rate }}satoshi(1satoshi=0.00000001BTC)</h1><br>
<h1> 1point = {{ USD_rate }}USD</h1><br>
<h1> Minimum Order = {{ BTC_min_points }}points</h1><br>
<form method="POST" action="/proceed/">{% csrf_token %}
  How many points?:<br>
  <input type="number" name="points" min="{{ BTC_min_points }}"><br>
  <button type="submit" class="btn btn-primary">Proceed to payment</button>
</form>
{% endblock content %}
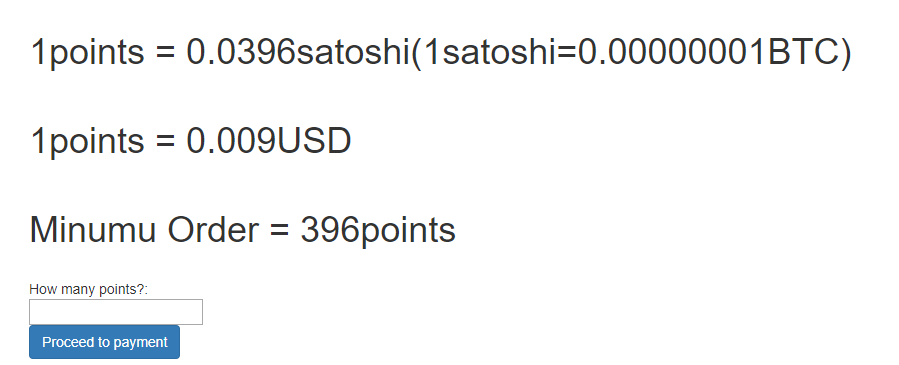
こんな感じのイメージ。pointsじゃなくてpoint、minumuもminimumですね。これはapiでrateを取得して確認したいだけなのでお許しを。
It looks something like this. As you probably notice, there are some erros in the picture. Well it's just to see how rate from api works so it's fine.

{% extends "base.html" %}
{% block content %}
<p>success</p>
{% endblock content %}
successと表示するだけです。 残りのhtmlはそんなに重要でないので割愛。
Just to show "success". Since the rest is not as important, I'll skip to explain them.
3. views
apiの解説は最後にします。まずはapiをインストール。
In Japanese it says " I'll explain api at the end but I don't think you guys need that since everything is written in English on api website.
pip install coingate-api
from coingate_api import CoingateAPI, api_error
from django.contrib.auth import get_user_model
from django.http import HttpResponseRedirect, Http404
import datetime
import secrets

User = get_user_model()
sand_auth_token ='your_sand_token'#これはsetting.pyに入れておくと良いらしい

class PurchaseView(TemplateView):
    template_name = "purchase.html"
    def get_object(self):
        return get_object_or_404(User, username__iexact=self.request.user)

    def get_context_data(self, *args, **kwargs):
        context = super(PontsView, self).get_context_data(*args, **kwargs)
        api = CoingateAPI(auth_token=sand_auth_token, environment='sandbox')
        BTC_rate = api.exchange_rate(from_='BTC', to='JPY')
        USD_rate = api.exchange_rate(from_='USD', to='JPY')
        context['BTC_rate'] = round(1/10000000*BTC_rate,4)
        context['BTC_min_points'] = round(1/1000*BTC_rate) #0.001BTC is the min of CoinGate
        context['USD_rate'] = round(1/USD_rate,3)
        return context

def ProceedView(request):
    try:
        if request.method == "POST":
            api = CoingateAPI(auth_token=sand_auth_token, environment='sandbox')
            points   = request.POST.get("points")
            user =  User.objects.get(username=request.user)
            created_date = datetime.datetime.now(tmz('UTC'))
            order_id = str(request.user) + "_" +str(datetime.datetime.now(tmz('UTC')))
            token = secrets.token_hex()
            rate = api.exchange_rate(from_='BTC', to='JPY')
            crypto_amount = float(points)/rate
            result = api.create_order(
                                crypto_amount,
                                "BTC",
                                "do_not_convert",
                                order_id=order_id,
                                title="Purchase points",
                                description="whatever",
                                token=token,
                                callback_url=url_1, #この3つのurlはurls.pyの内容に合わせてね
                                cancel_url=url_2,
                                success_url=url_3,
                                )
            Payment.objects.filter(user=request.user).delete() #前回の値が消されていない時用
            payment_instance = Payment(user=request.user, token=token, purchase_id=result['id'], created_date=created_date, points=points)
            payment_instance.save()
            return HttpResponseRedirect(result['payment_url'])
        else:
            raise Http404("request.method is not POST")
    except Exception as e:
        raise Http404(e)

class SuccessView(TemplateView):
    template_name = "success.html"

    def get(self, request, **kwargs):
        try:
            api = CoingateAPI(auth_token=sand_auth_token, environment='sandbox')
            qs = Payment.objects.filter(user=request.user)
            id = qs.values('purchase_id').first()["purchase_id"]
            result = api.checkout(id)# if there were no such an order, it would return error
            if result['status'] == 'paid':
                user_obj = UserProfile.objects.filter(user=self.request.user).first()
                points_original = user_obj.points
                points_add = qs.values('points').first()["points"]
                points = points_original + points_add
                user_obj.points = points
                user_obj.save()
                Payment.objects.filter(user=request.user).delete()
            return render(self.request, self.template_name)
        except api_error.APIError as e:
            raise Http404(e)
残りのviewはこれが分かればすぐ作れるので割愛
I'll skip the rest.
4. models
このPaymentのモデルで重要なのはuserとpurchase_idなので、ほかのtokenやcreated_dateなどはお好みで削除したり、べつのデータ
を加えたりしてください。
The important data here is user and purchase, so you can delete the rest or add some other data according to your website design.
from django.contrib.auth import get_user_model
from items.models import Item

User = get_user_model()

class Payment(models.Model):
    user = models.OneToOneField(User, on_delete=models.CASCADE)
    token = models.CharField(max_length=255, unique=True)
    purchase_id = models.IntegerField(unique=True, null=True)
    created_date = models.DateTimeField(blank=True, null=True)
    points = models.PositiveIntegerField(null=True)

class UserProfile(models.Model):
    user = models.OneToOneField(settings.AUTH_USER_MODEL, on_delete=models.CASCADE, related_name='profile')
    purchased_item = models.ManyToManyField(Item, blank=True,related_name='purchased')
    points = models.PositiveIntegerField(default=100)
coingate-api
公式ページはこちら
下記のコマンドで注文を飛ばすことができます。kwargsの値は入れたければ入れるという感じみたいですね。注文後のreturnはこちらに載っています。
api.create_order(price_amount, price_currency, receive_currency, **kwargs)
 #check documentation of API. Values of kwargs can contain also order_id, title, description
次に、これで先ほどのcreate.orderのreturnで帰ってくる"order_id"をもとに、orderの状況を確認できます。
api.checkout(order_id, pay_currency='BTC')
responseはここに載っている通り、下記の用になります。
{
    "message": "Order does not exist",
    "reason": "OrderNotFound"
}
{
    "id": 1723,
    "order_id": "",
    "pay_amount": "0.000023",
    "pay_currency": "BTC",
    "payment_address": "2MzyF5xfYRAmHVPwG6YPRMY74dojhAVEtmm",
    "payment_url": "http://coingate.com/invoice/4949cf0a-fccb-4cc2-9342-7af1890cc664",
    "price_amount": "0.01",
    "price_currency": "USD",
    "receive_amount": "0.01",
    "receive_currency": "USD",
    "status": "pending",
    "created_at": "2018-05-04T21:46:07+00:00",
    "expire_at": "2018-05-04T22:11:58+00:00"
}
"status"は1.pending, 2.invaiid, 3.paidの3パターンあります。これを使い分けてうまくviewsで処理しないといけないですね。
最後に
とりあえずざっくりやり方を載せたのですが、時間と需要次第でもう少し分かりやくするかもしれないです。コードの問題点などがあればご指摘いただけますと幸いです。