はじめに
CDNからVue-CILへの移行方法。Vue.jsをCDNを利用していた人が、Vue-CLIへ移行する際に、「こういう対応関係にある、と理解すると分り易いかも?」という話。
Node.js環境は導入済みで、「Vueには、Vue CLIを使う方法があるのね?」って興味を持ち始めた人が対象。ブラウザで直接動作するCDN版からスタートするので、ES5前提。
サンプルコードとしてToDoアプリを扱う。Vue.js公式のDoDoサンプルコードをベースに、機能を落として「追加と削除だけ」としたコードを用いる。
- Vue.js公式のDoDoサンプルコード
移行の大雑把な流れ
CDNのVue.jsを用いて書いたToDoのWebアプリを、Vue-CLIにへ置き換える。
- 次のようにな構成で作成したCDN版のToDoアプリから開始(ファイル名は任意)
- index.html
- vue_main.js
- vue_main.css
- Vue-CLI環境を導入する
- Vueファイル(
*vue)という形式でHtmlとJavaScriptとCSSを記述 - しかし、ブラウザはVueファイルを理解できない
- 実行時にhtmlファイル他へトランスパイルする環境を作成することで対応
- Vueファイル(
- CDN版で作成した3ファイルを、MyClient.vueファイルにまとめる(ファイル名は任意)
- Vue-CLIのスタートファイルとなるApp.vueに、「MyClient.vueを表示して」と記述
- devトランスパイルして(開発時の動作確認用)、ローカルのブラウザで表示を確認
- vueファイルが、Htmlとjsファイルに適切に変換される
- 開発時確認用のhttpサーバーが起動され、その上で確認
- buildトランスパイルして(公開用)、実際にhttpサーバーに配置して、ブラウザ表示を確認
- ローカルファイルとしてアクセスすると表示エラーする(※ファイル読込APIの都合、と思われる)
動作確認環境
- Node.js : v8.11.3
- Vue.js : v2.9.6
- OS : Windows 7 / 10
移行前のCDN版サンプルコード
ToDoアプリを次のように作成する。
- textareaで複数行のテキスト(ToDoアイテム)入力を受け取る
- ul+liタグでテキストを一覧表示する
- 入力時の日付を保持しておく
- ToDoアイテム一覧のテキスト部分がクリックされたら、打ち消し線を表示する
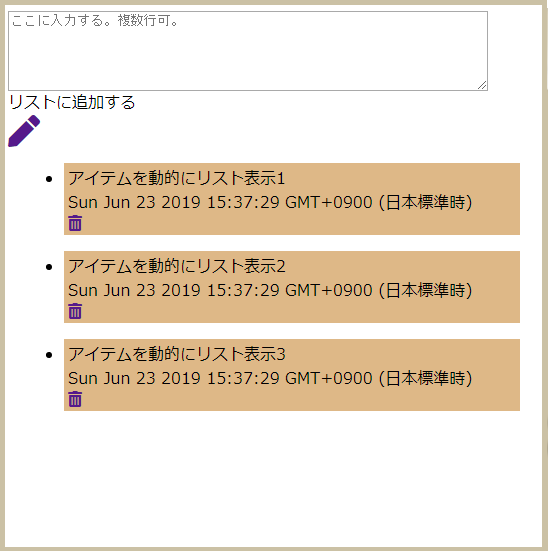
※都合で、実際のコードはアイコンでは無くボタンで「追加」と「削除」を表現している。後述。
デモ画面は、こちらを参照。
<html>
<head>
    <meta charset="UTF-8" />
    <meta name="viewport" id="id_viewport" content="width=device-width" >

    <script src="https://cdn.jsdelivr.net/npm/vue@2.6.10/dist/vue.js"></script>
    <script src="./javascripts/vue_main.js"></script>
    <link href="./stylesheets/vue_main.css" rel="stylesheet"></link>
</head>
<body>

<div id="id_app1">
    <div id="id_input_area">
        <div id="id_input_textarea">
            <textarea v-model="input_message" placeholder="ここに入力する。複数行可。"></textarea>
        </div>
        <div id="id_input_command">
            <div id="id_input_additional">
                リストに追加する
            </div>
            <div id="id_input_button" v-on:click="clickInputButton">
                <input type="button" value="追加"></input>
            </div>
        </div>
    </div>
    <div id="id_todolist">
        <ul>
            <li v-for="(item,index) in todo_list" v-bind:key="index">
                <!-- (要素、配列番号)で受け取れる仕様 -->
                <div class="item_text" v-on:click="clickItem(index)"><span v-bind:style="item.styleStr">{{ item.text }}</span></div>
                <div class="item_date">{{ item.dateStr }}</div>
                <div v-on:click="clickDeleteButton(index)">
                    <input type="button" value="削除"></input>
                </div>
            </li>
        </ul>
    </div>
</div>

</body>
</html>
var NoteItem = function (rowtext, createDateMiliSec) {
    var now = (createDateMiliSec) ? new Date(createDateMiliSec) : new Date();

    this.text = rowtext;
    this.utcSec = now.getTime();
    this.dateStr = now.toString();
    this.styleStr = "";
};
NoteItem.prototype.toggleTextStyle = function (styleStr) {
    this.styleStr = (this.styleStr.length==0) ? styleStr : "";
};
var createNoteItem = function (rowtext) {
    return new NoteItem( rowtext );
};


var STORAGE_KEY = "todo-sample-vuejs20190623"
var itemStorage = {
    fetch: function () {
        var todo_list = [];
        var saved_list = JSON.parse(localStorage.getItem(STORAGE_KEY) || "[]");
        if( saved_list.length > 0 ){
            saved_list.forEach(function (item) {
                todo_list.push(
                    createNoteItem(item.text, item.createDateMiliSec)
                )
            });
        }else{
            // 動作検証時、最初からアイテムがあったほうが都合が良いので。
            todo_list.push( createNoteItem("アイテムを動的にリスト表示1") );
            todo_list.push( createNoteItem("アイテムを動的にリスト表示2") );
            todo_list.push( createNoteItem("アイテムを動的にリスト表示3") );
        }
        return todo_list;
    },
    save : function (todo_list) {
        var saving_list = [];
        todo_list.forEach(function (item) {
            saving_list.push({
                "text" : item.text,
                "createDateMiliSec" : item.utcSec
            })
        });
        localStorage.setItem(STORAGE_KEY, JSON.stringify(saving_list));
    }
};


window.onload = function () {
    var app1 = new Vue({
        el : "#id_app1",
        data : {
            input_message : "",
            todo_list : itemStorage.fetch()
        },
        watch : {
            todo_list : {
                handler: function (todo_list) {
                    itemStorage.save(todo_list);
                },
                deep : true
            }
        },
        methods : {
            clickInputButton : function () {
                var new_text = this.input_message;
                if( new_text.length > 0 ){
                    this.todo_list.push( createNoteItem(new_text) );
                    this.input_message = "";
                }
            },
            clickItem : function (index) {
                this.todo_list[index].toggleTextStyle("text-decoration: line-through;");
                // ToDo: クリックでのトグル動作時の扱いを『暫定』としたいので、このような実装にする。
            },
            clickDeleteButton : function (index) {
                this.todo_list.splice(index, 1);
            }
        }
    });
};
# id_input_area textarea{
    width : 480px;
    height: 80px;
}

# id_todolist ul li {
    margin: 16px;
    padding: 4px;
    background-color: burlywood;
}

.item_text {
    white-space: pre-wrap;
    cursor: pointer;
}
Vue CLIへ移行の前準備
Node.js環境にて、以下のコマンドを実行してVue-CLIを導入する。
なお、ここでは「ローカル」にインストールする。
(※「グローバル」にインストールしたい場合は「-g」をオプションを付けること)
npm install vue-cli
つづいて、以下のコマンドを実行して、vue-cliのスケルトン的なものを作成する。これは「プロジェクト」などと呼ばれる一式。プロジェクト名は、ここでは「samplevueclie」とする。
(※上述のvue-cliを「グローバル」にインストールした場合は「vue init webpack samplevueclie」で実行する)
node_modules\.bin\vue init webpack samplevueclie
コマンドを実行すると、いくつかの質問を聞かれる。デフォルトのまま何も変更せずにEnterを押して良い。作者名は?のところには自分の名前を入れる。「なるべく簡単にしたい」場合は、build形式に「runtime」を選び、「Vue-routerを使うか?」以降の問いには「No」を答えるのもよい(私はそうした)。
$ Project name samplevueclie
$ Project description A Vue.js project
$ Author hoshimado
$ Vue build (Use arrow keys) runtime
$ Install vue-router? No
$ Use ESLint to lint your code? No
$ Set up unit tests No
$ Setup e2e tests with Nightwatch? No
フォルダ「samplevueclie」の中に、Vue-CLIのプロジェクト(vueトランスパイル用の環境)が作成される。
次のコマンドを実行して、ブラウザで次のURLを開いて、先ずは動作確認をする。
cd samplevueclie
npm run dev
http://localhost:8080/
ブラウザにVue.jsのサンプルページが表示されることを確認したら、コマンドライン上で「Ctrl+C」キーを押す。これにより、一旦Vueが止まる。
移行後のVue-CLIのコード
先に作成したVue.jsのプロジェクト内に、CDN版で作成したhtmlファイル、javacriptファイル、cssファイルを配置する。
考え方
先のVue-CLI導入直後の動作確認時に表示したページの実態は、フォルダ「samplevueclie\src\components\」配下にある、HelloWorld.vueである(中身はテキストファイル)。
これを開くと、先のブラウザで表示された内容であることがなんとなく見える。
そして、ファイル「HelloWorld.vue」を表示するように指定しているのは、フォルダ「samplevueclie\src\」直下にあるApp.vueである。
この App.vue ファイルにて、次のように「HelloWorld.vueを表示せよ」と記述されている。(正確には、main.jsにてApp.vueを描画するよう記述されていて、App.vueに記載されたVueコンポーネントが表示される。この例では、HelloWordlコンポーネントのみが記述されているので、「実態はHelloWorld」という表現をした。)
<template>
  <div id="app">
    <img src="./assets/logo.png">
    <HelloWorld/> <!-- ★★ここで指定★★ -->
  </div>
</template>

<script>
import HelloWorld from './components/HelloWorld' // ★★ここで指定★★

export default {
  name: 'App',
  components: {
    HelloWorld  // ★★ここで指定★★
  }
}
</script>

<style>
# app {
  font-family: 'Avenir', Helvetica, Arial, sans-serif;
  -webkit-font-smoothing: antialiased;
  -moz-osx-font-smoothing: grayscale;
  text-align: center;
  color: #2c3e50;
  margin-top: 60px;
}
</style>
したがって、表示したい内容のVueファイルを作成して、App.vueに「そのファイルを表示せよ(読み込め)」と記載すればよい。
コード配置の例
今回に表示したいのはCDN版で作成したToDoアプリである。CDN版では、htmlファイルと、JavaScriptファイル、Cssファイルに分けて書いた。Vue-CLI版では、これを1つのVueファイルにまとめて記述することができる(推奨される)。
ここではVueファイルとして「MyClient.vue」を作成し、ここに先のCDN版のファイルからコードを移植する。「MyClient.vue」ファイルは、「HelloWorld.vue」ファイルと同じ「samplevueclie\src\components\」配下に格納する。
次のルールに従って、移植する。
- htmlファイルの、Vue用のdivタグ配下を、templateタグ配下へコピー
- JavaScriptは、scriptタグ配下へコピー
-
Vue({})の部分は{}を取り出して、export default {}としてコピー- その際に、elタグに代わってnameタグを用いる
-
data : {}部分は、data : function(){return: {}; }のように、関数の戻り値としてオブジェクトを返却するように変更する
-
Vue({})以外のJavaScript部分は、そのままコピーする
-
- Cssは、styleタグ配下へコピー
<template>
<div><!-- 「id="id_app1"」としていたdivタグ配下をココへ配置。id_app1自体の定義は不要 -->
    <div id="id_input_area">
        <div id="id_input_textarea">
            <textarea v-model="input_message" placeholder="ここに入力する。複数行可。"></textarea>
        </div>
        <div id="id_input_command">
            <div id="id_input_additional">
                リストに追加する
            </div>
            <div id="id_input_button" v-on:click="clickInputButton">
                <!--
                <a href="#"><i class="fas fa-pen fa-2x"></i></a>
                -->
                    <input type="button" value="追加"></input>
            </div>
        </div>
    </div>
    <div id="id_todolist">
        <ul>
            <li v-for="(item,index) in todo_list" v-bind:key="index">
                <!-- (要素、配列番号)で受け取れる仕様 -->
                <div class="item_text" v-on:click="clickItem(index)"><span v-bind:style="item.styleStr">{{ item.text }}</span></div>
                <div class="item_date">{{ item.dateStr }}</div>
                <div v-on:click="clickDeleteButton(index)">
                    <!--
                    <a href="#"><i class="fas fa-trash-alt"></i></a>
                    -->
                        <input type="button" value="削除"></input>
                </div>
            </li>
        </ul>
    </div>
</div>
</template>

<script>
// javascriptファイルをココへ。
var NoteItem = function (rowtext, createDateMiliSec) {
    var now = (createDateMiliSec) ? new Date(createDateMiliSec) : new Date();

    this.text = rowtext;
    this.utcSec = now.getTime();
    this.dateStr = now.toString();
    this.styleStr = "";
};
NoteItem.prototype.toggleTextStyle = function (styleStr) {
    this.styleStr = (this.styleStr.length==0) ? styleStr : "";
};
var createNoteItem = function (rowtext) {
    return new NoteItem( rowtext );
};


var STORAGE_KEY = "todo-sample-vuejs20190623"
var itemStorage = {
    fetch: function () {
        var todo_list = [];
        var saved_list = JSON.parse(localStorage.getItem(STORAGE_KEY) || "[]");
        if( saved_list.length > 0 ){
            saved_list.forEach(function (item) {
                todo_list.push(
                    createNoteItem(item.text, item.createDateMiliSec)
                )
            });
        }else{
            // 動作検証時、最初からアイテムがあったほうが都合が良いので。
            todo_list.push( createNoteItem("アイテムを動的にリスト表示1") );
            todo_list.push( createNoteItem("アイテムを動的にリスト表示2") );
            todo_list.push( createNoteItem("アイテムを動的にリスト表示3") );
        }
        return todo_list;
    },
    save : function (todo_list) {
        var saving_list = [];
        todo_list.forEach(function (item) {
            saving_list.push({
                "text" : item.text,
                "createDateMiliSec" : item.utcSec
            })
        });
        localStorage.setItem(STORAGE_KEY, JSON.stringify(saving_list));
    }
};

// 「var app1 = new Vue({})」としていた部分の、「{}」の中だけを「export default {}」の部分は位置する。
// また、「el」キーは削除して、代わりに「name」キーを配置する。値にはファイル名を入れる(とりあえず)。
export default {
    name : "MyClient",
    data : function () { // オブジェクト{}で定義していた値を、「その値を返却する(無名)関数」に書き換える。
        return {
            input_message : "",
            todo_list : itemStorage.fetch()
        }
    },
    watch : {
        todo_list : {
            handler: function (todo_list) {
                itemStorage.save(todo_list);
            },
            deep : true
        }
    },
    methods : {
        clickInputButton : function () {
            var new_text = this.input_message;
            if( new_text.length > 0 ){
                this.todo_list.push( createNoteItem(new_text) );
                this.input_message = "";
            }
        },
        clickItem : function (index) {
            this.todo_list[index].toggleTextStyle("text-decoration: line-through;");
            // ToDo: クリックでのトグル動作時の扱いを『暫定』としたいので、このような実装にする。
        },
        clickDeleteButton : function (index) {
            this.todo_list.splice(index, 1);
        }
    }
}
</script>

<!-- Add "scoped" attribute to limit CSS to this component only -->
<style scoped>
/* Cssファイルはここへ配置する。 */
# id_input_area textarea{
    width : 480px;
    height: 80px;
}

# id_todolist ul li {
    margin: 16px;
    padding: 4px;
    background-color: burlywood;
}

.item_text {
    white-space: pre-wrap;
    cursor: pointer;
}
</style>
続いて、App.vueファイルを、HelloWorldに代わってMyClientを呼びだすように変更する。具体的には次のように変更する(CSS部分で元々のは「中央寄せ」が指定されているが、ここでは不要なので解除する)。
<template>
  <div id="app">
    <MyClient/>   // ★★ここで指定★★
  </div>
</template>

<script>
import MyClient from './components/MyClient'   // ★★ここで指定★★

export default {
  name: 'App',
  components: {
    MyClient   // ★★ここで指定★★
  }
}
</script>

<style>
# app {
  font-family: 'Avenir', Helvetica, Arial, sans-serif;
  -webkit-font-smoothing: antialiased;
  -moz-osx-font-smoothing: grayscale;
  color: #2c3e50;
}
新しく作成したファイルと、変更したファイルの配置は以下。
samplevueclie\src\App.vue
                 \components\MyClient.vue
ここまでの変更を終えたら、次のコマンドを実行してVue-CLIを開発時検証用にBuildする。
npm run dev
ブラウザで「http://localhost:8080/」にアクセスすると、今度は先ほどのCDN版のToDoアプリと同じ内容が表示される。
なお、以降のソースコードの編集時は、npm run devしたままにしておくと、変更後のファイルを保存した時点で即座にブラウザの表示に反映される(ホットリロード機能)。保存する度にBuildコマンドを明示的に実行したり、ブラウザ表示を更新する操作は不要。
npm run devの実行を終了したいときは、「Ctrl+C」で止めることが出来る。
余白
「*.vue」ファイルの編集にVSCodeを利用している場合、VSCodeが「Veturプラグイン入れるかい?」って聞いてくる。これを導入すると、Vueファイルも色分けで表示されるようになって便利なのでインストールお勧め。
Vue-CLIのプロジェクトから、公開用のファイルをビルドする。
公開時には「*.vue」ファイルから毎回トランスパイルする必要はなく、ブラウザが理解することが出来るHtml、js、cssファイルのみがあれば良い。
次のコマンドを実行して、公開用のHtml、js、cssファイルを作成する。
npm run build
distフォルダ配下に、トランスパイルされたファイルが出力される。
dist\index.html
    \static\css\
           \js\
このdistフォルダ配下のファイル一式を、任意のhttpサーバーにおけば良い。ブラウザで配置先のurlをひらいて、表示を確認する。
※出力時のメッセージ「Tip: built files are meant to be served over an HTTP server. Opening index.html over file:// won't work.」に記載あるように、ローカルファイルとしてブラウザで開いても表示エラーするので、注意。
※httpサーバーの公開フォルダのルートに配置する事(root/index.html)。これは、index.htmlからjsとcssファイルへのリンク記述が、ルートからの相対パス表記に成っているため。
以上ー。
参考サイトや本など
- Vue.js公式サイト - Web
- 基礎から学ぶVue.js - 本
余白
長くなったので、以下については後日に別記事にて記載予定。
-
*.vueファイルでは、requre()コマンド、importコマンドを使うことができる。- つまり、javascriptファイルのモジュール化&スコープのローカル化を簡単にできる♪
- モジュール化できるってことは、ファイル単位でのUnitTestも簡単にできるってこと。
- Vue-CLIでのMochaによるTest実行方法も こちら に書いてみた。
- なお↑は、Vue-CLI自身が「Karma+Mocha」でのテストを準備してくれているので、その仕組みに沿って「やってみた」って内容。
- fontawesomeを使おうとすると、どこでlink読み込む?問題にぶつかる。
-
*.vueファイル内で直に読み込む方法もあるようだが、nodejsのモジュールとして追加でnpm installする方法が望ましい。
-