背景
Electronを用いたアプリ開発の記事を探していたところ、Mediumで@codedrakenさんのBuild a Todo App with Electronという記事に出会いました。
この記事ではToDoアプリ(メモ帳)の実装方法がチュートリアル形式で掲載されており、とても勉強になったので、ぜひこの記事を紹介(和訳)したいと思います。
自分が実装する上でつまづいた点や、気づいた点などを補足しながら、実装の流れをみていきたいと思います。
環境
機種: Mac Book Air 2017
OS : MacOS Mojave ver 10.14.5
node.js : v12.13.0
npm : 6.13.4
electron : 8.1.1
開発する上での前提条件
PCにNode.jsとnpmがインストール済み
読者に要求する前提知識
javascriptに関する基礎知識
Electronに関する基礎知識
(公式サイトのサンプルコードを実行できれば十分です)
作るもの
@codedrakenさんによるgithubのコードはこちら

アプリはメインウィンドウ(Todos)とサブウィンドウ(Add Todo)の2窓構成で、Todoリストを作成・追加および削除することができます。また、Todoリストはjson形式のファイルとして保存されるため、アプリを終了後も情報が保持されます。
<操作内容>
メインウィンドウで「Create a new Todo」ボタンを押すと、サブウィンドウが開き、ToDoリストを入力できるようになります。
サブウィンドウのフォームから文字列を入力後、Enterキーを押下あるいは「Add Todo」ボタンを押すと、メインウィンドウのリストに入力内容が付加されます。
なお、メインウィンドウのリストの内容は、クリックすることで削除されます。
内部構成
Electronのプロセスは、MainプロセスとRendererプロセスの2つに大別されます。Rendererプロセスは個々の「画面」を制御するもので、今回の場合は「Todos」と「Add Todo」の2つの画面がそれぞれRendererプロセスにより制御されています。MainプロセスはRendererプロセスの上位に存在し、個々のRendererプロセスのライフサイクルを制御します。
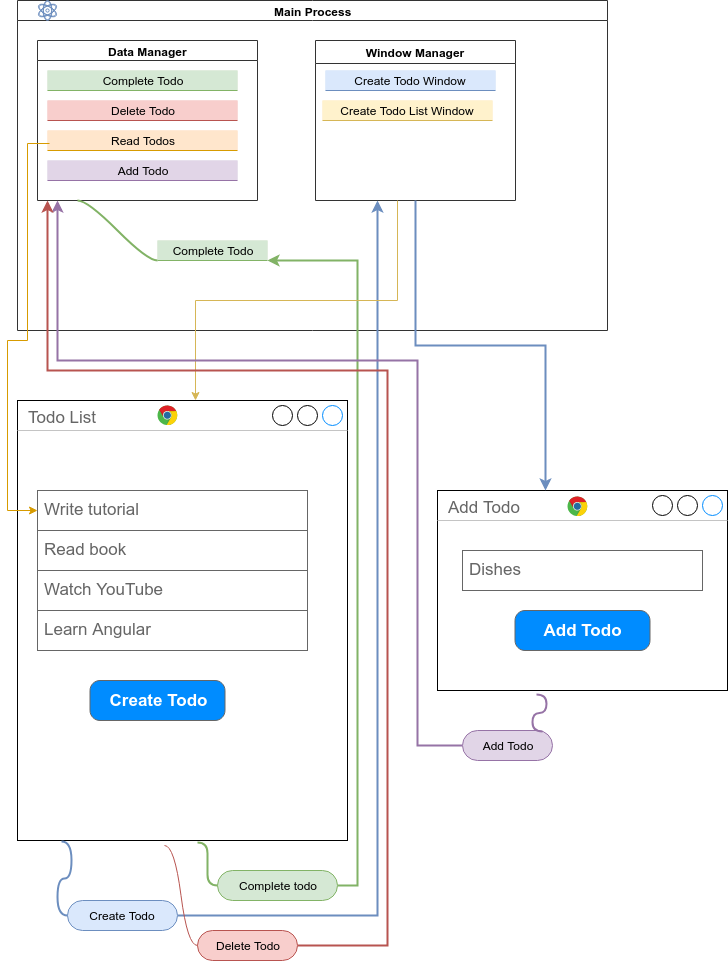
また、ElectronではRendererプロセスどうしの通信ができないため、Rendererプロセス間の通信は、必ずMainプロセスを介する必要があります(プロセスどうしが干渉したり、デッドロックを引き起こしたりするのを防ぐため)。
今回の例では、メインウィンドウ「Todos」からサブウィンドウ「Add Todos」を呼び出したり、サブウィンドウのフォーム入力によってメインウィンドウのリスト内容を変更したりします。これらのやりとりは、すべてMainプロセスを介することになります。
フォルダ構成
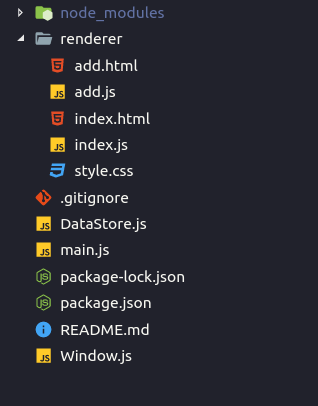
プロジェクトフォルダの直下(ルートディレクトリ)にメインプロセスのコード(main.js)をおき、rendererプロセスのコード一式はrendererフォルダ下にまとめます。なお、index.htmlとindex.jsでメインウィンドウを実装し、add.htmlとadd.jsでサブウィンドウを実装します。また、Window.jsとDataStore.jsで、それぞれメインプロセスで用いるクラスを記述します。
プロジェクトフォルダの作成
プロジェクトを進めるにあたって、プロジェクトフォルダを作成しましょう。場所は、desktopなど、好きなところで大丈夫です。フォルダの名前はelectron-todoにします。
Terminalを起動し、以下を実行します。
$ mkdir electron-todo
$ cd electron-todo
次に、作成したelectron-todoフォルダをnpmでイニシャライズし、package.jsonファイルを作成します。
$ npm init -y
npm initを実行したら、まずはelectron-todoフォルダ内にpackage.jsonファイルが作成されていることを確認します。
{
  "name": "electron-todo",
  "version": "1.0.0",
  "description": "",
  "main": "index.js",
  "scripts": {
    "test": "echo \"Error: no test specified\" && exit 1"
  },
  "keywords": [],
  "author": "",
  "license": "ISC"
}
作成されたpackage.jsonファイルの"main"と"scripts"の項目について、以下のように修正しましょう。この修正により、terminal上からelectronを実行するとき、main.jsファイルがエントリーポイントとなります。
{
  "name": "electron-todo",
  "version": "1.0.0",
  "description": "todo app",
  "main": "main.js",
  "scripts": {
    "start": "electron .",
    "test": "echo \"Error: no test specified\" && exit 1"
  },
  "keywords": [],
  "author": "",
  "license": "ISC",
}
最後に、あとでcodingする予定の、html,css,jsファイルをそれぞれ作成しておきましょう。
$ touch main.js Window.js DataStore.js
$ mkdir renderer
$ touch renderer/index.html renderer/index.js
$ touch renderer/add.html renderer/add.js
$ touch renderer/style.css
必要なパッケージの追加
npmを用いて、必要なパッケージをインストールしていきます。
今回インストールするパッケージは以下のとおりです。
・Electron
・electron-reload
・electron-store
・spectre.css
electron-reloadは、renderer画面のホットリロードを実現します。また、electron-storeは内部データをjson形式で保持するために必要です。そして、spectre.cssは、htmlを簡単にイケてるデザインにしてくれるパッケージです
terminalで以下のコードを実行します。
$ npm i electron
$ npm i electron-reload
$ npm i electron-store
$ npm i spectre.css
これで下準備は完了しました。あとはガリガリコードを書いていきます。
メインウィンドウを表示する
まずはメインウィンドウが表示されるところまで実装します。
メインウィンドウを描画するために必要な、index.html、index.js、style.cssを次のように記述します。
<!DOCTYPE html>
<html lang="en">
    <head>
        <meta charset="UTF-8" />
        <title>Todo</title>
        <link
            rel="stylesheet"
            href="../node_modules/spectre.css/dist/spectre.min.css"
        />
        <link rel="stylesheet" href="style.css" />
    </head>
    <body>
        <div class="container">
            <div class="columns">
                <div class="column col-10">
                    <h1 class="text-center">Todos</h1>
                    <button id="createTodoBtn" type="button" class="btn">
                        Create a New Todo
                    </button>
                    <ul id="todoList"></ul>
                </div>
            </div>
        </div>

        <script src="./index.js"></script>
    </body>
</html>
// 後で実装する機能

// 1. createTodoBtnボタンが押されたら、そのことをMainプロセスに知らせる
// 2. 「todoリストを更新せよ」という命令をMainプロセスから受け取り、実行する
body {
    font: caption;
}

.todo-item {
    background: none;
    padding: 0.5rem;
    margin: 0;
    cursor: pointer;
    font-size: 1rem;
}

.todo-item:nth-child(even) {
    background: #f4f4ff;
}

.todo-item:hover {
    background: #d8d8d8;
}
次に、メインプロセスを制御するためのmain.jsを以下のように記述します。
const { app, BrowserWindow } = require('electron');
let mainWindow = null;

app.on('ready', () => {
    mainWindow = new BrowserWindow({
        webPreferences: {
            nodeIntegration: true,
        },
    });
    mainWindow.loadFile('./renderer/index.html');
    mainWindow.on('closed', () => {
        mainWindow = null;
    });
});

app.on('window-all-closed', () => {
    app.quit();
});
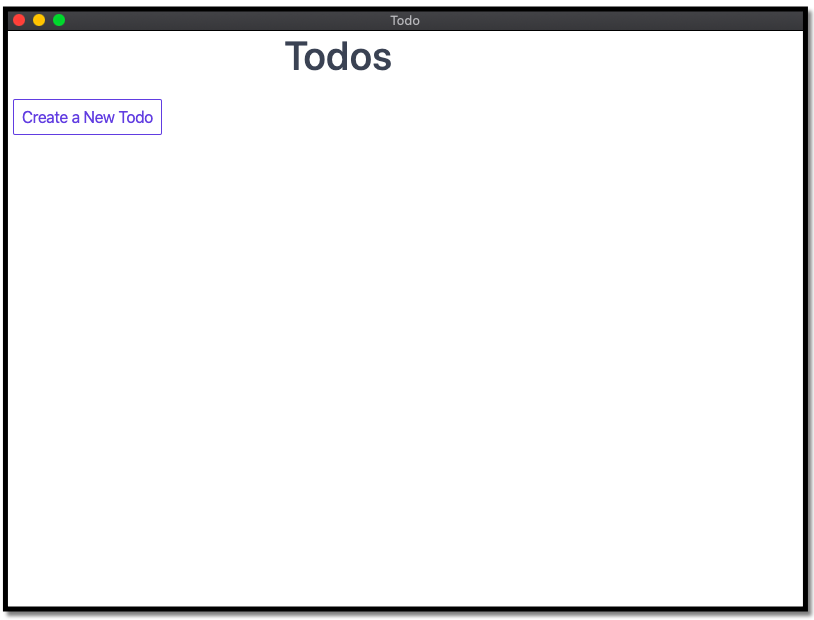
これでメインウィンドウを立ち上げることができます。
それでは、一度この状態でterminalからelectronを起動してみましょう。
$ npm start
現時点では、index.jsには何も記述していない上に、main.jsも必要最低限の記述しかしていないため、メインウィンドウのボタンを押しても何も反応がありません。
main.jsの中で、webPreferencesとしてnodeIntegration: trueとしたことに注意してください。これは、rendererプロセス中でnode.jsの機能を使えるようにする設定であり、あとでindex.jsおよびadd.jsをコードするときに必要となります。ところが、Electronの公式ではこの設定を一般的には推奨していません。Local環境で用いるアプリの場合は問題ありませんが、webを介するアプリを作成する場合には、XSSなどのセキュリティリスクを生むためです。
もし今後Electronを用いたアプリを作成される場合は、公式ドキュメントに目を通すようにしてください。
Window.jsファイルを編集する
上の例では、画面を実装するにあたってBrowserWindowクラスをそのまま用いました。以降では複数の画面を設定することになるので、BrowserWindowクラスを継承したWindowクラスを新たに定義します。Window.jsには、先ほど述べたnodeIntegrationの設定や、ファイル読み込みの設定などを記述します。これにより、main.jsに記述するコード行を減らすことができます。
const { BrowserWindow } = require('electron');

// default window settings
const defaultProps = {
    width: 500,
    height: 800,
    show: false,
    webPreferences: {
        nodeIntegration: true,
    },
};

class Window extends BrowserWindow {
    constructor({ file, ...windowSettings }) {
        super({ ...defaultProps, ...windowSettings });
        this.loadFile(file);
        this.once('ready-to-show', () => {
            this.show();
        });
    }
}

module.exports = Window;
メインウィンドウからサブウィンドウを呼び出す
次のステップとして、main.jsとindex.htmlを編集し、メインウィンドウのボタンを押すとサブウィンドウが表示されるようにしましょう。まずは、サブウィンドウを描画するのに必要なadd.htmlとadd.jsファイルについてcodingします。
<!DOCTYPE html>
<html lang="en">
    <head>
        <meta charset="UTF-8" />
        <title>Add Todo</title>
        <link
            rel="stylesheet"
            href="../node_modules/spectre.css/dist/spectre.min.css"
        />
        <link rel="stylesheet" href="style.css" />
    </head>
    <body>
        <div class="container">
            <div class="columns">
                <div class="column col-10">
                    <h1 class="text-center">Add Todo</h1>

                    <form id="todoForm">
                        <div class="form-group">
                            <label class="form-label" for="add-input"
                                >Todo</label
                            >
                            <input
                                class="form-input"
                                type="text"
                                name="add-input"
                                placeholder="I have to..."
                            />
                        </div>
                        <button class="btn">Add Todo</button>
                    </form>
                </div>
            </div>
        </div>
        <script src="./add.js"></script>
    </body>
</html>
// 後で実装する機能

// フォームに内容が入力されたらMainプロセスに通知する
サブウィンドウの設定が完了したので、メインウィンドウの設定を行います。メインウィンドウのボタンが押された場合、このことをMainプロセスに通知する内容をindex.jsに記述しましょう。
RendererプロセスからMainプロセスへの通信を行うときは、Electronに内蔵されているipcRendererというモジュールを利用します。
const { ipcRenderer } = require('electron');

// createTodoボタンが押されたら、そのことをMainプロセスに伝える
document.getElementById('createTodoBtn').addEventListener('click', () => {
    ipcRenderer.send('add-todo-window');
});
ipcRendererによってMainプロセスに通知が送られるようになりました。この通知は'add-todo-window'というチャンネルに送られるようになります。
では次に、Mainプロセスがこの通知を受け取れるように、main.jsを修正しましょう。
MainプロセスからRendererプロセスへの通知を行うときや、Rendererプロセスからの通知をMainプロセスが受け取る際には、ipcMainというモジュールを利用します。
const path = require('path');
const { app, ipcMain } = require('electron');
const Window = require('./Window');

app.on('ready', () => {
    let mainWindow = new Window({
        file: path.join('renderer', 'index.html'),
    });

    // add todo window
    let addTodoWin;

    // create add todo window
    ipcMain.on('add-todo-window', () => {
        if (!addTodoWin) {
            addTodoWin = new Window({
                file: path.join('renderer', 'add.html'),
                width: 400,
                height: 400,
                parent: mainWindow,
            });

            addTodoWin.on('closed', () => {
                addTodoWin = null;
            });
        }
    });
});

app.on('window-all-closed', () => {
    app.quit();
});
それでは、一度この状態でterminalからelectronを起動してみましょう。
$ npm start
「Create a New Todo」ボタンを押すと、あらたに「Add Todo」ウィンドウが表示されるようになりました。

現時点ではAdd Todoウィンドウのボタンについては何も設定していないため、ボタンを押しても何も反応はありません。
DataStore.jsファイルを編集する
今回作成するアプリでは、Todoリストをjson形式のファイルとして保持できるようにします。そのために、electron-storeモジュールを利用します。electron-storeはデータを保存するためのクラスとしてStoreクラスを用意していますが、今回はStoreクラスを継承したDataStoreクラスをあらたに定義します。
const Store = require('electron-store');

class DataStore extends Store {
    constructor(settings) {
        super(settings);

        // initialize with todos or empty array
        this.todos = this.get('todos') || [];
    }

    saveTodos() {
        // save todos to JSON file
        this.set('todos', this.todos);

        // returning 'this' allows method chaining
        return this;
    }

    getTodos() {
        // set object's todos to todos in JSON file
        this.todos = this.get('todos') || [];

        return this;
    }

    addTodo(todo) {
        // merge the existing todos with the new todo
        this.todos = [...this.todos, todo];

        return this.saveTodos();
    }

    deleteTodo(todo) {
        // filter out the target todo
        this.todos = this.todos.filter(t => t !== todo);

        return this.saveTodos();
    }
}

module.exports = DataStore;
公式にある通り、jsonファイルはapp.getPath('userData')に保存されます。app.getPath('userData')の具体的なパスについては、こちらを参照してください。
サブウィンドウの操作をメインウィンドウに反映させる
最後のステップになりました。あと実装しなければならない機能は、サブウィンドウのフォームに入力された内容をMainプロセスに通知し、その内容をDataStoreに保存すること、および、DataStoreの内容をメインウィンドウに反映させることです。
まずは、サブウィンドウのフォームに入力した内容を、Mainプロセスに通知する機能を実装しましょう。今回も、ipcRendererモジュールを利用するように、add.jsファイルに記述します。また、この通知は、'add-todo'チャネルとします。
const { ipcRenderer } = require('electron');
document.getElementById('todoForm').addEventListener('submit', evt => {
    // prevent default refresh functionality of forms
    evt.preventDefault();

    // get input on the form
    const input = evt.target[0];

    // send input.value to main proecss
    ipcRenderer.send('add-todo', input.value);

    // reset input
    input.value = '';
});
次に、main.jsを編集します。以下では、DataStoreインスタンスを作成して、その中にtodoリストを保存できるようにします。また、Rendererプロセスからの通知に対する応答に対しても記述しています。
const path = require('path');
const { app, ipcMain } = require('electron');

const Window = require('./Window');
const Datastore = require('./DataStore');

// ホットリロード機能を有効化
require('electron-reload')(__dirname);

// create a new todo store name "Todos Main"
const todosData = new Datastore({ name: 'Todos Main' });

app.on('ready', () => {
    let mainWindow = new Window({
        file: path.join('renderer', 'index.html'),
    });

    // add todo window
    let addTodoWin;

    // initialize with todos
    mainWindow.once('show', () => {
        mainWindow.webContents.send('todos', todosData.todos);
    });

    // create add todo window
    ipcMain.on('add-todo-window', () => {
        if (!addTodoWin) {
            addTodoWin = new Window({
                file: path.join('renderer', 'add.html'),
                width: 400,
                height: 400,
                parent: mainWindow,
            });

            addTodoWin.on('closed', () => {
                addTodoWin = null;
            });
        }
    });
    ipcMain.on('add-todo', (event, todo) => {
        const updatedTodos = todosData.addTodo(todo).todos;
        mainWindow.send('todos', updatedTodos);
    });

    ipcMain.on('delete-todo', (event, todo) => {
        const updatedTodos = todosData.deleteTodo(todo).todos;
        mainWindow.send('todos', updatedTodos);
    });
});

app.on('window-all-closed', () => {
    app.quit();
});
最後に、メインウィンドウにtodoリストの内容が反映されるように、index.jsファイルを編集します。
const { ipcRenderer } = require('electron');

// create add todo window button
document.getElementById('createTodoBtn').addEventListener('click', () => {
    ipcRenderer.send('add-todo-window');
});

// delete todo by its text value
const deleteTodo = e => {
    ipcRenderer.send('delete-todo', e.target.textContent);
};

// on receive todos
ipcRenderer.on('todos', (event, todos) => {
    // get todoList
    const todoList = document.getElementById('todoList');
    // create html string
    const todoItems = todos.reduce((html, todo) => {
        html += `<li class="todo-item">${todo}</li>`;

        return html;
    }, '');

    // set list html to the todo items
    todoList.innerHTML = todoItems;

    // add click handlers to delete the clicked todo
    todoList.querySelectorAll('.todo-item').forEach(item => {
        item.addEventListener('click', deleteTodo);
    });
});
これで一通りのcodingが終了しました。terminalからアプリを起動してみます。
$ npm start
問題なく動作しました。Electronの基本的な機能を学ぶには、とても良いサンプルアプリだと思います。
参考文献など
元の記事:Build a Todo App with Electron
ElectronのnodeIntegrationについて:[【Electron】nodeIntegration: falseのまま、RendererプロセスでElectronのモジュールを使用する]
(https://qiita.com/nomuyoshi/items/9091abd9dc3b05c85f44)
Electronのipc通信について:【Electron連載】第4回 基本編-メイン/レンダラープロセスの話
おすすめの書籍: Electron in Action